Importing the indicators into your trading platform
Indicators:
Acceleration/Deceleration Indicator (Alchemy AC)
Accumulation Distribution Indicator
The Alligator Indicator (Alchemy Alligator)
The Radar Gator Indicator (Alchemy RadarGator)
AO-Close-Volume PaintBar Indicator (Alchemy AO-Close-Volume)
AO-Close-Volume RadarScreen Indicator (Alchemy AO-Close-Volume RS)
AO-MovingAverage Trend PaintBar Indicator (Alchemy AO-MvgAvg Trend)
AO-MovingAverage Trend RadarScreen Indicator (Alchemy AO-MvgAvg Trend RS)
The Alchemy BarPatterns Indicator
The Alchemy BarPatterns Complete Indicator (Alchemy BarPattCompl)
Bar Value Comparison Indicator (Alchemy BarValueComp)
The Alchemy Breakout Indicator
Candlestick Engulfment & Reversal Indicators
The Alchemy Engulfment Indicator
The Alchemy DoubleBotTop Indicator
The Alchemy Reversal Indicator (Alchemy Reversal)
The Alchemy Reversal Bar Indicator (Alchemy ReversalBar)
CCI Average (Alchemy CCI Average)
The Alchemy Channel Indicator (Alchemy Channel)
The Alchemy Channel Oscillator (Alchemy ChannelOscillator)
Detrended Price Oscillator (Alchemy DPO)
Single Oscillator Divergence Indicators:
The Alchemy CCIDiverge Indicator
The Alchemy CCIHookDiverge Indicator
The Alchemy CustomDiv Indicator
The Alchemy CustomHookDiverge Indicator
The Alchemy MACDDiverge Indicator
The Alchemy MACDHookDiverge Indicator
The Alchemy RSIDiverge Indicator
The Alchemy RSIHookDiverge Indicator
The Alchemy StochDiverge Indicator
The Alchemy StochasticsHookDiverge Indicator
The Alchemy TickDiverge Indicator
The Alchemy TICKHookDiverge Indicator
The Alchemy Ultimate Divergene Indicators
The Alchemy Ultimate Divergence Charting Indicator (Alchemy UltimateDivg)
The Alchemy Ultimate Divergence RadarScreen Indicator (Alchemy UltDivergeRS)
The Alchemy Ultimate Dual Data Divergence Indicator (Alchemy UltDivg2Data)
The Alchemy Ultimate CCI Divergence Charting Indicator (Alchemy UltDivgCCI)
The Alchemy Ultimate CCI Divergence RadarScreen Indicator (Alchemy UltDivCCI RS)
The Alchemy Ultimate MACD Divergence Charting Indicator (Alchemy UltDivgMACD)
The Alchemy Ultimate MACD Divergence RadarScreen Indicator (Alchemy UltDiMACD RS)
The Alchemy Ultimate RSI Divergence Charting Indicator (Alchemy UltDivgRSI)
The Alchemy Ultimate RSI Divergence RadarScreen Indicator (Alchemy UltDivRSI RS)
The Alchemy Ultimate Stochastic Divergence Charting Indicator (Alchemy UltDivgStoch)
The Alchemy Ultimate Stochastic Divergence RadarScreen Indicator (Alchemy UltDiSto RS)
The Alchemy Universal Divergence Indicator (Alchemy UniverDiverg)
Dual Oscillator Divergence Indicators:
Donchian Channel Indicator (Alchemy DonchianChannel)
Equity Curve Indicator (Alchemy EquityCurve) Available for TradeStation 9/10 only!
Fibonacci Indicators
Auto Fibonacci Retracement Indicators
The Alchemy Auto Trend Retracement Indicator
The Alchemy Auto Daily Retracement Indicator
The Alchemy Auto Pivot Retracement Indicator
The Alchemy Auto S&P Pivot Retracement Indicator
The Alchemy Auto Swing Retracement Indicator
Auto Fibonacci Retracement/Extension Indicators
Common Charting Indicator Inputs
Common RadarScreen Indicator Inputs
The Alchemy Auto Daily Retracement/Extension Indicator (Alchemy DailyRetrExt/Alchemy DailyRetExRS)
The Alchemy Auto Pivot Retracement/Extension Indicator (Alchemy PivotRetrExt/Alchemy PivotRetExRS)
The Alchemy Auto Swing Retracement/Extension Indicator (Alchemy SwingRetrExt/Alchemy SwingRetExRS)
The Alchemy Auto Trend Retracement/Extension Indicator (Alchemy TrendRetrExt/Alchemy TrendRetExRS)
Average Range Fibonacci Indicator (Alchemy AvgRangeFibs)
Fibonacci Retracement/Extension Tools
The Alchemy Fib Retracement Tool
The Alchemy Fib Extension Tool
Floor Traders Pivot Points Indicators
The Alchemy MidPoints Indicator
The Alchemy FlrTrdPivots Indicator
Force Index Indicator (Alchemy ForceIndex)
Fractal-Squat Indicator (Alchemy Fractal-Squat)
Heikin-Ashi Indicator (Alchemy HeikinAshi)
Heikin-Ashi Alert Indicator (Alchemy Heikin-AshiAlert) Available for TradeStation 9/10 only!
Heikin-Ashi RadarScreen Indicator (Alchemy HeikinAshiRS)
High Low Indicators
Consecutive Highs-Lows Indicator (Alchemy HiLoConsec)
High Low Alert Indicator (Alchemy HighLowAlert)
High Low X-Bar Indicator (Alchemy HighLowXBar)
High Low RadarScreen Indicator (Alchemy HighLowRS)
The Alchemy Pivot Bar Formation Indicator (Alchemy PivotBarForm)
High Low Mid Points Indicators
The Alchemy DailyHiLoMid Indicator
The Alchemy WeeklyHiLoMd Indicator
The Alchemy MonthlyHLM Indicator
The Alchemy YearlyHiLoMd Indicator
Highest Daily Price Time Indicator (Alchemy HighestDailyPriceTime) Available for TradeStation 9/10 only!
Hook Percent Indicator (Alchemy HookPercent)
Keltner Channel Indicators
Keltner Paint Bar (Alchemy KeltnerPB)
The Alchemy Keltner-Moving Average Indicator (Alchemy Keltner-MovAvg)
Market Facilitation Index (Alchemy MFI)
Market Trend (Alchemy Market Trend)
Momentum Trigger Indicator (Alchemy MomentumTrig)
Moving Average Indicators:
The Alchemy Moving Averages Angles Indicator (Alchemy MovAvgAngles)
The Alchemy Moving Average Band Indicator (Alchemy MovAvgBand)
The Alchemy Moving Average Channel Indicator (Alchemy MovAvgChan)
The Alchemy Moving Average Color Indicator (Alchemy MovAvgColor)
The Alchemy Moving Average Exponential Indicator (Alchemy MovAvgExp)
The Alchemy Moving Average Exponential Universal Data Indicator (Alchemy MovAvgExpUniversalData) Available for TradeStation 9/10 only!
The Alchemy Moving Average Global Data Indicator (Alchemy MovAvgGlobalData) Available for TradeStation 9/10 only!
The Alchemy Moving Average Price Percent Indicator (Alchemy MovAvgPricePercent)
The Alchemy Moving Average-Price Ratio Indicator (Alchemy MovAvgPriceRatio)
The Alchemy Moving Average 1 Line Indicator (Alchemy MovAvg1Line)
The Alchemy Moving Average 1 Line OOEL Indicator (Alchemy MovAvg1Line.OOEL) Available for TradeStation 9/10 only!
The Alchemy Moving Average 1 Line RadarScreen Indicator (Alchemy MovAvg1LineRS)
The Alchemy Moving Average 1 Line Alert Indicator (Alchemy MovAvg1LAlrt)
The Alchemy Price To Moving Average Indicator (Alchemy PriceToMovAvg)
The Alchemy Smoothed Moving Average Indicator (Alchemy MovAvgSmooth)
Multiple Moving Averages Indicators
The Alchemy MovAvg2Line Indicator
The Alchemy 2 Line Moving Averages RadarScreen Indicator (Alchemy MovAvg2LineRS)
The Alchemy 2 Line Moving Averages Trend Indicator (Alchemy MovAvg2LnTrd)
The Alchemy 2 Line Pivot Moving Averages Indicator (Alchemy MovAvg2LnPiv)
The Alchemy MovAvg3Line Indicator
The Alchemy Moving Averages 3 Line RadarScreen Indicator (Alchemy MovAvg3LineRS)
The Alchemy Moving Averages 3 Line Spread Indicator (Alchemy MovAvg3LSprd)
The Alchemy 4 Line Moving Averages Indicator (Alchemy MovAvg4Line)
The Alchemy 4 Line Moving Averages Global Data Indicator (Alchemy MovAvg4LineGlobalData) Available for TradeStation 9/10 only!
The Alchemy 4 Line Moving Averages Global Data Stacked Indicator (Alchemy MovAvg4LineGlobalDataStacked) Available for TradeStation 9/10 only!
Order Macro Indicators
The Alchemy Accounts Provider Close Positions Indicator (Alchemy AccountsProviderClosePositions) Available for TradeStation 9/10 only!
The Alchemy Strategy Position Equalizer Indicator (Alchemy StratPosEqu) Available for TradeStation 9/10 only!
The Alchemy Strategy Position Equalizer Pro Indicator (Alchemy StratPosEquPro) Available for TradeStation 9/10 only!
The Alchemy Order Macro Pivot Stop Indicator (Alchemy OM PivotStop) Available for TradeStation 9/10 only!
The Alchemy Order Macro Stop-Target-Trailing Indicator (Alchemy OM StpTarTrl) Available for TradeStation 9/10 only!
The Alchemy Order Macro Stop-3 Target-Trailing Indicator (Alchemy OM StpT3Trl) Available for TradeStation 9/10 only!
The Alchemy Order Macro Trailing-Add On-Reverse Indicator (Alchemy OM TrailAddOnReverse) Available for TradeStation 9/10 only!
The Alchemy Order Macro Stop-Trailing-Add On-Reverse Indicator (Alchemy OM TrailAddOnReverse) Available for TradeStation 9/10 only!
Open Positions P&L Indicator (Alchemy OpenPositionsPL)
Oscillator Price Projection Indicators
The Alchemy RSI Projection Indicator (Alchemy RSIProjection)
The Alchemy Stochastic Projection Indicator (Alchemy StochasticProjection)
Overbought/Oversold Indicators
The Alchemy Overbought/Oversold Indicator
The Alchemy Overbought/Oversold 2 Data Indicator
Parabolic SAR Indicator (Alchemy ParabolicSAR)
Pivot High-Low Consecutive(Alchemy PivotHighLowConsecutive)
Pivots All-In-One (Alchemy Pivots All-In-One) Available for TradeStation 9/10 only!
Positive Negative Oscillator (Alchemy PositiveNegativeOscillator)
Price Difference Indicator (Alchemy PriceDifference)
Price-MACD Indicator (Alchemy pMACD)
The Alchemy Average Range Indicator (Alchemy AverageRange)
The Alchemy Average True Range Percent Charting Indicator (Alchemy ATR%)
The Alchemy Average True Range Percent RadarScreen Indicator (Alchemy ATR% RS)
The Alchemy Opening Bar Range Indicator (Alchemy OpenBarRange)
The Alchemy Opening Bar Range RadarScreen Indicator (Alchemy OpenBarRangeRS)
The Alchemy Range Alert Indicator (Alchemy RangeAlert)
The Alchemy Range Alert Percent Indicator (Alchemy RangeAlert%)
The Alchemy Range Bearish/Bullish Alert Indicator (Alchemy RangeAlert BearBull)
The Alchemy Range Expansion Indicator (Alchemy RangeExpansion)
Rate Of Change Indicator (Alchemy RateOfChange) Available for TradeStation 9/10 only!
Rectangle Indicator (Alchemy Rectangle) Available for TradeStation 9/10 and higher!
Renko Indicator (Alchemy Renko) Available for TradeStation 9/10 and higher!
Rolling Floor Traders Pivot Points
The Alchemy RollingPivot Indicator
The Alchemy Spike Indicator (Alchemy Spike)
Spreadsheet Updater Indicator (Alchemy SpreadSheetUpdater) Available for TradeStation 9/10 only!
Standard Deviation Indicators
Standard Deviation Indicator (Alchemy StdDev)
Standard Deviation Bands Indicator (Alchemy StdDevBands)
Standard Error Bands Indicator
The Alchemy Double Stochastic (Alchemy DoubleStoch)
The Alchemy Stochastic Fast-Slow Indicator (Alchemy StochFstSlw)
The Alchemy Stochastic Momentum Index Indicator (Alchemy SMI)
The Alchemy Stochastics Overbought/Oversold Indicator (Alchemy StochOVBOVS)
The Alchemy Stochastic Slow Indicator (Alchemy StochasticSlow)
The Alchemy Strategy Alert Indicator (Alchemy StrategyAlrt)
The Alchemy Strategy Entry Indicator (Alchemy StratEntry) Available for TradeStation 9/10 only!
The Alchemy StrongTrend and TrendEntry Indicators
The Alchemy StrongTrend RadarScreen Indicator
Support & Resistance Pivot Points
The Alchemy Bar Time Indicator (Alchemy BarTime)
The Alchemy Price Bar Clock Indicator (Alchemy PrceBarClock)
The Alchemy TimeZones Indicator
The Alchemy PercentStop Indicator (Alchemy PercentStop)
The AlchemyVolatile Stop Indicator
The Alchemy Automatic Volatile Stop Indicator (Alchemy VolatStpAuto)
The Alchemy PivotStop Indicator
TrendCatcher (Legacy) Indicator (Alchemy TrendCatcher & Alchemy TrendCatchRS)
TrendCatcher (Complete) Indicators
Alchemy TrendCatcher Chart Analysis Indicator (Alchemy TrendCatcherComplete)
Alchemy TrendCatcher RadarScreen Indicator (Alchemy TrendCatcherComplete RS)
For TradeStation 8 and MultiCharts:
TrendDirection Indicator (Alchemy TrendCatcher & Alchemy TrendCatchRS)
Trendline Indicators
Automatic Trendline Indicator (Alchemy TL Automatic)
The Alchemy Horizontal Line Indicator
The Alchemy Vertical Line Indicator (Alchemy VerticalLine)
True Strength Index Indicator (Alchemy TSI)
Volume Indicators
The Alchemy On Balance Volume Indicator (Alchemy OnBalanceVol)
The Alchemy Trend Volume with Zig Zag Points Indicators
The Alchemy Volume Average Indicator (Alchemy Volume Avg)
The Alchemy Volume Divergence Indicator (Alchemy VolumeDiverg)
The Alchemy Volume Net Up/Down Indicator (Alchemy VolumNetUpDn)
The Alchemy Volume Ratio Indicator
The Alchemy Volume Ratio Alert Indicator (Alchemy VoluRatiAler)
The Alchemy Volume Ratio Histogram Indicator (Alchemy VoluRatiHist)
The Alchemy Volume Ratio Oscillator (Alchemy VoluRatioOsc)
The Alchemy Volume Ratio PaintBar Indicator (Alchemy VoluRatioPB)
The Alchemy Volume Reversal Indicator (Alchemy VolumeRevers)
The Alchemy Volume Spread Analysis Indicator (Alchemy VolumeSpreadAnalysis)
The Alchemy Volume Up/Down Percent Indicator (Alchemy VolumeUp/Dn%)
Volume Weighted Average Price (VWAP) Indicators
The Alchemy Volume Weighted Average Price (VWAP) Charting Indicator (Alchemy VWAP)
The Alchemy Volume Weighted Average Price (VWAP) RadarScreen Indicator (Alchemy VWAP RS)
The Alchemy Volume Weighted Average Price (VWAP) RadarScreen Plus Indicator (Alchemy VWAP RS+)
W-M Indicator (Alchemy W-M) Available for TradeStation 9/10 only!
The Alchemy Wick-Tail Ratio RadarScreen Indicator (Alchemy WickTailRatio)
Dear Trader,
Thank you for choosing Trading Alchemy for your trading software needs.
This manual will cover all the Trading Alchemy indicators in addition to issues related to chart building, trouble shooting and general platform issues. We have attempted to develop a detailed and thorough instruction manual, which takes you step-by-step through each process in building and applying your Trading Alchemy indicators. Please take the time to read and familiarize yourself with the technical aspects included in the manual.
If you still have questions after reviewing the manual and the Trading Alchemy web site, please direct your questions to technicalsupport@tradingalchemy.com. We appreciate your business and wish you the best in your trading endeavors.
Importing the indicators into your platform
TradeStation 9/10:
1. From TradeStation 8/9, click on "File" - "Import/Export EasyLanguage...".
2. In the "Import/Export Wizard" screen, select the option, Import EasyLanguage File (ELD, ELS or ELA) and click on "Next".
3. In the "Import Wizard" screen, click on "Browse"
4. In the "Open" screen, browse to the location on your hard drive where you downloaded your indicator file to, select the indicator file and click on Open.
5. In the "Analysis Type" dialog, click on “Select All” and make sure that everything listed in the dialog is checked. Then click on "Next". In the "Available analysis techniques" dialog, click on “Select All” and make sure that everything listed in the dialog is checked. Then click on "Finish".
6. In the “Warning” message (Overwrite exisiting?) click on “Yes to all”.
This transfers all of our indicators into your charting program.
MultiCharts:
1. From the Power Language Editor, click on "File" - "Import Read-Only...".
2. In the "Select Files" screen, browse to the location on your hard drive where you downloaded your indicator file to, select the indicator file and click on Open.
3. In the "Import studies" window, click on "OK".
This transfers all of our indicators into your charting program.
TradeStation 2000i:
1. From the EasyLanguage PowerEditor, click on "File" - "Import and Export...".
2. In the "Import and Export Wizard" screen, select the first option, Import EasyLanguage Archive or Storage File (ELA or ELS) and click on "Next".
3. In the "Import Wizard" screen, click on "Browse"
4. In the "Open" screen, browse to the location on your hard drive where you downloaded your indicator file to, select the indicator file and click on Open.
5. In the "Analysis Type" dialog, click on “Select All” and make sure that everything listed in the dialog is checked. Then click on "Next". In the "Available analysis techniques" dialog, click on “Select All” and make sure that everything listed in the dialog is checked. Then click on "Finish".
6. In the “Warning” message (Overwrite exisiting?) click on “Yes to all”.
This transfers all of our indicators into your charting program.
TradeStation 4.0 and SuperCharts RT:
1. Go to the “QuickEditor”.
2. Click on the “Transfer” button. In the “Transfer Analysis Techniques” screen, make sure that the “Transfer analysis techniques FROM EasyLanguage Archive File” radio button is selected. Then click on “OK”.
3. In the “Transfer from archive file” screen, click on the "Browse" button and find the downloaded file and click on it. Then click on “OK”. This will put the selected file into the "From:" field. Then click on “OK”.
4. In the “Transfer” screen, check “Transfer All”. Then click on “OK”. In the “Warning” message (Overwrite exisiting?) click on “Yes to all”.
This transfers all of our indicators into your charting program.
The Alchemy Acceleration/Deceleration Indicator (Alchemy AC)
The Alchemy
Acceleration/Deceleration Indicator (AC) measures acceleration and deceleration
of the current driving force. This indicator will change direction before any
changes in the driving force, which, it its turn, will change its direction
before the price. If you realize that Acceleration/Deceleration is a signal of
an earlier warning, it gives you evident advantages.
The zero line is basically the spot where the driving force is at balance with
the acceleration. If Acceleration/Deceleration is higher than zero , then it is
usually easier for the acceleration to continue the upward movement (and vice
versa in cases when it is below zero ). Unlike in case with Awesome Oscillator,
it is not regarded as a signal when the zero line is crossed. The only thing
that needs to be done to control the market and make decisions is to watch for
changes in color. To save yourself serious reflections, you must remember: you
can not buy with the help of Acceleration/Deceleration, when the current column
is colored red, and you can not sell, when the current column is colored green.
If you enter the market in the direction of the driving force (the indicator is
higher than zero , when buying, or it is lower than zero , when selling), then
you need only two green columns to buy (two red columns to sell). If the driving
force is directed against the position to be opened (indicator below zero for
buying, or higher than zero for selling), a confirmation is needed, hence, an
additional column is required. In this case the indicator is to show three red
columns over the zero line for a short position and three green columns below
the zero line for a long position.
Indicator Input:
|
Price |
Specifies the price to be used for the acceleration/decelearion calculation. |
The Alchemy Accumulation Distribution Indicator (Alchemy AccumDist)
The Alchemy Accumulation Distribution indicator is a momentum indicator that attempts to gauge supply and demand by determining whether investors are generally "accumulating" (buying) or "distributing" (selling) a certain instrument by identifying divergences between price and volume flow. The basic premise behind the indicator is that higher-volume moves in price are given greater emphasis than lower-volume moves (over the specified period of time).
Accumulation Distribution is usually used as a divergence indicator, with long entries signaled by bullish divergence, and short entries signaled by bearish divergence. Divergences between the Accumulation/Distribution indicator and price indicate the upcoming change of prices. As a rule, in case of such divergences, the price tendency moves in the direction in which the indicator moves. Thus, if the indicator is growing, and the price is dropping, a turnaround of price should be expected. Accumulation Distribution can also be used as an exit indicator, by showing the end (or the weakening) of the current trend.
Indicator Inputs:
|
AnyVol |
Specifies the volume type to be used such as Volume or Ticks. |
| Type | Specifies the algorithm involving volume and price whereas a setting of 1 results in the most sensitive and reactive Accumulation Distribution line and a setting of 2 results in the accumulative value of setting 1. A setting of 3 results in a medium sensitive and reactive Accumulation Distribution line and a setting of 4 results in the accumulative value of setting 3. A setting of 5 results in the most smoothed Accumulation Distribution line and a setting of 6 results in the accumulative value of setting 5. Additionally, settings 5 and 6 also utilize a look back length for averaging the volume and price algorithm as specified with the input Length. |
| Length | Specifies the look back length for type 5 and 6 only. Otherwise, this input is ignored. |
The Alchemy Alligator Indicator (Alchemy Alligator)
Most of the
time the market remains stationary. Only for some 15–30% of time the market
generates trends, and traders who are not located in the exchange itself derive
most of their profits from the trends. In principle, the Alchemy Alligator
Indicator is a combination of Balance Lines (Moving Averages) that use fractal
geometry and nonlinear dynamics. The blue line (Alligator’s Jaw) is the
Balance Line for the timeframe that was used to build the chart, the red line
(Alligator’s Teeth) is the Balance Line for the value timeframe of one level
lower and the green line (Alligator’s Lips) is the Balance Line for the value
timeframe, one more level lower. Lips, Teeth and Jaw of the Alligator show
the interaction of different time periods. As clear trends can be seen only 15
to 30 per cent of the time, it is essential to follow them and refrain from
working on markets that fluctuate only within certain price periods. When
the Jaw, the Teeth and the Lips are closed or intertwined, it means the
Alligator is going to sleep or is asleep already. As it sleeps, it gets hungrier
and hungrier — the longer it will sleep, the hungrier it will wake up. The first
thing it does after it wakes up is to open its mouth and yawn. Then the smell of
food comes to its nostrils: flesh of a bull or flesh of a bear, and the
Alligator starts to hunt it. Having eaten enough to feel quite full, the
Alligator starts to lose the interest to the food/price (Balance Lines join
together) — this is the time to fix the profit.
Indicator Inputs:
|
Length1 |
Specifies the number of bars over which the blue line is calculated. |
|
Length2 |
Specifies the number of bars over which the red line is calculated. |
|
Length3 |
Specifies the number of bars over which the green line is calculated. |
|
Offset1 |
Specifies the number of bars to project the blue line into the future. |
|
Offset2 |
Specifies the number of bars to project the red line into the future. |
|
Offset3 |
Specifies the number of bars to project the green line into the future. |
The Alchemy Radar Gator Indicator (Alchemy RadarGator)
The Alchemy Radar Gator indicator is a RadarScreen indicator that contains 2 columns as follows:
Indicator Columns:
|
Height |
Displays the current bar's closing percent within its bar range, whereas at 0%, the closing price is at the bar's low and at 100%, the closing price is at the bar's high. The cells are colored differently based on their closing percentage above and below the mid range. |
|
Angle |
Displays the percent difference between the closing price and a specified Alligator Line. The cells are colored differently based on their positive or negative percent difference. If price closes within all 3 Alligator lines, the cells are colored with a neutral color. |
Indicator Inputs:
|
Price |
Specifies the price to be used for the closing price such as open, high, low, close or last |
|
AngleGatorNumber |
Specifies the Alligator line number to use for calculating the percent difference in the Angle column. |
|
BarPricePcntUpColor |
Specifies the cell color for the Height column when the closing percent is above the bar's mid range. |
|
BarPricePcntDnColor |
Specifies the cell color for the Height column when the closing percent is below the bar's mid range. |
|
BarPricePcntDojiColor |
Specifies the cell color for the Height column when the closing percent is precisely at the bar's mid range. |
|
BarPricePcntColorLength |
Specifies the number of bars back for considering the gradient coloring of the cell color for the Height column. With a setting of -1, the gradient coloring effect is disabled and the specified up and down colors are used. |
|
GatorDiffPcntUpColor |
Specifies the cell color for the Angle column when the percent difference is positive. |
|
GatorDiffPcntDnColor |
Specifies the cell color for the Angle column when the percent difference is negative. |
|
GatorDiffPcntNeutrColor |
Specifies the cell color for the Angle column when the closing price is within all Alligator lines. |
|
GatorDiffPcntColorLength |
Specifies the number of bars back for considering the gradient coloring of the cell color for the Angle column. With a setting of -1, the gradient coloring effect is disabled and the specified up and down colors are used. |
|
Length1 |
Specifies the number of bars over which the blue Alligator line is calculated. |
|
Length2 |
Specifies the number of bars over which the red Alligator line is calculated. |
|
Length3 |
Specifies the number of bars over which the green Alligator line is calculated. |
|
Offset1 |
Specifies the number of bars to project the blue Alligator line into the future. |
|
Offset2 |
Specifies the number of bars to project the red Alligator line into the future. |
|
Offset3 |
Specifies the number of bars to project the green Alligator line into the future. |
The AO Indicators
The Alchemy AO Indicators are designed to show current market momentum.
The Alchemy AO Oscillator (Alchemy AO)
The Alchemy AO Oscillator is displayed as a histogram. Each bar of the histogram that is higher than the preceding bar is green. Each bar that is lower than the preceding bar is red. As with other oscillators, the AO Oscillator generates a zero line cross trading signal when the zero line is crossed. A buy signal is generated when the histogram is crossed from below. A sell signal is generated when the histogram is crossed from above. A saucer buy signal is generated when the oscillator is above the zero line has two descending red bars are followed by a green bar and a saucer sell signal is generated when the oscillator is below the zero line and two ascending green bars are followed by a red bar. A twin peaks buy signal is created when the histogram is below the zero line and the last indicators low is higher than the preceding low. The histogram must remain below zero between these two troughs. When the higher low is made and followed by a green bar the buy signal is generated. A twin peaks sell signal is created when the histogram is above the zero line and the last bars high is lower than the preceding peak. The histogram must remain above zero line between the two peaks. When the lower high is made and followed by a red bar a sell signal is generated.
Indicator InputS:
|
Price |
Specifies the price to be used for the AO calculation. |
|
FastLength |
Specifies the look back length for the fast calculation of the AO oscillator. |
|
SlowLength |
Specifies the look back length for the slow calculation of the AO oscillator. |
The Alchemy AO-Close-Volume PaintBar Indicator (Alchemy AO-Close-Volume)
The Alchemy AO-Close-Volume PaintBar indicator paints the price bars with a bullish color when price closes above a specified bar range percentage, the AO oscillator is green and volume is either increasing and/or above its average and/or above a specified threshold. It paints the price bars with a bearish color when price closes below a specified bar range percentage, the AO oscillator is red and volume is either decreasing and/or below its average and/or below a specified threshold.
Indicator Inputs:
|
PB_High |
Specifies the high price for the paint bar. For example, with PaintBarHigh specified as high and PaintBarLow specified as low, the entire bar range is painted, whereas with PaintBarHigh specified as open and PaintBarLow specified as close, the candle body is painted. |
|
PB_Low |
Specifies the low price for the paint bar. For example, with PaintBarHigh specified as high and PaintBarLow specified as low, the entire bar range is painted, whereas with PaintBarHigh specified as open and PaintBarLow specified as close, the candle body is painted. |
|
VolumePrice |
Specifies the price to be used for volume such as volume or ticks. |
|
VolumePercent |
Specifies the percent for the current volume to be higher or lower than the previous volume. A setting of 0 disables this requirement. |
|
VolumeAvgLength |
Specifies the volume average length. A setting of 0 disables the volume to volume average convergence/divergence requirement. |
|
VolumeAvgType |
Specifies the volume average type, whereas a setting of 1 uses a simple moving average, a setting of 2 uses an exponential moving average, a setting of 3 uses a weighted moving average, a setting o 4 uses a triangular moving average, a setting of 5 uses a Mid Keltner and a setting of 6 uses a Hull moving average. A setting of 0 disables the volume to volume average convergence/divergence requirement. |
|
VolumeThreshold |
Specifies the threshold for volume to be above or below. A setting of 0 disables this requirement. |
|
AO_Price |
Specifies the price to be used for the AO calculation. |
|
AO_FastLength |
Specifies the look back length for the fast calculation of the AO oscillator. |
|
AO_SlowLength |
Specifies the look back length for the slow calculation of the AO oscillator. |
|
ClosePercent |
Specifies the closing bar range percent. A negative setting such as -1 disables this requirement. |
|
UpTrendAlert |
Enables/disables the up trend alert notification. |
|
DnTrendAlert |
Enables/disables the down trend alert notification. |
The Alchemy AO-Close-Volume RadarScreen Indicator (Alchemy AO-Close-Volume RS)
The Alchemy AO-Close-Volume RadarScreen indicator contains a column that displays an up trend text with a bullish background color when price closes above a specified bar range percentage, the AO oscillator is green and volume is either increasing and/or above its average and/or above a specified threshold. It displays a down trend text with a bearish background color when price closes below a specified bar range percentage, the AO oscillator is red and volume is either decreasing and/or below its average and/or below a specified threshold. Otherwise, it displays a neutral trend text with a neutral background color.
Indicator Inputs:
|
UpTrendColor |
Specifies the up trend background color. |
|
DownTrendColor |
Specifies the down trend background color. |
|
NeutralTrendColor |
Specifies the neutral trend background color. |
|
UpTrendText |
Specifies the up trend text to display. This is a string input which needs to always stay within quotation marks. |
|
DownTrendText |
Specifies the down trend text to display. This is a string input which needs to always stay within quotation marks. |
|
NeutralTrendText |
Specifies the neutral trend text to display. This is a string input which needs to always stay within quotation marks. |
|
VolumePrice |
Specifies the price to be used for volume such as volume or ticks. |
|
VolumePercent |
Specifies the percent for the current volume to be higher or lower than the previous volume. A setting of 0 disables this requirement. |
|
VolumeAvgLength |
Specifies the volume average length. A setting of 0 disables the volume to volume average convergence/divergence requirement. |
|
VolumeAvgType |
Specifies the volume average type, whereas a setting of 1 uses a simple moving average, a setting of 2 uses an exponential moving average, a setting of 3 uses a weighted moving average, a setting o 4 uses a triangular moving average, a setting of 5 uses a Mid Keltner and a setting of 6 uses a Hull moving average. A setting of 0 disables the volume to volume average convergence/divergence requirement. |
|
VolumeThreshold |
Specifies the threshold for volume to be above or below. A setting of 0 disables this requirement. |
|
AO_Price |
Specifies the price to be used for the AO calculation. |
|
AO_FastLength |
Specifies the look back length for the fast calculation of the AO oscillator. |
|
AO_SlowLength |
Specifies the look back length for the slow calculation of the AO oscillator. |
|
ClosePercent |
Specifies the closing bar range percent. A negative setting such as -1 disables this requirement. |
|
UpTrendAlert |
Enables/disables the up trend alert notification. |
|
DnTrendAlert |
Enables/disables the down trend alert notification. |
The Alchemy AO-MovingAverage Trend PaintBar Indicator (Alchemy AO-MvgAvg Trend)
The Alchemy AO-Moving Average PaintBar indicator paints the price bars with a bullish color when price is above a specified moving average while the AO oscillator is green and it paints the price bars with a bearish color when price is below a specified moving average while the AO oscillator is red.
Indicator Inputs:
|
PB_High |
Specifies the high price for the paint bar. For example, with PaintBarHigh specified as high and PaintBarLow specified as low, the entire bar range is painted, whereas with PaintBarHigh specified as open and PaintBarLow specified as close, the candle body is painted. |
|
PB_Low |
Specifies the low price for the paint bar. For example, with PaintBarHigh specified as high and PaintBarLow specified as low, the entire bar range is painted, whereas with PaintBarHigh specified as open and PaintBarLow specified as close, the candle body is painted. |
|
Price |
Specifies the price that has to be above or below the moving average such as open, high, low or close. |
|
MvgAvg_Price |
Specifies the price to be used for the moving average calculation. |
|
MvgAvg_Length |
Specifies the look back length to be used for the moving average calculation. |
|
MvgAvg_Offset |
Specifies the number of bars to offset the moving average calculation. |
|
MvgAvg_Type |
Specifies the moving average type, whereas a setting of 0 uses price as specified with the input MvgAvg_Price, a setting of 1 uses a simple moving average, a setting of 2 uses an exponential moving average, a setting of 3 uses a weighted moving average, a setting o 4 uses a triangular moving average, a setting of 5 uses a Mid Keltner, a setting of 6 uses a Hull moving average and a setting of 7 uses a smoothed moving average. |
|
AO_Price |
Specifies the price to be used for the AO calculation. |
|
AO_FastLength |
Specifies the look back length for the fast calculation of the AO oscillator. |
|
AO_SlowLength |
Specifies the look back length for the slow calculation of the AO oscillator. |
|
UpTrendAlert |
Enables/disables the up trend alert notification. |
|
DnTrendAlert |
Enables/disables the down trend alert notification. |
The Alchemy AO-MovingAverage Trend RadarScreen Indicator (Alchemy AO-MvgAvg Trend RS)
The Alchemy AO-Moving Average RadarScreen indicator contains a column that displays an up trend text with a bullish background color when price is above a specified moving average while the AO oscillator is green, it displays a down trend text with a bearish background color when price is below a specified moving average while the AO oscillator is red. Otherwise, it displays a neutral trend text with a neutral background color.
Indicator Inputs:
|
UpTrendColor |
Specifies the up trend background color. |
|
DownTrendColor |
Specifies the down trend background color. |
|
NeutralTrendColor |
Specifies the neutral trend background color. |
|
UpTrendText |
Specifies the up trend text to display. This is a string input which needs to always stay within quotation marks. |
|
DownTrendText |
Specifies the down trend text to display. This is a string input which needs to always stay within quotation marks. |
|
NeutralTrendText |
Specifies the neutral trend text to display. This is a string input which needs to always stay within quotation marks. |
|
Price |
Specifies the price that has to be above or below the moving average such as open, high, low or close. |
|
MvgAvg_Price |
Specifies the price to be used for the moving average calculation. |
|
MvgAvg_Length |
Specifies the look back length to be used for the moving average calculation. |
|
MvgAvg_Offset |
Specifies the number of bars to offset the moving average calculation. |
|
MvgAvg_Type |
Specifies the moving average type, whereas a setting of 0 uses price as specified with the input MvgAvg_Price, a setting of 1 uses a simple moving average, a setting of 2 uses an exponential moving average, a setting of 3 uses a weighted moving average, a setting o 4 uses a triangular moving average, a setting of 5 uses a Mid Keltner, a setting of 6 uses a Hull moving average and a setting of 7 uses a smoothed moving average. |
|
AO_Price |
Specifies the price to be used for the AO calculation. |
|
AO_FastLength |
Specifies the look back length for the fast calculation of the AO oscillator. |
|
AO_SlowLength |
Specifies the look back length for the slow calculation of the AO oscillator. |
|
UpTrendAlert |
Enables/disables the up trend alert notification. |
|
DnTrendAlert |
Enables/disables the down trend alert notification. |
The Alchemy ATR Fan Indicator (Alchemy ATR Fan)
The Alchemy Fan indicator displays a moving average with 3 separate percent ATR lines above and below.
Indicator Inputs:
|
ShowAvg: |
Enables/disables the moving average line |
|
MovAvgPrice: |
Specifies the price to be used for the moving average. |
|
MovAvgLength: |
Specifies the moving average length. |
|
MovAvgType: |
Specifies the moving average type. A setting of 1 uses a simple moving average, a setting of 2 uses an exponential moving average, a setting of 3 uses a weighted moving average, a setting o 4 uses a triangular moving average, a setting of 5 uses a Mid Keltner and a setting of 6 uses a Hull moving average, |
|
Displace: |
Specifies the number of bars to offset the moving average and its bands to the left. |
|
ATR_Length: |
Specifies the ATR length for calculating the upper and lower band width, whereas a setting of 0 disables all upper and lower lines |
|
UpperPercent1: |
Specifies the percent ATR distance for calculating the first upper line, whereas a setting of 0 disables the first upper line. |
|
UpperPercent2: |
Specifies the percent ATR distance for calculating the second upper line, whereas a setting of 0 disables the second upper line. |
|
UpperPercent3: |
Specifies the percent ATR distance for calculating the third upper line, whereas a setting of 0 disables the third upper line. |
|
LowerPercent1: |
Specifies the percent ATR distance for calculating the first lower line, whereas a setting of 0 disables the first lower line. |
|
LowerPercent2: |
Specifies the percent ATR distance for calculating the second lower line, whereas a setting of 0 disables the second lower line. |
|
LowerPercent3: |
Specifies the percent ATR distance for calculating the third lower line, whereas a setting of 0 disables the third lower line. |
The Alchemy Market Facilitation Index (Alchemy MFI)
The Alchemy Market Facilitation Index Indicator is the indicator which shows the change of price for one tick. Absolute values of the indicator do not mean anything as they are, only indicator changes have sense. Market Facilitation Index increases and volume increases — this points out that: a) the number of players coming into the market increases (volume increases) b) the new coming players open positions in the direction of bar development, i.e., the movement has begun and picks up speed; Market Facilitation Index falls and volume falls. It means the market participants are not interested anymore; Market Facilitation Index increases, but the volume falls. It is most likely, that the market is not supported with the volume from clients, and the price is changing due to traders’ (brokers and dealers) "on the floor" speculations; Market Facilitation Index falls, but the volume increases. There is a battle between bulls and bears, characterized by a large sell and buy volume, but the price is not changing significantly since the forces are equal. One of the contending parties (buyers vs. sellers) will eventually win the battle.
The default
setting of a green MFI bar signals an increasing MFI with increasing volume
and it tells that the market is on the move. Therefore, traders’ best
immediate reaction should be to go with the market, whatever direction it is
heading. On such green day you would already want to have an open trade in the
direction of the market move. If there were any trades left open, make sure they
are not going against the market, otherwise they risk to bring losses. A Green
MFI signifies three things: there are more traders entering the market; those
traders are biased in the direction the market is moving (the last price bar on
the chart); the market picks up speed. The histogram color and weight is
controlled with the color plot MFI+Vol+. Please note that when making a
color change or a size change, the indicator needs to be disabled and then
re-enabled again before the changes will take affect.
The default setting of a brown MFI bar is called a Fade and it signals a
decreasing MFI with decreasing volume. It appears when the
market starts to fade – lose interest in advancing further. Often this can be
observed at the end of a trend. Traders who used to actively participate in the
market are no longer interested in establishing new positions at current price,
which causes the market to fade (both volume and MFI decrease). Several brown
bars in a row can perfectly illustrate the period where fading excitement is
slowly building the base for a new market move. The histogram color and
weight is controlled with the color plot MFI+Vol+. Please note that when
making a color change or a size change, the indicator needs to be disabled and
then re-enabled again before the changes will take affect.
The default setting of a blue MFI bar is called a Fake and it signals an
increasing MFI with decreasing volume. When the market makes a progressive
move, but this move is not supported by the volume (for any reason), this
provides a clue that there are probably no real interest in the move yet, while
certain group of market participants is trying to control and manipulate the
market to their advantage. This is the point when newbies can be easily scared
out by sudden change in the dominant trend, which will cause them to close their
existing trades and attempt to run with the new trend, which to their huge
disappointment will be over as fast as it began, since it was not a real move
backed up by volume, it was a "fake" move, controlled by a small but strong
group of large market players. The histogram color and weight is
controlled with the color plot MFI+Vol+. Please note that when making a
color change or a size change, the indicator needs to be disabled and then
re-enabled again before the changes will take affect.
The default setting of a pink MFI bar is called a Squat and it signals a
decreasing MFI with increasing volume. It appears at the end of
each trend. The squat bar is marked by an increasing volume yet temporary
stalling price movement. The key factor is: there are many participants entering
the market, all of them are enthusiastic about selling/buying (volume rises),
but before the battle between buyers and sellers finds a winner, the price
movement stops – market sort of squats before leaping forward. The breakout is
going to be either seen as a reversal, or a continuation of a current trend.
Either way, it is a good starting point to get in at the beginning of a trend.
The histogram color and weight is controlled with the color plot MFI+Vol+.
Please note that when making a color change or a size change, the indicator
needs to be disabled and then re-enabled again before the changes will take
affect.
Indicator Input:
|
Price |
Specifies the price to be used for volume such as ticks or volume. |
The Alchemy Highest Daily Price Time Indicator (Alchemy HighestDailyPriceTime) Available for TradeStation 9/10 only!
The Alchemy Highest Daily Price Time indicator displays the time of the bar that most often shows the highest price of the session throughout all sessions since the beginning of the chart. This indicator contains 5 plots and each plot can be specified such as the 1st most occurrence, 2nd most occurrence and so fourth. When price is specified as volume for example, this indicator can be used to anticipate a time of the day when high volume is to be expected. This indicator is designed for intra-day charts only.
Indicator Inputs:
|
HighestBar1 |
Specifies the Nth most occurrence to be displayed for plot1, whereas a setting of 0 disables plot1. |
|
HighestBar2 |
Specifies the Nth most occurrence to be displayed for plot2, whereas a setting of 0 disables plot2. |
|
HighestBar3 |
Specifies the Nth most occurrence to be displayed for plot3, whereas a setting of 0 disables plot3. |
|
HighestBar4 |
Specifies the Nth most occurrence to be displayed for plot4, whereas a setting of 0 disables plot4. |
|
HighestBar5 |
Specifies the Nth most occurrence to be displayed for plot5, whereas a setting of 0 disables plot5. |
|
Price |
Specifies the price to be used such as open, high, low, close, volume or ticks. |
|
ResetValue |
Specifies the value for price to be reset at the beginning of the session in order to calculate the highest bar price made during the session. |
|
AlertText |
Specifies the text to display in the alert notification window when a bar makes a higher price. This is a string input and the specified text needs to stay within quotation marks. To disable this alert, this input needs be blank with just 2 quotation marks. |
|
SessStartTme |
Specifies the session start time in military time without the colons. For example, 1:00 PM would be specified as 1300. |
|
SessEndTme |
Specifies the session end time in military time without the colons. For example, 1:00 PM would be specified as 1300. |
|
ExcludeDayOfWeek |
Specifies the day of the week to exclude, whereas 0=Sunday, 1=Monday, 2=Tuesday, 3=Wednesday, 4=Thursday, 5=Friday, 6=Saturday and a negative setting disables this feature. |
The Alchemy Hook Percent Indicator
The Alchemy Hook Percent Indicator plots any specified oscillator, indicator or even price data line and it marks reversal points or hooks with show me dots. The strength of the reversal points or hooks can be specified by a minimum percent distance move from the peak and the valley.
Indicator Inputs:
|
Price |
Specifies the oscillator, indicator or price data. |
|
MinHookPercent |
Specifies the minimum percent distance move from the peak and the valley in order to qualify for a reversal and for the up and down reversal ShowMe dots to display. |
|
UpHookAlertText |
Specifies the text to display in the alert notification window when an up reversal or hook occurs. This is a string input and the specified text needs to stay within quotation marks. To disable this alert, this input needs be blank with just 2 quotation marks. |
|
DownHookAlertText |
Specifies the text to display in the alert notification window when a down reversal or hook occurs. This is a string input and the specified text needs to stay within quotation marks. To disable this alert, this input needs be blank with just 2 quotation marks. |
|
CmtryDecimalPercent |
Specifies the number of decimal points for all of the values in the Analysis Commentary window to display. A negative value disables the Analysis Commentary for this indicator. |
MACD Signal Line - %Ds Hook Divergence
Since TradeStation's standard MACD indicators only use bar lengths for EMA1, EMA2 and the signal line, we have designed the AlchemyMACD Indicator which contains inputs that can be entered either as bar lengths OR as smoothing factor percentages. This eliminates the need for any conversion from smoothing factors to bar lengths that would result in MACD's that never precisely match.
The Alchemy %Ds Hook Indicator uses a formula that is different from TradeStation's standard DSlow calculation to optimally work with divergence. It also points out hooks by changing plot colors and it contains a user-defined input that sets a minimum slope for a hook requirement.
The Signal Line-%Ds Hook Divergence Indicators are made up of the AlchemyPriceDivergence Indicator, the AlchemySignalLineDivergence Indicator and the AlchemyDsHookDivergence Indicator. These multiple divergence indicators pick the most significant reversal points by combining the %Ds and the MACD Signal Line. These unique indicators find all of the price pivots that only correlate to %Ds hooks and MACD Signal Line peaks/valleys, therefore filtering out any uneccessary noise. The indicators only mark the price pivots that diverge with both oscillators. By confirming the divergence with %Ds AND the MACD Signal Line, the reliability for a price reversal is greatly increased. The indicators mark the divergence points on %Ds, price and the MACD signal line in magenta and they color the previous pivot points that are associated with the divergence pivot on %Ds, price and the MACD Signal Line in yellow. This makes it very easy to quickly identify all of the corresponding pivots. The AlchemyDsHookDivergence Indicator colors all of the hooks that are associated with any divergence pivots.
What is divergence?
Divergence occurs when
%Ds and the MACD Signal Line is giving you an indication as to direction that
is different from the direction that price is moving. For example, price
is heading higher and the indicators are heading lower. Divergence occurs
when the higher price is not confirmed by a higher indicator reading.
Types of divergence:
Bullish Divergence - occurs when
price is making a lower low and the indicator is making a higher low, failing
to move to a new low with price. This is a great sign of a potential
bottom and many traders look deeper for confirmation of a buy signal when
bullish divergence occurs. Often times, you will see bullish divergence
correspond with the low of the day.
Bearish Divergence – occurs when
price is making a higher high and the indicator is making a lower high, failing
to move to a new high with price. This is a great sign of a potential top
and many traders look deeper for confirmation of a sell signal when bearish
divergence occurs. Often times, you will see bearish divergence
correspond with the high of the day.
Bullish and bearish divergence is a great tool for the intra-day trader.
However, spotting actual divergence with price and the indicator can be a very
tedious and inconsistent task for most traders. With the Alchemy Divergence
Indicators all the difficult and tedious measuring are done for you in a very
visual and consistent manner. This allows the trader to concentrate on possible
trade set-ups and trade confirmation signals.
The Alchemy %DsHook and the Alchemy MACD Indicators
To view chart, go to: http://www.tradingalchemy.com/ViewChartsMACDSignalLineDsHook.htm
User Defined Inputs for the Alchemy %DsHook Indicator:
Please note that if you mistakenly change any of these user-defined inputs, you can revert to the original settings by removing the indicator from your chart and then re-inserting it.
|
PlotHook |
Enables/disables the color change and/or Hook show me plot when a hook occurs. |
|
MinHook |
This user-defined input adjusts the minimum slope distance requirement for a hook. |
|
UpHookCol |
Specifies the plot color for up hooks. |
|
DownHookCol |
Specifies the plot color for down hooks. |
|
ShowHookLine |
Enables/disables the discoloring of the %Ds line when a hook occurs. |
|
HookColorOffset |
Specifies the number of bars to offset the hook coloring backwards. When the %Ds is plotted as a line this number should be set to 1, otherwise, it should be set to 0. |
|
HookShowMe |
Enables/disables the Hook show me dot (plot5). |
|
PlotOVBOVS |
Enables/disables the overbought and oversold lines. |
|
OverBought |
Specifies the overbought line and territory for which to limit the hook coloring. |
|
OverSold |
Specifies the oversold line and territory for which to limit the hook coloring. |
|
CenterLine |
Specifies the center line value, whereas a negative setting disables the center line |
|
|
|
|
AlchemyDsParameters: |
|
|
KIntervl |
Specifies the %K length for the Alchemy %Ds. |
|
DIntervl |
Specifies the %D length for the Alchemy %Ds. |
|
DSlowInt |
Specifies the %D slow length for the Alchemy %Ds. |
|
|
|
|
StandardStochasticParameters: |
|
|
StochLength |
Specifies the Stochastic length for the standard Stochastic |
|
Length1 |
Specifies length 1 for the standard Stochastic |
|
Length2 |
Specifies length 2 for the standard Stochastic |
|
SmoothingType |
Specifies the smoothing type for the standard Stochastic |
|
|
|
|
StochasticsType |
Specifies the Stochastic type to be used, whereas a value of 1 uses the Alchemy %Ds, a value of 2 uses the standard %D Slow, a value of 3 uses the standard %K Slow, a value of 4 uses the standard %D Fast and a value of 5 uses the standard %K Fast |
User Defined Inputs for the Alchemy MACD Indicator:
The dynamic colors of the MACD, MACD average and MACD/MACD average difference plots can be controlled through the Format Indicator > Color window with the color plots. Please note that when making a color change, the indicator needs to be disabled and then re-enabled again before the color changes will take affect.
|
AlchemyMACDParameters: |
|
|
|
Price |
Specifies the price to be used for the Alchemy MACD and the Alchemy signal line. | |
|
EMA1Len |
Specifies the bar length for the fast moving average. A setting of 0, uses the smoothing factor percentage entered in the "EMA1Fact" input. | |
|
EMA1Fact |
Specifies the smoothing factor percentage for the fast moving average. A setting of 0, uses the bar length entered in the " EMA1Len" input. | |
|
EMA2Len |
Specifies the bar length for the slow moving average. A setting of 0, uses the smoothing factor percentage entered in the " EMA2Fact" input. | |
|
EMA2Fact |
Specifies the smoothing factor percentage for the slow moving average. A setting of 0, uses the bar length entered in the " EMA2Len" input. | |
|
SigLen |
Specifies the bar length for the signal line. A setting of 0, uses the smoothing factor percentage entered in the " SigFact" input. | |
|
SigFact |
Specifies the smoothing factor percentage for the signal line. A setting of 0, uses the bar length entered in the " SigLen" input. | |
|
UseStandardMACD |
With this input set to true, the MACD can be customized based on the input settings below. When set to false, the proprietary Alchemy MACD formulas with the above parameters are being used. |
|
|
|
|
|
|
StandardMACDParameters: |
|
|
|
FastAvgPrice |
Specifies the price to be used for the fast moving average of the MACD. |
|
|
SlowAvgPrice |
Specifies the price to be used for the slow moving average of the MACD. |
|
|
FastAvgLength |
Specifies the length the fast moving average of the MACD. |
|
|
SlowAvgLength |
Specifies the length the slow moving average of the MACD. |
|
|
MACDAvgLength |
Specifies the length the moving average of the MACD. |
|
|
FastAvgType |
Specifies the type of moving average to be used for the fast moving average of the MACD, whereas a setting of 1 uses a simple moving average, a setting of 2 uses an exponential moving average, a setting of 3 uses a weighted moving average, a setting of 4 uses a triangular moving average, a setting of 5 uses a Mid Keltner, a setting of 6 uses a Hull moving average, a setting of 7 uses price as specified with the input FastAvgPrice. |
|
|
SlowAvgType |
Specifies the type of moving average to be used for the slow moving average of the MACD, whereas a setting of 1 uses a simple moving average, a setting of 2 uses an exponential moving average, a setting of 3 uses a weighted moving average, a setting of 4 uses a triangular moving average, a setting of 5 uses a Mid Keltner, a setting of 6 uses a Hull moving average, a setting of 7 uses price as specified with the input SlowAvgPrice. |
|
|
MACDAvgType |
Specifies the type of moving average to be used for the moving average of the MACD, whereas a setting of 1 uses a simple moving average, a setting of 2 uses an exponential moving average, a setting of 3 uses a weighted moving average, a setting of 4 uses a triangular moving average, a setting of 5 uses a Mid Keltner and a setting of 6 uses a Hull moving average. |
|
|
|
|
|
|
Plotting Parameters: |
|
|
|
DisplayMinMove |
When enabled, the MACD, MACD average and MACD/MACD average difference are displayed in cents, ticks or pips instead of dollars or points. |
|
|
PlotMACD_Histogram |
Enables/disables the MACD histogram plot. |
|
|
PlotMACD_Line |
Enables/disables the MACD line plot. |
|
|
PlotAverage |
Enables/disables the MACD average plot. |
|
|
PlotDifference |
Enables/disables the MACD/MACD average difference plot. |
|
|
PlotZero |
Enables/disables the zero line. |
|
|
MACD_ZeroCrossPlot |
Enables/disables the MACD zero cross alert mark. A setting of 1 shows the zero cross mark on the MACD plot, a setting of 2 shows the zero cross mark on the MACD Average plot, a setting of 3 shows the zero cross mark on the Difference plot and a setting of 0 disables the MACD zero cross alert mark. |
|
|
AvgZeroCrossPlot |
Enables/disables the MACD average zero cross alert mark. A setting of 1 shows the zero cross mark on the MACD plot, a setting of 2 shows the zero cross mark on the MACD Average plot, a setting of 3 shows the zero cross mark on the Difference plot and a setting of 0 disables the MACD average zero cross alert mark. |
|
|
DiffZeroCrossPlot |
|
|
| Sloping Parameters: | ||
| MinimumMACDSlope | Specifies the minimum MACD value difference from the previous bar to the current bar as to when the MACD changes colors, increases its plot width and generates an alert. A setting of 0 detects all positive and negative slopes and a negative setting disables this feature. The sloping colors for the MACD histogram are controlled with the color plots MACD UpCol+, MACD DnCol+, MACD UpCol- and MACD DnCol-. Please note that when making a color change, the indicator needs to be disabled and then re-enabled again before the color changes will take affect. | |
| MinimumAvgSlope | Specifies the minimum MACD average value difference from the previous bar to the current bar as to when the MACD average changes colors, increases its plot width and generates an alert. A setting of 0 detects all positive and negative slopes and a negative setting disables this feature. The sloping colors for the MACD average line are controlled with the color plots Avg UpColor and Avg DnColor. Please note that when making a color change, the indicator needs to be disabled and then re-enabled again before the color changes will take affect. | |
| MinimumDiffSlope | Specifies the minimum MACD difference value difference from the previous bar to the current bar as to when the MACD difference changes colors, increases its plot width and generates an alert. A setting of 0 detects all positive and negative slopes and a negative setting disables this feature. The sloping colors for the MACD difference line are controlled with the color plots Diff UpColor and Diff DnColor. Please note that when making a color change, the indicator needs to be disabled and then re-enabled again before the color changes will take affect. | |
| MACDOffset | Specifies the number of bars to offset the alert color change and plot width of the MACD. For histograms, this input should be set to 0 and for lines, this input should be set to 1 bar. | |
| AvgOffset | Specifies the number of bars to offset the alert color change and plot width of the MACD average. For histograms, this input should be set to 0 and for lines, this input should be set to 1 bar. | |
| DiffOffset | Specifies the number of bars to offset the alert color change and plot width of the MACD difference. For histograms, this input should be set to 0 and for lines, this input should be set to 1 bar. | |
| MACDWidthIncrease: | Specifies the MACD plot width increase for an alert bar. | |
| AvgWidthIncrease | Specifies the MACD average plot width increase for an alert bar. | |
| DiffWidthIncrease | Specifies the MACD difference plot width increase for an alert bar. | |
| Alert Parameters: | ||
| MACD_SlopeAlert | Enables/disables the alert that is triggered when the MACD slope is exceeded by the amount as specified by the input MinimumMACDSlope, whereas the MACD slope is defined by the value difference between the current and previous bar's MACD values. | |
| AvgSlopeAlert | Enables/disables the alert that is triggered when the MACD average slope is exceeded by the amount as specified by the input MinimumAvgSlope, whereas the MACD average slope is defined by the value difference between the current and previous bar's MACD average values. | |
| DiffSlopeAlert | Enables/disables the alert that is triggered when the MACD disfference slope is exceeded by the amount as specified by the input MinimumDiffSlope, whereas the MACD difference slope is defined by the value difference between the current and previous bar's MACD difference values. | |
| MACD_ZeroCrossAlert | Enables/disables the alert that is triggered when the MACD crosses zero. | |
| AvgZeroCrossAlert | Enables/disables the alert that is triggered when the MACD average crosses zero. | |
| DiffZeroCrossAlert | Enables/disables the alert that is triggered when the MACD difference crosses zero. | |
| AlertDecimal | Specifies the decimal points of the slope to be displayed in the alert notification window. |
|
AlchemyHookPivot is a multiple-output function that returns the values of a pivot point that is associated with a hook |
|
|
AlchemyMCD returns the difference between a fast and slow exponential moving average based on the same Price, using either number of trailing bars or a smoothing factor percentage. |
|
|
The Stochastic oscillators indicate overbought and oversold areas in the market, based upon momentum or price velocity. AlchemyPercentD returns the values for the Stochastics D line. |
|
|
This is a Stochastic function, smoothed by use of a moving average technique. The value returned represents the D line in the Stochastic indicator. AlchemyPercentDSlow returns the values for the Stochastics DSlow line on multiple data series. |
|
|
This is a Stochastic function. Stochastics are oscillators that are used to indicate overbought and oversold conditions in the market based on the premise that during periods of price decreases, bar closes tend to accumulate near the Low of the bar, and during periods of price increases, bar closes tend to accumulate near the High of the bar. AlchemyPercentK returns the values for the Stochastics %K line. |
|
|
AlchemySignalLine returns the exponential moving average of the Mov Avg Convergence Divergence, using either number of trailing bars or a smoothing factor percentage. |
|
|
AlchemyXFactoredAvg function is a weighted moving average of the prices of the last length bars. This function returns the current value of the exponentially smoothed moving average using either number of trailing bars or a smoothing factor percentage. |
The Alchemy PriceDivergence, the Alchemy %DsDivergence and the Alchemy SignalLineDivergence Indicators (not available in TradeStation 4.0 or SuperCharts RT)
To view chart, go to: http://www.tradingalchemy.com/ViewChartsMACDSignalLineDsHook.htm
User Defined Inputs:
If you applied all three indicators on one chart and you wish to make changes to the input settings, please make sure to make the same adjustments on all three indicators, otherwise they will mark divergence pivots that are out of sync from each other. Please note that if you mistakenly change any of these user-defined inputs, you can revert to the original settings by removing the indicator from your chart and then re-inserting it.
%D Slow and MACD Signal Line Parameters:
|
PriceH |
Specifies the value to use as the high in stochastic calculations |
|
PriceL |
Specifies the value to use as the low in stochastic calculations |
|
PriceC |
Specifies the value to use as the close in stochastic calculations |
|
StochLength |
The trailing number of bars to consider |
|
SmoothingLength1 |
The number of bars to consider for the average of the fast K line |
|
SmoothingLength2 |
The number of bars to consider for the average of the slow K line |
|
SmoothingType |
‘1’ will generate calculations based on the original formula, ‘2’ will conform to legacy TradeStation calculations |
|
MinHook |
This user-defined input adjusts the minimum slope distance requirement for a hook of the %DSlow. We optimized this input to a slope distance of 0.35. |
|
OverBought |
Specifies a minimum required %D Slow overbought value in which to look for bearish divergence. A negative value disables this requirement. |
|
OverSold |
Specifies a minimum required %D Slow oversold value in which to look for bullish divergence. A negative value disables this requirement. |
|
FastLength |
Number of trailing bars to consider for the MACD fast average |
|
SlowLength |
Number of trailing bars to consider for the MACD slow average |
|
MACDLength |
Number of trailing bars to consider for the MACD signal line average |
%D Slow and MACD Signal Line Parameters for Legacy indicators (L):
|
KIntervl: |
This user-defined input adjusts the %K length of the %DSlow. We optimized this input to a length of 5 bars. |
|
DIntervl: |
This user-defined input adjusts the %D length of the %DSlow. We optimized this input to a length of 5 bars. |
|
DSlowInt: |
Specifies the value to use as the close in stochastic calculations |
|
MinHook: |
This user-defined input adjusts the minimum slope distance requirement for a hook of the %DSlow. We optimized this input to a slope distance of 0.35. |
|
Price: |
Allows you set the bar's price for which the signal line are based on. It is defaulted to Close. |
|
EMA1Len: |
This user-defined input adjusts the bar length for the fast moving average of the signal line. A setting of 0, uses the smoothing factor percentage entered in the " EMA1Fact" input. It is defaulted to 0. |
|
EMA1Fact: |
This user-defined input adjusts the smoothing factor percentage for the fast moving average of the signal line. A setting of 0, uses the bar length entered in the " EMA1Len" input. We optimized this input to a smoothing factor of 0.8. |
|
EMA2Len: |
This user-defined input adjusts the bar length for the slow moving average of the signal line. A setting of 0, uses the smoothing factor percentage entered in the " EMA2Fact" input. It is defaulted to 0. |
|
EMA2Fact: |
This user-defined input adjusts the smoothing factor percentage for the slow moving average of the signal line. A setting of 0, uses the bar length entered in the " EMA2Len" input. We optimized this input to a smoothing factor of 0.3. |
|
SigLen: |
This user-defined input adjusts the bar length for the signal line. A setting of 0, uses the smoothing factor percentage entered in the " SigFact" input. It is defaulted to 0. |
|
SigFact: |
This user-defined input adjusts the smoothing factor percentage for the signal line. A setting of 0, uses the bar length entered in the " SigLen" input. We optimized this input to a smoothing factor of 0.5. |
Divergence Inputs for all divergence indicators:
DivPrDi: This user-defined input adjusts the minimum required distance for a double top/bottom. A negative number allows for the divergence price high/low to be shy of the previous price high/low by number of points. A positive number requires for the divergence price high/low to have penetrated the previous price high/low by number of points. We optimized this input to a distance of -0.5 point.
DivOsc1Di: This user-defined input adjusts the minimum required distance for %DSlow to be higher than the previous %DSlow to qualify for bullish divergence and the minimum required distance for %DSlow to be lower than the previous %DSlow to qualify for bearish divergence. It is defaulted to 0.
DivOsc2Di: This user-defined input adjusts the minimum required distance for the Signal Line to be higher than the previous Signal Line to qualify for bullish divergence and the minimum required distance for the Signal Line to be lower than the previous Signal Line to qualify for bearish divergence. It is defaulted to 0.
Osc1LagLen: This user-defined input adjusts the maximum number of bars for the %DSlow hook to lag price. We optimized this input to a distance of 5 bars.
MaxOsc2Offset:This user-defined input adjusts the maximum number of bars for the Signal Line peaks/valleys to be offset by price. We optimized this input to a distance of 2 bars.
MaxPivBack: This user-defined input adjusts the maximum number of %DSlow hook pivots to look back for divergence. We optimized this input to a distance of 1 pivot.
MinDivLen: This user-defined input adjusts the minimum number of bars between the previous high/low and the divergent high/low. It is defaulted to 0 bars.
MaxDivLen: This user-defined input adjusts the maximum number of bars between the previous high/low and the divergent high/low. A setting of 0 disables a maximum number of bars requirement. It is defaulted to 0 bars.
NumOsc: Allows you to change the number of divergence oscillators. A setting of 2 requires both, %DSlow and the Signal Line for divergence. A setting of 1 requires only the primary oscillator 1 for divergence, which could be either the %DSlow or the Signal Line, depending on the "PrimaryOsc" setting,. It is defaulted to 2.
PrimaryOsc:Allows you to set the primary oscillator 1 and the secondary oscillator 2. A setting of 1 uses %DSlow as primary oscillator 1 and the Signal Line as secondary oscillator 2. A setting of 2 uses the Signal Line as primary oscillator 1 and %DSlow as secondary oscillator 2. It is defaulted to 1.
DivVert: Allows you to vertically adjust the divergence dots. A greater value will raise the bearish divergence dots and lower the bullish divergence dots. A smaller value will lower the bearish divergence dots and raise the bullish divergence dots. It is defaulted to 0.
PivVert: Allows you to vertically adjust the previous pivot dots. A greater value will raise the previous pivot dots that correspond to bearish divergence and lower the previous pivot dots that correspond to bullish divergence. A smaller value will lower the previous pivot dots that correspond to bearish divergence dots and raise the previous pivot dots that correspond to bullish divergence dots. It is defaulted to 0.
PlotDiv: Allows you to disable the divergence dots. A setting of "true" enables the divergence dots and a setting of "false" disables the divergence dots. It is defaulted to true.
PlotPiv: Allows you to disable the previous pivot dots. A setting of "true" enables the previous pivot dots and a setting of "false" disables the previous pivot dots. It is defaulted to true.
Additional Inputs for the Alchemy SigLineDiv and the Alchemy %Ds Diverge indicators:
BearDivCol: Allows you to set the plot color for the bearish divergence dots. It is defaulted to Magenta.
BearPivCol: Allows you to set the plot color for the previous pivot dots that correspond to bearish divergence. It is defaulted to Yellow.
BullDivCol: Allows you to set the plot color for the bullish divergence dots. It is defaulted to Cyan.
BullPivCol: Allows you to set the plot color for the previous pivot dots that correspond to bullish divergence. It is defaulted to Yellow.
Additional Inputs for the Alchemy %Ds Diverge indicator:
HookCol: Allows you to set the plot color for hooks. It is defaulted to Magenta.
Additional Inputs for the Alchemy SigLineDiv indicator:
PlotMACD: Allows you to enable/disable the MACD. It is defaulted to false.
The rest of the inputs are advanced inputs and they are not designed to be changed.
|
AlchemyHookPivot is a multiple-output function that returns the values of a pivot point that is associated with a hook |
|
|
AlchemyMCD returns the difference between a fast and slow exponential moving average based on the same Price, using either number of trailing bars or a smoothing factor percentage. |
|
|
AlchemyMultOscDiv is a multiple-output function that provides the calculation of Bearish and Bullish Divergence between price and 2 oscillators. The first oscillator can be specified to require a minimum hook slope. |
|
|
AlchemyMultOscHkDiv is a multiple-output function that provides the calculation of Bearish and Bullish Divergence between price and 2 oscillators. The first oscillator can be specified to require a minimum hook slope. Additionally to the AlchemyMultOscDiv function, AlchemyMultOscHkDiv also passes the hook bar numbers. |
|
|
The Stochastic oscillators indicate overbought and oversold areas in the market, based upon momentum or price velocity. AlchemyPercentD returns the values for the Stochastics D line. |
|
|
This is a Stochastic function, smoothed by use of a moving average technique. The value returned represents the D line in the Stochastic indicator. AlchemyPercentDSlow returns the values for the Stochastics DSlow line on multiple data series. |
|
|
This is a Stochastic function. Stochastics are oscillators that are used to indicate overbought and oversold conditions in the market based on the premise that during periods of price decreases, bar closes tend to accumulate near the Low of the bar, and during periods of price increases, bar closes tend to accumulate near the High of the bar. AlchemyPercentK returns the values for the Stochastics %K line. |
|
|
AlchemySignalLine returns the exponential moving average of the Mov Avg Convergence Divergence, using either number of trailing bars or a smoothing factor percentage. |
|
|
AlchemyXFactoredAvg function is a weighted moving average of the prices of the last length bars. This function returns the current value of the exponentially smoothed moving average using either number of trailing bars or a smoothing factor percentage. |
Divergence Indicators
Spot tops and bottoms on any time frame. These are unique indicators not included in TradeStation. There are four separate divergence indicators that provide an alert and pop-up text whenever a divergent condition exists between price and the selected indicator. You may select between RSI, Stochastics, MACD or Tick to determine divergence.
The Alchemy Divergence Indicators were developed in response to a void left in the standard set of indicators provided with Tradestation. The Alchemy Divergence Indicators provide an alert and pop-up text when a divergent condition exists between price and the selected indicator. You can select divergence between price and RSI, MACD, Stochastics or Tick. You may select any one indicator or a combination of any of the four indicators.
Unlike the standard set of TradeStation divergence indicators, the Trading Alchemy Divergence Indicators do not wait for a pivot to occur in price action before indicating a divergent condition. This means that with the Alchemy Divergence Indicator you will receive a divergence indication much quicker than the standard TradeStation divergence indicator. This allows you to get a step on making top or bottom formation decisions and allows you to enter your trading orders much sooner.
What is divergence?
Divergence occurs when the indicator (RSI, MACD, Stochastics or Tick) is giving you an indication as to direction that is different from the direction that price is moving. For example, price is heading higher and the indicator is heading lower. Divergence occurs when the higher price is not confirmed by a higher indicator reading.
Types of divergence:
Bullish Divergence - occurs when price is making a lower low and the indicator is making a higher low, failing to move to a new low with price. This is a great sign of a potential bottom and many traders look deeper for confirmation of a buy signal when bullish divergence occurs. Often times, you will see bullish divergence correspond with the low of the day.
Bearish Divergence – occurs when price is making a higher high and the indicator is making a lower high, failing to move to a new high with price. This is a great sign of a potential top and many traders look deeper for confirmation of a sell signal when bearish divergence occurs. Often times, you will see bearish divergence correspond with the high of the day.
Bullish and bearish divergence is a great tool for the intra-day trader. However, spotting actual divergence with price and the indicator can be a very tedious and inconsistent task for most traders. With the Alchemy Divergence Indicators all the difficult and tedious measuring are done for you in a very visual and consistent manner. This allows the trader to concentrate on possible trade set-ups and trade confirmation signals.
A Detailed Explanation of the Indicators Used for Alchemy Divergence:
Commodity Channel Index – CCI
The Commodity Channel Index (CCI), which is best used with contracts that
display cyclical or seasonal characteristics, is formulated to detect the
beginning and ending of these cycles by incorporating a moving average together
with a divisor, which reflects both possible and actual trading ranges. The
final index measures the deviation from normal, which indicates major changes
in market trend. Many traders use the CCI as an overbought/oversold
indicator with 100 or greater indicating that the market is overbought, and
-100 or less that the market is oversold. The Alchemy CCI Divergence Indicator
is designed to display divergence in these overbought and oversold zones.
The Alchemy CCI Divergence Indicator is used for counter trend trades. It displays bullish divergence when price makes a lower low while the CCI makes a higher low and it displays bearish divergence when price makes a higher high while the CCI makes a lower high. These CCI divergences can be used in conjunction with CCI overbought/oversold line crosses and CCI trendline breaks for entries.
The Alchemy CCIDiverge Indicator
To view chart, go to: http://www.tradingalchemy.com/ViewChartsDivergence.htm
User Defined Inputs:
The Alchemy CCIDiverge Indicator is defaulted for optimal use on any chart ranging from Tick Bars over 4 Ticks to Monthly. The user-defined inputs offer additional options to change some settings in order to increase the indicator's flexibility. If you mistakenly change any of these user-defined inputs, you can revert to the original settings by removing the indicator from your chart and then re-inserting it.
|
CCILength |
This user-defined input determines the number of bars over which the CCI is calculated. |
|
CCIAvgLength |
Specifies the CCI Average Length. A setting of 0 uses the CCI for divergence detection and a positive setting uses the CCI average for divergence detection. |
|
DivFact |
This user-defined input adjusts the divergence sensitivity. A smaller number increases the indicators divergence sensitivity, therefore, displaying divergence for smaller pivots. A larger number decreases the indicators divergence sensitivity, therefore, displaying divergence for stronger pivots. |
|
ReverseDiv |
Enables reverse divergence calculation (lower price high/higher indicator high - higher price low/lower indicator low ). |
|
OVBOVS |
The Alchemy CCIDiverge indicator looks for bearish divergence when the CCI is in overbought territory as determined by the OverB input and it looks for bullish divergence when the CCI is in oversold territory as determined by the OverS input. This input enables or disables these overbought/oversold zones restrictions. |
|
OverS |
The Alchemy CCIDiverge indicator looks for bullish divergence when the CCI is in oversold territory as determined by this input. |
|
OverB |
The Alchemy CCIDiverge indicator looks for bearish divergence when the CCI is in overbought territory as determined by this input. |
|
Cycles |
When the Alchemy CCIDiverge indicator finds bearish divergence in overbought territory, the indicator requires for the CCI to cycle back down into oversold territory as determined by the OverSCyc input, in order to qualify for the next bearish divergence in overbought territory. When the Alchemy CCIDiverge indicator finds bullish divergence in oversold territory, the indicator requires for the CCI to cycle back up into overbought territory as determined by the OverBCyc input, in order to qualify for the next bullish divergence in oversold territory. This input enables or disables these overbought/oversold cycle restrictions. |
|
OverSCyc |
When the Alchemy CCIDiverge indicator finds bearish divergence in overbought territory, the indicator requires for the CCI to cycle back down to oversold territory as determined by this input, in order to qualify for the next bearish divergence in overbought territory. |
|
OverBCyc |
When the Alchemy CCIDiverge indicator finds bullish divergence in oversold territory, the indicator requires for the CCI to cycle back up into overbought territory as determined by this input, in order to qualify for the next bullish divergence in oversold territory. |
|
MinPos |
The Alchemy CCIDiverge indicator looks for bearish divergence when the CCI reaches a minimum positive value as determined by this input. A negative setting disables this input. |
|
MinNeg |
The Alchemy CCIDiverge indicator looks for bullish divergence when the CCI reaches a minimum negative value as determined by this input. A negative setting disables this input. |
|
BullAlrt |
Allows you to disable the alert for bullish divergence. |
|
BearAlrt |
Allows you to disable the alert for bearish divergence. |
|
ShowPlot |
Allows you to disable the divergence dots. |
|
PlotVert |
Allows you to vertically adjust the divergence dots. A greater value will raise the bearish divergence dots and lower the bullish divergence dots. |
|
ShowText |
Allows you to disable the divergence text. |
|
TextVert |
Allows you to vertically adjust the displayed text for the bullish and the bearish divergence. A greater value will raise the displayed text for the bearish divergence and lower the displayed text for the bullish divergence. A smaller value will lower the displayed text for the bearish divergence and raise the displayed text for the bullish divergence. |
|
TextHor |
Allows you to horizontally adjust the displayed text for the bullish and the bearish divergence. Each increment will move the text one bar further to the left. |
|
MaxSwg |
Specifies the maximum number of swings stored. |
|
Strength |
Specifies the pivot strength of each swing |
|
MaxLength |
Specifies the maximum number of swings back over which the indicator looks for divergence. |
|
Occur |
A numeric expression representing which occurrence (that is, 1 = most recent, 2 = 2nd most recent, and so on). |
|
BearPrice |
This user-defined input determines if bearish divergence is calculated off the open, the high, the low or the close. |
|
BullPrice |
This user-defined input determines if bullish divergence is calculated off the open, the high, the low or the close. |
|
PlotOscillator |
This input set to true, activates the CCI plot and displays the divergence dots on the CCI. With this input set to true, the scaling for this indicator needs to be changed to either Right Axis, Left Axis or No Axis. This input set to false, hides the CCI plot and displays the divergence dots on the price pivots. |
The Alchemy CCIHookDiverge Indicator
The Alchemy CCIHookDivergence indicator plots the CCI that is specified by the Indicator inputs. When the CCI hooks up, the Alchemy CCIHookDiverge indicator looks for bullish divergence between the current price/CCI pivot low and previous price/CCI pivot lows. When bullish divergence is found, the indicator places a cyan show me dot on the current CCI pivot low and a yellow show me dot on the corresponding previous CCI pivot low. When the CCI hooks down, the Alchemy CCIHookDiverge indicator looks for bearish divergence between the current price/CCI pivot high and previous price/CCI pivot highs. When bearish divergence is found, the indicator places a magenta show me dot on the current CCI pivot high and a yellow show me dot on the corresponding previous CCI pivot high.
Indicator Inputs:
|
CCILength |
Specifies the number of bars over which the CCI is calculated. |
|
CCIAvgLength |
Specifies the CCI Average Length. A setting of 0 uses the CCI for divergence detection and a positive setting uses the CCI average for divergence detection. |
|
MinHook |
This user-defined input adjusts the minimum slope distance requirement for a hook of the CCI. |
|
OverBought |
Enables/disables the overbought requirement in which to look for bearish divergence as well as the coloring changes of the CCI as specified in the OverBCol input when the CCI is in the overbought zone. |
|
OverBoughtZone |
Specifies a minimum required CCI overbought value in which to look for bearish divergence. |
|
OverSold |
Enables/disables the oversold requirement in which to look for bullish divergence as well as the coloring changes of the CCI as specified in the OverSCol input when the CCI is in the oversold zone. |
|
OverSoldZone |
Specifies a minimum required CCI oversold value in which to look for bullish divergence. |
|
CenterLine |
Specifies the centerline value. |
Divergence Inputs:
|
DivPrDi |
This user-defined input adjusts the minimum required distance for a double top/bottom. A negative number allows for the divergence price high/low to be shy of the previous price high/low by number of points. A positive number requires for the divergence price high/low to have penetrated the previous price high/low by number of points. |
|
DivOscDi |
This user-defined input adjusts the minimum required distance for the CCI to be higher than the previous CCI to qualify for bullish divergence and the minimum required distance for the CCI to be lower than the previous CCI to qualify for bearish divergence. |
|
OscLagLen |
This user-defined input adjusts the maximum number of bars for the CCI hook to lag price. |
|
MaxPivBack |
This user-defined input adjusts the maximum number of the CCI hook pivots to look back for divergence. |
|
MinDivLen |
This user-defined input adjusts the minimum number of bars between the previous high/low and the divergent high/low. |
|
MaxDivLen |
This user-defined input adjusts the maximum number of bars between the previous high/low and the divergent high/low. A setting of 0 disables a maximum number of bars requirement. |
Plotting Inputs:
|
DivVert |
Allows you to vertically adjust the divergence dots. A greater value will raise the bearish divergence dots and lower the bullish divergence dots. A smaller value will lower the bearish divergence dots and raise the bullish divergence dots. |
|
PivVert |
Allows you to vertically adjust the previous pivot dots. A greater value will raise the previous pivot dots that correspond to bearish divergence and lower the previous pivot dots that correspond to bullish divergence. A smaller value will lower the previous pivot dots that correspond to bearish divergence dots and raise the previous pivot dots that correspond to bullish divergence dots. |
|
PlotDiv |
Allows you to disable the divergence dots. A setting of "true" enables the divergence dots and a setting of "false" disables the divergence dots. |
|
PlotPiv |
Allows you to disable the previous pivot dots. A setting of "true" enables the previous pivot dots and a setting of "false" disables the previous pivot dots. |
|
PlotHook |
Enables/disables the coloring changes of the CCI when a divergence hook occurs. |
|
PlotCenterLine |
Enables/disables the centerline. |
|
BearDivCol |
Allows you to set the plot color for the bearish divergence dots. |
|
BearPivCol |
Allows you to set the plot color for the previous pivot dots that correspond to bearish divergence. |
|
BullDivCol |
Allows you to set the plot color for the bullish divergence dots. |
|
BullPivCol |
Allows you to set the plot color for the previous pivot dots that correspond to bullish divergence. |
|
HookCol |
Allows you to set the plot color for hooks. |
|
OverBCol |
Specifies the color of the CCI when it is in the overbought zone. |
|
OverSCol |
Specifies the color of the CCI when it is in the oversold zone. |
The rest of the inputs are advanced inputs and they are not designed to be changed.
Relative Strength Index – RSI
The RSI is a momentum indicator which measures price relative to itself.
It is relative to its past performance and is front weighted. Therefore,
it gives an excellent velocity reading in comparison to other indicators.
The RSI is less affected by sharp rises or drops in price performance.
Thus, it filters out some of the "noise" in an instruments trading
activity.
The RSI tends to treat price as a rubber band. The rubber band can be stretched just so far. After a certain point the rubber band is forced to contract. The RSI is a momentum indicator which usually turns ahead of price and lends itself well to trendlines, support and resistance levels and divergence.
One of the most important aspects of the RSI is to look for divergence between price action and RSI readings. Upwardly sloping price and downward sloping RSI should be taken as a warning that price is about to break down. The reverse is true for downward sloping price and upward sloping RSI. This usually indicates that price is about to break out of a decline.
The Alchemy RSIDiverge Indicator
To view chart, go to: http://www.tradingalchemy.com/ViewChartsDivergence.htm
User Defined Inputs:
The Alchemy RSIDiverge Indicator is defaulted for optimal use on any chart ranging from Tick Bars over 4 Ticks to. The user-defined inputs offer additional options to change some settings in order to increase the indicator's flexibility. If you mistakenly change any of these user-defined inputs, you can revert to the original settings by removing the indicator from your chart and then re-inserting it.
|
BullAlrt: |
Allows you to disable the alert for bullish divergence. A setting of "True" enables the alert and a setting of "False" disables the alert. It is defaulted to True. |
|
BearAlrt: |
Allows you to disable the alert for bearish divergence. A setting of "True" enables the alert and a setting of "False" disables the alert. It is defaulted to True. |
|
Price: |
This user-defined input determines if the RSI is calculated off the open, the high, the low or the close. It is defaulted to the Close. |
|
Length: |
This user-defined input determines the number of bars over which the RSI is calculated. We optimized this input to a setting of 21 bars. |
|
DivFact: |
This user-defined input adjusts the divergence sensitivity. A smaller number increases the indicators divergence sensitivity, therefore, displaying divergence for smaller pivots. A larger number decreases the indicators divergence sensitivity, therefore, displaying divergence for stronger pivots. We optimized this input to a factor of 3. |
|
ReverseDiv |
Enables reverse divergence calculation (lower price high/higher indicator high - higher price low/lower indicator low). |
|
HPrice |
Specifies the price to be used for bearish divergence calculation. |
|
LPrice |
Specifies the price to be used for bullish divergence calculation. |
|
PlotOscillator |
This input set to true, activates the RSI plot and displays the divergence dots on the RSI. With this input set to true, the scaling for this indicator needs to be changed to either Right Axis, Left Axis or No Axis. This input set to false, hides the RSI plot and displays the divergence dots on the price pivots. |
|
OVBOVS |
The Alchemy RSIDiverge indicator looks for bearish divergence when the RSI is in overbought territory as determined by the OverB input and it looks for bullish divergence when the RSI is in oversold territory as determined by the OverS input. This input enables or disables these overbought/oversold zones restrictions. |
|
OverS |
The Alchemy RSIDiverge indicator looks for bullish divergence when the RSI is in oversold territory as determined by this input. |
|
OverB |
The Alchemy RSIDiverge indicator looks for bearish divergence when the RSI is in overbought territory as determined by this input. |
|
Cycles |
When the Alchemy RSIDiverge indicator finds bearish divergence in overbought territory, the indicator requires for the RSI to cycle back down into oversold territory as determined by the OverSCyc input, in order to qualify for the next bearish divergence in overbought territory. When the Alchemy RSIDiverge indicator finds bullish divergence in oversold territory, the indicator requires for the RSI to cycle back up into overbought territory as determined by the OverBCyc input, in order to qualify for the next bullish divergence in oversold territory. This input enables or disables these overbought/oversold cycle restrictions. |
|
OverSCyc |
When the Alchemy RSIDiverge indicator finds bearish divergence in overbought territory, the indicator requires for the RSI to cycle back down to oversold territory as determined by this input, in order to qualify for the next bearish divergence in overbought territory. |
|
OverBCyc |
When the Alchemy RSIDiverge indicator finds bullish divergence in oversold territory, the indicator requires for the RSI to cycle back up into overbought territory as determined by this input, in order to qualify for the next bullish divergence in oversold territory. |
|
TrailingBars |
Specifies the number of trailing bars to consider. |
|
MaxSwings |
Specifies the maximum number of swings to look back |
|
PivStrength |
Specifies the minimum number of bars on either side of a price pivot |
|
Occur |
A numeric expression representing which occurrence (that is, 1 = most recent, 2 = 2nd most recent, and so on). |
|
PlotVert: |
Allows you to vertically adjust the divergence dots. A greater value will raise the bearish divergence dots and lower the bullish divergence dots. A smaller value will lower the bearish divergence dots and raise the bullish divergence dots. It is defaulted to 5 ticks. |
|
ShowText |
Enables/disables text objects. |
|
TextVert: |
Allows you to vertically adjust the displayed text for the bullish and the bearish divergence. A greater value will raise the displayed text for the bearish divergence and lower the displayed text for the bullish divergence. A smaller value will lower the displayed text for the bearish divergence and raise the displayed text for the bullish divergence. It is defaulted to 0 ticks. |
|
TextHor: |
Allows you to horizontally adjust the displayed text for the bullish and the bearish divergence. Each increment will move the text one bar further to the left. It is defaulted to 2 bars. |
The Alchemy RSIHookDiverge Indicator
The Alchemy RSIHookDivergence indicator plots the RSI that is specified by the Indicator inputs. When the RSI hooks up, the Alchemy RSIHookDiverge indicator looks for bullish divergence between the current price/RSI pivot low and previous price/RSI pivot lows. When bullish divergence is found, the indicator places a cyan show me dot on the current RSI pivot low and a yellow show me dot on the corresponding previous RSI pivot low. When the RSI hooks down, the Alchemy RSIHookDiverge indicator looks for bearish divergence between the current price/RSI pivot high and previous price/RSI pivot highs. When bearish divergence is found, the indicator places a magenta show me dot on the current RSI pivot high and a yellow show me dot on the corresponding previous RSI pivot high.
Indicator Inputs:
|
Price |
This user-defined input determines if the RSI is calculated off the open, the high, the low or the close. |
|
Length |
Specifies the number of bars over which the RSI is calculated. |
|
MinHook |
This user-defined input adjusts the minimum slope distance requirement for a hook of the RSI. |
|
OverBought |
Enables/disables the overbought requirement in which to look for bearish divergence as well as the coloring changes of the RSI as specified in the OverBCol input when the RSI is in the overbought zone. |
|
OverBoughtZone |
Specifies a minimum required RSI overbought value in which to look for bearish divergence. |
|
OverSold |
Enables/disables the oversold requirement in which to look for bullish divergence as well as the coloring changes of the RSI as specified in the OverSCol input when the RSI is in the oversold zone. |
|
OverSoldZone |
Specifies a minimum required RSI oversold value in which to look for bullish divergence. |
|
CenterLine |
Specifies the centerline value. |
Divergence Inputs:
|
DivPrDi |
This user-defined input adjusts the minimum required distance for a double top/bottom. A negative number allows for the divergence price high/low to be shy of the previous price high/low by number of points. A positive number requires for the divergence price high/low to have penetrated the previous price high/low by number of points. |
|
DivOscDi |
This user-defined input adjusts the minimum required distance for the RSI to be higher than the previous RSI to qualify for bullish divergence and the minimum required distance for the RSI to be lower than the previous RSI to qualify for bearish divergence. |
|
OscLagLen |
This user-defined input adjusts the maximum number of bars for the RSI hook to lag price. |
|
MaxPivBack |
This user-defined input adjusts the maximum number of the RSI hook pivots to look back for divergence. |
|
MinDivLen |
This user-defined input adjusts the minimum number of bars between the previous high/low and the divergent high/low. |
|
MaxDivLen |
This user-defined input adjusts the maximum number of bars between the previous high/low and the divergent high/low. A setting of 0 disables a maximum number of bars requirement. |
Plotting Inputs:
|
DivVert |
Allows you to vertically adjust the divergence dots. A greater value will raise the bearish divergence dots and lower the bullish divergence dots. A smaller value will lower the bearish divergence dots and raise the bullish divergence dots. |
|
PivVert |
Allows you to vertically adjust the previous pivot dots. A greater value will raise the previous pivot dots that correspond to bearish divergence and lower the previous pivot dots that correspond to bullish divergence. A smaller value will lower the previous pivot dots that correspond to bearish divergence dots and raise the previous pivot dots that correspond to bullish divergence dots. |
|
PlotDiv |
Allows you to disable the divergence dots. A setting of "true" enables the divergence dots and a setting of "false" disables the divergence dots. |
|
PlotPiv |
Allows you to disable the previous pivot dots. A setting of "true" enables the previous pivot dots and a setting of "false" disables the previous pivot dots. |
|
PlotHook |
Enables/disables the coloring changes of the RSI when a divergence hook occurs. |
|
PlotCenterLine |
Enables/disables the centerline. |
|
BearDivCol |
Allows you to set the plot color for the bearish divergence dots. |
|
BearPivCol |
Allows you to set the plot color for the previous pivot dots that correspond to bearish divergence. |
|
BullDivCol |
Allows you to set the plot color for the bullish divergence dots. |
|
BullPivCol |
Allows you to set the plot color for the previous pivot dots that correspond to bullish divergence. |
|
HookCol |
Allows you to set the plot color for hooks. |
|
OverBCol |
Specifies the color of the RSI when it is in the overbought zone. |
|
OverSCol |
Specifies the color of the RSI when it is in the oversold zone. |
The rest of the inputs are advanced inputs and they are not designed to be changed.
Stochastics
The Stochastics oscillator compares where price has closed relative to its price range over a specifically identified period of time. The theory is that in an upwardly trending market, prices tend to close near their high; and during a downward trending market, prices tend to close near their low. Further, as an upward trend matures, price tends to close further away from it’s high; and as a downward trend matures, price tends to close away from it’s low.
The Stochastics indicator attempts to determine when price starts to cluster around it’s low for an uptrending market and around it’s high in a downtrending market. These are the conditions, which indicate a possible trend reversal is about to occur.
The Stochastics indicator is plotted as two lines. They
are the %D line and the %K line. The % D line is more important than the
%K line. The Stochastic is plotted on a chart with values ranging from 0
to 100.
Ordinarily, the %K line will change direction before the %D line. However, when the %D line changes direction prior to the %K line, a slow and steady reversal is usually indicated. When both lines change direction, and the faster %K line subsequently changes direction to retest a crossing of the %D line, but does not cross it, this is a good confirmation of the stability of the prior reversal in price. Many times when the %K or %D lines begin to flatten out, this is an indication that the trend will reverse during the next trading range.
Quite often, divergence sets up on the Stochastics chart. That is, price may be making higher highs, but the Stochastic oscillator is making lower lows. Or conversely, price may be making lower highs, and the Stochastic oscillator is making higher highs. In either case, the indicator usually is demonstrating a change in price before price itself begins to change trend. In addition, the Alchemy Stochastics Divergence Indicator uses a proprietary Trading Alchemy formula which was specifically designed for detecting divergence. Using standard stochastics for spotting divergence can lead to many false signals and trading frustration. The Alchemy Stochastics Divergence Indicator was designed to filter out many of the false signals allowing the trader to use the signals with much more confidence.
The Alchemy StochDiverge Indicator
To view chart, go to: http://www.tradingalchemy.com/ViewChartsDivergence.htm
User Defined Inputs:
|
BullAlrt: |
Allows you to disable the alert for bullish divergence. A setting of "True" enables the alert and a setting of "False" disables the alert. It is defaulted to True. |
|
BearAlrt: |
Allows you to disable the alert for bearish divergence. A setting of "True" enables the alert and a setting of "False" disables the alert. It is defaulted to True. |
|
Length: |
This user-defined input determines the number of bars over which the Stochastics are calculated. We optimized this input to a setting of 21 bars. |
|
KAdjust: |
This user-defined input adjusts the calculation for the K line. We optimized this input to a setting of 3. |
|
DAdjust: |
This user-defined input adjusts the calculation for the D line. We optimized this input to a setting of 3. |
|
AlternateStochastic: |
This input allows the user to chose any Stochastic function available in TradeStation. At its default setting of -1, it uses a proprietary Trading Alchemy Stochastic function, especially designed for divergence. If you would like to use a regular TradeStation Stochastic function in its place, click on "Dictionary…" and select any available FastK, SlowK, FastD or SlowD user function. Then type the desired values into the Parameters. |
|
HPrice |
Specifies the price to be used for bearish divergence calculation. |
|
LPrice |
Specifies the price to be used for bullish divergence calculation. |
|
PlotOscillator |
This input set to true, activates the Stochastics plot and displays the divergence dots on the Stochastics. With this input set to true, the scaling for this indicator needs to be changed to either Right Axis, Left Axis or No Axis. This input set to false, hides the Stochastics plot and displays the divergence dots on the price pivots. |
|
OVBOVS |
The Alchemy StochDiverge indicator looks for bearish divergence when the Stochastics is in overbought territory as determined by the OverB input and it looks for bullish divergence when the Stochastics is in oversold territory as determined by the OverS input. This input enables or disables these overbought/oversold zones restrictions. |
|
OverS |
The Alchemy StochDiverge indicator looks for bullish divergence when the Stochastics is in oversold territory as determined by this input. |
|
OverB |
The Alchemy StochDiverge indicator looks for bearish divergence when the Stochastics is in overbought territory as determined by this input. |
|
Cycles |
When the Alchemy StochDiverge indicator finds bearish divergence in overbought territory, the indicator requires for the Stochastics to cycle back down into oversold territory as determined by the OverSCyc input, in order to qualify for the next bearish divergence in overbought territory. When the Alchemy StochDiverge indicator finds bullish divergence in oversold territory, the indicator requires for the Stochastics to cycle back up into overbought territory as determined by the OverBCyc input, in order to qualify for the next bullish divergence in oversold territory. This input enables or disables these overbought/oversold cycle restrictions. |
|
OverSCyc |
When the Alchemy StochDiverge indicator finds bearish divergence in overbought territory, the indicator requires for the Stochastics to cycle back down to oversold territory as determined by this input, in order to qualify for the next bearish divergence in overbought territory. |
|
OverBCyc |
When the Alchemy StochDiverge indicator finds bullish divergence in oversold territory, the indicator requires for the Stochastics to cycle back up into overbought territory as determined by this input, in order to qualify for the next bullish divergence in oversold territory. |
|
TrailingBars |
Specifies the number of trailing bars to consider. |
|
MaxSwings |
Specifies the maximum number of swings to look back |
|
PivStrength |
Specifies the minimum number of bars on either side of a price pivot |
|
Occur |
A numeric expression representing which occurrence (that is, 1 = most recent, 2 = 2nd most recent, and so on). |
|
DivFact: |
This user-defined input adjusts the divergence sensitivity. A smaller number increases the indicators divergence sensitivity, therefore, displaying more frequent divergence. A larger number decreases the indicators divergence sensitivity, therefore, displaying stronger divergence. We optimized this input to a factor of 0. |
|
ReverseDiv |
Enables reverse divergence calculation (lower price high/higher indicator high - higher price low/lower indicator low). |
|
PlotVert: |
Allows you to vertically adjust the divergence dots. A greater value will raise the bearish divergence dots and lower the bullish divergence dots. A smaller value will lower the bearish divergence dots and raise the bullish divergence dots. It is defaulted to 5 ticks. |
|
ShowText |
Enables/disables text objects. |
|
TextVert: |
Allows you to vertically adjust the displayed text for the bullish and the bearish divergence. A greater value will raise the displayed text for the bearish divergence and lower the displayed text for the bullish divergence. A smaller value will lower the displayed text for the bearish divergence and raise the displayed text for the bullish divergence. It is defaulted to 0 ticks. |
|
TextHor: |
Allows you to horizontally adjust the displayed text for the bullish and the bearish divergence. Each increment will move the text one bar further to the left. It is defaulted to 2 bars. |
The Alchemy StochasticsHookDiverge Indicator
The Alchemy StochasticsHookDivergence indicator plots the Stochastics that is specified by the Indicator inputs. When the Stochastics hooks up, the Alchemy StochasticsHookDiverge indicator looks for bullish divergence between the current price/Stochastics pivot low and previous price/Stochastics pivot lows. When bullish divergence is found, the indicator places a cyan show me dot on the current Stochastics pivot low and a yellow show me dot on the corresponding previous Stochastics pivot low. When the Stochastics hooks down, the Alchemy StochasticsHookDiverge indicator looks for bearish divergence between the current price/Stochastics pivot high and previous price/Stochastics pivot highs. When bearish divergence is found, the indicator places a magenta show me dot on the current Stochastics pivot high and a yellow show me dot on the corresponding previous Stochastics pivot high.
Indicator Inputs:
|
Length |
Indicates number of bars used in the Stochastics calculation. |
|
KAdjust |
Indicates number of bars used in the K line calculation. |
|
DAdjust |
Indicates number of bars used in the D line calculation. |
|
AlternateStochastic: |
This input allows the user to chose any Stochastic function available in TradeStation. At its default setting of -1, it uses a proprietary Trading Alchemy Stochastic function, especially designed for divergence. If you would like to use a regular TradeStation Stochastic function in its place, click on "Dictionary…" and select any available FastK, SlowK, FastD or SlowD user function. Then type the desired values into the Parameters. |
|
MinHook |
This user-defined input adjusts the minimum slope distance requirement for a hook of the Stochastics. |
|
OverBought |
Enables/disables the overbought requirement in which to look for bearish divergence as well as the coloring changes of the Stochastics as specified in the OverBCol input when the Stochastics is in the overbought zone. |
|
OverBoughtZone |
Specifies a minimum required Stochastics overbought value in which to look for bearish divergence. |
|
OverSold |
Enables/disables the oversold requirement in which to look for bullish divergence as well as the coloring changes of the Stochastics as specified in the OverSCol input when the Stochastics is in the oversold zone. |
|
OverSoldZone |
Specifies a minimum required Stochastics oversold value in which to look for bullish divergence. |
|
CenterLine |
Specifies the centerline value. |
Divergence Inputs:
|
DivPrDi |
This user-defined input adjusts the minimum required distance for a double top/bottom. A negative number allows for the divergence price high/low to be shy of the previous price high/low by number of points. A positive number requires for the divergence price high/low to have penetrated the previous price high/low by number of points. |
|
DivOscDi |
This user-defined input adjusts the minimum required distance for the Stochastics to be higher than the previous Stochastics to qualify for bullish divergence and the minimum required distance for the Stochastics to be lower than the previous Stochastics to qualify for bearish divergence. |
|
OscLagLen |
This user-defined input adjusts the maximum number of bars for the Stochastics hook to lag price. |
|
MaxPivBack |
This user-defined input adjusts the maximum number of the Stochastics hook pivots to look back for divergence. |
|
MinDivLen |
This user-defined input adjusts the minimum number of bars between the previous high/low and the divergent high/low. |
|
MaxDivLen |
This user-defined input adjusts the maximum number of bars between the previous high/low and the divergent high/low. A setting of 0 disables a maximum number of bars requirement. |
Plotting Inputs:
|
DivVert |
Allows you to vertically adjust the divergence dots. A greater value will raise the bearish divergence dots and lower the bullish divergence dots. A smaller value will lower the bearish divergence dots and raise the bullish divergence dots. |
|
PivVert |
Allows you to vertically adjust the previous pivot dots. A greater value will raise the previous pivot dots that correspond to bearish divergence and lower the previous pivot dots that correspond to bullish divergence. A smaller value will lower the previous pivot dots that correspond to bearish divergence dots and raise the previous pivot dots that correspond to bullish divergence dots. |
|
PlotDiv |
Allows you to disable the divergence dots. A setting of "true" enables the divergence dots and a setting of "false" disables the divergence dots. |
|
PlotPiv |
Allows you to disable the previous pivot dots. A setting of "true" enables the previous pivot dots and a setting of "false" disables the previous pivot dots. |
|
PlotHook |
Enables/disables the coloring changes of the Stochastics when a divergence hook occurs. |
|
PlotCenterLine |
Enables/disables the centerline. |
|
BearDivCol |
Allows you to set the plot color for the bearish divergence dots. |
|
BearPivCol |
Allows you to set the plot color for the previous pivot dots that correspond to bearish divergence. |
|
BullDivCol |
Allows you to set the plot color for the bullish divergence dots. |
|
BullPivCol |
Allows you to set the plot color for the previous pivot dots that correspond to bullish divergence. |
|
HookCol |
Allows you to set the plot color for hooks. |
|
OverBCol |
Specifies the color of the Stochastics when it is in the overbought zone. |
|
OverSCol |
Specifies the color of the Stochastics when it is in the oversold zone. |
The rest of the inputs are advanced inputs and they are not designed to be changed.
Moving Average Convergence Divergence (MACD)
The MACD is an oscillator which is derived by dividing one moving average by another. The moving averages are usually exponentially weighted, thus giving more weight to the most recent price action. MACD is plotted on a chart with a horizontal equilibrium line. The equilibrium line is important. When the two moving averages cross below the equilibrium line, it means that the shorter exponential moving average (EMA) is at a value less than the longer EMA. This would be a bearish signal. When the EMA’s are above the equilibrium line, it means that the shorter EMA has a value greater than the longer EMA. This is a bullish signal.
The Moving Average Convergence Divergence indicator name is derived from the fact that the shorter EMA is continually converging toward and diverging away from the longer EMA. MACD’s can be used for an infinite number of time periods. Divergence can occur using the MACD indicator and many traders use the MACD to detect divergence.
The Alchemy MACDDiverge Indicator
The Alchemy MACDDiverge indicator contains several options on which MACD to use for divergence calculation. With the inputs FastLength and SlowLength, a standard MACD is used to detect divergence and with the MACDLength input, a MACD average can be used for detecting divergence. For using custom moving averages for the MACD or the MACD average, the inputs FastMA,SlowMA and/or MACDMA can be used to type in any formula for moving averages. For example, in order to use a 12 bar simple moving average for the fast moving average of the MACD, you would type in average(close,12) into the input FastMA and in order to use a 26 bar simple moving average for the slow moving average of the MACD, you would type in average(close,26) into the input SlowMA. In order to use a 9 bar average of a 12/26 MACD, you would type in average( average(close,12)-average(close,26),9 ) into the input MACDMA.
To view chart, go to: http://www.tradingalchemy.com/ViewChartsDivergence.htm
User Defined Inputs:
|
HPrice |
Specifies the price to be used for bearish divergence calculation. |
|
LPrice |
Specifies the price to be used for bullish divergence calculation. |
|
PlotOscillator |
This input set to true, activates the MACD plot and displays the divergence dots on the MACD. With this input set to true, the scaling for this indicator needs to be changed to either Right Axis, Left Axis or No Axis. This input set to false, hides the MACD plot and displays the divergence dots on the price pivots. |
|
BullAlrt: |
Allows you to disable the alert for bullish divergence. A setting of "True" enables the alert and a setting of "False" disables the alert. It is defaulted to True. |
|
BearAlrt: |
Allows you to disable the alert for bearish divergence. A setting of "True" enables the alert and a setting of "False" disables the alert. It is defaulted to True. |
|
FastLength: |
This user-defined input determines the number of bars over which the fast moving average of the MACD is calculated. |
|
SlowLength: |
This user-defined input determines the number of bars over which the slow moving average of the MACD is calculated. |
|
MACDLength: |
Specifies the number of bars over which the moving average of the MACD is calculated. With a setting of 0, this indicator detects divergence on the MACD, otherwise it detects divergence on the average of the MACD, which is referred to as the MACD signal line. |
|
FastMA: |
Specifies a user-defined moving average for the fast moving average of the MACD and any moving average formula can be used. In order to use this custom moving average input, the inputs Fast Length and Slow Length need to be set to 0. For example, in order to use a 12 bar simple moving average for the fast moving average of the MACD, you would type in average(close,12) |
|
SlowMA: |
Specifies a user-defined moving average for the slow moving average of the MACD and any moving average formula can be used. In order to use this custom moving average input, the inputs Fast Length and Slow Length need to be set to 0. For example, in order to use a 26 bar simple moving average for the slow moving average of the MACD, you would type in average(close,26) |
|
MACDMA: |
Specifies a user-defined moving average for the MACD moving average and any moving average formula can be used. In order to use this custom moving average input, the inputs Fast Length and Slow Length need to be set to 0. Please note that this input functions independently from the FastMA and SlowMA input. For example, in order to use a 9 bar average of a 12/26 MACD, you would type in average( average(close,12)-average(close,26),9 ). Additionally, the input DivergeOsc needs to be set to 2 in order to use the MACD average for divergence calculation |
|
DivergeOsc: |
With a setting of 1, this indicator detects divergence on the MACD and with a setting of 2, it detects divergence on the average of the MACD, which is referred to as the MACD signal line. This input is active only if the MACD is calculated with the custom MACD formulas under FastMA, SlowMA and/or MACDMA. |
|
DivFact: |
This user-defined input adjusts the divergence sensitivity. A smaller number increases the indicators divergence sensitivity, therefore, displaying more frequent divergence. A larger number decreases the indicators divergence sensitivity, therefore, displaying stronger divergence. We optimized this input to a factor of 0. |
|
ReverseDiv |
Enables reverse divergence calculation (lower price high/higher indicator high - higher price low/lower indicator low). |
|
OVBOVS |
The Alchemy MACDDiverge indicator looks for bearish divergence when the MACD is in overbought territory as determined by the OverB input and it looks for bullish divergence when the MACD is in oversold territory as determined by the OverS input. This input enables or disables these overbought/oversold zones restrictions. |
|
OverS |
The Alchemy MACDDiverge indicator looks for bullish divergence when the MACD is in oversold territory as determined by this input. |
|
OverB |
The Alchemy MACDDiverge indicator looks for bearish divergence when the MACD is in overbought territory as determined by this input. |
|
Cycles |
When the Alchemy MACDDiverge indicator finds bearish divergence in overbought territory, the indicator requires for the MACD to cycle back down into oversold territory as determined by the OverSCyc input, in order to qualify for the next bearish divergence in overbought territory. When the Alchemy MACDDiverge indicator finds bullish divergence in oversold territory, the indicator requires for the MACD to cycle back up into overbought territory as determined by the OverBCyc input, in order to qualify for the next bullish divergence in oversold territory. This input enables or disables these overbought/oversold cycle restrictions. |
|
OverSCyc |
When the Alchemy MACDDiverge indicator finds bearish divergence in overbought territory, the indicator requires for the MACD to cycle back down to oversold territory as determined by this input, in order to qualify for the next bearish divergence in overbought territory. |
|
OverBCyc |
When the Alchemy MACDDiverge indicator finds bullish divergence in oversold territory, the indicator requires for the MACD to cycle back up into overbought territory as determined by this input, in order to qualify for the next bullish divergence in oversold territory. |
|
MinPos |
The Alchemy MACDDiverge indicator looks for bearish divergence when the MACD reaches a minimum positive value as determined by this input. A negative setting disables this input. |
|
MinNeg |
The Alchemy MACDDiverge indicator looks for bullish divergence when the MACD reaches a minimum negative value as determined by this input. A negative setting disables this input. |
|
TrailingBars: |
Specifies the number of trailing bars to consider. |
|
MaxSwings: |
Specifies the maximum number of swings to look back |
|
PivStrength: |
Specifies the minimum number of bars on either side of a price pivot |
|
Occur: |
A numeric expression representing which occurrence (that is, 1 = most recent, 2 = 2nd most recent, and so on). |
|
PlotVert: |
Allows you to vertically adjust the divergence dots. A greater value will raise the bearish divergence dots and lower the bullish divergence dots. A smaller value will lower the bearish divergence dots and raise the bullish divergence dots. It is defaulted to 5 ticks. |
|
ShowText: |
Enables/disables text objects. |
|
TextVert: |
Allows you to vertically adjust the displayed text for the bullish and the bearish divergence. A greater value will raise the displayed text for the bearish divergence and lower the displayed text for the bullish divergence. A smaller value will lower the displayed text for the bearish divergence and raise the displayed text for the bullish divergence. It is defaulted to 0 ticks. |
|
TextHor: |
Allows you to horizontally adjust the displayed text for the bullish and the bearish divergence. Each increment will move the text one bar further to the left. It is defaulted to 2 bars. |
The Alchemy MACDHookDiverge Indicator
The Alchemy MACDHookDivergence indicator plots the MACD that is specified by the Indicator inputs. When the MACD hooks up, the Alchemy MACDHookDiverge indicator looks for bullish divergence between the current price/MACD pivot low and previous price/MACD pivot lows. When bullish divergence is found, the indicator places a cyan show me dot on the current MACD pivot low and a yellow show me dot on the corresponding previous MACD pivot low. When the MACD hooks down, the Alchemy MACDHookDiverge indicator looks for bearish divergence between the current price/MACD pivot high and previous price/MACD pivot highs. When bearish divergence is found, the indicator places a magenta show me dot on the current MACD pivot high and a yellow show me dot on the corresponding previous MACD pivot high. Additionally, this indicator can plot both, the MACD and the MACD average as specified by the inputs and the indicator can be set to either show divergence on the MACD or the MACD average.
This indicator contains several options on which MACD to use for divergence calculation. With the inputs FastLength and SlowLength, a standard MACD is used to detect divergence and with the MACDLength input, a MACD average can be used for detecting divergence. For using custom moving averages for the MACD or the MACD average, the inputs FastMA,SlowMA and/or MACDMA can be used to type in any formula for moving averages. For example, in order to use a 12 bar simple moving average for the fast moving average of the MACD, you would type in average(close,12) into the input FastMA and in order to use a 26 bar simple moving average for the slow moving average of the MACD, you would type in average(close,26) into the input SlowMA. In order to use a 9 bar average of a 12/26 MACD, you would type in average( average(close,12)-average(close,26),9 ) into the input MACDMA. Independent from the divergence calculation, this indicator also allows you to plot the MACD and/or the MACD average.
Indicator Inputs:
|
FastLength |
Number of trailing bars to consider for the fast average. |
|
SlowLength |
Number of trailing bars to consider for the slow average. |
|
MACDLength: |
Specifies the number of trailing bars to consider for the moving average of the MACD. |
|
FastMA: |
Specifies a user-defined moving average for the fast moving average of the MACD and any moving average formula can be used. In order to use this custom moving average input, the inputs Fast Length and Slow Length need to be set to 0. For example, in order to use a 12 bar simple moving average for the fast moving average of the MACD, you would type in average(close,12) |
|
SlowMA: |
Specifies a user-defined moving average for the slow moving average of the MACD and any moving average formula can be used. In order to use this custom moving average input, the inputs Fast Length and Slow Length need to be set to 0. For example, in order to use a 26 bar simple moving average for the slow moving average of the MACD, you would type in average(close,26) |
|
MACDMA: |
Specifies a user-defined moving average for the MACD moving average and any moving average formula can be used. In order to use this custom moving average input, the inputs Fast Length and Slow Length need to be set to 0. Please note that this input functions independently from the FastMA and SlowMA input. For example, in order to use a 9 bar average of a 12/26 MACD, you would type in average( average(close,12)-average(close,26),9 ). Additionally, the input DivergeOsc needs to be set to 2 in order to use the MACD average for divergence calculation |
|
DivergeOsc: |
With a setting of 1, this indicator detects divergence on the MACD and with a setting of 2, it detects divergence on the average of the MACD, which is referred to as the MACD signal line. |
|
MinHook |
This user-defined input adjusts the minimum slope distance requirement for a hook of the MACD. |
|
OverBought |
Enables/disables the overbought requirement in which to look for bearish divergence as well as the coloring changes of the MACD as specified in the OverBCol input when the MACD is in the overbought zone. |
|
OverBoughtZone |
Specifies a minimum required MACD overbought value in which to look for bearish divergence. |
|
OverSold |
Enables/disables the oversold requirement in which to look for bullish divergence as well as the coloring changes of the MACD as specified in the OverSCol input when the MACD is in the oversold zone. |
|
OverSoldZone |
Specifies a minimum required MACD oversold value in which to look for bullish divergence. |
|
CenterLine |
Specifies the centerline value. |
Divergence Inputs:
|
DivPrDi |
This user-defined input adjusts the minimum required distance for a double top/bottom. A negative number allows for the divergence price high/low to be shy of the previous price high/low by number of points. A positive number requires for the divergence price high/low to have penetrated the previous price high/low by number of points. |
|
DivOscDi |
This user-defined input adjusts the minimum required distance for the MACD to be higher than the previous MACD to qualify for bullish divergence and the minimum required distance for the MACD to be lower than the previous MACD to qualify for bearish divergence. |
|
OscLagLen |
This user-defined input adjusts the maximum number of bars for the MACD hook to lag price. |
|
MaxPivBack |
This user-defined input adjusts the maximum number of the MACD hook pivots to look back for divergence. |
|
MinDivLen |
This user-defined input adjusts the minimum number of bars between the previous high/low and the divergent high/low. |
|
MaxDivLen |
This user-defined input adjusts the maximum number of bars between the previous high/low and the divergent high/low. A setting of 0 disables a maximum number of bars requirement. |
Plotting Inputs:
|
PlotMACD |
Allows you to plot the MACD. A setting of "true" enables the MACD line and a setting of "false" disables the MACD line. |
|
PlotMACDAvg |
Allows you to plot the MACD average. A setting of "true" enables the MACD average line and a setting of "false" disables the MACD average line. |
|
DivVert |
Allows you to vertically adjust the divergence dots. A greater value will raise the bearish divergence dots and lower the bullish divergence dots. A smaller value will lower the bearish divergence dots and raise the bullish divergence dots. |
|
PivVert |
Allows you to vertically adjust the previous pivot dots. A greater value will raise the previous pivot dots that correspond to bearish divergence and lower the previous pivot dots that correspond to bullish divergence. A smaller value will lower the previous pivot dots that correspond to bearish divergence dots and raise the previous pivot dots that correspond to bullish divergence dots. |
|
PlotDiv |
Allows you to disable the divergence dots. A setting of "true" enables the divergence dots and a setting of "false" disables the divergence dots. |
|
PlotPiv |
Allows you to disable the previous pivot dots. A setting of "true" enables the previous pivot dots and a setting of "false" disables the previous pivot dots. |
|
PlotHook |
Enables/disables the coloring changes of the MACD when a divergence hook occurs. |
|
PlotCenterLine |
Enables/disables the centerline. |
|
BearDivCol |
Allows you to set the plot color for the bearish divergence dots. |
|
BearPivCol |
Allows you to set the plot color for the previous pivot dots that correspond to bearish divergence. |
|
BullDivCol |
Allows you to set the plot color for the bullish divergence dots. |
|
BullPivCol |
Allows you to set the plot color for the previous pivot dots that correspond to bullish divergence. |
|
HookCol |
Allows you to set the plot color for hooks. |
|
ShowOVBOVS |
Allows you to show when the divergence Oscillator as specified under DivergeOsc is in overbought or oversold territory. A setting of "true" enables this feature and a setting of "false" disables this feature. |
|
OverBCol |
Specifies the color of the divergence Oscillator as specified under DivergeOsc when it is in the overbought zone. Please note that ShowOVBOVS needs to be set to true in order for this color to be activated. |
|
OverSCol |
Specifies the color of the divergence Oscillator as specified under DivergeOsc when it is in the overbought zone. Please note that ShowOVBOVS needs to be set to true in order for this color to be activated. |
The rest of the inputs are advanced inputs and they are not designed to be changed.
TICK
The TICK, also known as the NYSE cumulative tick index, is a measure of the number of NYSE stocks that at any moment are trading on an up tick if positive or on a down tick if negative. Although the TICK is without question a lagging indicator, it is still helpful to the trader in many ways. First, if you are currently in an established position in the market, the TICK is an excellent confirmation as to whether or not you have the right side of the market. For example, if you are long the market with a position, it is very helpful to watch the TICK to see if it is improving from a lower-level and trending up to a higher level. That will confirm that the cash market is indeed moving along with the futures which will give you greater confidence to maintain your position.
When the TICK reaches extreme levels it is a good indication that the trend may be close to running out of steam. Of course, extreme levels vary. The TICK can also be used by traders to assist in confirming reversal chart formations. If the TICK is at an extreme level and then begins to reverse and head in the opposite direction, this could be a great confirmation, along with other chart patterns, that a reversal is occurring.
The TICK can also be used as an excellent divergence indicator and will assist the trader in identifying major turning points in the day.
The Alchemy TickDiverge Indicator
The Alchemy TickDivergence indicator looks for divergence between price of data 1 and the TICK symbol (or any other symbol) applied to data 2. Therefore, it is necessary to insert the TICK symbol (or any other symbol) with the same time frame and date range (as hidden subgraph) into your chart before applying our TICK Divergence indicator.
To view chart, go to: http://www.tradingalchemy.com/ViewChartsDivergence.htm
User Defined Inputs:
|
DataSer |
Specifies the data series number to which the TICK symbol is applied to. |
|
Use_Close |
If set to true, it uses the close of the TICK to measure divergence with. Otherwise it uses the high of the bar for bearish divergence and the low of the bar for bullish divergence. |
|
DivSymbol |
Specifies the name of the divergence type that is being displayed in the text object. If left blank (“”), it will insert the symbol name of the corresponding data series. |
|
BullAlrt: |
Allows you to disable the alert for bullish divergence. A setting of "True" enables the alert and a setting of "False" disables the alert. It is defaulted to True. |
|
BearAlrt |
Allows you to disable the alert for bearish divergence. A setting of "True" enables the alert and a setting of "False" disables the alert. It is defaulted to True |
|
DivFact |
This user-defined input adjusts the divergence sensitivity. A smaller number increases the indicators divergence sensitivity, therefore, displaying more frequent divergence. A larger number decreases the indicators divergence sensitivity, therefore, displaying stronger divergence. We optimized this input to a factor of 0. |
|
ReverseDiv |
Enables reverse divergence calculation (lower price high/higher indicator high - higher price low/lower indicator low). |
|
HPrice |
Specifies the price to be used for bearish divergence calculation. |
|
LPrice |
Specifies the price to be used for bullish divergence calculation. |
|
PlotTICK |
With this input set to true and Use_Close set to true, the TICK symbol is plotted with the DivOsc plot and the divergence dots are displayed on the DivOsc plot. With this input set to true and Use_Close set to false, the TICK symbol is plotted as a paint bar with the BearDivPrice and BullDivPrice plots and the divergence dots are displayed on the high/low of these paint bars. With this input set to true, the scaling for this indicator needs to be changed to either Right Axis, Left Axis or No Axis. This input set to false, hides the TICK symbol and displays the divergence dots on the price pivots. |
|
OVBOVS |
The Alchemy TICKDiverge indicator looks for bearish divergence when the TICK symbol is in overbought territory as determined by the OverB input and it looks for bullish divergence when the TICK symbol is in oversold territory as determined by the OverS input. This input enables or disables these overbought/oversold zones restrictions. |
|
OverS |
The Alchemy TICKDiverge indicator looks for bullish divergence when the TICK symbol is in oversold territory as determined by this input. |
|
OverB |
The Alchemy TICKDiverge indicator looks for bearish divergence when the TICK symbol is in overbought territory as determined by this input. |
|
Cycles |
When the Alchemy TICKDiverge indicator finds bearish divergence in overbought territory, the indicator requires for the TICK symbol to cycle back down into oversold territory as determined by the OverSCyc input, in order to qualify for the next bearish divergence in overbought territory. When the Alchemy TICKDiverge indicator finds bullish divergence in oversold territory, the indicator requires for the TICK symbol to cycle back up into overbought territory as determined by the OverBCyc input, in order to qualify for the next bullish divergence in oversold territory. This input enables or disables these overbought/oversold cycle restrictions. |
|
OverSCyc |
When the Alchemy TICKDiverge indicator finds bearish divergence in overbought territory, the indicator requires for the TICK symbol to cycle back down to oversold territory as determined by this input, in order to qualify for the next bearish divergence in overbought territory. |
|
OverBCyc |
When the Alchemy TICKDiverge indicator finds bullish divergence in oversold territory, the indicator requires for the TICK symbol to cycle back up into overbought territory as determined by this input, in order to qualify for the next bullish divergence in oversold territory. |
|
MinPos |
The Alchemy TICKDiverge indicator looks for bearish divergence when the TICK symbol reaches a minimum positive value as determined by this input. A negative setting disables this input. |
|
MinNeg |
The Alchemy TICKDiverge indicator looks for bullish divergence when the TICK symbol reaches a minimum negative value as determined by this input. A negative setting disables this input. |
|
TrailingBars |
Specifies the number of trailing bars to consider. |
|
MaxSwings |
Specifies the maximum number of swings to look back |
|
PivStrength |
Specifies the minimum number of bars on either side of a price pivot |
|
Occur |
A numeric expression representing which occurrence (that is, 1 = most recent, 2 = 2nd most recent, and so on). |
|
PlotVert |
Allows you to vertically adjust the divergence dots. A greater value will raise the bearish divergence dots and lower the bullish divergence dots. A smaller value will lower the bearish divergence dots and raise the bullish divergence dots. It is defaulted to 5 ticks. |
|
ShowText |
Enables/disables text objects.
|
|
TextVert |
Allows you to vertically adjust the displayed text for the bullish and the bearish divergence. A greater value will raise the displayed text for the bearish divergence and lower the displayed text for the bullish divergence. A smaller value will lower the displayed text for the bearish divergence and raise the displayed text for the bullish divergence. It is defaulted to 0 ticks. |
|
TextHor |
Allows you to horizontally adjust the displayed text for the bullish and the bearish divergence. Each increment will move the text one bar further to the left. It is defaulted to 2 bars. |
The Alchemy TICKHookDiverge Indicator
he Alchemy TickHookDivergence indicator looks for divergence between price of data 1 and the TICK symbol (or any other symbol) applied to data 2. Therefore, it is necessary to insert the TICK symbol (or any other symbol) with the same time frame and date range (as hidden subgraph) into your chart before applying our TICK Divergence indicat. The Alchemy TICKHookDivergence indicator plots the TICK that is inserted to the data number specified by the input DataSer. When the TICK hooks up, the Alchemy TICKHookDiverge indicator looks for bullish divergence between the current price/TICK pivot low and previous price/TICK pivot lows. When bullish divergence is found, the indicator places a cyan show me dot on the current TICK pivot low and a yellow show me dot on the corresponding previous TICK pivot low. When the TICK hooks down, the Alchemy TICKHookDiverge indicator looks for bearish divergence between the current price/TICK pivot high and previous price/TICK pivot highs. When bearish divergence is found, the indicator places a magenta show me dot on the current TICK pivot high and a yellow show me dot on the corresponding previous TICK pivot high.
Indicator Inputs:
|
DataSer |
Specifies the data series number to which the TICK symbol is applied to. |
|
Use_Close |
If set to true, it uses the close of the TICK to measure divergence with. Otherwise it uses the high of the bar for bearish divergence and the low of the bar for bullish divergence. |
|
PlotData2 |
Enables/disables the plotting of data 2 (TICK). |
|
MinHook |
This user-defined input adjusts the minimum slope distance requirement for a hook of the TICK. |
|
OverBought |
Enables/disables the overbought requirement in which to look for bearish divergence as well as the coloring changes of the TICK as specified in the OverBCol input when the TICK is in the overbought zone. |
|
OverBoughtZone |
Specifies a minimum required TICK overbought value in which to look for bearish divergence. |
|
OverSold |
Enables/disables the oversold requirement in which to look for bullish divergence as well as the coloring changes of the TICK as specified in the OverSCol input when the TICK is in the oversold zone. |
|
OverSoldZone |
Specifies a minimum required TICK oversold value in which to look for bullish divergence. |
|
CenterLine |
Specifies the centerline value. |
Divergence Inputs:
|
DivPrDi |
This user-defined input adjusts the minimum required distance for a double top/bottom. A negative number allows for the divergence price high/low to be shy of the previous price high/low by number of points. A positive number requires for the divergence price high/low to have penetrated the previous price high/low by number of points. |
|
DivOscDi |
This user-defined input adjusts the minimum required distance for the TICK to be higher than the previous TICK to qualify for bullish divergence and the minimum required distance for the TICK to be lower than the previous TICK to qualify for bearish divergence. |
|
OscLagLen |
This user-defined input adjusts the maximum number of bars for the TICK hook to lag price. |
|
MaxPivBack |
This user-defined input adjusts the maximum number of the TICK hook pivots to look back for divergence. |
|
MinDivLen |
This user-defined input adjusts the minimum number of bars between the previous high/low and the divergent high/low. |
|
MaxDivLen |
This user-defined input adjusts the maximum number of bars between the previous high/low and the divergent high/low. A setting of 0 disables a maximum number of bars requirement. |
Plotting Inputs:
|
DivVert |
Allows you to vertically adjust the divergence dots. A greater value will raise the bearish divergence dots and lower the bullish divergence dots. A smaller value will lower the bearish divergence dots and raise the bullish divergence dots. |
|
PivVert |
Allows you to vertically adjust the previous pivot dots. A greater value will raise the previous pivot dots that correspond to bearish divergence and lower the previous pivot dots that correspond to bullish divergence. A smaller value will lower the previous pivot dots that correspond to bearish divergence dots and raise the previous pivot dots that correspond to bullish divergence dots. |
|
PlotDiv |
Allows you to disable the divergence dots. A setting of "true" enables the divergence dots and a setting of "false" disables the divergence dots. |
|
PlotPiv |
Allows you to disable the previous pivot dots. A setting of "true" enables the previous pivot dots and a setting of "false" disables the previous pivot dots. |
|
PlotHook |
Enables/disables the coloring changes of the TICK when a divergence hook occurs. |
|
PlotCenterLine |
Enables/disables the centerline. |
|
BearDivCol |
Allows you to set the plot color for the bearish divergence dots. |
|
BearPivCol |
Allows you to set the plot color for the previous pivot dots that correspond to bearish divergence. |
|
BullDivCol |
Allows you to set the plot color for the bullish divergence dots. |
|
BullPivCol |
Allows you to set the plot color for the previous pivot dots that correspond to bullish divergence. |
|
HookCol |
Allows you to set the plot color for hooks. |
|
OverBCol |
Specifies the color of the TICK when it is in the overbought zone. |
|
OverSCol |
Specifies the color of the TICK when it is in the oversold zone. |
The rest of the inputs are advanced inputs and they are not designed to be changed.
The Alchemy CustomDiv Indicator
User Defined Inputs:
|
DataSer |
With this input, the indicator can look for divergence between data series 1 and any other data series applied on the same chart. This input specifies the data series number to use for divergence calculation. For example, with a setting of 2, the indicator looks for divergence between data series 1 and data series 2. With a setting of 1, the indicator detects divergence between price and the indicator specified in the input Osc. |
|
Use_Close |
This input works in conjunction with DataSer set higher than 1. With Use_Close set to true, pivot highs and pivot lows of the second data series are based on the closing price, whereas with Use_Close set to false, pivot highs of the second data series are based on the high of the bar and pivot lows of the second data series are based on the low of the bar. |
|
Osc |
Specifies the indicator to be used for divergence and any available function in the dictionary can be pasted into this input. |
|
OscName |
Specifies the name of the divergence indicator that will be displayed in the divergence text. |
|
DivFact |
This user-defined input adjusts the divergence sensitivity. A smaller number increases the indicators divergence sensitivity, therefore, displaying divergence for smaller pivots. A larger number decreases the indicators divergence sensitivity, therefore, displaying divergence for stronger pivots. |
|
ReverseDiv |
Enables reverse divergence calculation (lower price high/higher indicator high - higher price low/lower indicator low). |
|
OVBOVS |
The Alchemy CustomDiv indicator looks for bearish divergence when the indicator is in overbought territory as determined by the OverB input and it looks for bullish divergence when the indicator is in oversold territory as determined by the OverS input. This input enables or disables these overbought/oversold zones restrictions. |
|
OverS |
The Alchemy CustomDiv indicator looks for bullish divergence when the indicator is in oversold territory as determined by this input. |
|
OverB |
The Alchemy CustomDiv indicator looks for bearish divergence when the indicator is in overbought territory as determined by this input. |
|
Cycles |
When the Alchemy CustomDiv indicator finds bearish divergence in overbought territory, the indicator is required to cycle back down into oversold territory as determined by the OverSCyc input, in order to qualify for the next bearish divergence in overbought territory. When the Alchemy CustomDiv indicator finds bullish divergence in oversold territory, the indicator is required to cycle back up into overbought territory as determined by the OverBCyc input, in order to qualify for the next bullish divergence in oversold territory. This input enables or disables these overbought/oversold cycle restrictions. |
|
OverSCyc |
When the Alchemy CustomDiv indicator finds bearish divergence in overbought territory, the indicator is required to cycle back down to oversold territory as determined by this input, in order to qualify for the next bearish divergence in overbought territory. |
|
OverBCyc |
When the Alchemy CustomDiv indicator finds bullish divergence in oversold territory, the indicator is required to cycle back up into overbought territory as determined by this input, in order to qualify for the next bullish divergence in oversold territory. |
|
MinPos |
The Alchemy CustomDiv indicator looks for bearish divergence when the indicator reaches a minimum positive value as determined by this input. A negative setting disables this input. |
|
MinNeg |
The Alchemy CustomDiv indicator looks for bullish divergence when the indicator reaches a minimum negative value as determined by this input. A negative setting disables this input. |
|
BullAlrt |
Allows you to disable the alert for bullish divergence. |
|
BearAlrt |
Allows you to disable the alert for bearish divergence. |
|
ShowPlot |
Allows you to disable the divergence dots. |
|
PlotVert |
Allows you to vertically adjust the divergence dots. A greater value will raise the bearish divergence dots and lower the bullish divergence dots. |
|
ShowText |
Allows you to disable the divergence text. |
|
TextVert |
Allows you to vertically adjust the displayed text for the bullish and the bearish divergence. A greater value will raise the displayed text for the bearish divergence and lower the displayed text for the bullish divergence. A smaller value will lower the displayed text for the bearish divergence and raise the displayed text for the bullish divergence. |
|
TextHor |
Allows you to horizontally adjust the displayed text for the bullish and the bearish divergence. Each increment will move the text one bar further to the left. |
|
MaxSwg |
Specifies the maximum number of swings stored. |
|
Strength |
Specifies the pivot strength of each swing |
|
MaxLength |
Specifies the maximum number of swings back over which the indicator looks for divergence. |
|
BearPrice |
Specifies the high price to be used for bearish divergence. For example, this input can be set to high or close or even an oscillator such as SlowD(14), in order to look for divergence between 2 oscillators. |
|
BullPrice |
Specifies the low price to be used for bullish divergence. For example, this input can be set to low or close or even an oscillator such as SlowD(14), in order to look for divergence between 2 oscillators. |
|
PlotOscillator |
With this input set to true, Use_Close set to true and DataSer greater than 1, the second data series symbol is plotted with the DivOsc plot and the divergence dots are displayed on the DivOsc plot. With this input set to true, Use_Close set to false and DataSer greater than 1, the second data series symbol is plotted as a paint bar with the BearDivPrice and BullDivPrice plots and the divergence dots are displayed on the high/low of these paint bars. With this input set to true, the scaling for this indicator needs to be changed to either Right Axis, Left Axis or No Axis. With this input set to false or DataSer smaller than 1, it hides the second data series symbol and displays the divergence dots on the price pivots. |
|
AlchemyBearishDiverg function searches for and finds occurrences of highs in prices (i.e., High, Close, etc.) not accompanied by highs in an oscillator (i.e., RSI, Percent R, SlowD). If the criteria of the Bearish Divergence function is met, a +1 will be returned; if it has not been met, a 0 will be returned. |
|
|
AlchemyBullishDiverg function searches for and finds occurrences of lows in prices (i.e., Low, Close, etc.) not accompanied by lows in an oscillator (i.e., RSI, Percent R, SlowD). If the criteria of the Bullish Divergence function is met, a +1 will be returned; if it has not been met, a 0 will be returned. |
|
|
AlchemyDivergence function searches for and finds divergence. It returns +1 for bullish divergence, -1 for bearish divergence, otherwise it returns 0. |
|
|
AlchemyRSI returns the Relative Strength index as defined by Welles Wider. |
|
|
AlchemyMACD returns the difference between a fast and slow exponential or simple moving average based on the same Price, using either number of trailing bars or a smoothing factor percent |
|
|
The Stochastic oscillators indicate overbought and oversold areas in the market, based upon momentum or price velocity. AlchemyStochastics returns the values for the Stochastics line. |
The Alchemy CustomHookDiverge Indicator
The Alchemy CustomHookDivergence indicator plots the indicator specified under the “Osc” input. When the Osc hooks up, the Alchemy CustomHookDiverge indicator looks for bullish divergence between the current price/Osc pivot low and previous price/Osc pivot lows. When bullish divergence is found, the indicator places a cyan show me dot on the current Osc pivot low and a yellow show me dot on the corresponding previous Osc pivot low. When the Osc hooks down, the Alchemy CustomHookDiverge indicator looks for bearish divergence between the current price/Osc pivot high and previous price/Osc pivot highs. When bearish divergence is found, the indicator places a magenta show me dot on the current Osc pivot high and a yellow show me dot on the corresponding previous Osc pivot high.
Indicator Inputs:
|
DataSer |
With this input, the indicator can look for divergence between data series 1 and any other data series applied on the same chart. This input specifies the data series number to use for divergence calculation. For example, with a setting of 2, the indicator looks for divergence between data series 1 and data series 2. With a setting of 1, the indicator detects divergence between price and the indicator specified in the input Oscillator. |
|
Use_Close |
This input works in conjunction with DataSer set higher than 1. With Use_Close set to true, pivot highs and pivot lows of the second data series are based on the closing price, whereas with Use_Close set to false, pivot highs of the second data series are based on the high of the bar and pivot lows of the second data series are based on the low of the bar. |
|
PriceHigh |
Specifies the high price to be used for bearish divergence. For example, this input can be set to high or close or even an oscillator such as SlowD(14), in order to look for divergence between 2 oscillators. |
|
PriceLow |
Specifies the low price to be used for bullish divergence. For example, this input can be set to low or close or even an oscillator such as SlowD(14), in order to look for divergence between 2 oscillators. |
|
Oscillator |
Specifies the indicator to be used for divergence and any available function in the dictionary can be pasted into this input. |
|
MinHook |
This user-defined input adjusts the minimum slope distance requirement for a hook of the specified indicator. |
|
OverBought |
Enables/disables the overbought requirement in which to look for bearish divergence as well as the coloring changes of the specified indicator as specified in the OverBCol input when the specified indicator is in the overbought zone. |
|
OverBoughtZone |
Specifies a minimum required specified indicator overbought value in which to look for bearish divergence. |
|
OverSold |
Enables/disables the oversold requirement in which to look for bullish divergence as well as the coloring changes of the specified indicator as specified in the OverSCol input when the TICK is in the oversold zone. |
|
OverSoldZone |
Specifies a minimum required specified indicator oversold value in which to look for bullish divergence. |
|
CenterLine |
Specifies the centerline value. |
Divergence Inputs:
|
DivPrDi |
This user-defined input adjusts the minimum required distance for a double top/bottom. A negative number allows for the divergence price high/low to be shy of the previous price high/low by number of points. A positive number requires for the divergence price high/low to have penetrated the previous price high/low by number of points. |
|
DivOscDi |
This user-defined input adjusts the minimum required distance for the specified indicator to be higher than the previous specified indicator to qualify for bullish divergence and the minimum required distance for the specified indicator to be lower than the previous specified indicator to qualify for bearish divergence. |
|
OscLagLen |
This user-defined input adjusts the maximum number of bars for the specified indicator hook to lag price. |
|
MaxPivBack |
This user-defined input adjusts the maximum number of the specified indicator hook pivots to look back for divergence. |
|
MinDivLen |
This user-defined input adjusts the minimum number of bars between the previous high/low and the divergent high/low. |
|
MaxDivLen |
This user-defined input adjusts the maximum number of bars between the previous high/low and the divergent high/low. A setting of 0 disables a maximum number of bars requirement. |
Plotting Inputs:
|
DivVert |
Allows you to vertically adjust the divergence dots. A greater value will raise the bearish divergence dots and lower the bullish divergence dots. A smaller value will lower the bearish divergence dots and raise the bullish divergence dots. |
|
PivVert |
Allows you to vertically adjust the previous pivot dots. A greater value will raise the previous pivot dots that correspond to bearish divergence and lower the previous pivot dots that correspond to bullish divergence. A smaller value will lower the previous pivot dots that correspond to bearish divergence dots and raise the previous pivot dots that correspond to bullish divergence dots. |
|
PlotDiv |
Allows you to disable the divergence dots. A setting of "true" enables the divergence dots and a setting of "false" disables the divergence dots. |
|
PlotPiv |
Allows you to disable the previous pivot dots. A setting of "true" enables the previous pivot dots and a setting of "false" disables the previous pivot dots. |
|
PlotHook |
Enables/disables the coloring changes of the specified indicator when a divergence hook occurs. |
|
PlotCenterLine |
Enables/disables the centerline. |
|
BearDivCol |
Allows you to set the plot color for the bearish divergence dots. |
|
BearPivCol |
Allows you to set the plot color for the previous pivot dots that correspond to bearish divergence. |
|
BullDivCol |
Allows you to set the plot color for the bullish divergence dots. |
|
BullPivCol |
Allows you to set the plot color for the previous pivot dots that correspond to bullish divergence. |
|
HookCol |
Allows you to set the plot color for hooks. |
|
OverBCol |
Specifies the color of the specified indicator when it is in the overbought zone. |
|
OverSCol |
Specifies the color of the specified indicator when it is in the oversold zone. |
The rest of the inputs are advanced inputs and they are not designed to be changed.
The Alchemy Universal Divergence Indicator (Alchemy UniverDiverg)
The Alchemy Universal Divergence indicator can be used to detect divergence as follows:
Divergence between price and any specified oscillator
Divergence between 2 different price series
Divergence between 2 specified oscillators
Here are some other features of this indicator:
Divergence can be specified as regular divergence, opposite divergence or reverse divergence.
The divergence can be displayed as show me dots above/below price or it can be plotted as oscillator with its corresponding divergence dots.
Either, divergence pivot and previous pivot that the divergence is measured from can be displayed and the indicator can connect the 2 price pivots with trend lines.
Please see indicator inputs below for a more detailed description:
Indicator Inputs:
|
ReverseDivergence |
A setting of false uses regular divergence as defined as follows: Bearish Divergence: Higher prices and lower oscillator - Bullish Divergence: Lower prices and higher oscillator
A setting of true uses reverse divergence as defined as follows: Bearish Divergence: Lower prices and higher oscillator - Bullish Divergence: Higher prices and lower oscillator |
|
MinimumBars |
Specifies the minimum number of required bars in between 2 price pivots. |
|
MaximumBars |
Specifies the maximum number of allowed bars in between 2 price pivots, whereas a setting of 0 disables this requirement. |
|
MaximumPivotsBack |
Specifies the maximum number of price pivots for the indicator to look back for divergence. |
|
BearPrice |
Specifies the price to be used for bearish divergence. This can be specified as high in order to look for bearish divergence between price highs and an oscillator as specified with the input BearOsc or it can be specified as an oscillator function to be pasted in from the EasyLanguage dictionary for bearish divergence between this oscillator and a second oscillator as specified with the input BearOsc. |
|
BullPrice |
Specifies the price to be used for bullish divergence. This can be specified as low in order to look for bearish divergence between price lows and an oscillator as specified with the input BullOsc or it can be specified as an oscillator function to be pasted in from the EasyLanguage dictionary for bullish divergence between this oscillator and a second oscillator as specified with the input BullOsc. |
|
MinBearPriceDifference |
Specifies the minimum required point/dollar price difference between two bearish price pivots. This can also be a negative value in order to qualify for divergence even if the second price pivot is shy by this specified distance from the first price pivot. For example, with a setting of 1, the second price pivot has to be at least 1 point higher from the first price pivot in order to qualify for bearish divergence and with a setting of -1, the second price pivot can be as much as 1 point lower than the first price pivot in order to still qualify for bearish divergence. |
|
MinBullPriceDifference |
Specifies the minimum required point/dollar price difference between two bullish price pivots. This can also be a negative value in order to qualify for divergence even if the second price pivot is shy by this specified distance from the first price pivot. For example, with a setting of 1, the second price pivot has to be at least 1 point lower from the first price pivot in order to qualify for bullish divergence and with a setting of -1, the second price pivot can be as much as 1 point higher than the first price pivot in order to still qualify for bullish divergence. |
|
PivotLeftStrength |
Specifies the minimum required number of bars with lower lows to the left of a pivot high or the minimum required number of bars with higher highs to the left of a pivot low in order to qualify as a previous pivot to compare for divergence. The current price for detecting divergence does not need to be an actual pivot. |
|
PivotRightStrength |
Specifies the minimum required number of bars with lower lows to the right of a pivot high or the minimum required number of bars with higher highs to the right of a pivot low in order to qualify as a previous pivot to compare for divergence. The current price for detecting divergence does not need to be an actual pivot. |
|
PivotMaxEqualBars |
Specifies the maximum number of allowed bars with equal higher highs in order to still qualify as one previous pivot high to compare for divergence or the maximum number of allowed bars with equal lows in order to still qualify as one previous pivot low to compare for divergence The current price for detecting divergence does not need to be an actual pivot. |
|
PivotUnEqualBars |
Specifies the maximum number of allowed bars with lower highs in between 2 equal highs in order to still qualify as one previous pivot high to compare for divergence or the maximum number of allowed bars with higher lows in between 2 equal lows in order to still qualify as one previous pivot low to compare for divergence The current price for detecting divergence does not need to be an actual pivot. |
|
BearOsc |
Specifies the oscillator to be used for bearish divergence. This can be specified an oscillator function to be pasted in from the EasyLanguage dictionary or a second data series price data such as high of data(2). |
|
BullOsc |
Specifies the oscillator to be used for bullish divergence. This can be specified an oscillator function to be pasted in from the EasyLanguage dictionary or a second data series price data such as low of data(2). |
|
MinimumBearOscHook |
Specifies the minimum oscillator hook that is required to look for bearish divergence, whereas with a setting of 0 the oscillator needs to be hooking down by more than just 0. A bearish hook always creates a peak and the minimum hook distance is specified in the value difference between the peak value and the oscillator value as it slopes down. Once a down hook is formed, the indicator looks for divergence back to previous pivots. With a negative setting, the oscillator does not need to hook and the indicator constantly compares price as specified with the input BearPrice and the current oscillator value with previous pivots and their oscillator values. |
|
MinimumBullOscHook |
Specifies the minimum oscillator hook that is required to look for bullish divergence, whereas with a setting of 0 the oscillator needs to be hooking up by more than just 0. A bullish hook always creates a trough and the minimum hook distance is specified in the value difference between the trough value and the oscillator value as it slopes up. Once an up hook is formed, the indicator looks for divergence back to previous pivots. With a negative setting, the oscillator does not need to hook and the indicator constantly compares price as specified with the input BullPrice and the current oscillator value with previous pivots and their oscillator values. |
|
BearOscLeadingBars |
Specifies the maximum number of bars that the bearish oscillator is expected to form a pivot before price does in order to find the corresponding price/oscillator pivots for detecting bearish divergence. |
|
BearOscLaggingBars |
Specifies the maximum number of bars that the bearish oscillator is expected to form a pivot after price does in order to find the corresponding price/oscillator pivots for detecting bearish divergence. |
|
BullOscLeadingBars |
Specifies the maximum number of bars that the bullish oscillator is expected to form a pivot before price does in order to find the corresponding price/oscillator pivots for detecting bullish divergence. |
|
BullOscLaggingBars |
Specifies the maximum number of bars that the bullish oscillator is expected to form a pivot after price does in order to find the corresponding price/oscillator pivots for detecting bullish divergence. |
|
OppositeBearishOscillator |
A setting of true uses opposite bearish divergence as defined as follows: Regular opposite bearish divergence: Higher prices and higher oscillator Reverse opposite bearish divergence: Lower prices and lower oscillator |
|
OppositeBullishOscillator |
A setting of true uses opposite bullish divergence as defined as follows: Regular opposite bullish divergence: Lower prices and lower oscillator Reverse opposite bullish divergence: Higher prices and higher oscillator |
|
UseBearishThreshold1 |
Enables/disables the requirement of the first bearish oscillator pivot to be beyond a threshold as specified with the input BearishThreshold1. |
|
UseBearishThreshold2 |
Enables/disables the requirement of the second bearish oscillator pivot to be beyond a threshold as specified with the input BearishThreshold2. |
|
UseBullishThreshold1 |
Enables/disables the requirement of the first bullish oscillator pivot to be beyond a threshold as specified with the input BullishThreshold1. |
|
UseBullishThreshold2 |
Enables/disables the requirement of the second bullish oscillator pivot to be beyond a threshold as specified with the input BullishThreshold2. |
|
BearishThreshold1 |
Specifies the threshold for the first bearish oscillator pivot. |
|
BearishThreshold2 |
Specifies the threshold for the second bearish oscillator pivot. |
|
BullishThreshold1 |
Specifies the threshold for the first bullish oscillator pivot. |
|
BullishThreshold2 |
Specifies the threshold for the second bullish oscillator pivot. |
|
MinBearOscDivergence |
Specifies the minimum required bearish oscillator value difference between two bearish oscillator pivots. This can also be a negative value in order to qualify for divergence even if the second bearish oscillator price still exceeds the first bearish oscillator pivot by this specified distance. For example, if the bearish oscillator is a Stochastic and with a setting of 10, the second bearish oscillator pivot has to be lower by at least 10 from the first bearish oscillator pivot in order to qualify for bearish divergence and with a setting of -10, the second bearish oscillator pivot can still be higher than 10 points from the first bearish oscillator pivot in order to still qualify for bearish divergence. |
|
MinBullOscDivergence |
Specifies the minimum required bullish oscillator value difference between two bullish oscillator pivots. This can also be a negative value in order to qualify for divergence even if the second bullish oscillator price is still lower than first bullish oscillator pivot by this specified distance. For example, if the bullish oscillator is a Stochastic and with a setting of 10, the second bullish oscillator pivot has to be higher by at least 10 from the first bullish oscillator pivot in order to qualify for bullish divergence and with a setting of -10, the second bullish oscillator pivot can still be lower than 10 points from the first bullish oscillator pivot in order to still qualify for bearish divergence. |
|
TestForBearOscPeakTrough |
With a setting of true, the first bearish oscillator pivot has to be the highest pivot for regular bearish divergence and the first bearish oscillator pivot has to be the lowest pivot for regular opposite bearish divergence. This avoids detecting bearish divergence if there is a higher bearish oscillator pivot in between two oscillator pivots. |
|
TestForBullOscPeakTrough |
With a setting of true, the first bullish oscillator pivot has to be the lowest pivot for regular bullish divergence and the first bullish oscillator pivot has to be the highest pivot for regular opposite bullish divergence. This avoids detecting bullish divergence if there is a lower bullish oscillator pivot in between the two oscillator pivots. |
|
BullAlrt |
Enables/disables the alert when bullish divergence is detected. |
|
BearAlrt |
Enables/disables the alert when bearish divergence is detected. |
|
DivergencePlot |
Enables/disables the divergence show me dots, BullDiv and BearDiv |
|
DivergencePlotOffset |
Specifies the point distance to offset the divergence show me dots from their corresponding BearPrice and BullPrice |
|
Pivot1Plot |
Enables/disables the pivot 1 show me dots, BullPivot1 and BearPivot1. Pivot 1 is the previous pivot that the divergence is compared to. |
|
Pivot1PlotOffset |
Specifies the point distance to offset the pivot 1 show me dots from their corresponding BearPrice and BullPrice |
|
ShowText |
Enables/disables the divergence text that is displayed for the most recent divergence found. When the indicator is plotted as oscillator, this text is automatically disabled. |
|
Divergence text inputs: |
In order to completely customize the text objects, we broke them out into 3 separate components to be specified with separate inputs as follows: Bearish divergence text objects: BearishText + BearOscName + DivergenceText/ReverseDivergenceText Bullish divergence text objects: BullishText + BullOscName + DivergenceText/ReverseDivergenceText For example, with the input settings of BearishText as "Bearish ", BearOscName as "MACD" and DivergenceText as " Divergence", the bearish divergence text object would display as Bearish MACD Divergence. Please note that these inputs are string inputs which always need to be bracketed by quotation marks. |
|
TextVert |
Specifies the point distance to offset the divergence text from their corresponding BearPrice and BullPrice up or down. |
|
TextHor |
Specifies the bar distance to offset the divergence text to the left of their corresponding BearPrice and BullPrice bars. |
|
ShowTL |
Enables/disables the trendline that connects both price pivots in order to see where the corresponding divergence points are. When the indicator is plotted as oscillator, this trendline is automatically disabled. |
|
TL_Size |
Specifies the trend line size. Please note that the trend line size can be increased only for solid trend lines. |
|
TL_Style |
Specifies the trend line style. The options are as follows: tool_solid or 1, tool_dashed or 2, tool_dotted or 3, tool_dashed2 or 4, tool_dashed3 or 5 |
|
PlotBearOscillator |
Enables/disables the bearish oscillator plot, BearOsc. With this plot enabled, the bearish divergence and bearish pivot 1 dots are placed directly on the bearish oscillator instead of the BearPrice. |
|
PlotBullOscillator |
Enables/disables the bullish oscillator plot, BullOsc. With this plot enabled, the bullish divergence and bullish pivot 1 dots are placed directly on the bullish oscillator instead of the BullPrice. |
|
PlotBearThreshold1 |
Enables/disables the threshold line for the first bearish oscillator pivot threshold as specified with the input BearishThreshold1. This threshold line can only be plotted with PlotBearOscillator set to true. The name of this plot is BearThresh1. |
|
PlotBearThreshold2 |
Enables/disables the threshold line for the second bearish oscillator pivot threshold as specified with the input BearishThreshold2. This threshold line can only be plotted with PlotBearOscillator set to true. The name of this plot is BearThresh2. |
|
PlotBullThreshold1 |
Enables/disables the threshold line for the first bullish oscillator pivot threshold as specified with the input BullishThreshold1. This threshold line can only be plotted with PlotBullOscillator set to true. The name of this plot is BullThresh1. |
|
PlotBullThreshold2 |
Enables/disables the threshold line for the second bullish oscillator pivot threshold as specified with the input BullishThreshold2. This threshold line can only be plotted with PlotBullOscillator set to true. The name of this plot is BullThresh2. |
Alchemy Function used for this indicator: (for function definitions, click on the corresponding function):
|
AlchemyDivergeUniver is a multiple-output function that provides the calculation of bearish and bullish divergence of the Alchemy UniverDiverg indicator. |
The Alchemy Ultimate Divergence Indicators
The Alchemy Ultimate Divergence Charting Indicator (Alchemy UltimateDivg)
The Alchemy Ultimate Divergence charting indicator can be used to detect divergence as follows:
Divergence between price and any specified oscillator
Divergence between 2 different price series
Divergence between 2 specified oscillators
Here are some other features of this indicator:
Divergence can be specified as regular divergence, opposite divergence or reverse divergence.
The divergence can be displayed as show me dots above/below price or it can be plotted as oscillator with its corresponding divergence dots.
Either, divergence pivot and previous pivot that the divergence is measured from can be displayed and the indicator can connect the 2 price pivots with trend lines.
The Alchemy Ultimate Divergence RadarScreen Indicator (Alchemy UltDivergeRS)
The Alchemy Ultimate Divergence RadarScreen indicator contains the same features as the charting indicator above but it is designed to be used in RadarScreen or Scanner.
Please see indicator inputs below for a more detailed description:
Charting and RadarScreen Indicator Inputs:
Specified Price and Oscillators:
|
BearPrice_SpecPrice |
Specifies the price to be used for bearish divergence. This can be specified as high in order to look for bearish divergence between price highs and the specified oscillator or it can be specified as an oscillator function to be pasted in from the EasyLanguage dictionary for bearish divergence between this oscillator and the second oscillator. In order to utilize this input the predefined bearish price type in the input BearPrice_PriceType needs to be set to 0. |
|
BullPrice_SpecPrice |
Specifies the price to be used for bullish divergence. This can be specified as low in order to look for bullish divergence between price lows and the specified oscillator or it can be specified as an oscillator function to be pasted in from the EasyLanguage dictionary for bullish divergence between this oscillator and the second oscillator. In order to utilize this input the predefined bullish price type in the input BullPrice_PriceType needs to be set to 0. |
|
BearOsc_SpecPrice |
Specifies the oscillator to be used for bearish divergence. This can be specified as an oscillator function to be pasted in from the EasyLanguage dictionary or as a second data series price data such as high of data(2). In order to utilize this input the predefined bearish oscillator type in the input BearOsc_PriceType needs to be set to 0. |
|
BullOsc_SpecPrice |
Specifies the oscillator to be used for bullish divergence. This can be specified as an oscillator function to be pasted in from the EasyLanguage dictionary or as a second data series price data such as low of data(2). In order to utilize this input the predefined bullish oscillator type in the input BullOsc_PriceType needs to be set to 0. |
Predefined Price and Oscillators:
Bearish Price:
|
BearPrice_PriceType |
Specifies the predefined price to be used for bearish divergence. A setting of 0 uses price as specified with the input BearPrice_SpecPrice, a setting of -1 uses the open, a setting of -2 uses the high, a setting of -3 uses the low, a setting of -4 uses the close, a setting of -5 uses the volume, a setting of -6 uses the sum of down and up ticks, a setting of -7 uses upticks, a setting of -8 uses downticks, a setting of 1 uses the Stochastic FastK, a setting of 2 uses the Stochastic FastD, a setting of 3 uses the Stochastic SlowK, a setting of 4 uses the Stochastic SlowD, a setting of 5 uses the RSI, a setting of 6 uses the MACD and a setting of 7 uses the CCI. |
|
BearPrice_DataSeriesNum |
Specifies the data series number to be used for the predefined price types -1 through -8 as specified with the input BearPrice_PriceType. |
|
BearPrice_OscPrice |
Specifies the price to be used for the predefined oscillator types 5 through 7 as specified with the input BearPrice_PriceType. |
|
BearPrice_OscLength1 |
Specifies the first length for the predefined oscillator types 1 through 7 as specified with the input BearPrice_PriceType. Please see length examples below. |
|
BearPrice_OscLength2 |
Specifies the second length for the predefined oscillator types 1 through 7 as specified with the input BearPrice_PriceType. Please see length examples below. |
|
BearPrice_OscLength3 |
Specifies the third length for the predefined oscillator types 1 through 7 as specified with the input BearPrice_PriceType. Please see length examples below. |
|
BearPrice_AvgLength |
Specifies the average length for the predefined oscillator types 1 through 7 as specified with the input BearPrice_PriceType. Please see length examples below. |
|
BearPrice_AvgType |
Specifies the average type for the predefined oscillator types 1 through 7 as specified with the input BearPrice_PriceType. A setting of 1 uses a simple moving average, a setting of 2 uses an exponential moving average, a setting of 3 uses a weighted moving average, a setting o 4 uses a triangular moving average, a setting of 5 uses a Mid Keltner and a setting of 6 uses a Hull moving average. |
Bullish Price:
|
BullPrice_PriceType |
Specifies the predefined price to be used for bullish divergence. A setting of 0 uses price as specified with the input BullPrice_SpecPrice, a setting of -1 uses the open, a setting of -2 uses the high, a setting of -3 uses the low, a setting of -4 uses the close, a setting of -5 uses the volume, a setting of -6 uses the sum of down and up ticks, a setting of -7 uses upticks, a setting of -8 uses downticks, a setting of 1 uses the Stochastic FastK, a setting of 2 uses the Stochastic FastD, a setting of 3 uses the Stochastic SlowK, a setting of 4 uses the Stochastic SlowD, a setting of 5 uses the RSI, a setting of 6 uses the MACD and a setting of 7 uses the CCI. |
|
BullPrice_DataSeriesNum |
Specifies the data series number to be used for the predefined price types -1 through -8 as specified with the input BullPrice_PriceType. |
|
BullPrice_OscPrice |
Specifies the price to be used for the predefined oscillator types 5 through 7 as specified with the input BullPrice_PriceType. |
|
BullPrice_OscLength1 |
Specifies the first length for the predefined oscillator types 1 through 7 as specified with the input BullPrice_PriceType. Please see length examples below. |
|
BullPrice_OscLength2 |
Specifies the second length for the predefined oscillator types 1 through 7 as specified with the input BullPrice_PriceType. Please see length examples below. |
|
BullPrice_OscLength3 |
Specifies the third length for the predefined oscillator types 1 through 7 as specified with the input BullPrice_PriceType. Please see length examples below. |
|
BullPrice_AvgLength |
Specifies the average length for the predefined oscillator types 1 through 7 as specified with the input BullPrice_PriceType. Please see length examples below. |
|
BullPrice_AvgType |
Specifies the average type for the predefined oscillator types 1 through 7 as specified with the input BullPrice_PriceType. A setting of 1 uses a simple moving average, a setting of 2 uses an exponential moving average, a setting of 3 uses a weighted moving average, a setting o 4 uses a triangular moving average, a setting of 5 uses a Mid Keltner and a setting of 6 uses a Hull moving average. |
Bearish Oscillator:
|
BearOsc_PriceType |
Specifies the predefined oscillator to be used for bearish divergence. A setting of 0 uses the oscillator as specified with the input BearOsc_SpecPrice, a setting of -1 uses the open, a setting of -2 uses the high, a setting of -3 uses the low, a setting of -4 uses the close, a setting of -5 uses the volume, a setting of -6 uses the sum of down and up ticks, a setting of -7 uses upticks, a setting of -8 uses downticks, a setting of 1 uses the Stochastic FastK, a setting of 2 uses the Stochastic FastD, a setting of 3 uses the Stochastic SlowK, a setting of 4 uses the Stochastic SlowD, a setting of 5 uses the RSI, a setting of 6 uses the MACD and a setting of 7 uses the CCI. |
|
BearOsc_DataSeriesNum |
Specifies the data series number to be used for the predefined price types -1 through -8 as specified with the input BearOsc_PriceType. |
|
BearOsc_OscPrice |
Specifies the price to be used for the predefined oscillator types 5 through 7 as specified with the input BearOsc_PriceType. |
|
BearOsc_OscLength1 |
Specifies the first length for the predefined oscillator types 1 through 7 as specified with the input BearOsc_PriceType. Please see length examples below. |
|
BearOsc_OscLength2 |
Specifies the second length for the predefined oscillator types 1 through 7 as specified with the input BearOsc_PriceType. Please see length examples below. |
|
BearOsc_OscLength3 |
Specifies the third length for the predefined oscillator types 1 through 7 as specified with the input BearOsc_PriceType. Please see length examples below. |
|
BearOsc_AvgLength |
Specifies the average length for the predefined oscillator types 1 through 7 as specified with the input BearOsc_PriceType. Please see length examples below. |
|
BearOsc_AvgType |
Specifies the average type for the predefined oscillator types 1 through 7 as specified with the input BearOsc_PriceType. A setting of 1 uses a simple moving average, a setting of 2 uses an exponential moving average, a setting of 3 uses a weighted moving average, a setting o 4 uses a triangular moving average, a setting of 5 uses a Mid Keltner and a setting of 6 uses a Hull moving average. |
Bullish Oscillator:
|
BullOsc_PriceType |
Specifies the predefined oscillator to be used for bullish divergence. A setting of 0 uses the oscillator as specified with the input BullOsc_SpecPrice, a setting of -1 uses the open, a setting of -2 uses the high, a setting of -3 uses the low, a setting of -4 uses the close, a setting of -5 uses the volume, a setting of -6 uses the sum of down and up ticks, a setting of -7 uses upticks, a setting of -8 uses downticks, a setting of 1 uses the Stochastic FastK, a setting of 2 uses the Stochastic FastD, a setting of 3 uses the Stochastic SlowK, a setting of 4 uses the Stochastic SlowD, a setting of 5 uses the RSI, a setting of 6 uses the MACD and a setting of 7 uses the CCI. |
|
BullOsc_DataSeriesNum |
Specifies the data series number to be used for the predefined price types -1 through -8 as specified with the input BullOsc_PriceType. |
|
BullOsc_OscPrice |
Specifies the price to be used for the predefined oscillator types 5 through 7 as specified with the input BullOsc_PriceType. |
|
BullOsc_OscLength1 |
Specifies the first length for the predefined oscillator types 1 through 7 as specified with the input BullOsc_PriceType. Please see length examples below. |
|
BullOsc_OscLength2 |
Specifies the second length for the predefined oscillator types 1 through 7 as specified with the input BullOsc_PriceType. Please see length examples below. |
|
BullOsc_OscLength3 |
Specifies the third length for the predefined oscillator types 1 through 7 as specified with the input BullOsc_PriceType. Please see length examples below. |
|
BullOsc_AvgLength |
Specifies the average length for the predefined oscillator types 1 through 7 as specified with the input BullOsc_PriceType. Please see length examples below. |
|
BullOsc_AvgType |
Specifies the average type for the predefined oscillator types 1 through 7 as specified with the input BullOsc_PriceType. A setting of 1 uses a simple moving average, a setting of 2 uses an exponential moving average, a setting of 3 uses a weighted moving average, a setting o 4 uses a triangular moving average, a setting of 5 uses a Mid Keltner and a setting of 6 uses a Hull moving average. |
Stochastic Slow: StochLength (14), SmoothingLength1 (3), SmoothingLength2 (3)
Length1=14, Length2=3, Length3 =3,
Price Type 1 uses FastK, Price Type 2 uses FastD, Price Type 3 uses SlowK, Price Type 4 uses SlowD
Price Type 5:
RSI: Length (14)
Length1=14
Price Type 6:
MACD: FastLength (12), SlowLength (26), MACDLength (9)
Length1=12, Length2=26, AvgLength=0 or AvgType=0 uses MACD
AvgLength=9, AvgType=2 (exponential) uses MACD average
Price Type 7:
CCI: CCILength (14), CCIAvgLength (9)
Length1=14, AvgLength=0 or AvgType=0 uses CCI
Length1=14, AvgLength=9, AvgType=1 uses CCI average
Divergence:
|
ReverseDivergence |
A setting of false uses regular divergence as defined as follows: Bearish Divergence: Higher prices and lower oscillator - Bullish Divergence: Lower prices and higher oscillator
A setting of true uses reverse divergence as defined as follows: Bearish Divergence: Lower prices and higher oscillator - Bullish Divergence: Higher prices and lower oscillator |
|
MinimumBars |
Specifies the minimum number of required bars in between 2 price pivots. |
|
MaximumBars |
Specifies the maximum number of allowed bars in between 2 price pivots, whereas a setting of 0 disables this requirement. |
|
MaximumPivotsBack |
Specifies the maximum number of price pivots for the indicator to look back for divergence. |
|
MinBearPriceDifference |
Specifies the minimum required point/dollar price difference between two bearish price pivots. This can also be a negative value in order to qualify for divergence even if the second price pivot is shy by this specified distance from the first price pivot. For example, with a setting of 1, the second price pivot has to be at least 1 point higher from the first price pivot in order to qualify for bearish divergence and with a setting of -1, the second price pivot can be as much as 1 point lower than the first price pivot in order to still qualify for bearish divergence. |
|
MinBullPriceDifference |
Specifies the minimum required point/dollar price difference between two bullish price pivots. This can also be a negative value in order to qualify for divergence even if the second price pivot is shy by this specified distance from the first price pivot. For example, with a setting of 1, the second price pivot has to be at least 1 point lower from the first price pivot in order to qualify for bullish divergence and with a setting of -1, the second price pivot can be as much as 1 point higher than the first price pivot in order to still qualify for bullish divergence. |
|
PivotLeftStrength |
Specifies the minimum required number of bars with lower lows to the left of a pivot high or the minimum required number of bars with higher highs to the left of a pivot low in order to qualify as a previous pivot to compare for divergence. The current price for detecting divergence does not need to be an actual pivot. |
|
PivotRightStrength |
Specifies the minimum required number of bars with lower lows to the right of a pivot high or the minimum required number of bars with higher highs to the right of a pivot low in order to qualify as a previous pivot to compare for divergence. The current price for detecting divergence does not need to be an actual pivot. |
|
PivotMaxEqualBars |
Specifies the maximum number of allowed bars with equal higher highs in order to still qualify as one previous pivot high to compare for divergence or the maximum number of allowed bars with equal lows in order to still qualify as one previous pivot low to compare for divergence The current price for detecting divergence does not need to be an actual pivot. |
|
PivotUnEqualBars |
Specifies the maximum number of allowed bars with lower highs in between 2 equal highs in order to still qualify as one previous pivot high to compare for divergence or the maximum number of allowed bars with higher lows in between 2 equal lows in order to still qualify as one previous pivot low to compare for divergence The current price for detecting divergence does not need to be an actual pivot. |
|
MinimumBearOscHook |
Specifies the minimum oscillator hook that is required to look for bearish divergence, whereas with a setting of 0 the oscillator needs to be hooking down by more than just 0. A bearish hook always creates a peak and the minimum hook distance is specified in the value difference between the peak value and the oscillator value as it slopes down. Once a down hook is formed, the indicator looks for divergence back to previous pivots. With a negative setting, the oscillator does not need to hook and the indicator constantly compares price as specified with the input BearPrice and the current oscillator value with previous pivots and their oscillator values. |
|
MinimumBullOscHook |
Specifies the minimum oscillator hook that is required to look for bullish divergence, whereas with a setting of 0 the oscillator needs to be hooking up by more than just 0. A bullish hook always creates a trough and the minimum hook distance is specified in the value difference between the trough value and the oscillator value as it slopes up. Once an up hook is formed, the indicator looks for divergence back to previous pivots. With a negative setting, the oscillator does not need to hook and the indicator constantly compares price as specified with the input BullPrice and the current oscillator value with previous pivots and their oscillator values. |
|
BearOscLeadingBars |
Specifies the maximum number of bars that the bearish oscillator is expected to form a pivot before price does in order to find the corresponding price/oscillator pivots for detecting bearish divergence. |
|
BearOscLaggingBars |
Specifies the maximum number of bars that the bearish oscillator is expected to form a pivot after price does in order to find the corresponding price/oscillator pivots for detecting bearish divergence. |
|
BullOscLeadingBars |
Specifies the maximum number of bars that the bullish oscillator is expected to form a pivot before price does in order to find the corresponding price/oscillator pivots for detecting bullish divergence. |
|
BullOscLaggingBars |
Specifies the maximum number of bars that the bullish oscillator is expected to form a pivot after price does in order to find the corresponding price/oscillator pivots for detecting bullish divergence. |
|
OppositeBearishOscillator |
A setting of true uses opposite bearish divergence as defined as follows: Regular opposite bearish divergence: Higher prices and higher oscillator Reverse opposite bearish divergence: Lower prices and lower oscillator |
|
OppositeBullishOscillator |
A setting of true uses opposite bullish divergence as defined as follows: Regular opposite bullish divergence: Lower prices and lower oscillator Reverse opposite bullish divergence: Higher prices and higher oscillator |
|
UseBearishPriceThreshold1 |
Enables/disables the requirement of the first bearish price pivot to be beyond a threshold as specified with the input BearishPriceThreshold1. |
|
UseBearishPriceThreshold2 |
Enables/disables the requirement of the second bearish price pivot to be beyond a threshold as specified with the input BearishPriceThreshold2. |
|
UseBullishPriceThreshold1 |
Enables/disables the requirement of the first bullish price pivot to be beyond a threshold as specified with the input BullishPriceThreshold1. |
|
UseBullishPriceThreshold2 |
Enables/disables the requirement of the second bullish price pivot to be beyond a threshold as specified with the input BullishPriceThreshold2. |
|
BearishPriceThreshold1 |
Specifies the threshold for the first bearish price pivot. |
|
BearishPriceThreshold2 |
Specifies the threshold for the second bearish price pivot. |
|
BullishPriceThreshold1 |
Specifies the threshold for the first bullish price pivot. |
|
BullishPriceThreshold2 |
Specifies the threshold for the second bullish price pivot. |
|
UseBearishThreshold1 |
Enables/disables the requirement of the first bearish oscillator pivot to be beyond a threshold as specified with the input BearishThreshold1. |
|
UseBearishThreshold2 |
Enables/disables the requirement of the second bearish oscillator pivot to be beyond a threshold as specified with the input BearishThreshold2. |
|
UseBullishThreshold1 |
Enables/disables the requirement of the first bullish oscillator pivot to be beyond a threshold as specified with the input BullishThreshold1. |
|
UseBullishThreshold2 |
Enables/disables the requirement of the second bullish oscillator pivot to be beyond a threshold as specified with the input BullishThreshold2. |
|
BearishThreshold1 |
Specifies the threshold for the first bearish oscillator pivot. |
|
BearishThreshold2 |
Specifies the threshold for the second bearish oscillator pivot. |
|
BullishThreshold1 |
Specifies the threshold for the first bullish oscillator pivot. |
|
BullishThreshold2 |
Specifies the threshold for the second bullish oscillator pivot. |
|
MinBearOscDivergence |
Specifies the minimum required bearish oscillator value difference between two bearish oscillator pivots. This can also be a negative value in order to qualify for divergence even if the second bearish oscillator price still exceeds the first bearish oscillator pivot by this specified distance. For example, if the bearish oscillator is a Stochastic and with a setting of 10, the second bearish oscillator pivot has to be lower by at least 10 from the first bearish oscillator pivot in order to qualify for bearish divergence and with a setting of -10, the second bearish oscillator pivot can still be higher than 10 points from the first bearish oscillator pivot in order to still qualify for bearish divergence. |
|
MinBullOscDivergence |
Specifies the minimum required bullish oscillator value difference between two bullish oscillator pivots. This can also be a negative value in order to qualify for divergence even if the second bullish oscillator price is still lower than first bullish oscillator pivot by this specified distance. For example, if the bullish oscillator is a Stochastic and with a setting of 10, the second bullish oscillator pivot has to be higher by at least 10 from the first bullish oscillator pivot in order to qualify for bullish divergence and with a setting of -10, the second bullish oscillator pivot can still be lower than 10 points from the first bullish oscillator pivot in order to still qualify for bearish divergence. |
|
TestForBearOscPeakTrough |
With a setting of true, the first bearish oscillator pivot has to be the highest pivot for regular bearish divergence and the first bearish oscillator pivot has to be the lowest pivot for regular opposite bearish divergence. This avoids detecting bearish divergence if there is a higher bearish oscillator pivot in between two oscillator pivots. |
|
TestForBullOscPeakTrough |
With a setting of true, the first bullish oscillator pivot has to be the lowest pivot for regular bullish divergence and the first bullish oscillator pivot has to be the highest pivot for regular opposite bullish divergence. This avoids detecting bullish divergence if there is a lower bullish oscillator pivot in between the two oscillator pivots. |
MovingAveragesFilter:
|
MovAvgPrice |
Specifies the moving averages price such as open, high, low or close, for example. |
|
FastMovAvgLength |
Specifies the fast moving average length, whereas a value of 0 disables this moving average. |
|
FastMovAvgType |
Specifies the fast moving average type. A setting of 1 uses a simple moving average, a setting of 2 uses an exponential moving average, a setting of 3 uses a weighted moving average, a setting o 4 uses a triangular moving average, a setting of 5 uses a Mid Keltner and a setting of 6 uses a Hull moving average. |
|
SlowMovAvgLength |
Specifies the slow moving average length, whereas a value of 0 disables this moving average. |
|
SlowMovAvgType |
Specifies the slow moving average type. A setting of 1 uses a simple moving average, a setting of 2 uses an exponential moving average, a setting of 3 uses a weighted moving average, a setting o 4 uses a triangular moving average, a setting of 5 uses a Mid Keltner and a setting of 6 uses a Hull moving average. |
|
AvgDivType |
Specifies the moving averages filter as follows: Positive value such as 1:
Bullish divergence: The divergence pivot low has to be above the moving
averages. Negative value such as -1: Bullish
divergence: The divergence pivot low has to be below the moving averages |
|
ClosestMovAvgPosition |
Specifies the moving averages positioning as follows: A value of zero: Disables this criteria Positive value: Specifies the highest moving average number for bullish divergence and the lowest moving average number for bearish divergence, whereas a value of 1 specifies the fast moving average and a value of 2 specifies the slow moving average. Negative value: Specifies the lowest moving average number for bullish divergence and the highest moving average number for bearish divergence, whereas a value of -1 specifies the fast moving average and a value of -2 specifies the slow moving average. |
Charting indicator inputs:
Plots:
|
DivergencePlot |
Enables/disables the divergence show me dots, BullDiv and BearDiv |
|
Pivot1Plot |
Enables/disables the pivot 1 show me dots, BullPivot1 and BearPivot1. Pivot 1 is the previous pivot that the divergence is compared to. |
|
DivergencePlotOffset |
Specifies the point distance to offset the divergence show me dots from their corresponding bearish and bullish prices. |
|
Pivot1PlotOffset |
Specifies the point distance to offset the pivot 1 show me dots from their corresponding bearish and bullish prices. |
|
PlotBearPrice |
Enables/disables the bearish price plot BearPrice. |
|
PlotBullPrice |
Enables/disables the bullish price plot BullPrice. |
|
PlotBearOscillator |
Enables/disables the bearish oscillator plot BearOsc. With this plot enabled, the bearish divergence and bearish pivot 1 dots are placed directly on the bearish oscillator instead of the bearish price. |
|
PlotBullOscillator |
Enables/disables the bullish oscillator plot BullOsc. With this plot enabled, the bullish divergence and bullish pivot 1 dots are placed directly on the bullish oscillator instead of the bullish price. |
|
PlotBearThreshold1 |
Enables/disables the threshold line for the first bearish oscillator pivot threshold as specified with the input BearishThreshold1. This threshold line can only be plotted with PlotBearOscillator set to true. The name of this plot is BearThresh1. |
|
PlotBearThreshold2 |
Enables/disables the threshold line for the second bearish oscillator pivot threshold as specified with the input BearishThreshold2. This threshold line can only be plotted with PlotBearOscillator set to true. The name of this plot is BearThresh2. |
|
PlotBullThreshold1 |
Enables/disables the threshold line for the first bullish oscillator pivot threshold as specified with the input BullishThreshold1. This threshold line can only be plotted with PlotBullOscillator set to true. The name of this plot is BullThresh1. |
|
PlotBullThreshold2 |
Enables/disables the threshold line for the second bullish oscillator pivot threshold as specified with the input BullishThreshold2. This threshold line can only be plotted with PlotBullOscillator set to true. The name of this plot is BullThresh2. |
Text:
|
ShowText |
Enables/disables the divergence text that is displayed for the most recent divergence found. When the indicator is plotted as oscillator, this text is automatically disabled. |
|
Divergence text inputs: |
In order to completely customize the text objects, we broke them out into 3 separate components to be specified with separate inputs as follows: Bearish divergence text objects: BearishText + BearOscName + DivergenceText/ReverseDivergenceText Bullish divergence text objects: BullishText + BullOscName + DivergenceText/ReverseDivergenceText For example, with the input settings of BearishText as "Bearish ", BearOscName as "RSI" and DivergenceText as " Divergence", the bearish divergence text object would display as Bearish RSI Divergence. Please note that these inputs are string inputs which always need to be bracketed by quotation marks. |
|
TextVerticalOffset |
Specifies the point distance to offset the divergence text from their corresponding bearish and bullish prices up or down. |
|
TextHorizontalOffset |
Specifies the bar distance to offset the divergence text to the left of their corresponding bearish and bullish price bars. |
Trendlines:
|
ShowTL |
Enables/disables the trendline that connects both price pivots in order to see where the corresponding divergence points are. When the indicator is plotted as oscillator, this trendline is automatically disabled. |
|
TL_Size |
Specifies the trend line size. Please note that the trend line size can be increased only for solid trend lines. |
|
TL_Style |
Specifies the trend line style. The options are as follows: tool_solid or 1, tool_dashed or 2, tool_dotted or 3, tool_dashed2 or 4, tool_dashed3 or 5 |
Alerts:
|
BullAlrt |
Enables/disables the alert when bullish divergence is detected. |
|
BearAlrt |
Enables/disables the alert when bearish divergence is detected. |
RadarScreen indicator inputs:
Plots:
|
BullishText |
Specifies the text to display in the BullDiv column. Please note that this input is a string input which always needs to be bracketed by quotation marks. |
|
BearishText |
Specifies the text to display in the BearDiv column. Please note that this input is a string input which always needs to be bracketed by quotation marks. |
|
BullishForegrdColor |
Specifies the text color of the BullDiv column. |
|
BearishForegrdColor |
Specifies the text color of the BearDiv column. |
|
BullishBackgrdColor |
Specifies the background color of the BullDiv column cells when the bullish text is displayed. |
|
BearishBackgrdColor |
Specifies the background color of the BearDiv column cells when the bearish text is displayed. |
Alerts:
|
BullAlrt |
Enables/disables the alert when bullish divergence is detected. |
|
BearAlrt |
Enables/disables the alert when bearish divergence is detected. |
|
BearOscName |
Specifies the bearish oscillator name to be used for display in the alert notification window. Please note that this input is a string input which always needs to be bracketed by quotation marks. |
|
BullOscName |
Specifies the bullish oscillator name to be used for display in the alert notification window. Please note that this input is a string input which always needs to be bracketed by quotation marks. |
The Alchemy Ultimate Dual Data Divergence Indicator (Alchemy UltDivg2Data)
The Alchemy Ultimate Divergence charting indicator can be used to detect divergence as follows:
Divergence between 2 different price series
Divergence can be specified as regular divergence, opposite divergence or reverse divergence.
The divergence can be displayed as show me dots above/below price or it can be plotted as oscillator with its corresponding divergence dots.
Either, divergence pivot and previous pivot that the divergence is measured from can be displayed and the indicator can connect the 2 price pivots with trend lines.
Please see indicator inputs below for a more detailed description:
Indicator Inputs:
Price:
|
BearishPrice1 |
Specifies the price to be used for bearish divergence. |
|
BullishPrice1 |
Specifies the price to be used for bullish divergence. |
|
BearishPrice2Type |
Specifies the second price to be used for bearish divergence. A setting of -1 uses the open, a setting of -2 uses the high, a setting of -3 uses the low, a setting of -4 uses the close, a setting of -5 uses the volume, a setting of -6 uses the sum of down and up ticks, a setting of -7 uses upticks and a setting of -8 uses downticks. |
|
BullishPrice2Type |
Specifies the second price to be used for bullish divergence. A setting of -1 uses the open, a setting of -2 uses the high, a setting of -3 uses the low, a setting of -4 uses the close, a setting of -5 uses the volume, a setting of -6 uses the sum of down and up ticks, a setting of -7 uses upticks and a setting of -8 uses downticks. |
|
DataSeries2Number |
Specifies the data series number to be used for the second price series. |
Divergence:
|
ReverseDivergence |
A setting of false uses regular divergence as defined as follows: Bearish Divergence: Higher prices and lower oscillator - Bullish Divergence: Lower prices and higher oscillator
A setting of true uses reverse divergence as defined as follows: Bearish Divergence: Lower prices and higher oscillator - Bullish Divergence: Higher prices and lower oscillator |
|
MinimumBars |
Specifies the minimum number of required bars in between 2 price pivots. |
|
MaximumBars |
Specifies the maximum number of allowed bars in between 2 price pivots, whereas a setting of 0 disables this requirement. |
|
MaximumPivotsBack |
Specifies the maximum number of price pivots for the indicator to look back for divergence. |
|
MinPriceDifference |
Specifies the minimum required point/dollar price difference between two price pivots. This can also be a negative value in order to qualify for divergence even if the second price pivot is shy by this specified distance from the first price pivot. For example, with a setting of 1, the second price pivot high has to be at least 1 point higher from the first price pivot high in order to qualify for bearish divergence and with a setting of -1, the second price pivot high can be as much as 1 point lower than the first price pivot in order to still qualify for bearish divergence. |
|
PivotLeftStrength |
Specifies the minimum required number of bars with lower lows to the left of a pivot high or the minimum required number of bars with higher highs to the left of a pivot low in order to qualify as a previous pivot to compare for divergence. The current price for detecting divergence does not need to be an actual pivot. |
|
PivotRightStrength |
Specifies the minimum required number of bars with lower lows to the right of a pivot high or the minimum required number of bars with higher highs to the right of a pivot low in order to qualify as a previous pivot to compare for divergence. The current price for detecting divergence does not need to be an actual pivot. |
|
PivotMaxEqualBars |
Specifies the maximum number of allowed bars with equal higher highs in order to still qualify as one previous pivot high to compare for divergence or the maximum number of allowed bars with equal lows in order to still qualify as one previous pivot low to compare for divergence The current price for detecting divergence does not need to be an actual pivot. |
|
PivotUnEqualBars |
Specifies the maximum number of allowed bars with lower highs in between 2 equal highs in order to still qualify as one previous pivot high to compare for divergence or the maximum number of allowed bars with higher lows in between 2 equal lows in order to still qualify as one previous pivot low to compare for divergence The current price for detecting divergence does not need to be an actual pivot. |
|
MinimumData2Hook |
Specifies the minimum data 2 hook that is required to look for divergence, whereas with a setting of 0 data 2 needs to be hooking down or up by more than just 0. A bearish hook always creates a peak and the minimum hook distance is specified in the value difference between the peak value and data 2 value as it slopes down. Once a hook is formed, the indicator looks for divergence back to previous pivots. With a negative setting, data 2 does not need to hook and the indicator constantly compares price and the current data 2 value with previous pivots and their data 2 values. |
|
Data2LeadingBars |
Specifies the maximum number of bars that data 2 is expected to form a pivot before price does in order to find the corresponding price/data 2 pivots for detecting divergence. |
|
Data2LaggingBars |
Specifies the maximum number of bars that data 2 is expected to form a pivot after price does in order to find the corresponding price/data 2 pivots for detecting divergence. |
|
OppositeData2 |
A setting of true uses opposite divergence as defined as follows: Regular opposite bearish divergence: Higher prices and higher data 2 Reverse opposite bearish divergence: Lower prices and lower data 2 Regular opposite bullish divergence: Lower prices and lower data 2 Reverse opposite bullish divergence: higher prices and higher data 2 |
|
UseThreshold1 |
Enables/disables the requirement of the first data 2 pivot to be beyond a threshold as specified with the input BearishThreshold1 and BullishThreshold1 |
|
UseThreshold2 |
Enables/disables the requirement of the second data 2 pivot to be beyond a threshold as specified with the input BearishThreshold2 and BullishThreshold2. |
|
BearishThreshold1 |
Specifies the threshold for the first bearish data 2 pivot. |
|
BearishThreshold2 |
Specifies the threshold for the second bearish data 2 pivot. |
|
BullishThreshold1 |
Specifies the threshold for the first bullish data 2 pivot. |
|
BullishThreshold2 |
Specifies the threshold for the second bullish data 2 pivot. |
|
MinData2Divergence |
Specifies the minimum required data 2 value difference between two data 2 pivots. This can also be a negative value in order to qualify for divergence even if the second data 2 price still exceeds the first data 2 pivot by this specified distance. For example, with a setting of 10, the second bearish data 2 pivot has to be lower by at least 10 from the first bearish data 2 pivot in order to qualify for bearish divergence and with a setting of -10, the second bearish data 2 pivot can still be higher than 10 points from the first bearish data 2 pivot in order to still qualify for bearish divergence. |
|
TestForOscPeakTrough |
With a setting of true, the first bearish data 2 pivot has to be the highest pivot for regular bearish divergence and the first bearish data 2 pivot has to be the lowest pivot for regular opposite bearish divergence. This avoids detecting bearish divergence if there is a higher bearish data 2 pivot in between two data 2 pivots. Vice versa, with a setting of true, the first bullish data 2 pivot has to be the lowest pivot for regular bullish divergence and the first bullish data 2 pivot has to be the highest pivot for regular opposite bullish divergence. This avoids detecting bullish divergence if there is a lower bullish data 2 pivot in between the two data 2 pivots. |
Plots:
|
DivergencePlot |
Enables/disables the divergence show me dots, BullDiv and BearDiv |
|
Pivot1Plot |
Enables/disables the pivot 1 show me dots, BullPivot1 and BearPivot1. Pivot 1 is the previous pivot that the divergence is compared to. |
|
DivergencePlotOffset |
Specifies the point distance to offset the divergence show me dots from their corresponding bearish and bullish prices. |
|
Pivot1PlotOffset |
Specifies the point distance to offset the pivot 1 show me dots from their corresponding bearish and bullish prices. |
|
PlotData2 |
Enables/disables the data 2 plot. With this plot enabled, the bearish divergence and bearish pivot 1 dots are placed directly on the data 2 instead of the bearish price. Please note that this indicator is defaulted for the divergence dots to be displayed above and below the price bars. Therefore, it is necessary to change the indicator scaling to Right, left or No Axis when plotting it as data 2. |
|
PlotThreshold1 |
Enables/disables the threshold line for the first data 2 pivot threshold as specified with the input BearishThreshold1 and BullishThreshold1. This threshold line can only be plotted with PlotData2 set to true. The name of this plot is BearThresh1 and BullThresh1. |
|
PlotThreshold2 |
Enables/disables the threshold line for the second data 2 pivot threshold as specified with the input BearishThreshold2 and BullishThreshold2. This threshold line can only be plotted with PlotData2 set to true. The name of this plot is BearThresh2 and BullThresh2. |
Text:
|
ShowText |
Enables/disables the divergence text that is displayed for the most recent divergence found. When the indicator is plotted as data 2, this text is automatically disabled. |
|
Divergence text inputs: |
In order to completely customize the text objects, we broke them out into 3 separate components to be specified with separate inputs as follows: Bearish divergence text objects: BearishText + OscName + DivergenceText/ReverseDivergenceText Bullish divergence text objects: BullishText + OscName + DivergenceText/ReverseDivergenceText For example, assuming that data 2 is a $TICK symbol, applied as second data series, with the input settings of BearishText as "Bearish ", OscName as getsymbolname data(2) and DivergenceText as " Divergence", the bearish divergence text object would display as Bearish $TICK Divergence. Please note that these inputs are string inputs which always need to be bracketed by quotation marks. |
|
TextVerticalOffset |
Specifies the point distance to offset the divergence text from their corresponding bearish and bullish prices up or down. |
|
TextHorizontalOffset |
Specifies the bar distance to offset the divergence text to the left of their corresponding bearish and bullish price bars. |
Trendlines:
|
ShowTL |
Enables/disables the trendline that connects both price pivots in order to see where the corresponding divergence points are. When the indicator is plotted as oscillator, this trendline is automatically disabled. |
|
TL_Size |
Specifies the trend line size. Please note that the trend line size can be increased only for solid trend lines. |
|
TL_Style |
Specifies the trend line style. The options are as follows: tool_solid or 1, tool_dashed or 2, tool_dotted or 3, tool_dashed2 or 4, tool_dashed3 or 5 |
Alerts:
|
BullAlrt |
Enables/disables the alert when bullish divergence is detected. |
|
BearAlrt |
Enables/disables the alert when bearish divergence is detected. |
The Alchemy Ultimate CCI Divergence Charting Indicator (Alchemy UltDivgCCI)
The Alchemy Ultimate CCI Divergence charting indicator detects divergence between price and the CCI oscillator.
Divergence can be specified as regular divergence, opposite divergence or reverse divergence.
The divergence can be displayed as show me dots above/below price or it can be plotted as oscillator with its corresponding divergence dots.
Either, divergence pivot and previous pivot that the divergence is measured from can be displayed and the indicator can connect the 2 price pivots with trend lines.
The Alchemy Ultimate CCI Divergence RadarScreen Indicator (Alchemy UltDivCCI RS)
The Alchemy Ultimate CCI Divergence RadarScreen indicator contains the same features as the charting indicator above but it is designed to be used in RadarScreen or Scanner.
Please see indicator inputs below for a more detailed description:
Charting and RadarScreen Indicator Inputs:
Price:
|
BearishPrice |
Specifies the price to be used for bearish divergence. This can be specified as high in order to look for bearish divergence between price highs and the CCI oscillator or it can be specified as an oscillator function to be pasted in from the EasyLanguage dictionary for bearish divergence between this oscillator and the CCI oscillator. |
|
BullishPrice |
Specifies the price to be used for bullish divergence. This can be specified as low in order to look for bullish divergence between price highs and the CCI oscillator or it can be specified as an oscillator function to be pasted in from the EasyLanguage dictionary for bullish divergence between this oscillator and the CCI oscillator. |
CCI:
|
Length |
Specifies the look back length to be used for the CCI. |
|
AvgLength |
Specifies the look back length to be used for the average of the CCI. With a setting of 0, the CCI is used for divergence. |
|
AvgType |
Specifies the average type to be used for the average of the CCI. A setting of 1 uses a simple moving average, a setting of 2 uses an exponential moving average, a setting of 3 uses a weighted moving average, a setting o 4 uses a triangular moving average, a setting of 5 uses a Mid Keltner and a setting of 6 uses a Hull moving average. With a setting of 0, the CCI is used for divergence. |
Divergence:
|
ReverseDivergence |
A setting of false uses regular divergence as defined as follows: Bearish Divergence: Higher prices and lower oscillator - Bullish Divergence: Lower prices and higher oscillator
A setting of true uses reverse divergence as defined as follows: Bearish Divergence: Lower prices and higher oscillator - Bullish Divergence: Higher prices and lower oscillator |
|
MinimumBars |
Specifies the minimum number of required bars in between 2 price pivots. |
|
MaximumBars |
Specifies the maximum number of allowed bars in between 2 price pivots, whereas a setting of 0 disables this requirement. |
|
MaximumPivotsBack |
Specifies the maximum number of price pivots for the indicator to look back for divergence. |
|
MinPriceDifference |
Specifies the minimum required point/dollar price difference between two price pivots. This can also be a negative value in order to qualify for divergence even if the second price pivot is shy by this specified distance from the first price pivot. For example, with a setting of 1, the second price pivot high has to be at least 1 point higher from the first price pivot high in order to qualify for bearish divergence and with a setting of -1, the second price pivot high can be as much as 1 point lower than the first price pivot in order to still qualify for bearish divergence. |
|
PivotLeftStrength |
Specifies the minimum required number of bars with lower lows to the left of a pivot high or the minimum required number of bars with higher highs to the left of a pivot low in order to qualify as a previous pivot to compare for divergence. The current price for detecting divergence does not need to be an actual pivot. |
|
PivotRightStrength |
Specifies the minimum required number of bars with lower lows to the right of a pivot high or the minimum required number of bars with higher highs to the right of a pivot low in order to qualify as a previous pivot to compare for divergence. The current price for detecting divergence does not need to be an actual pivot. |
|
PivotMaxEqualBars |
Specifies the maximum number of allowed bars with equal higher highs in order to still qualify as one previous pivot high to compare for divergence or the maximum number of allowed bars with equal lows in order to still qualify as one previous pivot low to compare for divergence The current price for detecting divergence does not need to be an actual pivot. |
|
PivotUnEqualBars |
Specifies the maximum number of allowed bars with lower highs in between 2 equal highs in order to still qualify as one previous pivot high to compare for divergence or the maximum number of allowed bars with higher lows in between 2 equal lows in order to still qualify as one previous pivot low to compare for divergence The current price for detecting divergence does not need to be an actual pivot. |
|
MinimumOscHook |
Specifies the minimum oscillator hook that is required to look for divergence, whereas with a setting of 0 the oscillator needs to be hooking down or up by more than just 0. A bearish hook always creates a peak and the minimum hook distance is specified in the value difference between the peak value and the oscillator value as it slopes down. Once a hook is formed, the indicator looks for divergence back to previous pivots. With a negative setting, the oscillator does not need to hook and the indicator constantly compares price and the current oscillator value with previous pivots and their oscillator values. |
|
OscLeadingBars |
Specifies the maximum number of bars that the oscillator is expected to form a pivot before price does in order to find the corresponding price/oscillator pivots for detecting divergence. |
|
OscLaggingBars |
Specifies the maximum number of bars that the oscillator is expected to form a pivot after price does in order to find the corresponding price/oscillator pivots for detecting divergence. |
|
OppositeOscillator |
A setting of true uses opposite divergence as defined as follows: Regular opposite bearish divergence: Higher prices and higher oscillator Reverse opposite bearish divergence: Lower prices and lower oscillator Regular opposite bullish divergence: Lower prices and lower oscillator Reverse opposite bullish divergence: higher prices and higher oscillator |
|
UseThreshold1 |
Enables/disables the requirement of the first oscillator pivot to be beyond a threshold as specified with the input BearishThreshold1 and BullishThreshold1 |
|
UseThreshold2 |
Enables/disables the requirement of the second oscillator pivot to be beyond a threshold as specified with the input BearishThreshold2 and BullishThreshold2. |
|
BearishThreshold1 |
Specifies the threshold for the first bearish oscillator pivot. |
|
BearishThreshold2 |
Specifies the threshold for the second bearish oscillator pivot. |
|
BullishThreshold1 |
Specifies the threshold for the first bullish oscillator pivot. |
|
BullishThreshold2 |
Specifies the threshold for the second bullish oscillator pivot. |
|
MinOscDivergence |
Specifies the minimum required oscillator value difference between two oscillator pivots. This can also be a negative value in order to qualify for divergence even if the second oscillator price still exceeds the first oscillator pivot by this specified distance. For example, with a setting of 10, the second bearish oscillator pivot has to be lower by at least 10 from the first bearish oscillator pivot in order to qualify for bearish divergence and with a setting of -10, the second bearish oscillator pivot can still be higher than 10 points from the first bearish oscillator pivot in order to still qualify for bearish divergence. |
|
TestForOscPeakTrough |
With a setting of true, the first bearish oscillator pivot has to be the highest pivot for regular bearish divergence and the first bearish oscillator pivot has to be the lowest pivot for regular opposite bearish divergence. This avoids detecting bearish divergence if there is a higher bearish oscillator pivot in between two oscillator pivots. Vice versa, with a setting of true, the first bullish oscillator pivot has to be the lowest pivot for regular bullish divergence and the first bullish oscillator pivot has to be the highest pivot for regular opposite bullish divergence. This avoids detecting bullish divergence if there is a lower bullish oscillator pivot in between the two oscillator pivots. |
Alerts:
|
BullAlrt |
Enables/disables the alert when bullish divergence is detected. |
|
BearAlrt |
Enables/disables the alert when bearish divergence is detected. |
Charting Indicator Inputs:
Plots:
|
DivergencePlot |
Enables/disables the divergence show me dots, BullDiv and BearDiv |
|
Pivot1Plot |
Enables/disables the pivot 1 show me dots, BullPivot1 and BearPivot1. Pivot 1 is the previous pivot that the divergence is compared to. |
|
DivergencePlotOffset |
Specifies the point distance to offset the divergence show me dots from their corresponding bearish and bullish prices. |
|
Pivot1PlotOffset |
Specifies the point distance to offset the pivot 1 show me dots from their corresponding bearish and bullish prices. |
|
PlotOscillator |
Enables/disables the CCI oscillator plot. With this plot enabled, the bearish divergence and bearish pivot 1 dots are placed directly on the CCI oscillator instead of the bearish price. Please note that this indicator is defaulted for the divergence dots to be displayed above and below the price bars. Therefore, it is necessary to change the indicator scaling to Right, left or No Axis when plotting it as an oscillator. |
|
PlotThreshold1 |
Enables/disables the threshold line for the first oscillator pivot threshold as specified with the input BearishThreshold1 and BullishThreshold1. This threshold line can only be plotted with PlotOscillator set to true. The name of this plot is BearThresh1 and BullThresh1. |
|
PlotThreshold2 |
Enables/disables the threshold line for the second oscillator pivot threshold as specified with the input BearishThreshold2 and BullishThreshold2. This threshold line can only be plotted with PlotOscillator set to true. The name of this plot is BearThresh2 and BullThresh2. |
Text:
|
ShowText |
Enables/disables the divergence text that is displayed for the most recent divergence found. When the indicator is plotted as oscillator, this text is automatically disabled. |
|
Divergence text inputs: |
In order to completely customize the text objects, we broke them out into 3 separate components to be specified with separate inputs as follows: Bearish divergence text objects: BearishText + OscName + DivergenceText/ReverseDivergenceText Bullish divergence text objects: BullishText + OscName + DivergenceText/ReverseDivergenceText For example, with the input settings of BearishText as "Bearish ", OscName as "CCI" and DivergenceText as " Divergence", the bearish divergence text object would display as Bearish CCI Divergence. Please note that these inputs are string inputs which always need to be bracketed by quotation marks. |
|
TextVerticalOffset |
Specifies the point distance to offset the divergence text from their corresponding bearish and bullish prices up or down. |
|
TextHorizontalOffset |
Specifies the bar distance to offset the divergence text to the left of their corresponding bearish and bullish price bars. |
Trendlines:
|
ShowTL |
Enables/disables the trendline that connects both price pivots in order to see where the corresponding divergence points are. When the indicator is plotted as oscillator, this trendline is automatically disabled. |
|
TL_Size |
Specifies the trend line size. Please note that the trend line size can be increased only for solid trend lines. |
|
TL_Style |
Specifies the trend line style. The options are as follows: tool_solid or 1, tool_dashed or 2, tool_dotted or 3, tool_dashed2 or 4, tool_dashed3 or 5 |
RadarScreen indicator inputs:
Plots:
|
BullishText |
Specifies the text to display in the BullDiv column. Please note that this input is a string input which always needs to be bracketed by quotation marks. |
|
BearishText |
Specifies the text to display in the BearDiv column. Please note that this input is a string input which always needs to be bracketed by quotation marks. |
|
BullishForegrdColor |
Specifies the text color of the BullDiv column. |
|
BearishForegrdColor |
Specifies the text color of the BearDiv column. |
|
BullishBackgrdColor |
Specifies the background color of the BullDiv column cells when the bullish text is displayed. |
|
BearishBackgrdColor |
Specifies the background color of the BearDiv column cells when the bearish text is displayed. |
The Alchemy Ultimate MACD Divergence Charting Indicator (Alchemy UltDivgMACD)
The Alchemy Ultimate MACD Divergence charting indicator detects divergence between price and the MACD oscillator.
Divergence can be specified as regular divergence, opposite divergence or reverse divergence.
The divergence can be displayed as show me dots above/below price or it can be plotted as oscillator with its corresponding divergence dots.
Either, divergence pivot and previous pivot that the divergence is measured from can be displayed and the indicator can connect the 2 price pivots with trend lines.
The Alchemy Ultimate MACD Divergence RadarScreen Indicator (Alchemy UltDiMACD RS)
The Alchemy Ultimate MACD Divergence RadarScreen indicator contains the same features as the charting indicator above but it is designed to be used in RadarScreen or Scanner.
Please see indicator inputs below for a more detailed description:
Charting and RadarScreen Indicator Inputs:
Price:
|
BearishPrice |
Specifies the price to be used for bearish divergence. This can be specified as high in order to look for bearish divergence between price highs and the MACD oscillator or it can be specified as an oscillator function to be pasted in from the EasyLanguage dictionary for bearish divergence between this oscillator and the MACD oscillator. |
|
BullishPrice |
Specifies the price to be used for bullish divergence. This can be specified as low in order to look for bullish divergence between price highs and the MACD oscillator or it can be specified as an oscillator function to be pasted in from the EasyLanguage dictionary for bullish divergence between this oscillator and the MACD oscillator. |
MACD:
|
FastLength |
Specifies the look back length to be used for the fast moving average of the MACD. |
|
SlowLength |
Specifies the look back length to be used for the slow moving average of the MACD. |
|
MACD_AvgLength |
Specifies the look back length to be used for the average of the MACD. With a setting of 0, the MACD is used for divergence. |
|
MACD_AvgType |
Specifies the average type to be used for the average of the MACD. A setting of 1 uses a simple moving average, a setting of 2 uses an exponential moving average, a setting of 3 uses a weighted moving average, a setting o 4 uses a triangular moving average, a setting of 5 uses a Mid Keltner and a setting of 6 uses a Hull moving average. With a setting of 0, the MACD is used for divergence. |
Divergence:
|
ReverseDivergence |
A setting of false uses regular divergence as defined as follows: Bearish Divergence: Higher prices and lower oscillator - Bullish Divergence: Lower prices and higher oscillator
A setting of true uses reverse divergence as defined as follows: Bearish Divergence: Lower prices and higher oscillator - Bullish Divergence: Higher prices and lower oscillator |
|
MinimumBars |
Specifies the minimum number of required bars in between 2 price pivots. |
|
MaximumBars |
Specifies the maximum number of allowed bars in between 2 price pivots, whereas a setting of 0 disables this requirement. |
|
MaximumPivotsBack |
Specifies the maximum number of price pivots for the indicator to look back for divergence. |
|
MinPriceDifference |
Specifies the minimum required point/dollar price difference between two price pivots. This can also be a negative value in order to qualify for divergence even if the second price pivot is shy by this specified distance from the first price pivot. For example, with a setting of 1, the second price pivot high has to be at least 1 point higher from the first price pivot high in order to qualify for bearish divergence and with a setting of -1, the second price pivot high can be as much as 1 point lower than the first price pivot in order to still qualify for bearish divergence. |
|
PivotLeftStrength |
Specifies the minimum required number of bars with lower lows to the left of a pivot high or the minimum required number of bars with higher highs to the left of a pivot low in order to qualify as a previous pivot to compare for divergence. The current price for detecting divergence does not need to be an actual pivot. |
|
PivotRightStrength |
Specifies the minimum required number of bars with lower lows to the right of a pivot high or the minimum required number of bars with higher highs to the right of a pivot low in order to qualify as a previous pivot to compare for divergence. The current price for detecting divergence does not need to be an actual pivot. |
|
PivotMaxEqualBars |
Specifies the maximum number of allowed bars with equal higher highs in order to still qualify as one previous pivot high to compare for divergence or the maximum number of allowed bars with equal lows in order to still qualify as one previous pivot low to compare for divergence The current price for detecting divergence does not need to be an actual pivot. |
|
PivotUnEqualBars |
Specifies the maximum number of allowed bars with lower highs in between 2 equal highs in order to still qualify as one previous pivot high to compare for divergence or the maximum number of allowed bars with higher lows in between 2 equal lows in order to still qualify as one previous pivot low to compare for divergence The current price for detecting divergence does not need to be an actual pivot. |
|
MinimumOscHook |
Specifies the minimum oscillator hook that is required to look for divergence, whereas with a setting of 0 the oscillator needs to be hooking down or up by more than just 0. A bearish hook always creates a peak and the minimum hook distance is specified in the value difference between the peak value and the oscillator value as it slopes down. Once a hook is formed, the indicator looks for divergence back to previous pivots. With a negative setting, the oscillator does not need to hook and the indicator constantly compares price and the current oscillator value with previous pivots and their oscillator values. |
|
OscLeadingBars |
Specifies the maximum number of bars that the oscillator is expected to form a pivot before price does in order to find the corresponding price/oscillator pivots for detecting divergence. |
|
OscLaggingBars |
Specifies the maximum number of bars that the oscillator is expected to form a pivot after price does in order to find the corresponding price/oscillator pivots for detecting divergence. |
|
OppositeOscillator |
A setting of true uses opposite divergence as defined as follows: Regular opposite bearish divergence: Higher prices and higher oscillator Reverse opposite bearish divergence: Lower prices and lower oscillator Regular opposite bullish divergence: Lower prices and lower oscillator Reverse opposite bullish divergence: higher prices and higher oscillator |
|
UseThreshold1 |
Enables/disables the requirement of the first oscillator pivot to be beyond a threshold as specified with the input BearishThreshold1 and BullishThreshold1 |
|
UseThreshold2 |
Enables/disables the requirement of the second oscillator pivot to be beyond a threshold as specified with the input BearishThreshold2 and BullishThreshold2. |
|
BearishThreshold1 |
Specifies the threshold for the first bearish oscillator pivot. |
|
BearishThreshold2 |
Specifies the threshold for the second bearish oscillator pivot. |
|
BullishThreshold1 |
Specifies the threshold for the first bullish oscillator pivot. |
|
BullishThreshold2 |
Specifies the threshold for the second bullish oscillator pivot. |
|
MinOscDivergence |
Specifies the minimum required oscillator value difference between two oscillator pivots. This can also be a negative value in order to qualify for divergence even if the second oscillator price still exceeds the first oscillator pivot by this specified distance. For example, with a setting of 10, the second bearish oscillator pivot has to be lower by at least 10 from the first bearish oscillator pivot in order to qualify for bearish divergence and with a setting of -10, the second bearish oscillator pivot can still be higher than 10 points from the first bearish oscillator pivot in order to still qualify for bearish divergence. |
|
TestForOscPeakTrough |
With a setting of true, the first bearish oscillator pivot has to be the highest pivot for regular bearish divergence and the first bearish oscillator pivot has to be the lowest pivot for regular opposite bearish divergence. This avoids detecting bearish divergence if there is a higher bearish oscillator pivot in between two oscillator pivots. Vice versa, with a setting of true, the first bullish oscillator pivot has to be the lowest pivot for regular bullish divergence and the first bullish oscillator pivot has to be the highest pivot for regular opposite bullish divergence. This avoids detecting bullish divergence if there is a lower bullish oscillator pivot in between the two oscillator pivots. |
Alerts:
|
BullAlrt |
Enables/disables the alert when bullish divergence is detected. |
|
BearAlrt |
Enables/disables the alert when bearish divergence is detected. |
Charting Indicator Inputs:
Plots:
|
DivergencePlot |
Enables/disables the divergence show me dots, BullDiv and BearDiv |
|
Pivot1Plot |
Enables/disables the pivot 1 show me dots, BullPivot1 and BearPivot1. Pivot 1 is the previous pivot that the divergence is compared to. |
|
DivergencePlotOffset |
Specifies the point distance to offset the divergence show me dots from their corresponding bearish and bullish prices. |
|
Pivot1PlotOffset |
Specifies the point distance to offset the pivot 1 show me dots from their corresponding bearish and bullish prices. |
|
PlotOscillator |
Enables/disables the MACD oscillator plot. With this plot enabled, the bearish divergence and bearish pivot 1 dots are placed directly on the MACD oscillator instead of the bearish price. Please note that this indicator is defaulted for the divergence dots to be displayed above and below the price bars. Therefore, it is necessary to change the indicator scaling to Right, left or No Axis when plotting it as an oscillator. |
|
PlotThreshold1 |
Enables/disables the threshold line for the first oscillator pivot threshold as specified with the input BearishThreshold1 and BullishThreshold1. This threshold line can only be plotted with PlotOscillator set to true. The name of this plot is BearThresh1 and BullThresh1. |
|
PlotThreshold2 |
Enables/disables the threshold line for the second oscillator pivot threshold as specified with the input BearishThreshold2 and BullishThreshold2. This threshold line can only be plotted with PlotOscillator set to true. The name of this plot is BearThresh2 and BullThresh2. |
Text:
|
ShowText |
Enables/disables the divergence text that is displayed for the most recent divergence found. When the indicator is plotted as oscillator, this text is automatically disabled. |
|
Divergence text inputs: |
In order to completely customize the text objects, we broke them out into 3 separate components to be specified with separate inputs as follows: Bearish divergence text objects: BearishText + OscName + DivergenceText/ReverseDivergenceText Bullish divergence text objects: BullishText + OscName + DivergenceText/ReverseDivergenceText For example, with the input settings of BearishText as "Bearish ", OscName as "MACD" and DivergenceText as " Divergence", the bearish divergence text object would display as Bearish MACD Divergence. Please note that these inputs are string inputs which always need to be bracketed by quotation marks. |
|
TextVerticalOffset |
Specifies the point distance to offset the divergence text from their corresponding bearish and bullish prices up or down. |
|
TextHorizontalOffset |
Specifies the bar distance to offset the divergence text to the left of their corresponding bearish and bullish price bars. |
Trendlines:
|
ShowTL |
Enables/disables the trendline that connects both price pivots in order to see where the corresponding divergence points are. When the indicator is plotted as oscillator, this trendline is automatically disabled. |
|
TL_Size |
Specifies the trend line size. Please note that the trend line size can be increased only for solid trend lines. |
|
TL_Style |
Specifies the trend line style. The options are as follows: tool_solid or 1, tool_dashed or 2, tool_dotted or 3, tool_dashed2 or 4, tool_dashed3 or 5 |
RadarScreen indicator inputs:
Plots:
|
BullishText |
Specifies the text to display in the BullDiv column. Please note that this input is a string input which always needs to be bracketed by quotation marks. |
|
BearishText |
Specifies the text to display in the BearDiv column. Please note that this input is a string input which always needs to be bracketed by quotation marks. |
|
BullishForegrdColor |
Specifies the text color of the BullDiv column. |
|
BearishForegrdColor |
Specifies the text color of the BearDiv column. |
|
BullishBackgrdColor |
Specifies the background color of the BullDiv column cells when the bullish text is displayed. |
|
BearishBackgrdColor |
Specifies the background color of the BearDiv column cells when the bearish text is displayed. |
The Alchemy Ultimate RSI Divergence Charting Indicator (Alchemy UltDivgRSI)
The Alchemy Ultimate RSI Divergence charting indicator detects divergence between price and the RSI oscillator.
Divergence can be specified as regular divergence, opposite divergence or reverse divergence.
The divergence can be displayed as show me dots above/below price or it can be plotted as oscillator with its corresponding divergence dots.
Either, divergence pivot and previous pivot that the divergence is measured from can be displayed and the indicator can connect the 2 price pivots with trend lines.
The Alchemy Ultimate RSI Divergence RadarScreen Indicator (Alchemy UltDivRSI RS)
The Alchemy Ultimate RSI Divergence RadarScreen indicator contains the same features as the charting indicator above but it is designed to be used in RadarScreen or Scanner.
Please see indicator inputs below for a more detailed description:
Charting and RadarScreen Indicator Inputs:
Price:
|
BearishPrice |
Specifies the price to be used for bearish divergence. This can be specified as high in order to look for bearish divergence between price highs and the RSI oscillator or it can be specified as an oscillator function to be pasted in from the EasyLanguage dictionary for bearish divergence between this oscillator and the RSI oscillator. |
|
BullishPrice |
Specifies the price to be used for bullish divergence. This can be specified as low in order to look for bullish divergence between price highs and the RSI oscillator or it can be specified as an oscillator function to be pasted in from the EasyLanguage dictionary for bullish divergence between this oscillator and the RSI oscillator. |
RSI:
|
RSI_Price |
Specifies the price to be used for the RSI. |
|
Length |
Specifies the look back length to be used for the RSI. |
Divergence:
|
ReverseDivergence |
A setting of false uses regular divergence as defined as follows: Bearish Divergence: Higher prices and lower oscillator - Bullish Divergence: Lower prices and higher oscillator
A setting of true uses reverse divergence as defined as follows: Bearish Divergence: Lower prices and higher oscillator - Bullish Divergence: Higher prices and lower oscillator |
|
MinimumBars |
Specifies the minimum number of required bars in between 2 price pivots. |
|
MaximumBars |
Specifies the maximum number of allowed bars in between 2 price pivots, whereas a setting of 0 disables this requirement. |
|
MaximumPivotsBack |
Specifies the maximum number of price pivots for the indicator to look back for divergence. |
|
MinPriceDifference |
Specifies the minimum required point/dollar price difference between two price pivots. This can also be a negative value in order to qualify for divergence even if the second price pivot is shy by this specified distance from the first price pivot. For example, with a setting of 1, the second price pivot high has to be at least 1 point higher from the first price pivot high in order to qualify for bearish divergence and with a setting of -1, the second price pivot high can be as much as 1 point lower than the first price pivot in order to still qualify for bearish divergence. |
|
PivotLeftStrength |
Specifies the minimum required number of bars with lower lows to the left of a pivot high or the minimum required number of bars with higher highs to the left of a pivot low in order to qualify as a previous pivot to compare for divergence. The current price for detecting divergence does not need to be an actual pivot. |
|
PivotRightStrength |
Specifies the minimum required number of bars with lower lows to the right of a pivot high or the minimum required number of bars with higher highs to the right of a pivot low in order to qualify as a previous pivot to compare for divergence. The current price for detecting divergence does not need to be an actual pivot. |
|
PivotMaxEqualBars |
Specifies the maximum number of allowed bars with equal higher highs in order to still qualify as one previous pivot high to compare for divergence or the maximum number of allowed bars with equal lows in order to still qualify as one previous pivot low to compare for divergence The current price for detecting divergence does not need to be an actual pivot. |
|
PivotUnEqualBars |
Specifies the maximum number of allowed bars with lower highs in between 2 equal highs in order to still qualify as one previous pivot high to compare for divergence or the maximum number of allowed bars with higher lows in between 2 equal lows in order to still qualify as one previous pivot low to compare for divergence The current price for detecting divergence does not need to be an actual pivot. |
|
MinimumOscHook |
Specifies the minimum oscillator hook that is required to look for divergence, whereas with a setting of 0 the oscillator needs to be hooking down or up by more than just 0. A bearish hook always creates a peak and the minimum hook distance is specified in the value difference between the peak value and the oscillator value as it slopes down. Once a hook is formed, the indicator looks for divergence back to previous pivots. With a negative setting, the oscillator does not need to hook and the indicator constantly compares price and the current oscillator value with previous pivots and their oscillator values. |
|
OscLeadingBars |
Specifies the maximum number of bars that the oscillator is expected to form a pivot before price does in order to find the corresponding price/oscillator pivots for detecting divergence. |
|
OscLaggingBars |
Specifies the maximum number of bars that the oscillator is expected to form a pivot after price does in order to find the corresponding price/oscillator pivots for detecting divergence. |
|
OppositeOscillator |
A setting of true uses opposite divergence as defined as follows: Regular opposite bearish divergence: Higher prices and higher oscillator Reverse opposite bearish divergence: Lower prices and lower oscillator Regular opposite bullish divergence: Lower prices and lower oscillator Reverse opposite bullish divergence: higher prices and higher oscillator |
|
UseThreshold1 |
Enables/disables the requirement of the first oscillator pivot to be beyond a threshold as specified with the input BearishThreshold1 and BullishThreshold1 |
|
UseThreshold2 |
Enables/disables the requirement of the second oscillator pivot to be beyond a threshold as specified with the input BearishThreshold2 and BullishThreshold2. |
|
BearishThreshold1 |
Specifies the threshold for the first bearish oscillator pivot. |
|
BearishThreshold2 |
Specifies the threshold for the second bearish oscillator pivot. |
|
BullishThreshold1 |
Specifies the threshold for the first bullish oscillator pivot. |
|
BullishThreshold2 |
Specifies the threshold for the second bullish oscillator pivot. |
|
MinOscDivergence |
Specifies the minimum required oscillator value difference between two oscillator pivots. This can also be a negative value in order to qualify for divergence even if the second oscillator price still exceeds the first oscillator pivot by this specified distance. For example, with a setting of 10, the second bearish oscillator pivot has to be lower by at least 10 from the first bearish oscillator pivot in order to qualify for bearish divergence and with a setting of -10, the second bearish oscillator pivot can still be higher than 10 points from the first bearish oscillator pivot in order to still qualify for bearish divergence. |
|
TestForOscPeakTrough |
With a setting of true, the first bearish oscillator pivot has to be the highest pivot for regular bearish divergence and the first bearish oscillator pivot has to be the lowest pivot for regular opposite bearish divergence. This avoids detecting bearish divergence if there is a higher bearish oscillator pivot in between two oscillator pivots. Vice versa, with a setting of true, the first bullish oscillator pivot has to be the lowest pivot for regular bullish divergence and the first bullish oscillator pivot has to be the highest pivot for regular opposite bullish divergence. This avoids detecting bullish divergence if there is a lower bullish oscillator pivot in between the two oscillator pivots. |
Alerts:
|
BullAlrt |
Enables/disables the alert when bullish divergence is detected. |
|
BearAlrt |
Enables/disables the alert when bearish divergence is detected. |
Charting Indicator Inputs:
Plots:
|
DivergencePlot |
Enables/disables the divergence show me dots, BullDiv and BearDiv |
|
Pivot1Plot |
Enables/disables the pivot 1 show me dots, BullPivot1 and BearPivot1. Pivot 1 is the previous pivot that the divergence is compared to. |
|
DivergencePlotOffset |
Specifies the point distance to offset the divergence show me dots from their corresponding bearish and bullish prices. |
|
Pivot1PlotOffset |
Specifies the point distance to offset the pivot 1 show me dots from their corresponding bearish and bullish prices. |
|
PlotOscillator |
Enables/disables the RSI oscillator plot. With this plot enabled, the bearish divergence and bearish pivot 1 dots are placed directly on the RSI oscillator instead of the bearish price. Please note that this indicator is defaulted for the divergence dots to be displayed above and below the price bars. Therefore, it is necessary to change the indicator scaling to Right, left or No Axis when plotting it as an oscillator. |
|
PlotThreshold1 |
Enables/disables the threshold line for the first oscillator pivot threshold as specified with the input BearishThreshold1 and BullishThreshold1. This threshold line can only be plotted with PlotOscillator set to true. The name of this plot is BearThresh1 and BullThresh1. |
|
PlotThreshold2 |
Enables/disables the threshold line for the second oscillator pivot threshold as specified with the input BearishThreshold2 and BullishThreshold2. This threshold line can only be plotted with PlotOscillator set to true. The name of this plot is BearThresh2 and BullThresh2. |
Text:
|
ShowText |
Enables/disables the divergence text that is displayed for the most recent divergence found. When the indicator is plotted as oscillator, this text is automatically disabled. |
|
Divergence text inputs: |
In order to completely customize the text objects, we broke them out into 3 separate components to be specified with separate inputs as follows: Bearish divergence text objects: BearishText + OscName + DivergenceText/ReverseDivergenceText Bullish divergence text objects: BullishText + OscName + DivergenceText/ReverseDivergenceText For example, with the input settings of BearishText as "Bearish ", OscName as "RSI" and DivergenceText as " Divergence", the bearish divergence text object would display as Bearish RSI Divergence. Please note that these inputs are string inputs which always need to be bracketed by quotation marks. |
|
TextVerticalOffset |
Specifies the point distance to offset the divergence text from their corresponding bearish and bullish prices up or down. |
|
TextHorizontalOffset |
Specifies the bar distance to offset the divergence text to the left of their corresponding bearish and bullish price bars. |
Trendlines:
|
ShowTL |
Enables/disables the trendline that connects both price pivots in order to see where the corresponding divergence points are. When the indicator is plotted as oscillator, this trendline is automatically disabled. |
|
TL_Size |
Specifies the trend line size. Please note that the trend line size can be increased only for solid trend lines. |
|
TL_Style |
Specifies the trend line style. The options are as follows: tool_solid or 1, tool_dashed or 2, tool_dotted or 3, tool_dashed2 or 4, tool_dashed3 or 5 |
RadarScreen indicator inputs:
Plots:
|
BullishText |
Specifies the text to display in the BullDiv column. Please note that this input is a string input which always needs to be bracketed by quotation marks. |
|
BearishText |
Specifies the text to display in the BearDiv column. Please note that this input is a string input which always needs to be bracketed by quotation marks. |
|
BullishForegrdColor |
Specifies the text color of the BullDiv column. |
|
BearishForegrdColor |
Specifies the text color of the BearDiv column. |
|
BullishBackgrdColor |
Specifies the background color of the BullDiv column cells when the bullish text is displayed. |
|
BearishBackgrdColor |
Specifies the background color of the BearDiv column cells when the bearish text is displayed. |
The Alchemy Ultimate Stochastic Divergence Charting Indicator (Alchemy UltDivgStoch)
The Alchemy Ultimate Stochastic Divergence charting indicator detects divergence between price and the Stochastic oscillator.
Divergence can be specified as regular divergence, opposite divergence or reverse divergence.
The divergence can be displayed as show me dots above/below price or it can be plotted as oscillator with its corresponding divergence dots.
Either, divergence pivot and previous pivot that the divergence is measured from can be displayed and the indicator can connect the 2 price pivots with trend lines.
The Alchemy Ultimate Stochastic Divergence RadarScreen Indicator (Alchemy UltDiSto RS)
The Alchemy Ultimate Stochastic Divergence RadarScreen indicator contains the same features as the charting indicator above but it is designed to be used in RadarScreen or Scanner.
Please see indicator inputs below for a more detailed description:
Charting and RadarScreen Indicator Inputs:
Price:
|
BearishPrice |
Specifies the price to be used for bearish divergence. This can be specified as high in order to look for bearish divergence between price highs and the Stochastic oscillator or it can be specified as an oscillator function to be pasted in from the EasyLanguage dictionary for bearish divergence between this oscillator and the Stochastic oscillator. |
|
BullishPrice |
Specifies the price to be used for bullish divergence. This can be specified as low in order to look for bullish divergence between price highs and the Stochastic oscillator or it can be specified as an oscillator function to be pasted in from the EasyLanguage dictionary for bullish divergence between this oscillator and the Stochastic oscillator. |
Stochastic:
|
StochLength |
Specifies the look back length to be used for the Stochastic. |
|
SmoothingLength1 |
Specifies the first smoothing length of the Stochastic. |
|
SmoothingLength2 |
Specifies the second smoothing length of the Stochastic. |
|
FastK1_SlowK2_FastD3_SlowD4 |
With a setting of 1, the FastK is used for divergence, with a setting of 2, the SlowK is used for divergence, with a setting of 3, the FastD is used for divergence and with a setting of 4, the SlowD is used for divergence. |
Divergence:
|
ReverseDivergence |
A setting of false uses regular divergence as defined as follows: Bearish Divergence: Higher prices and lower oscillator - Bullish Divergence: Lower prices and higher oscillator
A setting of true uses reverse divergence as defined as follows: Bearish Divergence: Lower prices and higher oscillator - Bullish Divergence: Higher prices and lower oscillator |
|
MinimumBars |
Specifies the minimum number of required bars in between 2 price pivots. |
|
MaximumBars |
Specifies the maximum number of allowed bars in between 2 price pivots, whereas a setting of 0 disables this requirement. |
|
MaximumPivotsBack |
Specifies the maximum number of price pivots for the indicator to look back for divergence. |
|
MinPriceDifference |
Specifies the minimum required point/dollar price difference between two price pivots. This can also be a negative value in order to qualify for divergence even if the second price pivot is shy by this specified distance from the first price pivot. For example, with a setting of 1, the second price pivot high has to be at least 1 point higher from the first price pivot high in order to qualify for bearish divergence and with a setting of -1, the second price pivot high can be as much as 1 point lower than the first price pivot in order to still qualify for bearish divergence. |
|
PivotLeftStrength |
Specifies the minimum required number of bars with lower lows to the left of a pivot high or the minimum required number of bars with higher highs to the left of a pivot low in order to qualify as a previous pivot to compare for divergence. The current price for detecting divergence does not need to be an actual pivot. |
|
PivotRightStrength |
Specifies the minimum required number of bars with lower lows to the right of a pivot high or the minimum required number of bars with higher highs to the right of a pivot low in order to qualify as a previous pivot to compare for divergence. The current price for detecting divergence does not need to be an actual pivot. |
|
PivotMaxEqualBars |
Specifies the maximum number of allowed bars with equal higher highs in order to still qualify as one previous pivot high to compare for divergence or the maximum number of allowed bars with equal lows in order to still qualify as one previous pivot low to compare for divergence The current price for detecting divergence does not need to be an actual pivot. |
|
PivotUnEqualBars |
Specifies the maximum number of allowed bars with lower highs in between 2 equal highs in order to still qualify as one previous pivot high to compare for divergence or the maximum number of allowed bars with higher lows in between 2 equal lows in order to still qualify as one previous pivot low to compare for divergence The current price for detecting divergence does not need to be an actual pivot. |
|
MinimumOscHook |
Specifies the minimum oscillator hook that is required to look for divergence, whereas with a setting of 0 the oscillator needs to be hooking down or up by more than just 0. A bearish hook always creates a peak and the minimum hook distance is specified in the value difference between the peak value and the oscillator value as it slopes down. Once a hook is formed, the indicator looks for divergence back to previous pivots. With a negative setting, the oscillator does not need to hook and the indicator constantly compares price and the current oscillator value with previous pivots and their oscillator values. |
|
OscLeadingBars |
Specifies the maximum number of bars that the oscillator is expected to form a pivot before price does in order to find the corresponding price/oscillator pivots for detecting divergence. |
|
OscLaggingBars |
Specifies the maximum number of bars that the oscillator is expected to form a pivot after price does in order to find the corresponding price/oscillator pivots for detecting divergence. |
|
OppositeOscillator |
A setting of true uses opposite divergence as defined as follows: Regular opposite bearish divergence: Higher prices and higher oscillator Reverse opposite bearish divergence: Lower prices and lower oscillator Regular opposite bullish divergence: Lower prices and lower oscillator Reverse opposite bullish divergence: higher prices and higher oscillator |
|
UseThreshold1 |
Enables/disables the requirement of the first oscillator pivot to be beyond a threshold as specified with the input BearishThreshold1 and BullishThreshold1 |
|
UseThreshold2 |
Enables/disables the requirement of the second oscillator pivot to be beyond a threshold as specified with the input BearishThreshold2 and BullishThreshold2. |
|
BearishThreshold1 |
Specifies the threshold for the first bearish oscillator pivot. |
|
BearishThreshold2 |
Specifies the threshold for the second bearish oscillator pivot. |
|
BullishThreshold1 |
Specifies the threshold for the first bullish oscillator pivot. |
|
BullishThreshold2 |
Specifies the threshold for the second bullish oscillator pivot. |
|
MinOscDivergence |
Specifies the minimum required oscillator value difference between two oscillator pivots. This can also be a negative value in order to qualify for divergence even if the second oscillator price still exceeds the first oscillator pivot by this specified distance. For example, with a setting of 10, the second bearish oscillator pivot has to be lower by at least 10 from the first bearish oscillator pivot in order to qualify for bearish divergence and with a setting of -10, the second bearish oscillator pivot can still be higher than 10 points from the first bearish oscillator pivot in order to still qualify for bearish divergence. |
|
TestForOscPeakTrough |
With a setting of true, the first bearish oscillator pivot has to be the highest pivot for regular bearish divergence and the first bearish oscillator pivot has to be the lowest pivot for regular opposite bearish divergence. This avoids detecting bearish divergence if there is a higher bearish oscillator pivot in between two oscillator pivots. Vice versa, with a setting of true, the first bullish oscillator pivot has to be the lowest pivot for regular bullish divergence and the first bullish oscillator pivot has to be the highest pivot for regular opposite bullish divergence. This avoids detecting bullish divergence if there is a lower bullish oscillator pivot in between the two oscillator pivots. |
Alerts:
|
BullAlrt |
Enables/disables the alert when bullish divergence is detected. |
|
BearAlrt |
Enables/disables the alert when bearish divergence is detected. |
Charting Indicator Inputs:
Plots:
|
DivergencePlot |
Enables/disables the divergence show me dots, BullDiv and BearDiv |
|
Pivot1Plot |
Enables/disables the pivot 1 show me dots, BullPivot1 and BearPivot1. Pivot 1 is the previous pivot that the divergence is compared to. |
|
DivergencePlotOffset |
Specifies the point distance to offset the divergence show me dots from their corresponding bearish and bullish prices. |
|
Pivot1PlotOffset |
Specifies the point distance to offset the pivot 1 show me dots from their corresponding bearish and bullish prices. |
|
PlotOscillator |
Enables/disables the Stochastic oscillator plot. With this plot enabled, the bearish divergence and bearish pivot 1 dots are placed directly on the Stochastic oscillator instead of the bearish price. Please note that this indicator is defaulted for the divergence dots to be displayed above and below the price bars. Therefore, it is necessary to change the indicator scaling to Right, left or No Axis when plotting it as an oscillator. |
|
PlotThreshold1 |
Enables/disables the threshold line for the first oscillator pivot threshold as specified with the input BearishThreshold1 and BullishThreshold1. This threshold line can only be plotted with PlotOscillator set to true. The name of this plot is BearThresh1 and BullThresh1. |
|
PlotThreshold2 |
Enables/disables the threshold line for the second oscillator pivot threshold as specified with the input BearishThreshold2 and BullishThreshold2. This threshold line can only be plotted with PlotOscillator set to true. The name of this plot is BearThresh2 and BullThresh2. |
Text:
|
ShowText |
Enables/disables the divergence text that is displayed for the most recent divergence found. When the indicator is plotted as oscillator, this text is automatically disabled. |
|
Divergence text inputs: |
In order to completely customize the text objects, we broke them out into 3 separate components to be specified with separate inputs as follows: Bearish divergence text objects: BearishText + OscName + DivergenceText/ReverseDivergenceText Bullish divergence text objects: BullishText + OscName + DivergenceText/ReverseDivergenceText For example, with the input settings of BearishText as "Bearish ", OscName as "Stoch" and DivergenceText as " Divergence", the bearish divergence text object would display as Bearish Stoch Divergence. Please note that these inputs are string inputs which always need to be bracketed by quotation marks. |
|
TextVerticalOffset |
Specifies the point distance to offset the divergence text from their corresponding bearish and bullish prices up or down. |
|
TextHorizontalOffset |
Specifies the bar distance to offset the divergence text to the left of their corresponding bearish and bullish price bars. |
Trendlines:
|
ShowTL |
Enables/disables the trendline that connects both price pivots in order to see where the corresponding divergence points are. When the indicator is plotted as oscillator, this trendline is automatically disabled. |
|
TL_Size |
Specifies the trend line size. Please note that the trend line size can be increased only for solid trend lines. |
|
TL_Style |
Specifies the trend line style. The options are as follows: tool_solid or 1, tool_dashed or 2, tool_dotted or 3, tool_dashed2 or 4, tool_dashed3 or 5 |
RadarScreen indicator inputs:
Plots:
|
BullishText |
Specifies the text to display in the BullDiv column. Please note that this input is a string input which always needs to be bracketed by quotation marks. |
|
BearishText |
Specifies the text to display in the BearDiv column. Please note that this input is a string input which always needs to be bracketed by quotation marks. |
|
BullishForegrdColor |
Specifies the text color of the BullDiv column. |
|
BearishForegrdColor |
Specifies the text color of the BearDiv column. |
|
BullishBackgrdColor |
Specifies the background color of the BullDiv column cells when the bullish text is displayed. |
|
BearishBackgrdColor |
Specifies the background color of the BearDiv column cells when the bearish text is displayed. |
Donchian Channel
The Donchian channel is an indicator used in market trading
developed by Richard Donchian. It is formed by taking the highest high and the
lowest low of the last n periods. The area between the high and the low is the
channel for the period chosen. The Donchian channel is a useful indicator
for seeing the volatility of a market price. If a price is stable the Donchian
channel will be relatively narrow. If the price fluctuates a lot the Donchian
channel will be wider. Its primary use, however, is for providing signals for
long and short positions. When price closes above the Donchian Channel,
buy long and cover short positions. When price closes below the Donchian
Channel, sell short and liquidate long positions.
The Alchemy Donchian Channel Indicator (Alchemy DonchianChannel)
The Alchemy Donchian Channel Indicator contains an upper and lower Donchian Channel plot line as well as the average line of the channels.
Indicator Inputs:
| Length: | Specifies the look back length for calculating the highest high and lowest low of the Donchian Channel lines. |
| Offset: | Specifies the number of bars to offset the highest high and lowest low calculation from the current bar. For example, with a setting of 1, the highest high and lowest low does not include the high and low of the current bar. |
| HighPrice: | Specifies the price to be used for calculating the highest high, such as high or close. |
| LowPrice: | Specifies the price to be used for calculating the lowest low, such as low or close. |
| ShowChannel: |
Enables/disables the channel lines. |
| ShowAverage: |
Enables/disables the channel average line. |
The Alchemy Rate Of Change Indicator (Alchemy RateOfChange) Available for TradeStation 9/10 only!
The Alchemy
Rate Of Change indicator measures the real time change of price movement over
the last x number of seconds to the upside as well as to the downside as a
positive and as a negative histogram. Since this is a real time indicator,
the histogram displays on a chart for the last bar only.
Indicator Inputs:
| Price | Specifies the price that is used to measure the real time change of price movement. |
| NumberSeconds | Specifies the last number of seconds over which to measure the real time change of price movement. |
| PriceDivisor | With a setting of 0, the price movement is measured in cents, ticks or pips and with a setting of 1, the price movement is measured in dollars or points |
| PlotZeroLine | Enables/disables the zero line |
The Alchemy Spreadsheet Updater Indicator (Alchemy SpreadSheetUpdater) Available for TradeStation 9/10 only!
The Alchemy Spreadsheet Updater indicator is a RadarScreen indicator that contains the columns Industry, Open, High, Low, Close and CurrentPrice. Once applied to a RadarScreen window, the indicator updates a spreadsheet with the industry name, open, high, low and close prices from this RadarScreen window in real time.
For a detailed explanation of all the features of this indicator, please refer to the input description below.
Indicator Inputs:
|
Header Text: |
|
| IndustryHeader | Specifies the header text for the Industry column to be displayed in the spreadsheet. This is a string input which needs to be within quotation marks. |
| SymbolHeader | Specifies the header text for the Symbol column to be displayed in the spreadsheet. This is a string input which needs to be within quotation marks. |
| OpenHeader | Specifies the header text for the Open column to be displayed in the spreadsheet. This is a string input which needs to be within quotation marks. |
| HighHeader | Specifies the header text for the High column to be displayed in the spreadsheet. This is a string input which needs to be within quotation marks. |
| LowHeader | Specifies the header text for the Low column to be displayed in the spreadsheet. This is a string input which needs to be within quotation marks. |
| CloseHeader | Specifies the header text for the Close column to be displayed in the spreadsheet. This is a string input which needs to be within quotation marks. |
| CurrentPriceHeader | Specifies the header text for the CurrentPrice column to be displayed in the spreadsheet. This is a string input which needs to be within quotation marks. |
|
Column Numbers: |
|
| IndustryColumnNumber | Specifies the column number for the Industry column to be displayed in the spreadsheet. With a setting of 0, this column won't be displayed. |
| SymbolColumnNumber | Specifies the column number for the Symbol column to be displayed in the spreadsheet. With a setting of 0, this column won't be displayed. |
| OpenColumnNumber | Specifies the column number for the Open column to be displayed in the spreadsheet. With a setting of 0, this column won't be displayed. |
| HighColumnNumber | Specifies the column number for the High column to be displayed in the spreadsheet. With a setting of 0, this column won't be displayed. |
| LowColumnNumber | Specifies the column number for the Low column to be displayed in the spreadsheet. With a setting of 0, this column won't be displayed. |
| CloseColumnNumber | Specifies the column number for the Close column to be displayed in the spreadsheet. With a setting of 0, this column won't be displayed. |
| CurrentPriceColumnNumber | Specifies the column number for the CurrentPrice column to be displayed in the spreadsheet. |
|
Row Numbers: |
|
| HeaderRowNumber | Specifies the row number of the header row to be displayed in the spreadsheet. With a setting of 0, the header row won't be displayed. |
| FirstRowNumber | Specifies the row number of the first symbol row to be displayed in the spreadsheet. |
|
GlobalSpreadsheet: |
|
| FileName | Specifies the file name of the spreadsheet and the location as to where this spreadsheet is located on the hard drive. This is a string input which needs to be within quotation marks. This input is defaulted to "c:/Book1.xls" and in order to use this indicator with this default setting, please create a new Excel workbook and save it to your local c directory before applying this indicator to a RadarScreen window or before opening our sample workspace. |
| SheetName | Specifies the name of the worksheet within the spreadsheet workbook. This is a string input which needs to be within quotation marks. |
| SaveSpreadSheet | When enabled, any changes to the spreadsheet will be automatically saved. |
The Alchemy Standard Deviation Indicator (Alchemy StdDev)
The Alchemy
Standard Deviation indicator plots the Standard deviation which is a statistical
term that measures the amount of variability or dispersion around an average.
Standard deviation is also a measure of volatility. Generally speaking,
dispersion is the difference between the actual value and the average value. The
larger this dispersion or variability is, the higher the standard deviation. The
smaller this dispersion or variability is, the lower the standard deviation.
Chartists can use the Standard Deviation to measure expected risk and determine
the significance of certain price movements.
For a detailed explanation of all the features of this indicator, please refer to the input description below.
Indicator Inputs:
| Price | Specifies the price that is used for calculating the standard deviation. |
| Length | Specifies the look back period. |
| AvgType | Specifies the average type to be used for the look back period. A setting of 1 uses a simple moving average, a setting of 2 uses an exponential moving average, a setting of 3 uses a weighted moving average, a setting of 4 uses a triangular moving average, a setting of 5 uses a Mid Keltner and a setting of 6 uses a Hull moving average. |
| DataType | A setting of 1 uses the entire population and a setting of 2 uses a sample in order to return the SD for the population. |
The Alchemy Standard Deviation Bands Indicator (Alchemy StdDevBands)
The Alchemy
Standard Deviation Bands indicator plots a moving average and the Standard Deviation
Bands above and below the moving average. The Standard Deviation Bands are
based on a separate moving average, independent from the moving average that
they are offset from. Both, the moving average line as well as the moving
average of the Standard Deviation bands can be specified as regular price as
well.
Indicator Inputs:
| ShowAverage | Enables/disables the average line. |
| ShowBands | Enables/disables the Standard Deviation Bands. |
| Avg_Price | Specifies the price to be used for calculating the average line |
| Avg_Length | Specifies the average line length |
| Avg_Type | Specifies the average type to be used for the average line. A setting of 1 uses a simple moving average, a setting of 2 uses an exponential moving average, a setting of 3 uses a weighted moving average, a setting of 4 uses a triangular moving average, a setting of 5 uses a Mid Keltner, a setting of 6 uses a Hull moving average and a setting of 7 uses price as specified with the input Avg_Price |
| SD_AvgPrice | Specifies the price to be used for calculating the average of the Standard Deviation. |
| SD_AvgLength | Specifies the Standard Deviation.average length. A setting of 0 disables the Standard Deviation Bands |
| SD_AvgType | Specifies the average type to be used for the Standard Deviation.average. A setting of 1 uses a simple moving average, a setting of 2 uses an exponential moving average, a setting of 3 uses a weighted moving average, a setting of 4 uses a triangular moving average, a setting of 5 uses a Mid Keltner, a setting of 6 uses a Hull moving average and a setting of 7 uses price as specified with the input SD_AvgPricee. A setting of 0 disables the Standard Deviation bands |
| SD_Factor | Specifies the band width multipler for the Standard Deviation Bands |
| SD_Length | Specifies the look back period for the Standard Deviation calculation. |
| SD_DataType | A setting of 1 uses the entire population and a setting of 2 uses a sample in order to return the Standard Deviation for the population. |
The Alchemy Standard Error Bands Indicator (Alchemy SE Bands)
The Alchemy
Standard Error Bands indicator is a type of envelope similar to Bollinger Bands
in appearance, but they are calculated and interpreted quite differently. Where
Bollinger Bands are plotted at standard deviation levels above and below a
moving average, Standard Error Bands are plotted at standard error levels above
and below a linear regression plot. Since Standard Error Bands are
statistically based, other statistical indicators such as r-squared, Standard
Error, Linear Regression, etc. work well for trade confirmation. Tight
bands are an indication of a strong trend. Prices tend to bounce between
the bands when the bands are wide. Tight bands followed by a widening of the
bands may indicate the exhaustion of a trend and a possible reversal. When
the bands reverse direction after an exhausted trend, prices tend to move in the
direction of the bands. The r-squared indicator works well in combination
with Standard Error Bands. A high r-squared value combined with tight bands
confirms a strong trend. A low r-squared value combined with wide bands confirms
that prices are consolidating.
For a detailed explanation of all the features of this indicator, please refer to the input description below.
Indicator Inputs:
| Price | Specifies which bar value (price, function, or formula) to be considered. |
| LinRegLength | Sets the number of bars to be considered. |
| SmoothingLength | Sets the number of bars to be considered for the smoothing factor. |
| Displace | Specifies the number of bars to displace the standard error bands to the left. |
| MidLineUpSlopeColor | Specifies the color for the mid line when it slopes up. |
| MidLineDownSlopeColor | Specifies the color for the mid line when it slopes down. |
| ColorBarOffset | Specifies the number of bars to offset the color change. For a histogram, point, cross, left tic or right tic, this input should be set to 0 and for lines, this input should be set to 1 bar. |
Stochastics Indicators
Our Alchemy Stochastics Indicators plot a %K and %D with overbought and oversold lines. We use a proprietary Stochastics formula for the %K and %D that is specifically designed to be very effective in the use of divergence and overbought/oversold market conditions.
The Alchemy Stochastics Overbought/Oversold Indicator (Alchemy StochOVBOVS)
The Alchemy Stochastics Overbought/Oversold indicator alerts to the Alchemy Stochastics %K and/or the Alchemy Stochastics %D crossing under the overbought and over the oversold line. This typically indicates a momentum change and it can mark the beginning of a new trend. This indicator displays show me dots and a text description above price highs for a crossing under the overbought line and it displays show me dots and a text description below price lows for a crossing over the oversold line. For a detailed explanation of all the features of this indicator, please refer to the input description below.
User Defined Inputs:
| AlchemyStochLength | Specifies the Stochastics length of the Alchemy Stochastics indicator. |
| AlchemyStochKAv | Specifies the Stochastics %K length of the Alchemy Stochastics indicator. |
| AlchemyStochDAv | Specifies the Stochastics %D length of the Alchemy Stochastics indicator. |
| AlchemyDataNumber | Specifies the data series number for which the Alchemy Stochastics indicator should be calculated over. |
| AlternativeStochK | With this input, an alternative Stochastics %K can be used instead of our Alchemy Stochastics %K. To pick an alternative Stochastics %K, click on the Dictionary... button and select your choice of Stochastics %K function. With a negative value, it disables this feature and uses our Alchemy Stochastics %K. |
| AlternativeStochD | With this input, an alternative Stochastics %D can be used instead of our Alchemy Stochastics %D. To pick an alternative Stochastics %D, click on the Dictionary... button and select your choice of Stochastics %D function. With a negative value, it disables this feature and uses our Alchemy Stochastics %D. |
| OverSold | Specifies the oversold line. A negative value disables the oversold alert. |
| OverBought | Specifies the overbought line. A negative value disables the overbought alert. |
| StochCross | Specifies the Stochastics crossing alert mode as follows: With a setting of 3, both, %K and %D have to cross the oversold/overbought line. With a setting of 2, %D has to cross first, while %K is still in the oversold/overbought territory. With a setting of -2, %D has to cross regardless of %K. With a setting of 1, %K has to cross first, while %D is still in the oversold/overbought territory. With a setting of -1, %K has to cross regardless of %D. With a setting of 0, either %K or %D crossing will generate an alert. |
| ShowPlot | Enables/disables the show me dot alert plots CrossDown and CrossUp |
| ShowText | Enables/disables the alert text on the chart. The colors of the alert text on the chart can be controlled through the plot color settings of its corresponding plot under Format Indicator > Color. Please note that when changing the plot color, the indicator needs to be disabled and then re-enabled again before the color changes of the text can take effect. |
| Plot_VerticalOffset | Specifies the vertical offset distance in number of ticks from the high/low of the bar for the show me dots |
| Text_VerticalOffset | Specifies the vertical offset distance in number of ticks from the high/low of the bar for the alert text. |
| Text_HorizontalOffset | Specifies the horizontal offset distance in number of bars for the alert text. |
| Text_HorizontalAlign | Specifies the horizontal alignment for the alert text, whereas a setting of 0 is right aligned, a setting of 1 is left aligned and a setting of 2 is center aligned. |
| Text_VerticalAlign | Specifies the vertical alignment for the alert text, whereas a setting of 0 is bottom aligned, a setting of 1 is top aligned and a setting of 2 is center aligned. |
| AlertDecimal | Specifies the number of decimal points for of the overbought/oversold line values to display in the alert notification window. With the alert enabled, this indicator generates an alert notification whenever a show me dot is displayed. This alert notification can also be viewed in the Analysis Commentary window by clicking on the corresponding bar with the Analysis Commentary tool (View > Analysis Commentary) |
The Alchemy Stochastic Slow Indicator (Alchemy StochasticSlow)
The Alchemy Stochastic Slow indicator plots a standard SlowK and SlowD line. Additionally the Alchemy Stochastic Slow indicator contains a cross plot and a cross alert when the SlowK crosses the SlowD.
User Defined Inputs:
| Stochastic Parameter Inputs: | |
| PriceH | Specifies which bar value (price, function, or formula) to use for the high in stochastic calculations. |
| PriceL | Specifies which bar value (price, function, or formula) to use for the low in stochastic calculations. |
| PriceC | Specifies which bar value (price, function, or formula) to use for the close in stochastic calculations. |
| StochLength | Sets the number of bars to consider. |
| SmoothingLength1 | Sets the constant for smoothing the fast K line. |
| SmoothingLength2 | Sets the constant for smoothing the fast D line. |
| SmoothingType | Sets the calculation method for smoothing: 1 for calculations based on the original formula. 2 to conform to legacy TradeStation calculations. |
| OverSold | Specifies the oversold territory threshold. |
| OverBought | Specifies the overbought territory threshold. |
| Plotting Inputs: | |
| ShowSlowK | Enables/disables the SlowK line. |
| ShowSlowD | Enables/disables the SlowD line. |
| ShowThresholds | Enables/disables the overbought and oversold lines. |
| ShowCross | Enables/disables the cross plot. |
| SlowK_ColorNormLength | Number of bars over which to normalize the SlowK line for gradient coloring. |
| SlowK_UpColor | Specifies the color to use for SlowK indicator values that are relatively high over SlowK_ColorNormLength bars, whereas a negative setting disables the gradient coloring of the SlowK line and uses the fixed default color for the SlowK line |
| SlowK_DnColor | Specifies the color to use for SlowK indicator values that are relatively low over SlowK_ColorNormLength bars, whereas a negative setting disables the gradient coloring of the SlowK line and uses the fixed default color for the SlowK line |
| SlowK_GridForegroundColor | Specifies the color to use for SlowK numbers in RadarScreen cells when gradient coloring is enabled, that is, when both SlowK_UpColor and SlowK_DnColor are set to non-negative values. |
| SlowD_ColorNormLength | Number of bars over which to normalize the SlowD line for gradient coloring. |
| SlowD_UpColor | Specifies the color to use for SlowD values that are relatively high over SlowD_ColorNormLength bars, whereas a negative setting disables the gradient coloring of the SlowD line and uses the fixed default color for the SlowD line |
| SlowD_DnColor | Specifies the color to use for SlowD values that are relatively low over SlowD_ColorNormLength bars, whereas a negative setting disables the gradient coloring of the SlowD line and uses the fixed default color for the SlowD line |
| SlowD_GridForegroundColor | Specifies the color to use for SlowD numbers in RadarScreen cells when gradient coloring is enabled, that is, when both SlowD_UpColor and SlowD_DnColor are set to non-negative values. |
| SlowD_CrossUpColor | Specifies the color to use for the cross plot when the SlowK crosses over the SlowD line, whereas a setting of 0 disables the cross over plot and alert. |
| SlowD_CrossDnColor | Specifies the color to use for the cross plot when the SlowK crosses under the SlowD line, whereas a setting of 0 disables the cross under plot and alert. |
| Alert Inputs: | |
| OverSoldAlert | Enables/disables the SlowD crossing over the oversold line alert notification. |
| OverBoughtAlert | Enables/disables the SlowD crossing under the overbought line alert notification. |
The Alchemy Stochastic Fast-Slow Indicator (Alchemy StochFstSlw)
The Alchemy
Stochastic Fast-Slow indicator plots a standard FastK, FastD, SlowK and SlowD
line. The FastK and SlowK line colors can be controlled through the Format
Indicator > Color window with the color plots FastKAboveD, FastKBelowD,
SlowKAboveD and SlowKBelowD. Please note that when making a color change,
the indicator needs to be disabled and then re-enabled again before the color
changes will take affect.
User Defined Inputs:
| Stochastic Parameter Inputs: | |
| PriceH | Specifies which bar value (price, function, or formula) to use for the high in stochastic calculations. |
| PriceL | Specifies which bar value (price, function, or formula) to use for the low in stochastic calculations. |
| PriceC | Specifies which bar value (price, function, or formula) to use for the close in stochastic calculations. |
| StochLength | Sets the number of bars to consider. |
| SmoothingLength1 | Sets the constant for smoothing the fast K line. |
| SmoothingLength2 | Sets the constant for smoothing the fast D line. |
| SmoothingType | Sets the calculation method for smoothing: 1 for calculations based on the original formula. 2 to conform to legacy TradeStation calculations. |
| OverSold | Specifies the oversold territory threshhold. |
| OverBought | Specifies the overbought territory threshhold. |
| Plotting Inputs: | |
| PlotFastK | Enables/disables the FastK line. |
| PlotFastD | Enables/disables the FastD line. |
| PlotSlowK | Enables/disables the SlowK line. |
| PlotSlowD | Enables/disables the SlowD line. |
| PlotOverSold | Enables/disables the oversold line. |
| PlotOverBought | Enables/disables the overbought line. |
| ColorOffset | Specifies the number of bars to offset the color change. For a histogram, point, cross, left tic or right tic, this input should be set to 0 and for lines, this input should be set to 1 bar. |
The Alchemy Double Stochastic Indicator (Alchemy DoubleStoch)
The Alchemy
Double Stochastic indicator plots the double Stochastic oscillators of
the FastK, FastD, SlowK and SlowD lines.
User Defined Inputs:
| PriceH | Specifies which bar value (price, function, or formula) to use for the high in stochastic calculations. |
| PriceL | Specifies which bar value (price, function, or formula) to use for the low in stochastic calculations. |
| PriceC | Specifies which bar value (price, function, or formula) to use for the close in stochastic calculations. |
| StochLength | Sets the number of bars to consider. |
| Length1 | Sets the constant for smoothing the fast K line. |
| Length2 | Sets the constant for smoothing the fast D line. |
| SmoothingType | Sets the calculation method for smoothing: 1 for calculations based on the original formula. 2 to conform to legacy TradeStation calculations. |
| StochasticType | A setting of 1 uses our Alchemy proprietary double Stochastic calculation and a setting of 2 uses the standard double Stochastic calculation. |
| PlotFastK | Enables/disables the FastK line. |
| PlotFastD | Enables/disables the FastD line. |
| PlotSlowK | Enables/disables the SlowK line. |
| PlotSlowD | Enables/disables the SlowD line. |
| OverBought | Specifies the overbought territory threshhold. |
| OverSold | Specifies the oversold territory threshhold. |
| FastCrossoverAlert | Enables/disables the alert notification when the fast K crosses over the fast D in oversold territory. |
| FastCrossunderAlert | Enables/disables the alert notification when the fast K crosses under the fast D in overbought territory. |
| SlowCrossoverAlert | Enables/disables the alert notification when the slow K crosses over the slow D in oversold territory. |
| SlowCrossunderAlert | Enables/disables the alert notification when the slow K crosses under the slow D in overbought territory. |
The Alchemy Stochastic Momentum Index Indicator (Alchemy SMI)
The Alchemy
Stochastic Momentum Index indicator demonstrates where the close is relative to
the middle of the last high/low range, in comparison to the close relative to
the recent low/high with the Stochastic Oscillator, which resembles the
Stochastic Momentum Index. It's an oscillator that shifts between -100 and
+100 and can be a bit less inconstant than an equal period Stochastic
Oscillator. The oscillator consists of 2 lines - the moving average of the SMI
and the SMI. The SMI will be negative if the close is less than the middle point
of the range. The SMI will be positive if the close is greater than the middle
point of the range. The SMI interpretation is in fact the same as that of
the Stochastic Oscillator. The most ordinary way of using it is to trade from is
to sell when the SMI rises above +40 and then returns to the point under that
level and to purchase at the moment when the SMI decreases under -40 and then
shifts back above it. Another trading sign is to purchase when the SMI shifts
above the moving average, and sell when the SMI decreases below the moving
average. Our Alchemy Stochastic Momentum Index indicator contains the
option of 3 different Stochastic Momentum Index formulas, our own proprietary Stochastic
Momentum Index formula, a standard TradeStation Stochastic Momentum Index
formula and a formula specific to the BarChart platform.
User Defined Inputs:
| With Type set to 1, the indicator uses a proprietary Alchemy Stochastic Momentum Index calculation as follows: | |
| Length1 | Specifies the Percent D length of the Stochastic Momentum Index. |
| Length2 | Specifies the Percent K length of the Stochastic Momentum Index. |
| Length3 | Specifies the exponential average length of the SMI value. |
| With Type set to 2, the indicator uses a standard TradeStation Stochastic Momentum Index calculation as follows: | |
| Length1 | Specifies length 1 of the Stochastic Momentum Index. |
| Length2 | Specifies length 2 of the Stochastic Momentum Index. |
| Length3 | Specifies length 3 of the Stochastic Momentum Index.. |
| With Type set to 3, the indicator uses a Stochastic Momentum Index calculation specific tp the BarChart platform as follows: | |
| Length1 | Specifies period 1 of the Stochastic Momentum Index. |
| Length2 | Specifies period 2 of the Stochastic Momentum Index. |
| Length3 | Specifies the exponential average length of the SMI value. |
| alertLevel | Specifies the positive and negative threshold lines and a negative setting disables these threshold lines. |
| PlotSMI | Enables/disables the SMI line. |
| PlotAverage | Enables/disables the SMI average line. Please note that type 2 does not support the moving average feature. |
The Alchemy Open Positions P&L Indicator (Alchemy OpenPositionsPL)
The Alchemy
Open Positions P&L indicator displays the combined real time open position
profit/loss of up to 4 trading accounts, the real time open position profit/loss
of each one of these 4 trading accounts as well the real time open position
profit/loss of one specified instrument. It contains an alert that triggers when
a specified loss or a specified profit for anyone of these accounts or
instruments is reached. This indicator can be applied on either a chart or on a
RadarScreen window.
User Defined Inputs:
| Name | Type | Description |
| Account1 | string | Specifies the first account number. |
| Account2 | string | Specifies the second account number. |
| Account3 | string | Specifies the third account number. |
| Account4 | string | Specifies the fourth account number. |
| SymbolAccount | numeric | Specifies which one of the 4 accounts is to be used for the symbol position. |
| SymbolNme | string | Specifies the name of the symbol. |
| ShowCombinedAccounts | boolean | Enables/disables the open positions P&L for all combined accounts. If only one account is used, the combined accounts are disabled. |
| ShowAccount1 | boolean | Enables/disables the open positions P&L for the first account. |
| ShowAccount2 | boolean | Enables/disables the open positions P&L for the second account. |
| ShowAccount3 | boolean | Enables/disables the open positions P&L for the third account. |
| ShowAccount4 | boolean | Enables/disables the open positions P&L for the fourth account. |
| ShowSymbol | boolean | Enables/disables the open positions P&L for the symbol. |
| ProfitAlert | numeric | Specifies the dollar profit for any one of the enabled accounts or positions, at which an alert is triggered. |
| LossAlert | numeric | Specifies the dollar loss for any one of the enabled accounts or positions, at which an alert is triggered. |
| ProfitColor | numeric | Specifies the profit color for any one of the enabled accounts or positions. |
| LossColor | numeric | Specifies the loss color for any one of the enabled accounts or positions. |
| ProfitAlertColor | numeric | Specifies the profit alert color for any one of the enabled accounts or positions. |
| LossAlertColor | numeric | Specifies the loss alert color for any one of the enabled accounts or positions. |
Oscillator Price Projection Indicators
The Oscillator Price Projection Indicators draw a trend line to a projected price point, based on the current oscillator reading. The trend line is marked with a text and it's corresponding price value.
The Alchemy RSI Projection Indicator
Indicator Inputs:
| RSI Parameters: | |
| RSI_Price | Specifies price to be used for calculating the RSI |
| RSI_Length | Specifies RSI look back length |
| ProjFact | The Projection Factor specifies the minimum required opposite divergence amount. With a value of 0, detect opposite bullish divergence whenever the RSI troughs are lower by any amount, while the price lows are higher and it detects opposite bearish divergence whenever the RSI peaks are higher by any amount, while the price highs are lower. In order to show stronger projections, this input value can be increased. |
| Price Pivots Parameters: | |
| Occur | Specifies the number of the last price pivot occurrence to be used. |
| HPrice | Specifies pivot high price to be used. |
| LPrice | Specifies pivot low price to be used. |
| Stren | Specifies the pivot strength. |
| Len | Specifies the pivot look back length. |
| MaxSwg | Specifies the maximum number of price swings to look back. The indicator will go through the entire maximum number of swings and finds the highest or lowest projection price. This is the reason why this indicator takes a lot of calculation time. To make this indicator run faster, you can reduce the number of “Maximum Swing”, but keep in mind that with a fewer number of “Maximum Swing”, the indicator can not look as far back and therefore only shows the more immediate projections. |
| Formatting Parameters: | |
| PlotProjection | Enables/disables the projection plot. |
| PlotPreviousPivot | Enables/disables the previous pivot plot. |
| ShowText | Enables/disables the text objects, displaying the price projections together with the trend lines. |
| HorPos | Specifies the number of bars to move the text objects the left of the last bar |
| BuVerPos | Specifies the number of cents, ticks or pips to move the bullish price projection text object above the projected price line. |
| BeVerPos | Specifies the number of cents, ticks or pips to move the bearish price projection text object above the projected price line. |
| ExtProj | This input extends the trend line to the right until the price meets the projection. A value of 0 draws the trend line from the projected bar to the bar where the projection occurred and moves the text object to the left of this bar, whereas a value of 1 extends the trend line to the right and moves the text object to the left of the last bar. |
| TLStyle | Specifies the trend line style. |
| TLSize | Specifies the trendline size. |
The Alchemy Stochastic Projection Indicator
Indicator Inputs:
| RSI Parameters: | |
| StochPriceH | Specifies high price to be used for calculating the Stochastic |
| StochPriceL | Specifies low price to be used for calculating the Stochastic |
| StochPriceC | Specifies close price to be used for calculating the Stochastic |
| StochLength | Specifies Stochastic look back length |
| SmoothingLength1 | Specifies Stochastic smoothing 1 length |
| SmoothingLength2 | Specifies Stochastic smoothing 2 length |
| SmoothingType | Specifies Stochastic smoothing type |
| FastK_SlowK_FastD_SlowD | A value of 1 uses the FastK, a value of 2 uses the SlowK, a value of 3 uses the FastD and a value of 4 uses the SlowD |
| ProjFact | The Projection Factor specifies the minimum required opposite divergence amount. With a value of 0, detect opposite bullish divergence whenever the Stochastic troughs are lower by any amount, while the price lows are higher and it detects opposite bearish divergence whenever the Stochastic peaks are higher by any amount, while the price highs are lower. In order to show stronger projections, this input value can be increased. |
| Price Pivots Parameters: | |
| Occur | Specifies the number of the last price pivot occurrence to be used. |
| HPrice | Specifies pivot high price to be used. |
| LPrice | Specifies pivot low price to be used. |
| Stren | Specifies the pivot strength. |
| Len | Specifies the pivot look back length. |
| MaxSwg | Specifies the maximum number of price swings to look back. The indicator will go through the entire maximum number of swings and finds the highest or lowest projection price. This is the reason why this indicator takes a lot of calculation time. To make this indicator run faster, you can reduce the number of “Maximum Swing”, but keep in mind that with a fewer number of “Maximum Swing”, the indicator can not look as far back and therefore only shows the more immediate projections. |
| Formatting Parameters: | |
| PlotProjection | Enables/disables the projection plot. |
| PlotPreviousPivot | Enables/disables the previous pivot plot. |
| ShowText | Enables/disables the text objects, displaying the price projections together with the trend lines. |
| HorPos | Specifies the number of bars to move the text objects the left of the last bar |
| BuVerPos | Specifies the number of cents, ticks or pips to move the bullish price projection text object above the projected price line. |
| BeVerPos | Specifies the number of cents, ticks or pips to move the bearish price projection text object above the projected price line. |
| ExtProj | This input extends the trend line to the right until the price meets the projection. A value of 0 draws the trend line from the projected bar to the bar where the projection occurred and moves the text object to the left of this bar, whereas a value of 1 extends the trend line to the right and moves the text object to the left of the last bar. |
| TLStyle | Specifies the trend line style. |
| TLSize | Specifies the trendline size. |
OverBought/Oversold Indicators
When an oscillator such as the Stochastics or the RSI is in oversold territory, it typically indicates that the selling pressure is exhausted and that prices might get ready to move to the upside or at least stop falling. Vice versa, when these oscillators are in overbought territory, it typically indicates that the buying pressure is exhausted and that prices might get ready to move to the downside or at least stop rising. When these conditions occur simultaneously on either 2 different oscillators or on the same oscillators on 2 different time frames, the likelihood of a price reversal greatly increases. Our Overbought/Oversold indicators spot overbought and oversold conditions on up to 2 oscillators on a single data series or on up to 2 different data series. They display show me dots and a text description above price highs for overbought conditions and they display show me dots and a text description below price lows for oversold conditions. The oscillators can be specified through indicator inputs. These indicators have the option of requiring both oscillators to be overbought/oversold before generating an alert or they can be set to alert for anyone oscillator to be overbought/oversold.
In a strong trending market, oscillators can remain in overbought/oversold territory for a long period of time before prices change direction and in order to signal a turnaround of prices, a cross of a faster oscillator is commonly used. For example, when the Stochastics D is in overbought territory and the faster oscillator Stochastics K crosses below the Stochastics D, it signals that prices may get ready to fall. Vice versa, when the Stochastics D is in oversold territory and the faster oscillator Stochastics K crosses over the Stochastics D, it signals that prices may get ready to rise. Other combinations of fast and slow oscillators would be an average of the CCI together with the CCI or an average of the MACD together with the MACD. Our Overbought/Oversold indicators contain a separate crossover oscillator for each one of the two oversold/overbought oscillators that can be used to require such crosses in order to trigger an overbought/oversold alert. For example, if a slow D is selected for the overbought/oversold oscillator and a slow K is selected for the Cross oscillator, then an oversold condition is displayed when the slow D is in oversold territory and the slow K crosses over the slow D.
The Alchemy Overbought/Oversold Indicator
The Alchemy Overbought/Oversold indicator spots overbought and oversold conditions on up to 2 oscillators on a single data series. It displays show me dots and a text description above price highs for overbought conditions and it displays show me dots and a text description below price lows for oversold conditions. The oscillators can be specified through indicator inputs. These indicators have the option of requiring both oscillators to be overbought/oversold before generating an alert or they can be set to alert for anyone oscillator to be overbought/oversold. The indicator contains a separate crossover oscillator for each one of the two oversold/overbought oscillators that can be used to require such crosses in order to trigger an overbought/oversold alert. For example, if a slow D is selected for the overbought/oversold oscillator and a slow K is selected for the Cross oscillator, then an oversold condition is displayed when the slow D is in oversold territory and the slow K crosses over the slow D.
The Alchemy Overbought/Oversold 2 Data Indicator
The Alchemy Overbought/Oversold 2 data indicator is a copy of the Alchemy Overbought/Oversold indicator with oscillator input settings for 2 data series. As default, it uses 2 slow D oscillators and 2 slow K oscillators with the same parameters but calculated on 2 different data series. It is designed to detect simultaneous overbought/oversold conditions on either 2 different time frames or 2 different markets. This indicator requires 2 data streams, data 1 and data 2 before it can be inserted. Once the initial chart is created, a second data stream needs to be inserted via Insert > Symbol. This second data stream can either be the same symbol on a higher time frame or a different symbol on the same or higher time frame. We do provide a workspace for TradeStation that contains a chart with this indicator applied on a 1 and 3 minute chart of the S&P E-Minis that can be used as a template. You can download this workspace by clicking on this link: TA OverboughtOversold ES.tsw
User Defined Inputs:
|
OVBOVSOsc1 |
Specifies the first oscillator to be used for overbought/oversold detection. To select your choice of oscillator, click on the Dictionary... button and select the User Function category. Then select the corresponding function that represents this oscillator and click on OK. You will need to type in the oscillator parameters into the parenthesis. For example, to use a 14/3/3 slow D, you would pick the SlowDCustomOrig function and replace PriceH with high, PriceL with low, PriceC with close, StochLength with 14, SmoothingLength1 with 3 and SmoothingLength2 with 3 so that it reads SlowDCustomOrig(high,low,close,14,3,3). |
|
OVBOVSOsc2 |
Specifies the second oscillator to be used for overbought/oversold detection. To select your choice of oscillator, click on the Dictionary... button and select the User Function category. Then select the corresponding function that represents this oscillator and click on OK. You will need to type in the oscillator parameters into the parenthesis. For example, to use a 14/3/3 slow D, you would pick the SlowDCustomOrig function and replace PriceH with high, PriceL with low, PriceC with close, StochLength with 14, SmoothingLength1 with 3 and SmoothingLength2 with 3 so that it reads SlowDCustomOrig(high,low,close,14,3,3). |
|
CrossOsc1 |
Specifies the oscillator to be used for a crossing requirement of this oscillator with the first oscillator. For example, if a slow D is selected for OVBOVSOsc1 and a slow K is selected for CrossOsc1, then an oversold condition is displayed when the slow D is in oversold territory and the slow K crosses over the slow D. To select your choice of oscillator, click on the Dictionary... button and select the User Function category. Then select the corresponding function that represents this oscillator and click on OK. You will need to type in the oscillator parameters into the parenthesis. For example, to use a 14/3/3 slow K, you would pick the SlowKCustomOrig function and replace PriceH with high, PriceL with low, PriceC with close, StochLength with 14, SmoothingLength1 with 3 and SmoothingLength2 with 3 so that it reads SlowKCustomOrig(high,low,close,14,3,3). |
|
CrossOsc2 |
Specifies the oscillator to be used for a crossing requirement of this oscillator with the second oscillator. For example, if a slow D is selected for OVBOVSOsc2 and a slow K is selected for CrossOsc2, then an oversold condition is displayed when the slow D is in oversold territory and the slow K crosses over the slow D. To select your choice of oscillator, click on the Dictionary... button and select the User Function category. Then select the corresponding function that represents this oscillator and click on OK. You will need to type in the oscillator parameters into the parenthesis. For example, to use a 14/3/3 slow K, you would pick the SlowKCustomOrig function and replace PriceH with high, PriceL with low, PriceC with close, StochLength with 14, SmoothingLength1 with 3 and SmoothingLength2 with 3 so that it reads SlowKCustomOrig(high,low,close,14,3,3). |
|
Osc1 |
Specifies the name of the first oscillator that is displayed in the text of the overbought/oversold indication and pop-up alert. This is a string input and the quotation marks are required. Please note that this solely determines how the text box displays and it does not effect the actual calculation of the indicator. |
|
Osc2 |
Specifies the name of the second oscillator that is displayed in the text of the overbought/oversold indication and pop-up alert. This is a string input and the quotation marks are required. Please note that this solely determines how the text box displays and it does not effect the actual calculation of the indicator. |
|
Osc1OverSold |
Specifies the oversold territory for the first oscillator. |
|
Osc1OverBought |
Specifies the overbought territory for the first oscillator. |
|
Osc2OverSold |
Specifies the oversold territory for the second oscillator. |
|
Osc2OverBought |
Specifies the overbought territory for the second oscillator. |
|
ShowOsc |
Specifies as to which and what combination of oscillators are to be used for overbought/oversold detection as follows: With a setting of 2, the indicator will display show me dots, text and/or alerts when both oscillators are simultaneously overbought or oversold. With a setting of 1, the indicator will display show me dots, text and/or alerts when both oscillators are simultaneously overbought or oversold as well as when anyone of the 2 oscillators are overbought or oversold. With a setting of -1, the indicator will display show me dots, text and/or alerts when the first oscillator is overbought or oversold. With a setting of -2, the indicator will display show me dots, text and/or alerts when the second oscillator is overbought or oversold. In order to differentiate between the various show me dots, the colors can be specified for each individual oscillator, both oscillators as well as overbought and oversold conditions separately. For color specifications, please refer to the inputs Osc1OVBColor, Osc2OVBColor, BothOVBColor, Osc1OVSColor, Osc2OVSColor and BothOVSColor. |
|
ShowOsc1Cross |
Enables/disables the requirement for a faster oscillator as specified in CrossOsc1 to cross the slower oscillator 1 as specified in OVBOVSOsc1 for overbought/oversold detection. |
|
ShowOsc2Cross |
Enables/disables the requirement for a faster oscillator as specified in CrossOsc2 to cross the slower oscillator 2 as specified in OVBOVSOsc2 for overbought/oversold detection. |
|
PrimaryCrossOsc |
Specifies the primary crossing oscillator, whereas a setting of 0 does not require for any specific oscillator to cross. This input narrows down the overbought/oversold alert to the crossing of a specified oscillator. For example, with a setting of ShowOsc set to 2, ShowOsc1Cross set to true, ShowOsc2Cross set to true and PrimaryCrossOsc set to 1, an oversold alert is only generated under the following conditions: OVBOVSOsc1 is in oversold territory, CrossOsc1 crosses over OVBOVSOsc1, OVBOVSOsc2 is in oversold territory, CrossOsc2 is above OVBOVSOsc2 |
|
ShowText |
Enables/disables the text objects created on the chart for each most recent overbought/oversold occurrence. |
|
PlotVertOffsetBoth |
Specifies the number of ticks by which to offset the dual overbought/oversold show me dot (plot1). For example, a setting of 1 moves the dual overbought show me dot 1 tick above the high of the bar and it moves the dual oversold show me dot 1 tick below the low of the bar. |
|
PlotVertOffsetOsc1 |
Specifies the number of ticks by which to offset the overbought/oversold show me dot for oscillator 1 only (plot2). For example, a setting of 1 moves the oscillator 1 overbought show me dot 1 tick above the high of the bar and it moves the oscillator 1 oversold show me dot 1 tick below the low of the bar. |
|
PlotVertOffsetOsc2 |
Specifies the number of ticks by which to offset the overbought/oversold show me dot for oscillator 2 only (plot3). For example, a setting of 1 moves the oscillator 2 overbought show me dot 1 tick above the high of the bar and it moves the oscillator 2 oversold show me dot 1 tick below the low of the bar. |
|
TextVertOffsetBoth |
Specifies the number of ticks by which to offset the dual overbought/oversold text box. For example, a setting of 1 moves the dual overbought text box 1 tick above the high of the bar and it moves the dual oversold text box 1 tick below the low of the bar. |
|
TextVertOffsetOsc1 |
Specifies the number of ticks by which to offset the overbought/oversold text box for oscillator 1 only. For example, a setting of 1 moves the oscillator 1 overbought text box 1 tick above the high of the bar and it moves the oscillator 1 oversold text box 1 tick below the low of the bar. |
|
TextVertOffsetOsc2 |
Specifies the number of ticks by which to offset the overbought/oversold text box for oscillator 2 only. For example, a setting of 1 moves the oscillator 2 overbought text box 1 tick above the high of the bar and it moves the oscillator 2 oversold text box 1 tick below the low of the bar. |
|
TextHorAlign |
Specifies the horizontal alignment of the text objects, whereas 0 equals left aligned, 1 equals right aligned and 3 equals centered aligned. |
|
TextVertAlign |
Specifies the vertical alignment of the text objects, whereas 0 equals top aligned, 1 equals bottom aligned and 3 equals centered aligned |
|
TextHorOffset |
Specifies the number of bars by which to move the dual overbought/oversold text boxes to the left from the bar that generates the overbought/oversold condition. |
|
Osc1OVBColor |
Specifies the color of the show me dots and text objects for overbought conditions of oscillator 1 only. |
|
Osc2OVBColor |
Specifies the color of the show me dots and text objects for overbought conditions of oscillator 2 only. |
|
BothOVBColor |
Specifies the color of the show me dots and text objects for dual overbought conditions. |
|
Osc1OVSColor |
Specifies the color of the show me dots and text objects for oversold conditions of oscillator 1 only. |
|
Osc2OVSColor |
Specifies the color of the show me dots and text objects for oversold conditions of oscillator 2 only. |
|
BothOVSColor |
Specifies the color of the show me dots and text objects for dual oversold conditions. |
Auto Fibonacci Retracement Indicators
Never miss a retracement level again. Identify your pullback target levels and enter the market with confidence. The Alchemy Fibonacci Retracement indicators include four different indicators: Pivot Retracement, Daily Retracement, Trend Retracement and a highly customized retracement indicator designed for maximum use with the popular S&P futures contract.
Leonardo
Fibonacci was a mathematician born in 12th century
This is a series of numbers in which every number has a relationship with the number following it, the number preceding it, as well as every other number in the series. By dividing any larger number by the following larger number you will get approximately 61.8%. So each number is approximately 61.8% of the number following it.
There are many other mathematical relationships possible, but the primary percentages that concern us in technical trading are 23.6%, 38.2%, 50% and 61.8%. These Fibonacci numbers have been rounded for simplicity sake to 25%, 38%, 50%, and 62% for purposes of determining Fibonacci retracements.
In studies of past markets it has been determined that after price makes a significant move and begins to retrace or correct, it tends to move to the levels of 25%, 38%, 50% or 62% of the previous significant move. When price moves to one of the levels and stops, you have a high probability the correction is over and the primary move will resume. Note that the direction of the primary move can be in either direction, up or down. The direction of the primary move is not a factor. In a primary down move, the direction of the correction would be up. In a primary up move, the direction of the correction would be down. The key to using and applying Fibonacci retracement levels is identifying the primary move and calculating the proper retracement levels.
The Alchemy Fibbonacci Retracement Indicators automatically calculate the primary trends and then display the appropriate retracement levels in real-time. You will always know the direction of the primary trend and where you are in any corrective phase.
The Alchemy Auto Trend Retracement Indicator
To view chart, go to: http://www.tradingalchemy.com/ViewChartsFibRetracements.htm
User Defined Inputs:
|
BegTime: |
Allows you to set the time of the first bar from when the
Alchemy Trend Retrace Indicator will start calculating the swings. The time format is in military time (e.g. |
|
BegDate: |
Allows you to set the date of the first bar from when the
Alchemy Trend Retrace Indicator will start calculating the swings. The date format is as follows: Year-Month-Day (e.g. 010510 = |
|
ShowHiLo: |
Allows you to display the swing high and the swing low either as a trendline or as a plotline. Plotlines adjust the screen scaling of the chart to the extreme high and low prices of the plot values, whereas trendlines move into view as the current market price approaches them. If the range between the highest and the lowest plot value is very large, it may compress the entire chart to a point where it becomes very hard to read the bars. In order to help with viewing the highs and lows from which the retracements are calculated, we defaulted this input to "Plot", however, if the swing high and the swing low encompass a very large range therefore causing your chart to get too compressed, you may change this input to "Trendline". |
|
ShowCurR: |
Allows you to disable the text for the current retracement percentage. A setting of "True" enables the text and a setting of "False" disables the text. It is defaulted to True. |
|
ShowAllRetracements: |
With a setting of false, the trendlines and text objects of all retracements that have been penetrated by the current closing price will disappear and with a setting of true, all retracements trend lines and text objects will remain on the chart, independent of the current price. |
|
PlotR1: |
Enables the plot for R1. Please note that the color for the R1 line and R1 text is controlled through the R1 plot color. |
|
PlotR2: |
Enables the plot for R2. Please note that the color for the R2 line and R2 text is controlled through the R2 plot color. |
|
PlotR3: |
Enables the plot for R3. Please note that the color for the R3 line and R3 text is controlled through the R3 plot color. |
|
PlotR4: |
Enables the plot for R4. Please note that the color for the R4 line and R4 text is controlled through the R4 plot color. |
|
PlotCurR: |
Enables the plot for the current retracement. |
|
AR1Color: |
Specifies the text and trend line color of the 1st retracement. |
|
AR2Color: |
Specifies the text and trend line color of the 2nd retracement. |
|
AR3Color: |
Specifies the text and trend line color of the 3rd retracement. |
|
AR4Color: |
Specifies the text and trend line color of the 4th retracement. |
|
MinRetCo: |
Specifies the text color of the current retracement percentage. |
|
UpCol: |
Specifies the text and trend line color of the swing high in an uptrend. |
|
DownCol: |
Specifies the text and trend line color of the swing low in a downtrend. |
|
NeutrCol: |
Specifies the text and trend line color of the swing low in an uptrend and the swing high in a downtrend. |
|
HiLoAlrt: |
Allows you to disable the alert when the market makes a new high or low. A setting of "True" enables the alert and a setting of "False" disables the alert. It is defaulted to True. |
|
TrndAlrt: |
Allows you to disable the alert when the market changes its trend. A setting of "True" enables the alert and a setting of "False" disables the alert. It is defaulted to True |
|
R1Alrt: |
Allows you to disable the alert when the market approaches or breaks the first retracement. A setting of "True" enables the alert and a setting of "False" disables the alert. It is defaulted to True. |
|
R2Alrt: |
Allows you to disable the alert when the market approaches or breaks the second retracement. A setting of "True" enables the alert and a setting of "False" disables the alert. It is defaulted to True. |
|
R3Alrt: |
Allows you to disable the alert when the market approaches or breaks the third retracement. A setting of "True" enables the alert and a setting of "False" disables the alert. It is defaulted to True. |
|
R4Alrt: |
Allows you to disable the alert when the market approaches or breaks the fourth retracement. A setting of "True" enables the alert and a setting of "False" disables the alert. It is defaulted to True. |
|
AlrtDist: |
Allows you to adjust the distance in ticks by how far the market can approach the first, second, third or fourth retracement before an alert is generated. It is defaulted to 10 ticks. |
|
MinBreak: |
Allows you to adjust the minimum distance in ticks by how far the market needs to break the first, second, third or fourth retracement, before an alert is generated. It is defaulted to 0 ticks. |
|
RetrVert: |
Allows you to vertically adjust the displayed text for the first, second, third and fourth retracement values. If the text sits below the plot line or trendline, a positive value will raise the text and a negative value will lower the text. If the text sits above the plot line or trendline, a positive value will lower the text and a negative value raise the text. It is defaulted to 0 ticks. |
|
HiLoVert: |
Allows you to vertically adjust the displayed text for the swing high and swing low values. If the text sits below the plot line or trendline, a positive value will raise the text and a negative value will lower the text. If the text sits above the plot line or trendline, a positive value will lower the text and a negative value raise the text. It is defaulted to 0 ticks. |
|
CurRVert: |
Allows you to vertically adjust the displayed text for the current retracement percentages. If the text sits below the plot line or trendline, a positive value will raise the text and a negative value will lower the text. If the text sits above the plot line or trendline, a positive value will lower the text and a negative value raise the text. It is defaulted to 0 ticks. |
|
HorAlign: |
Specifies the horizontal text alignment of all text objects. This is a string field which needs to stay within quotation marks. For left alignment, type in "Left" or "L", for center alignment, type in "Center" or "C" and for right alignment, type in "Right" or "R". |
|
LeftSpace: |
With this input, additional blank space can be added to the left of the text label for the purpose of moving the text labels into the extra space to the right of the last bar as created through Format > Space to the Right. For this purpose, the input HorAlign needs to be set to "Left" and all ...Hor inputs below need to be set to 0. Please note that this is a string input and the quotation marks need to remain. For example, to move the text labels 10 spaces to the right of the most recent bar, the input value would be as follows " " Again, in order for the text object to be visible, the extra space needs to be created between the last bar and the right price axis via Format > Space to the Right |
|
RetrHor: |
Allows you to horizontally adjust the displayed text for the first, second, third and fourth retracement values. Each increment will move the text one bar further to the left. It is defaulted to 46 bars. |
|
HiLoHor: |
Allows you to horizontally adjust the displayed text for the swing high and swing low values. Each increment will move the text one bar further to the left. It is defaulted to 46 bars. |
|
CurRHor: |
Allows you to horizontally adjust the displayed text for the current retracement percentages. Each increment will move the text one bar further to the left. It is defaulted to 13 bars. |
|
RetrLen: |
Allows you to adjust the length of the horizontal marks for the first, second, third and fourth retracement values. It is defaulted to 2 bars. |
|
R1: |
This user-defined input sets the percent value for the first retracement. It is defaulted to the commonly used first Fibonacci retracement percentage of 23.6%. |
|
R2: |
This user-defined input sets the percent value for the second retracement. It is defaulted to the commonly used second Fibonacci retracement percentage of 38.12%. |
|
R3: |
This user-defined input sets the percent value for the third retracement. It is defaulted to the commonly used third Fibonacci retracement percentage of 50%. |
|
R4: |
This user-defined input sets the percent value for the fourth retracement. It is defaulted to the commonly used fourth Fibonacci retracement percentage of 61.8%. |
|
TrndSens: |
This user-defined input adjusts the Trend Sensitivity of how the trend is calculated. A smaller number calculates the trend based on a shorter time frame, therefore, changing the direction of the trend more often. A larger number calculates the trend based on a longer time frame, therefore, displaying the larger trend of the market. We optimized this input to a setting of 90, however, if you wish to display shorter or longer swings, you can decrease or increase this input. |
|
MinRetP: |
Specifies the minimum retracement percentage for the current retracement plot to display. This input is useful for RadarScreen sorting symbols that are within a specified retracement percentage range |
|
MaxRetP: |
Specifies the maximum retracement percentage for the current retracement plot to display. This input is useful for RadarScreen sorting symbols that are within a specified retracement percentage range |
|
Decimal: |
Allows you to adjust the number of decimals in which the text for the first, second, third and fourth retracement values display. It is defaulted to 2 decimals. |
|
Fraction: |
If you are applying the Alchemy Trend Retrace Indicator to any symbol that reads in fractions, such as bonds, you can set this input to True and the displayed text for the first, second, third and fourth values will read in fractions (e.g. 106^30). For symbols that trade in ½ ticks such as the 10 year US Treasury Notes, the “Decimal” input needs to be set to a negative number. |
The Alchemy Auto Daily Retracement Indicator
To view chart, go to: http://www.tradingalchemy.com/ViewChartsFibRetracements.htm
User Defined Inputs:
|
StartT: |
Specifies the session start time. This is a special feature that gives this indicator the flexibility to specify the session times. With this feature, the daily swing can be displayed based on a predetermined session while plotted on an all sessions symbol. A negative setting uses TradeStation's open/high/low/close functions that are based on a calendar day. |
|
EndT: |
Specifies the session end time. This is a special feature that gives this indicator the flexibility to specify the session times. With this feature, the daily swing can be displayed based on a predetermined session while plotted on an all sessions symbol. A negative setting uses TradeStation's open/high/low/close functions that are based on a calendar day. |
|
XdayOfWeek: |
Specifies a certain day of the week to be excluded from a session to be used for the daily swing. 0=Sunday, 1=Monday, 2=Tuesday, 3=Wednesday, 4=Thursday, 5=Friday, 6=Saturday and a negative value disables this feature. |
|
Days Ago: |
Specifies the number of days ago for which to display the trend, high, low and retracements, whereas a setting of 0 calculates the current day, a setting of 1 calculates the previous day and so fourth. |
|
ShowHiLo: |
Allows you to display the daily high and the daily low either as a trendline or as a plotline. Plotlines adjust the screen scaling of the chart to the extreme high and low prices of the plot values, whereas trendlines move into view as the current market price approaches them. If the range between the highest and the lowest plot value is very large, it may compress the entire chart to a point where it becomes very hard to read the bars. In order to help with viewing the highs and lows from which the retracements are calculated, we defaulted this input to "Plot", however, if the daily high and the daily low encompass a very large range therefore causing your chart to get too compressed, you may change this input to "Trendline". |
|
ShowCurR: |
Allows you to disable the text for the current retracement percentage. A setting of "True" enables the text and a setting of "False" disables the text. It is defaulted to True. |
|
ShowAllRetracements: |
With a setting of false, the trendlines and text objects of all retracements that have been penetrated by the current closing price will disappear and with a setting of true, all retracements trend lines and text objects will remain on the chart, independent of the current price. |
|
PlotR1: |
Enables the plot for R1. Please note that the color for the R1 line and R1 text is controlled through the R1 plot color. |
|
PlotR2: |
Enables the plot for R2. Please note that the color for the R2 line and R2 text is controlled through the R2 plot color. |
|
PlotR3: |
Enables the plot for R3. Please note that the color for the R3 line and R3 text is controlled through the R3 plot color. |
|
PlotR4: |
Enables the plot for R4. Please note that the color for the R4 line and R4 text is controlled through the R4 plot color. |
|
PlotCurR: |
Enables the plot for the current retracement. |
|
AR1Color: |
Specifies the text and trend line color for the 1st retracement. |
|
AR2Color: |
Specifies the text and trend line color for the 2nd retracement. |
|
AR3Color: |
Specifies the text and trend line color for the 3rd retracement. |
|
AR4Color: |
Specifies the text and trend line color for the 4th retracement. |
|
MinRetCo: |
Specifies the text color for the current retracement percentage |
|
UpCol: |
Specifies the text and trend line color for the swing high in an uptrend. |
|
DownCol: |
Specifies the text and trend line color for the swing low in a downtrend. |
|
NeutrCol: |
Specifies the text and trend line color for the swing low in an uptrend and the swing high in a downtrend. |
|
HiLoAlrt: |
Allows you to disable the alert when the market makes a new high or low. A setting of "True" enables the alert and a setting of "False" disables the alert. It is defaulted to True. |
|
TrndAlrt: |
Allows you to disable the alert when the market changes its trend. A setting of "True" enables the alert and a setting of "False" disables the alert. It is defaulted to True. |
|
R1Alrt: |
Allows you to disable the alert when the market approaches or breaks the first retracement. A setting of "True" enables the alert and a setting of "False" disables the alert. It is defaulted to True. |
|
R2Alrt: |
Allows you to disable the alert when the market approaches or breaks the second retracement. A setting of "True" enables the alert and a setting of "False" disables the alert. It is defaulted to True. |
|
R3Alrt: |
Allows you to disable the alert when the market approaches or breaks the third retracement. A setting of "True" enables the alert and a setting of "False" disables the alert. It is defaulted to True. |
|
R4Alrt: |
Allows you to disable the alert when the market approaches or breaks the fourth retracement. A setting of "True" enables the alert and a setting of "False" disables the alert. It is defaulted to True. |
|
AlrtDist: |
Allows you to adjust the distance in ticks by how far the market can approach the first, second, third or fourth retracement before an alert is generated. It is defaulted to 10 ticks. |
|
MinBreak: |
Allows you to adjust the minimum distance in ticks by how far the market needs to break the first, second, third or fourth retracement, before an alert is generated. It is defaulted to 0 ticks. |
|
RetrVert: |
Allows you to vertically adjust the displayed text for the first, second, third and fourth retracement values. If the text sits below the plot line or trendline, a positive value will raise the text and a negative value will lower the text. If the text sits above the plot line or trendline, a positive value will lower the text and a negative value raise the text. It is defaulted to 0 ticks. |
|
HiLoVert: |
Allows you to vertically adjust the displayed text for the daily high and daily low values. If the text sits below the plot line or trendline, a positive value will raise the text and a negative value will lower the text. If the text sits above the plot line or trendline, a positive value will lower the text and a negative value raise the text. It is defaulted to 0 ticks. |
|
CurRVert: |
Allows you to vertically adjust the displayed text for the current retracement percentages. If the text sits below the plot line or trendline, a positive value will raise the text and a negative value will lower the text. If the text sits above the plot line or trendline, a positive value will lower the text and a negative value raise the text. It is defaulted to 0 ticks. |
|
HorAlign: |
Specifies the horizontal text alignment of all text objects. This is a string field which needs to stay within quotation marks. For left alignment, type in "Left" or "L", for center alignment, type in "Center" or "C" and for right alignment, type in "Right" or "R". |
|
LeftSpace: |
With this input, additional blank space can be added to the left of the text label for the purpose of moving the text labels into the extra space to the right of the last bar as created through Format > Space to the Right. For this purpose, the input HorAlign needs to be set to "Left" and all ...Hor inputs below need to be set to 0. Please note that this is a string input and the quotation marks need to remain. For example, to move the text labels 10 spaces to the right of the most recent bar, the input value would be as follows " " Again, in order for the text object to be visible, the extra space needs to be created between the last bar and the right price axis via Format > Space to the Right |
|
RetrHor: |
Allows you to horizontally adjust the displayed text for the first, second, third and fourth retracement values. Each increment will move the text one bar further to the left. It is defaulted to 46 bars. |
|
HiLoHor: |
Allows you to horizontally adjust the displayed text for the daily high and daily low values. Each increment will move the text one bar further to the left. It is defaulted to 46 bars. |
|
CurRHor: |
Allows you to horizontally adjust the displayed text for the current retracement percentages. Each increment will move the text one bar further to the left. It is defaulted to 13 bars. |
|
RetrLen: |
Allows you to adjust the length of the horizontal marks for the first, second, third and fourth retracement values. It is defaulted to 2 bars |
|
R1: |
This user-defined input sets the percent value for the first retracement. It is defaulted to the commonly used first Fibonacci retracement percentage of 23.6%. |
|
R2: |
This user-defined input sets the percent value for the second retracement. It is defaulted to the commonly used second Fibonacci retracement percentage of 38.12%. |
|
R3: |
This user-defined input sets the percent value for the third retracement. It is defaulted to the commonly used third Fibonacci retracement percentage of 50%. |
|
R4: |
This user-defined input sets the percent value for the fourth retracement. It is defaulted to the commonly used fourth Fibonacci retracement percentage of 61.8%. |
|
MinRetP: |
Specifies the minimum retracement percentage for the current retracement plot to display. This input is useful for RadarScreen sorting symbols that are within a specified retracement percentage range |
|
MaxRetP: |
Specifies the maximum retracement percentage for the current retracement plot to display. This input is useful for RadarScreen sorting symbols that are within a specified retracement percentage range |
|
Decimal: |
Allows you to adjust the number of decimals in which the text for the first, second, third and fourth values display. It is defaulted to 2 decimals. |
|
Fraction: |
If you are applying the Alchemy Daily Retrace Indicator to any symbol that reads in fractions, such as bonds, you can set this input to True and the displayed text for the first, second, third and fourth values will read in fractions (e.g. 106^30). For symbols that trade in ½ ticks such as the 10 year US Treasury Notes, the “Decimal” input needs to be set to a negative number |
The Alchemy Auto Pivot Retracement Indicator
To view chart, go to: http://www.tradingalchemy.com/ViewChartsFibRetracements.htm
User Defined Inputs:
|
BegTime: |
Allows you to set the time of the first bar from when the
Alchemy PivotRetrace Indicator will start calculating the swings. The time format is in military time (e.g. |
|
BegDate: |
Allows you to set the date of the first bar from when the
Alchemy PivotRetrace Indicator will start calculating the swings. The date format is as follows: Year-Month-Day (e.g. 010510 = |
|
DayStart: |
A setting of 1 will automatically start newly calculating the swings at the beginning of each day, therefore disregarding any previous price action. A setting of 0 will start calculating the swing with the first bar on the chart. This input is defaulted to 0. |
|
ShowHiLo: |
Allows you to display the swing high and the swing low either as a trendline or as a plotline. Plotlines adjust the screen scaling of the chart to the extreme high and low prices of the plot values, whereas trendlines move into view as the current market price approaches them. If the range between the highest and the lowest plot value is very large, it may compress the entire chart to a point where it becomes very hard to read the bars. In order to help with viewing the highs and lows from which the retracements are calculated, we defaulted this input to "Plot", however, if the swing high and the swing low encompass a very large range therefore causing your chart to get too compressed, you may change this input to "Trendline". |
|
ShowCurR: |
Allows you to disable the text for the current retracement percentage. A setting of "True" enables the text and a setting of "False" disables the text. It is defaulted to True. |
|
ShowAllRetracements: |
With a setting of false, the trendlines and text objects of all retracements that have been penetrated by the current closing price will disappear and with a setting of true, all retracements trend lines and text objects will remain on the chart, independent of the current price. |
|
PlotR1: |
Enables the plot for R1. Please note that the color for the R1 line and R1 text is controlled through the R1 plot color. |
|
PlotR2: |
Enables the plot for R2. Please note that the color for the R2 line and R2 text is controlled through the R2 plot color. |
|
PlotR3: |
Enables the plot for R3. Please note that the color for the R3 line and R3 text is controlled through the R3 plot color. |
|
PlotR4: |
Enables the plot for R4. Please note that the color for the R4 line and R4 text is controlled through the R4 plot color. |
|
PlotCurR: |
Enables the plot for the current retracement. |
|
AR1Color: |
Specifies the text and trendline color of the 1st retracement. |
|
AR2Color: |
Specifies the text and trendline color of the 2nd retracement. |
|
AR3Color: |
Specifies the text and trendline color of the 3rd retracement. |
|
AR4Color: |
Specifies the text and trendline color of the 4th retracement. |
|
MinRetCo: |
Specifies the text color of the current retracement percentage. |
|
UpCol: |
Specifies the text and trendline color for the swing high in an uptrend. |
|
DownCol: |
Specifies the text and trendline color for a swing low in a downtrend. |
|
NeutrCol: |
Specifies the text and trendline color of the swing low in an uptrend and the swing high in a downtrend. |
|
HiLoAlrt: |
Allows you to disable the alert when the market makes a new high or low. A setting of "True" enables the alert and a setting of "False" disables the alert. It is defaulted to True. |
|
TrndAlrt: |
Allows you to disable the alert when the market changes its trend. A setting of "True" enables the alert and a setting of "False" disables the alert. It is defaulted to True. |
|
R1Alrt: |
Allows you to disable the alert when the market approaches or breaks the first retracement. A setting of "True" enables the alert and a setting of "False" disables the alert. It is defaulted to True. |
|
R2Alrt: |
Allows you to disable the alert when the market approaches or breaks the second retracement. A setting of "True" enables the alert and a setting of "False" disables the alert. It is defaulted to True. |
|
R3Alrt: |
Allows you to disable the alert when the market approaches or breaks the third retracement. A setting of "True" enables the alert and a setting of "False" disables the alert. It is defaulted to True. |
|
R4Alrt: |
Allows you to disable the alert when the market approaches or breaks the fourth retracement. A setting of "True" enables the alert and a setting of "False" disables the alert. It is defaulted to True. |
|
AlrtDist: |
Allows you to adjust the distance in ticks by how far the market can approach the first, second, third or fourth retracement before an alert is generated. It is defaulted to 10 ticks. |
|
MinBreak: |
Allows you to adjust the minimum distance in ticks by how far the market needs to break the first, second, third or fourth retracement, before an alert is generated. It is defaulted to 0 ticks. |
|
RetrVert: |
Allows you to vertically adjust the displayed text for the first, second, third and fourth retracement values. If the text sits below the plot line or trendline, a positive value will raise the text and a negative value will lower the text. If the text sits above the plot line or trendline, a positive value will lower the text and a negative value raise the text. It is defaulted to 0 ticks. |
|
HiLoVert: |
Allows you to vertically adjust the displayed text for the swing high and swing low values. If the text sits below the plot line or trendline, a positive value will raise the text and a negative value will lower the text. If the text sits above the plot line or trendline, a positive value will lower the text and a negative value raise the text. It is defaulted to 0 ticks. |
|
CurRVert: |
Allows you to vertically adjust the displayed text for the current retracement percentages. If the text sits below the plot line or trendline, a positive value will raise the text and a negative value will lower the text. If the text sits above the plot line or trendline, a positive value will lower the text and a negative value raise the text. It is defaulted to 0 ticks. |
|
HorAlign: |
Specifies the horizontal text alignment of all text objects. This is a string field which needs to stay within quotation marks. For left alignment, type in "Left" or "L", for center alignment, type in "Center" or "C" and for right alignment, type in "Right" or "R". |
|
LeftSpace: |
With this input, additional blank space can be added to the left of the text label for the purpose of moving the text labels into the extra space to the right of the last bar as created through Format > Space to the Right. For this purpose, the input HorAlign needs to be set to "Left" and all ...Hor inputs below need to be set to 0. Please note that this is a string input and the quotation marks need to remain. For example, to move the text labels 10 spaces to the right of the most recent bar, the input value would be as follows " " Again, in order for the text object to be visible, the extra space needs to be created between the last bar and the right price axis via Format > Space to the Right |
|
RetrHor: |
Allows you to horizontally adjust the displayed text for the first, second, third and fourth retracement values. Each increment will move the text one bar further to the left. It is defaulted to 46 bars. |
|
HiLoHor: |
Allows you to horizontally adjust the displayed text for the swing high and swing low values. Each increment will move the text one bar further to the left. It is defaulted to 46 bars. |
|
CurRHor: |
Allows you to horizontally adjust the displayed text for the current retracement percentages. Each increment will move the text one bar further to the left. It is defaulted to 13 bars |
|
RetrLen: |
Allows you to adjust the length of the horizontal marks for the first, second, third and fourth retracement values. It is defaulted to 2 bars. |
|
R1: |
This user-defined input sets the percent value for the first retracement. It is defaulted to the commonly used first Fibonacci retracement percentage of 23.6%. |
|
R2: |
This user-defined input sets the percent value for the second retracement. It is defaulted to the commonly used second Fibonacci retracement percentage of 38.12%. |
|
R3: |
This user-defined input sets the percent value for the third retracement. It is defaulted to the commonly used third Fibonacci retracement percentage of 50%. |
|
R4: |
This user-defined input sets the percent value for the fourth retracement. It is defaulted to the commonly used fourth Fibonacci retracement percentage of 61.8%. |
|
MinRetP: |
Specifies the minimum retracement percentage for the current retracement plot to display. This input is useful for RadarScreen sorting symbols that are within a specified retracement percentage range |
|
MaxRetP: |
Specifies the maximum retracement percentage for the current retracement plot to display. This input is useful for RadarScreen sorting symbols that are within a specified retracement percentage range |
|
MinRetr: |
Specifies the minimum point/dollar retracement in order for a retracement pivot to qualify. |
|
InSwg: |
Specifies the minimum initial point/dollar swing size before the indicator looks for a retracement. |
|
PivStren: |
This user-defined input determines the minimum requirement for number of bars making lower highs following a swing high in an uptrend or making higher lows following a swing low in a downtrend, in order to qualifiy for a retracement pivot. We defaulted this input to 4 bars, however, if you wish to display shorter term swings or longer term swings, you may decrease or increase this input respectively. |
|
Decimal: |
Allows you to adjust the number of decimals in which the text for the first, second, third and fourth values display. It is defaulted to 2 decimals. |
|
Fraction: |
If you are applying the Alchemy Pivot Retrace Indicator to any symbol that reads in fractions, such as bonds, you can set this input to True and the displayed text for the first, second, third and fourth values will read in fractions (e.g. 106^30). For symbols that trade in ½ ticks such as the 10 year US Treasury Notes, the “Decimal” input needs to be set to a negative number.. |
The Alchemy Auto S&P Pivot Retracement Indicator
For TradeStation 4.0 or SuperCharts RT, use the following indicators:
Alchemy CurS&PPivRetr
Alchemy S&PPivotHiLo
Alchemy S&PPivotR1R2
Alchemy S&PPivotR3R4
To view chart, go to: http://www.tradingalchemy.com/ViewChartsFibRetracements.htm
User Defined Inputs:
|
BegTime: |
Allows you to set the time of the first bar from when the
Alchemy S&PPivRetr Indicator will start calculating the swings. The time format is in military time (e.g. |
|
BegDate: |
Allows you to set the date of the first bar from when the
Alchemy S&PPivRetr Indicator will start calculating the swings. The date format is as follows: Year-Month-Day (e.g. 010510 = |
|
DayStart: |
A setting of 1 will automatically start newly calculating the swings at the beginning of each day, therefore disregarding any previous price action. A setting of 0 will start calculating the swing with the first bar on the chart. This input is defaulted to 0. |
|
ShowHiLo: |
Allows you to display the swing high and the swing low either as a trendline or as a plotline. Plotlines adjust the screen scaling of the chart to the extreme high and low prices of the plot values, whereas trendlines move into view as the current market price approaches them. If the range between the highest and the lowest plot value is very large, it may compress the entire chart to a point where it becomes very hard to read the bars. In order to help with viewing the highs and lows from which the retracements are calculated, we defaulted this input to "Plot", however, if the swing high and the swing low encompass a very large range therefore causing your chart to get too compressed, you may change this input to "Trendline". |
|
ShowCurR: |
Allows you to disable the text for the current retracement percentage. A setting of "True" enables the text and a setting of "False" disables the text. It is defaulted to True. |
|
ShowAllRetracements: |
With a setting of false, the trendlines and text objects of all retracements that have been penetrated by the current closing price will disappear and with a setting of true, all retracements trend lines and text objects will remain on the chart, independent of the current price. |
|
PlotR1: |
Enables the plot for R1. Please note that the color for the R1 line and R1 text is controlled through the R1 plot color. |
|
PlotR2: |
Enables the plot for R2. Please note that the color for the R2 line and R2 text is controlled through the R2 plot color. |
|
PlotR3: |
Enables the plot for R3. Please note that the color for the R3 line and R3 text is controlled through the R3 plot color. |
|
PlotR4: |
Enables the plot for R4. Please note that the color for the R4 line and R4 text is controlled through the R4 plot color. |
|
PlotCurR: |
Enables the plot for the current retracement. |
|
AR1Color: |
Specifies the text and trend line color of the 1st retracement. |
|
AR2Color: |
Specifies the text and trend line color of the 2nd retracement. |
|
AR3Color: |
Specifies the text and trend line color of the 3rd retracement. |
|
AR4Color: |
Specifies the text and trend line color of the 4th retracement. |
|
MinRetCo: |
Specifies the text color of the current retracement percentage. |
|
UpCol: |
Specifies the text and trend line color of the swing high in an uptrend. |
|
DownCol: |
Specifies the text and trend line color of the swing low in a downtrend. |
|
NeutrCol: |
Specifies the text and trend line color of the swing low in an uptrend and the swing high in a downtrend. |
|
HiLoAlrt: |
Allows you to disable the alert when the market makes a new high or low. A setting of "True" enables the alert and a setting of "False" disables the alert. It is defaulted to True. |
|
TrndAlrt: |
Allows you to disable the alert when the market changes its trend. A setting of "True" enables the alert and a setting of "False" disables the alert. It is defaulted to True. |
|
R1Alrt: |
Allows you to disable the alert when the market approaches or breaks the first retracement. A setting of "True" enables the alert and a setting of "False" disables the alert. It is defaulted to True. |
|
R2Alrt: |
Allows you to disable the alert when the market approaches or breaks the second retracement. A setting of "True" enables the alert and a setting of "False" disables the alert. It is defaulted to True. |
|
R3Alrt: |
Allows you to disable the alert when the market approaches or breaks the third retracement. A setting of "True" enables the alert and a setting of "False" disables the alert. It is defaulted to True. |
|
R4Alrt: |
Allows you to disable the alert when the market approaches or breaks the fourth retracement. A setting of "True" enables the alert and a setting of "False" disables the alert. It is defaulted to True. |
|
AlrtDist: |
Allows you to adjust the distance in ticks by how far the market can approach the first, second, third or fourth retracement before an alert is generated. It is defaulted to 10 ticks. |
|
MinBreak: |
Allows you to adjust the minimum distance in ticks by how far the market needs to break the first, second, third or fourth retracement, before an alert is generated. It is defaulted to 0 ticks. |
|
RetrVert: |
Allows you to vertically adjust the displayed text for the first, second, third and fourth retracement values. If the text sits below the plot line or trendline, a positive value will raise the text and a negative value will lower the text. If the text sits above the plot line or trendline, a positive value will lower the text and a negative value raise the text. It is defaulted to 0 ticks. |
|
HiLoVert: |
Allows you to vertically adjust the displayed text for the swing high and swing low values. If the text sits below the plot line or trendline, a positive value will raise the text and a negative value will lower the text. If the text sits above the plot line or trendline, a positive value will lower the text and a negative value raise the text. It is defaulted to 0 ticks. |
|
CurRVert: |
Allows you to vertically adjust the displayed text for the current retracement percentages. If the text sits below the plot line or trendline, a positive value will raise the text and a negative value will lower the text. If the text sits above the plot line or trendline, a positive value will lower the text and a negative value raise the text. It is defaulted to 0 ticks |
|
HorAlign: |
Specifies the horizontal text alignment of all text objects. This is a string field which needs to stay within quotation marks. For left alignment, type in "Left" or "L", for center alignment, type in "Center" or "C" and for right alignment, type in "Right" or "R". |
|
LeftSpace: |
With this input, additional blank space can be added to the left of the text label for the purpose of moving the text labels into the extra space to the right of the last bar as created through Format > Space to the Right. For this purpose, the input HorAlign needs to be set to "Left" and all ...Hor inputs below need to be set to 0. Please note that this is a string input and the quotation marks need to remain. For example, to move the text labels 10 spaces to the right of the most recent bar, the input value would be as follows " " Again, in order for the text object to be visible, the extra space needs to be created between the last bar and the right price axis via Format > Space to the Right |
|
RetrHor: |
Allows you to horizontally adjust the displayed text for the first, second, third and fourth retracement values. Each increment will move the text one bar further to the left. It is defaulted to 46 bars. |
|
HiLoHor: |
Allows you to horizontally adjust the displayed text for the swing high and swing low values. Each increment will move the text one bar further to the left. It is defaulted to 46 bars. |
|
CurRHor: |
Allows you to horizontally adjust the displayed text for the current retracement percentages. Each increment will move the text one bar further to the left. It is defaulted to 13 bars. |
|
RetrLen: |
Allows you to adjust the length of the horizontal marks for the first, second, third and fourth retracement values. It is defaulted to 2 bars. |
|
R1: |
This user-defined input sets the percent value for the first retracement. It is defaulted to the commonly used first Fibonacci retracement percentage of 23.6%. |
|
R2: |
This user-defined input sets the percent value for the second retracement. It is defaulted to the commonly used second Fibonacci retracement percentage of 38.12%. |
|
R3: |
This user-defined input sets the percent value for the third retracement. It is defaulted to the commonly used third Fibonacci retracement percentage of 50%. |
|
R4: |
This user-defined input sets the percent value for the fourth retracement. It is defaulted to the commonly used fourth Fibonacci retracement percentage of 61.8%. |
|
MinRetP: |
Specifies the minimum retracement percentage for the current retracement plot to display. This input is useful for RadarScreen sorting symbols that are within a specified retracement percentage range |
|
MaxRetP: |
Specifies the maximum retracement percentage for the current retracement plot to display. This input is useful for RadarScreen sorting symbols that are within a specified retracement percentage range |
|
MinRetr: |
Specifies the minimum point/dollar retracement for a retracement pivot to qualify. |
|
InSwg: |
Specifies the minimum initial point/dollar swing size before the indicator looks for a retracement. |
|
PivStren: |
This user-defined input determines the minimum requirement for number of bars making lower highs following a swing high in an uptrend or making higher lows following a swing low in a downtrend, in order to qualifiy for a retracement pivot. We defaulted this input to 4 bars, however, if you wish to display shorter term swings or longer term swings, you may decrease or increase this input respectively. |
|
Decimal: |
Allows you to adjust the number of decimals in which the text for the first, second, third and fourth values display. It is defaulted to 2 decimals. |
|
Fraction: |
If you are applying the Alchemy S&PPivRetr Indicator to any symbol that reads in fractions, such as bonds, you can set this input to True and the displayed text for the first, second, third and fourth values will read in fractions (e.g. 106^30). For symbols that trade in ½ ticks such as the 10 year US Treasury Notes, the “Decimal” input needs to be set to a negative number |
The Alchemy Auto Swing Retracement Indicator
The Alchemy Auto Swing Retracement Indicator calculates swings and displays real time fibonnacci retracements starting from a preset swing point that can be specified with indicator inputs. This indicator also contains a swing end feature in order to display historical swings and their retracements. This retracement indicator is designed to offer the flexibility of picking multiple swing starting points in order to look for confluence on retracement levels between larger swings and more recent swings. For example, if the 62% retracement of the most recent swing is in the same area as the 38% retacement of a larger swing, it makes for a much stronger support or resistance, therefore increasing the reliability of a trend continuation when prices pullback to these retracement confluences. In order to display multiple swings, this indicator can be inserted into the same chart several times with different swing start settings for each indicator. The various swings and retracements can be differentiated by identifying them with a different name such as Swing1, Swing2, etc. Additionally, the colors can be specified individually for each retracement level and swing high/low.
To view chart, go to: http://www.tradingalchemy.com/ViewChartsFibRetracements.htm
User Defined Inputs:
|
SwingIdentifier: |
Names the swing in the displayed text objects for its corresponding swing high, swing low, retracement percentages and current retracement percentage. When inserting several swing retracement indicators with different swing points, this identifies each swing with a unique name such as Swing1, Swing2 and so fourth. This is a string input and the text to be displayed needs to be in quotation marks. |
|
SwingStartDate_YYYYMMDD: |
Specifies the date of the bar that starts the swing
calculation. The date format is as follows: Year-Month-Day (e.g. |
|
SwingStartTime: |
Specifies the time of the bar that starts the swing
calculation. The time format is in military time (e.g. |
|
SwingEndDate_YYYYMMDD: |
Specifies the date of the bar that stops the swing
calculation. The date format is as follows: Year-Month-Day (e.g. |
|
SwingEndTime: |
Specifies the time of the bar that stops the swing
calculation. The time format is in military time (e.g. |
|
ShowHiLo: |
Allows you to display the swing high and the swing low either as a trendline or as a plotline. Plotlines adjust the screen scaling of the chart to the extreme high and low prices of the plot values, whereas trendlines move into view as the current market price approaches them. If the range between the highest and the lowest plot value is very large, it may compress the entire chart to a point where it becomes very hard to read the bars. In order to help with viewing the highs and lows from which the retracements are calculated, we defaulted this input to "Plot", however, if the swing high and the swing low encompass a very large range therefore causing your chart to get too compressed, you may change this input to "Trendline". |
|
ShowCurR: |
Allows you to disable the text for the current retracement percentage. A setting of "True" enables the text and a setting of "False" disables the text. It is defaulted to True. |
|
|
|
|
|
TradeStation 8/9: |
|
ShowAllRetracements: |
With a setting of false, the trendlines and text objects of all retracements that have been penetrated by the current closing price will disappear and with a setting of true, all retracements trend lines and text objects will remain on the chart, independent of the current price. |
|
PlotR1: |
Enables the plot for R1. Please note that the color for the R1 line and R1 text is controlled through the R1 plot color. |
|
PlotR2: |
Enables the plot for R2. Please note that the color for the R2 line and R2 text is controlled through the R2 plot color. |
|
PlotR3: |
Enables the plot for R3. Please note that the color for the R3 line and R3 text is controlled through the R3 plot color. |
|
PlotR4: |
Enables the plot for R4. Please note that the color for the R4 line and R4 text is controlled through the R4 plot color. |
|
PlotCurR: |
Enables the plot for the current retracement. |
|
|
|
|
|
TradeStation 2000i, TradeStation 4 and SuperCharts: |
|
AR1Color: |
Specifies the text and trend line color of the 1st retracement. |
|
AR2Color: |
Specifies the text and trend line color of the 2nd retracement. |
|
AR3Color: |
Specifies the text and trend line color of the 3rd retracement. |
|
AR4Color: |
Specifies the text and trend line color of the 4th retracement. |
|
|
|
|
|
All Versions: |
|
MinRetCo: |
Specifies the text color of the current retracement percentage. |
|
UpCol: |
Specifies the text and trend line color of the swing high in an uptrend. |
|
DownCol: |
Specifies the text and trend line color of the swing low in a downtrend. |
|
NeutrCol: |
Specifies the text and trend line color of the swing low in an uptrend and the swing high in a downtrend. |
|
HiLoAlrt: |
Allows you to disable the alert when the market makes a new high or low. A setting of "True" enables the alert and a setting of "False" disables the alert. It is defaulted to True. |
|
TrndAlrt: |
Allows you to disable the alert when the market changes its trend. A setting of "True" enables the alert and a setting of "False" disables the alert. It is defaulted to True. |
|
R1Alrt: |
Allows you to disable the alert when the market approaches or breaks the first retracement. A setting of "True" enables the alert and a setting of "False" disables the alert. It is defaulted to True. |
|
R2Alrt: |
Allows you to disable the alert when the market approaches or breaks the second retracement. A setting of "True" enables the alert and a setting of "False" disables the alert. It is defaulted to True. |
|
R3Alrt: |
Allows you to disable the alert when the market approaches or breaks the third retracement. A setting of "True" enables the alert and a setting of "False" disables the alert. It is defaulted to True. |
|
R4Alrt: |
Allows you to disable the alert when the market approaches or breaks the fourth retracement. A setting of "True" enables the alert and a setting of "False" disables the alert. It is defaulted to True. |
|
AlrtDist: |
Allows you to adjust the distance in ticks by how far the market can approach the first, second, third or fourth retracement before an alert is generated. It is defaulted to 10 ticks. |
|
MinBreak: |
Allows you to adjust the minimum distance in ticks by how far the market needs to break the first, second, third or fourth retracement, before an alert is generated. It is defaulted to 0 ticks. |
|
RetrVert: |
Allows you to vertically adjust the displayed text for the first, second, third and fourth retracement values. If the text sits below the plot line or trendline, a positive value will raise the text and a negative value will lower the text. If the text sits above the plot line or trendline, a positive value will lower the text and a negative value raise the text. It is defaulted to 0 ticks. |
|
HiLoVert: |
Allows you to vertically adjust the displayed text for the swing high and swing low values. If the text sits below the plot line or trendline, a positive value will raise the text and a negative value will lower the text. If the text sits above the plot line or trendline, a positive value will lower the text and a negative value raise the text. It is defaulted to 0 ticks. |
|
CurRVert: |
Allows you to vertically adjust the displayed text for the current retracement percentages. If the text sits below the plot line or trendline, a positive value will raise the text and a negative value will lower the text. If the text sits above the plot line or trendline, a positive value will lower the text and a negative value raise the text. It is defaulted to 0 ticks |
|
HorAlign: |
Specifies the horizontal text alignment of all text objects. This is a string field which needs to stay within quotation marks. For left alignment, type in "Left" or "L", for center alignment, type in "Center" or "C" and for right alignment, type in "Right" or "R". |
|
LeftSpace: |
With this input, additional blank space can be added to the left of the text label for the purpose of moving the text labels into the extra space to the right of the last bar as created through Format > Space to the Right. For this purpose, the input HorAlign needs to be set to "Left" and all ...Hor inputs below need to be set to 0. Please note that this is a string input and the quotation marks need to remain. For example, to move the text labels 10 spaces to the right of the most recent bar, the input value would be as follows " " Again, in order for the text object to be visible, the extra space needs to be created between the last bar and the right price axis via Format > Space to the Right |
|
RetrHor: |
Allows you to horizontally adjust the displayed text for the first, second, third and fourth retracement values. Each increment will move the text one bar further to the left. It is defaulted to 46 bars. |
|
HiLoHor: |
Allows you to horizontally adjust the displayed text for the swing high and swing low values. Each increment will move the text one bar further to the left. It is defaulted to 46 bars. |
|
CurRHor: |
Allows you to horizontally adjust the displayed text for the current retracement percentages. Each increment will move the text one bar further to the left. It is defaulted to 13 bars. |
|
RetrLen: |
Allows you to adjust the length of the horizontal marks for the first, second, third and fourth retracement values. It is defaulted to 2 bars. |
|
R1: |
This user-defined input sets the percent value for the first retracement. It is defaulted to the commonly used first Fibonacci retracement percentage of 23.6%. |
|
R2: |
This user-defined input sets the percent value for the second retracement. It is defaulted to the commonly used second Fibonacci retracement percentage of 38.12%. |
|
R3: |
This user-defined input sets the percent value for the third retracement. It is defaulted to the commonly used third Fibonacci retracement percentage of 50%. |
|
R4: |
This user-defined input sets the percent value for the fourth retracement. It is defaulted to the commonly used fourth Fibonacci retracement percentage of 61.8%. |
|
MinRetP: |
Specifies the minimum retracement percentage for the current retracement plot to display. This input is useful for RadarScreen sorting symbols that are within a specified retracement percentage range |
|
MaxRetP: |
Specifies the maximum retracement percentage for the current retracement plot to display. This input is useful for RadarScreen sorting symbols that are within a specified retracement percentage range |
|
Decimal: |
Allows you to adjust the number of decimals in which the text for the first, second, third and fourth values display. It is defaulted to 2 decimals. |
|
Fraction: |
If you are applying the Alchemy S&PPivRetr Indicator to any symbol that reads in fractions, such as bonds, you can set this input to True and the displayed text for the first, second, third and fourth values will read in fractions (e.g. 106^30). For symbols that trade in ½ ticks such as the 10 year US Treasury Notes, the “Decimal” input needs to be set to a negative number |
Auto Fibonacci Retracement/Extension Indicators
The Alchemy Auto Fibonacci Retracement/Extension Indicators automatically calculate swing highs and swing lows based on various swing point conditions. They identify the trend and automatically display 4 Fibonacci retracements, 4 Fibonacci extensions, the swing high, the swing low, the actual retracement prices and the current retracement percentage based on these swings. There are 5 different types of Auto Fibonacci Retracement/Extension Indicators and each type is available as a charting indicator and as a RadarScreen indicator.
Common inputs for all indicators:
|
R1: |
This user-defined input sets the percent value for the first retracement. It is defaulted to the commonly used first Fibonacci retracement percentage of 23.6%. A setting of 0 disables this retracement level. |
|
R2: |
This user-defined input sets the percent value for the second retracement. It is defaulted to the commonly used second Fibonacci retracement percentage of 38.12%. A setting of 0 disables this retracement level. |
|
R3: |
This user-defined input sets the percent value for the third retracement. It is defaulted to the commonly used third Fibonacci retracement percentage of 50%. A setting of 0 disables this retracement level. |
|
R4: |
This user-defined input sets the percent value for the fourth retracement. It is defaulted to the commonly used fourth Fibonacci retracement percentage of 61.8%. A setting of 0 disables this retracement level. |
|
X1: |
This user-defined input sets the percent value for the first extension. It is defaulted to the commonly used first Fibonacci extension percentage of 38.2%. A setting of 0 disables this extension level. |
|
X2: |
This user-defined input sets the percent value for the second extension. It is defaulted to the commonly used second Fibonacci extension percentage of 61.8%. A setting of 0 disables this extension level. |
|
X3: |
This user-defined input sets the percent value for the third extension. It is defaulted to the commonly used third Fibonacci extension percentage of 138.2%. A setting of 0 disables this extension level. |
|
X4: |
This user-defined input sets the percent value for the fourth extension. It is defaulted to the commonly used fourth Fibonacci extension percentage of 161.8%. A setting of 0 disables this extension level. |
|
PlotSwingHigh: |
Enables/disables the swing high plot. |
|
PlotSwingLow: |
Enables/disables the swing low plot. |
|
PlotR1: |
Enables/disables the plot for the first retracement. |
|
PlotR2: |
Enables/disables the plot for the second retracement. |
|
PlotR3: |
Enables/disables the plot for the third retracement. |
|
PlotR4: |
Enables/disables the plot for the fourth retracement. |
|
PlotX1: |
Enables/disables the plot for the first extension. |
|
PlotX2: |
Enables/disables the plot for the second extension. |
|
PlotX3: |
Enables/disables the plot for the third extension. |
|
PlotX4: |
Enables/disables the plot for the fourth extension. |
|
PlotRetracement: |
Enables/disables the retracement plot. |
|
UpCol: |
Specifies the text and trend line color of the swing high in an uptrend. |
|
DownCol: |
Specifies the text and trend line color of the swing low in a downtrend. |
|
NeutrCol: |
Specifies the text and trend line color of the swing low in an uptrend and the swing high in a downtrend. |
|
HiLoAlrt: |
Allows you to disable the alert when the market makes a new high or low. A setting of "True" enables the alert and a setting of "False" disables the alert. |
|
TrndAlrt: |
Allows you to disable the alert when the market changes its trend. A setting of "True" enables the alert and a setting of "False" disables the alert. |
|
R1Alrt: |
Allows you to disable the alert when the market approaches or breaks the first retracement. A setting of "True" enables the alert and a setting of "False" disables the alert. |
|
R2Alrt: |
Allows you to disable the alert when the market approaches or breaks the second retracement. A setting of "True" enables the alert and a setting of "False" disables the alert. |
|
R3Alrt: |
Allows you to disable the alert when the market approaches or breaks the third retracement. A setting of "True" enables the alert and a setting of "False" disables the alert. |
|
R4Alrt: |
Allows you to disable the alert when the market approaches or breaks the fourth retracement. A setting of "True" enables the alert and a setting of "False" disables the alert. |
|
AlrtDist: |
Allows you to adjust the distance in ticks by how far the market can approach the first, second, third or fourth retracement before an alert is generated. |
|
MinBreak: |
Allows you to adjust the minimum distance in ticks by how far the market needs to break the first, second, third or fourth retracement, before an alert is generated. |
|
MinRetP: |
Specifies the minimum retracement percentage that the current retracement percentage displays |
|
MaxRetP: |
Specifies the maximum retracement percentage that the current retracement percentage displays |
|
Decimal: |
Specifies the number of decimals for the retracements, swing high and swing low prices display. |
|
Fraction: |
Specifies if the prices for the retracements, swing high and swing low are displayed in fractions. |
|
PercDec: |
Specifies the number of decimals for the percentage display. |
Common inputs for all charting indicators:
|
ShowAllRetracements: |
With a setting of false, the trendlines and text objects of all retracements that have been penetrated by the current closing price will disappear and with a setting of true, all retracements trend lines and text objects will remain on the chart, independent of the current price. |
|
ShowSwingHigh_TL: |
Enables/disables the swing high trend line. |
|
ShowSwingHigh_Txt: |
Enables/disables the swing high text label. |
|
ShowSwingLow_TL: |
Enables/disables the swing low trend line. |
|
ShowSwingLow_Txt: |
Enables/disables the swing low text label. |
|
ShowCurR: |
Allows you to disable the text for the current retracement percentage. A setting of "True" enables the text and a setting of "False" disables the text. |
|
ShowRetracement_TL: |
Enables/disables the trend lines for the current retracement prices. |
|
ShowRetracement_Txt: |
Enables/disables the text labels for the current retracement prices. |
|
ShowExtension_TL: |
Enables/disables the trend lines for the current extension prices. |
|
ShowExtension_Txt: |
Enables/disables the text labels for the current extension prices. |
|
MinRetCo: |
Specifies the text color of the current retracement percentage. |
|
RetrVert: |
Allows you to vertically adjust the displayed text for the first, second, third and fourth retracement values. If the text sits below the plot line or trendline, a positive value will raise the text and a negative value will lower the text. If the text sits above the plot line or trendline, a positive value will lower the text and a negative value raise the text. |
|
HiLoVert: |
Allows you to vertically adjust the displayed text for the swing high and swing low values. If the text sits below the plot line or trendline, a positive value will raise the text and a negative value will lower the text. If the text sits above the plot line or trendline, a positive value will lower the text and a negative value raise the text. |
|
CurRVert: |
Allows you to vertically adjust the displayed text for the current retracement percentages. If the text sits below the plot line or trendline, a positive value will raise the text and a negative value will lower the text. If the text sits above the plot line or trendline, a positive value will lower the text and a negative value raise the text. |
|
RetrHor: |
Allows you to horizontally adjust the displayed text for the first, second, third and fourth retracement values. Each increment will move the text one bar further to the left. |
|
HiLoHor: |
Allows you to horizontally adjust the displayed text for the swing high and swing low values. Each increment will move the text one bar further to the left. |
|
CurRHor: |
Allows you to horizontally adjust the displayed text for the current retracement percentages. Each increment will move the text one bar further to the left. |
|
RetrLen: |
Allows you to adjust the length of the horizontal marks for the first, second, third and fourth retracement values. |
|
ExtLen: |
Allows you to adjust the length of the horizontal marks for the first, second, third and fourth extension prices. |
|
ExtHor: |
Allows you to horizontally adjust the the first, second, third and fourth extension text labels. Each increment will move the text one bar further to the left. |
|
ExtVert: |
Allows you to vertically adjust the the first, second, third and fourth extension text labels. If the text sits below the plot line or trendline, a positive value will raise the text and a negative value will lower the text. If the text sits above the plot line or trendline, a positive value will lower the text and a negative value raise the text. |
|
TLStyle: |
Specifies the style for all trend lines. |
|
TLSize: |
Specifies the size for all trend lines. |
|
HorAlign: |
Specifies the horizontal alignment for all text labels. For right horizontal alignment enter "Right" into this input, for left horizontal alignment enter "Left" into this input and for center horizontal alignment enter "Center" into this input. |
|
LeftSpace: |
With this input, additional blank space can be added to the left of the text label for the purpose of moving the text labels into the extra space to the right of the last bar as created through Format > Space to the Right. For this purpose, the input HorAlign needs to be set to "Left" and all ...Hor inputs above need to be set to 0. Please note that this is a string input and the quotation marks need to remain. For example, to move the text labels 10 spaces to the right of the most recent bar, the input value would be as follows " " Again, in order for the text object to be visible, the extra space needs to be created between the last bar and the right price axis via Format > Space to the Right |
Common inputs for all RadarScreen indicators:
|
PlotCurrRetracement: |
Enables/disables the current retracement percentage column. |
The Alchemy Auto Daily Retracement/Extension Indicators (Alchemy DailyRetrExt/Alchemy DailyRetExRS)
Calculates the Fibonacci retracements, the Fibonacci extensions, the swing high, the swing low, the actual retracement prices and the current retracement percentage based on daily highs and lows.
Inputs specific to these indicators:
|
StartT: |
Specifies the session start time. The time format is in military time (e.g. |
|
EndT: |
Specifies the session end time. The time format is in military time (e.g. |
|
Days Ago: |
Specifies the number of days ago for which to display the trend, high, low, extensions and retracements, whereas a setting of 0 calculates the current day, a setting of 1 calculates the previous day and so fourth. |
The Alchemy Auto Pivot Retracement/Extension Indicators (Alchemy PivotRetrExt/Alchemy PivotRetExRS)
Calculates the swing points for the Fibonacci retracements, the Fibonacci extensions, the swing high, the swing low, the actual retracement prices and the current retracement percentage based on the principal of retracement pivots as follows. In an uptrend, when price breaks through retracement low of the previous up swing, the trend changes to the down side and the last high that was made, becomes the new swing start. Vice versa, in a downtrend, when price breaks through retracement high of the previous down swing, the trend changes to the up side and the last low that was made, becomes the new swing start.
Inputs specific to these indicators:
|
BegTime: |
Allows you to set the time of the first bar from when the
Alchemy PivotRetrace Indicator will start calculating the swings. The time format is in military time (e.g. |
|
BegDate: |
Allows you to set the date of the first bar from when the
Alchemy PivotRetrace Indicator will start calculating the swings. The date format is as follows: Year-Month-Day (e.g. 010510 = |
|
DayStart: |
A setting of 1 will automatically start newly calculating the swings at the beginning of each day, therefore disregarding any previous price action. A setting of 0 will start calculating the swing with the first bar on the chart. This input is defaulted to 0. |
|
MinRetr: |
Specifies the minimum point/dollar retracement in order for a retracement pivot to qualify. |
|
InSwg: |
Specifies the minimum initial point/dollar swing size before the indicator looks for a retracement. |
|
PivStren: |
This user-defined input determines the minimum requirement for number of bars making lower highs following a swing high in an uptrend or making higher lows following a swing low in a downtrend, in order to qualifiy for a retracement pivot. We defaulted this input to 4 bars, however, if you wish to display shorter term swings or longer term swings, you may decrease or increase this input respectively. |
The Alchemy Auto S&P Pivot Retracement/Extension Indicators (Alchemy SPPivRetrExt/Alchemy SPPivRetExRS)
This is the same indicator as the The Alchemy Auto Pivot Retracement/Extension Indicator with default settings that are optimized to be used on the S&P 500.
Inputs specific to these indicators:
|
BegTime: |
Allows you to set the time of the first bar from when the
Alchemy S&PPivRetr Indicator will start calculating the swings. The time format is in military time (e.g. |
|
BegDate: |
Allows you to set the date of the first bar from when the
Alchemy S&PPivRetr Indicator will start calculating the swings. The date format is as follows: Year-Month-Day (e.g. 010510 = |
|
DayStart: |
A setting of 1 will automatically start newly calculating the swings at the beginning of each day, therefore disregarding any previous price action. A setting of 0 will start calculating the swing with the first bar on the chart. This input is defaulted to 0. |
|
MinRetr: |
Specifies the minimum point/dollar retracement for a retracement pivot to qualify. |
|
InSwg: |
Specifies the minimum initial point/dollar swing size before the indicator looks for a retracement. |
|
PivStren: |
This user-defined input determines the minimum requirement for number of bars making lower highs following a swing high in an uptrend or making higher lows following a swing low in a downtrend, in order to qualifiy for a retracement pivot. We defaulted this input to 4 bars, however, if you wish to display shorter term swings or longer term swings, you may decrease or increase this input respectively. |
The Alchemy Auto Swing Retracement/Extension Indicator (Alchemy SwingRetrExt/Alchemy SwingRetExRS)
The Alchemy Auto Swing Retracement/Extension Indicator calculates swings and displays real time fibonnacci retracements/extensions, starting from a preset swing point that can be specified with indicator inputs. This indicator also contains a swing end feature in order to display historical swings and their retracements/extensions. This retracements/extensions indicator is designed to offer the flexibility of picking multiple swing starting points in order to look for confluence on retracement levels between larger swings and more recent swings. For example, if the 62% retracement of the most recent swing is in the same area as the 38% retacement of a larger swing, it makes for a much stronger support or resistance, therefore increasing the reliability of a trend continuation when prices pullback to these retracement confluences. In order to display multiple swings, this indicator can be inserted into the same chart several times with different swing start settings for each indicator. The various swings and retracementsretracements/extensions can be differentiated by identifying them with a different name such as Swing1, Swing2, etc. Additionally, the colors can be specified individually for each retracement level and swing high/low.
Inputs specific to these indicators:
|
SwingIdentifier: |
Names the swing in the displayed text objects for its corresponding swing high, swing low, retracement percentages and current retracement percentage. When inserting several swing retracement indicators with different swing points, this identifies each swing with a unique name such as Swing1, Swing2 and so fourth. This is a string input and the text to be displayed needs to be in quotation marks. |
|
SwingStartDate_YYYYMMDD: |
Specifies the date of the bar that starts the swing
calculation. The date format is as follows: Year-Month-Day (e.g. |
|
SwingStartTime: |
Specifies the time of the bar that starts the swing
calculation. The time format is in military time (e.g. |
|
SwingEndDate_YYYYMMDD: |
Specifies the date of the bar that stops the swing
calculation. The date format is as follows: Year-Month-Day (e.g. |
|
SwingEndTime: |
Specifies the time of the bar that stops the swing
calculation. The time format is in military time (e.g. |
The Alchemy Auto Trend Retracement/Extension Indicators (Alchemy TrendRetrExt/Alchemy TrendRetExRS)
Calculates the swing points for the Fibonacci retracements, the Fibonacci extensions, the swing high, the swing low, the actual retracement prices and the current retracement percentage based on a fast and 2 slow averages. In an uptrend, when the fast line penetrates down through the 2 slower lines, the trend changes to the down side and the last high that was made, becomes the new swing start. Vice versa, in a downtrend, when the fast line penetrates up through the 2 slower lines, the trend changes to the up side and the last low that was made, becomes the new swing start.
Inputs specific to these indicators:
|
BegTime: |
Allows you to set the time of the first bar from when this
indicator will start calculating the swings. The time format is in military time (e.g. |
|
BegDate: |
Allows you to set the date of the first bar from when this
indicator will start calculating the swings. The date format is as follows: Year-Month-Day (e.g. 010510 = |
|
TrndSens: |
This user-defined input adjusts the Trend Sensitivity of how the trend is calculated. A smaller number calculates the trend based on a shorter time frame, therefore, changing the direction of the trend more often. A larger number calculates the trend based on a longer time frame, therefore, displaying the larger trend of the market. |
Average Range Fibonacci Indicator(Alchemy AvgRangeFibs)
The Alchemy Average Range Indicator draws Fibonacci lines and displays the Fibonacci percentages as well as the prices for each Fibonacci line for the last bar on the chart. The Fibonacci lines are based on the average range that is added to the low of the bar for upper lines, referred to as long and subtracted from the high of the bar for lower lines, referred to as short. Each set of lines contains 10 Fibonacci levels, a zero line, a 100% line and a vertical line that spans from 0 to 100. Each line and text can be individually enabled and formatted. The text and line colors can be controlled with their corresponding plot colors under Format Indicator > Color and the line sizes can be controlled with their corresponding plot weights under Format Indicator > Style. Please note that the line size can be increased only for solid lines. When making a color change or a size change, the indicator needs to be disabled and then re-enabled again before the changes will take.
Indicator inputs:
|
LongShort |
A setting of -1 enables the lower lines only, a setting of 0 enables both, the lower and upper lines and a setting of 1 enables the upper lines only. |
|
|
Long (Upper Lines): |
|
Long_ShowStart |
Enables/disables the zero line and text for the upper lines. |
|
Long_ShowEnd |
Enables/disables the 100% line and text for the upper lines. |
|
Long_Fib1 through 10 |
Specifies the Fibonacci percentages for each corresponding Fibonacci level, whereas a setting of 0, disables the corresponding Fibonacci level. |
|
|
Long Lines (Upper Lines): |
|
Long_ShowVerticalLine |
Enables/disables the vertical line that spans from 0% to 100% for the upper lines. |
|
Long_ShowHorizontalLines |
Enables/disables all upper horizontal lines. |
|
Long_VerticalStyle |
Specifies the line style for the vertical line that spans from 0% to 100% for the upper lines. The options are as follows: tool_solid or 1, tool_dashed or 2, tool_dotted or 3, tool_dashed2 or 4, tool_dashed3 or 5. |
|
Long_StartStyle |
Specifies the line style for the 0% line for the upper lines. The options are as follows: tool_solid or 1, tool_dashed or 2, tool_dotted or 3, tool_dashed2 or 4, tool_dashed3 or 5. |
|
Long_EndStyle |
Specifies the line style for for each corresponding Fibonacci level for the upper lines. The options are as follows: tool_solid or 1, tool_dashed or 2, tool_dotted or 3, tool_dashed2 or 4, tool_dashed3 or 5. |
|
Long_FibStyle 1 through 10 |
Specifies the line styles for the Fibonacci lines for the upper lines. The options are as follows: tool_solid or 1, tool_dashed or 2, tool_dotted or 3, tool_dashed2 or 4, tool_dashed3 or 5. |
|
|
Long Text (Upper Lines): |
|
Long_ShowText |
Enables/disables all price and percentage text objects of the upper lines. |
|
Long_TextLeftSpace |
With this input, additional blank space can be added to the left of the text objects of the upper lines for the purpose of moving the text objects into the extra space to the right of the last bar as created through Format > Space to the Right. For example, to move the text objects 10 spaces to the right of the most recent bar, the input value would be as follows " " Again, in order for the text object to be visible, the extra space needs to be created between the last bar and the right price axis via Format > Space to the Right |
|
Long_TextHorizAlign |
Specifies the horizontal text alignment for the text objects of the upper lines. The options are "Left", "Right" or "Center". |
|
Long_TextVertAlign |
Specifies the vertical text alignment for the text objects of the upper lines. The options are "Top", "Bottom" or "Center". |
|
|
Short (Lower Lines): |
|
Short_ShowStart |
Enables/disables the zero line and text for the upper lines. |
|
Short_ShowEnd |
Enables/disables the 100% line and text for the upper lines. |
|
Short_Fib1 through 10 |
Specifies the Fibonacci percentages for each corresponding Fibonacci level, whereas a setting of 0, disables the corresponding Fibonacci level. |
|
|
Short Lines (Lower Lines): |
|
Short_ShowVerticalLine |
Enables/disables the vertical line that spans from 0% to 100% for the lower lines. |
|
Short_ShowHorizontalLines |
Enables/disables all lower horizontal lines. |
|
Short_VerticalStyle |
Specifies the line style for the vertical line that spans from 0% to 100% for the lower lines. The options are as follows: tool_solid or 1, tool_dashed or 2, tool_dotted or 3, tool_dashed2 or 4, tool_dashed3 or 5. |
|
Short_StartStyle |
Specifies the line style for the 0% line for the lower lines. The options are as follows: tool_solid or 1, tool_dashed or 2, tool_dotted or 3, tool_dashed2 or 4, tool_dashed3 or 5. |
|
Short_EndStyle |
Specifies the line style for for each corresponding Fibonacci level for the lower lines. The options are as follows: tool_solid or 1, tool_dashed or 2, tool_dotted or 3, tool_dashed2 or 4, tool_dashed3 or 5. |
|
Short_FibStyle 1 through 10 |
Specifies the line styles for the Fibonacci lines for the lower lines. The options are as follows: tool_solid or 1, tool_dashed or 2, tool_dotted or 3, tool_dashed2 or 4, tool_dashed3 or 5. |
|
|
Short Text (Lower Lines): |
|
Short_ShowText |
Enables/disables all price and percentage text objects of the lower lines. |
|
Short_TextLeftSpace |
With this input, additional blank space can be added to the left of the text objects of the lower lines for the purpose of moving the text objects into the extra space to the right of the last bar as created through Format > Space to the Right. For example, to move the text objects 10 spaces to the right of the most recent bar, the input value would be as follows " " Again, in order for the text object to be visible, the extra space needs to be created between the last bar and the right price axis via Format > Space to the Right |
|
Short_TextHorizAlign |
Specifies the horizontal text alignment for the text objects of the lower lines. The options are "Left", "Right" or "Center". |
|
Short_TextVertAlign |
Specifies the vertical text alignment for the text objects of the lower lines. The options are "Top", "Bottom" or "Center". |
|
|
Global: |
|
PriceDecimal |
Specifies the decimal points for the price to be displayed. A negative setting disables the display of all prices. |
|
PercentDecimal |
Specifies the decimal points for the percentage to be displayed. A negative setting disables the display of all percentages. |
|
|
Average Range: |
|
AvgRange_UseBody |
With a setting of true, the range is calculated as the candlestick body range, defined as open to close and with a setting of false, the range is calculated as the high to the low of a bar. |
|
AvgRange_UseTrueRange |
With a setting of true, the range is calculated as the true range, meaning that if the previous bars' close is above the current bars' high, the previous bars' close will be considered as the high for calculating the current bar's range and vice versa, if the previous bars' close is below the current bars' low, the previous bars' close will be considered as the low for calculating the current bar's range. |
|
AvgRange_Length |
Specifies the average length. |
|
AvgRange_Type |
Specifies the average type. A setting of 1 uses a simple moving average, a setting of 2 uses an exponential moving average, a setting of 3 uses a weighted moving average, a setting of 4 uses a triangular moving average, a setting of 5 uses a Mid Keltner and a setting of 6 uses a Hull moving average. |
Fibonacci Retracement/Extension Tools
The Alchemy Fib Retracement Tool
The Alchemy Fibonacci Retracement tool is an enhanced retracement tool that draws a line from the swing start to the swing end, draws up to 7 fibonacci retracement lines (TradeStation 4.0 and SuperCharts contain only 2 fibonacci retracement lines) and labels them with their corresponding retracement price. The swing points can be determined by either moving text object labels or by entering them through inputs. For instructions on using this tool, please refer to our inputs definition below.
User Defined Inputs:
Setting the swing start and the swing end through inputs (referred to as input swing, not available for TradeStation 4.0 or SuperCharts):
Swing Start:
|
StartYear |
Enter the last 2 digits of the year of the swing start. |
|
StartMonth |
Enter the month of the swing start. A setting of 0 disables the input swing. |
|
StartDte |
Enter the day of the month of the swing start. This input is not required on monthly charts. |
|
StartTme |
Enter the time (military chart time) of the swing start. This input is not required on daily, weekly or monthly charts. |
Swing End:
|
EndYear |
Enter the last 2 digits of the year of the swing end. |
|
EndMonth |
Enter the month of the swing end. A setting of 0 disables the input swing. |
|
EndDte |
Enter the day of the month of the swing end. This input is not required on monthly charts. |
|
EndTme |
Enter the time (military chart time) of the swing end. This input is not required on daily, weekly or monthly charts. |
Setting the swing start and the swing end through text object labels (referred to as label swing):
To use the label swing method for determining the swing start and the swing end, a text object matching the StartLabel input needs to be created on the chart for the swing start (referred to as start label, defaulted to S), and a separate text object matching the EndLabel input needs to be created on the chart for the swing end (referred to as end label, defaulted to E). To create text objects, either use the Text button (abc) from your toolbar strip or go to "Drawing" - "Text" and type in the corresponding labels on your chart. Then select the small pointer tool again and move the text objects to the desired swing start and swing end points. Then select the Analysis Commentary (TradeStation 8/9) or the Expert Commentary (2000i, TradeStation 4.0 and SuperCharts) toolbar button and click anywhere on the chart. This opens up the Analysis Commentary/Expert Commentary window, which can be closed immediately or left open for additional information. Whenever the start label and/or the end label are moved to measure a new swing, the indicator needs to be recalculated by clicking anywhere on the chart again with the Analysis Commentary/Expert Commentary tool. Another method of recalculating is by going to "Format" - "Analysis Techniques" and turning the status of the Alchemy FibRetrace indicator off and then on. If any one of the text labels on the chart are deleted, the indicator will automatically switch to input swing.
|
StartLabel |
Specifies the label to be used for the swing start. Always needs to be in quotation marks and it is caps sensitive. A blank ("") disables the label swing and looks for the input swing for swing start and end. |
|
EndLabel |
Specifies the label to be used for the swing end. Always needs to be in quotation marks and it is caps sensitive. A blank ("") disables the label swing and looks for the input swing for swing start and end. |
Remainder of inputs:
|
R1 |
1st Retracement percentage, whereas a negative value disables this retracement level. |
|
R2 |
2nd Retracement percentage, whereas a negative value disables this retracement level. |
|
R3 |
3rd Retracement percentage*, whereas a negative value disables this retracement level. |
|
R4 |
4th Retracement percentage*, whereas a negative value disables this retracement level. |
|
R5 |
5th Retracement percentage*, whereas a negative value disables this retracement level. |
|
R6 |
6th Retracement percentage*, whereas a negative value disables this retracement level. |
|
R7 |
7th Retracement percentage*, whereas a negative value disables this retracement level. |
|
PlotBegEnd |
Enables or disables the dots at the swing start and swing end. |
|
TxtVertOff |
A positive value raises the text displaying the retracement prices higher from the retracement lines and a negative value lowers the text displaying the retracement prices lower from the retracement lines |
|
TxtHorOff |
A positive value moves the text displaying the retracement prices further to the left and a negative value moves the text displaying the retracement prices further to the right. |
|
HorAlign |
"Left" left aligns the text displaying the retracement prices, "Right" right aligns the text displaying the retracement prices and "Center" center aligns the text displaying the retracement prices. |
|
SwingColor |
Specifies the color of the line drawn from swing start to swing end. |
|
F1Color |
Specifies the color of the R1 line drawn |
|
F2Color |
Specifies the color of the R2 line drawn |
|
F3Color |
Specifies the color of the R3 line drawn* |
|
F4Color |
Specifies the color of the R4 line drawn* |
|
F5Color |
Specifies the color of the R5 line drawn* |
|
F6Color |
Specifies the color of the R6 line drawn* |
|
F7Color |
Specifies the color of the R7 line drawn* |
|
Fraction |
Specifies if the text showing the retracement prices is displayed in fractions or decimals. For symbols that trade in ½ ticks such as the 10 year US Treasury Notes, the “Decimal” input needs to be set to a negative number. |
|
Decimal |
Specifies the number of decimals of the displayed retracement prices. |
|
PercDec |
Specifies the number of decimals of the displayed retracement percentages. |
* not available in TradeStation 4.0 or SuperCharts
To view chart, go to http://www.tradingalchemy.com/ViewChartsFibRetracements.htm
The Alchemy Fib Extension Tool
There are 2 different methods of applying Fibonacci Extensions. In Elliott wave methodology, the Fibonacci Extensions are drawn from the beginning of a swing to the end of the swing (beginning of Wave 1 to end of Wave 3) and then to the retracement point (Wave 4) to find a target price area for the next swing that is expected to resume the trend of the previous swing (Wave 5). Another common method extends the Fibonacci Extensions from the beginning of the swing. In either case, the Fibonacci Extension tool is used to measure the amount the market has extended compared to the overall market movement. This tool uses ratios which are mathematical in nature, derived from the same Fibonacci sequence. Fibonacci Extensions are used for general target price areas.
The Alchemy Fibonacci Extension tool accommodates both methods and it draws a line from the swing start to the swing end. If it is set to use the retracement extension method, it also draws a line from the swing end to the retracement point. It then draws up to 7 projected fibonacci extensions (TradeStation 4.0 and SuperCharts contain only 2 fibonacci retracement lines) and labels them with their corresponding extension price.
The swing and retracement points can be determined by either moving text object labels or by entering them through inputs. For instructions on using this tool, please refer to our inputs definition below.
User Defined Inputs:
Setting the swing start, the swing end and retracement points through inputs (referred to as input swing, not available for TradeStation 4.0 or SuperCharts):
Swing Start:
|
StartYear |
Enter the last 2 digits of the year of the swing start. |
|
StartMonth |
Enter the month of the swing start. A setting of 0 disables the input swing. |
|
StartDte |
Enter the day of the month of the swing start. This input is not required for monthly charts. |
|
StartTme |
Enter the time (military chart time) of the swing start. This input is not required for daily, weekly or monthly charts. |
Swing End:
|
EndYear |
Enter the last 2 digits of the year of the swing end. |
|
EndMonth |
Enter the month of the swing end. A setting of 0 disables the input swing. |
|
EndDte |
Enter the day of the month of the swing end. This input is not required for monthly charts. |
|
EndTme |
Enter the time (military chart time) of the swing end. This input is not required for daily, weekly or monthly charts. |
Retracement Point:
Switching from retracement extension to swing start extension:
When using the input method, and either RetraceYear, RetraceMonth or RetraceDte are set to 0, the Alchemy FibExtension tool extends the fibonacci extensions from the swing start, otherwise it extends fibonacci extensions from the retracement point.
|
RetraceYear |
Enter the last 2 digits of the year of the retracement point. |
|
RetraceMonth |
Enter the month of the retracement point. A setting of 0 extends the fibonacci extensions from the swing start. |
|
RetraceDte |
Enter the day of the month of the retracement point. This input is not required for monthly charts. |
|
RetraceTme |
Enter the time (military chart time) of the retracement point. This input is not required for daily, weekly or monthly charts. |
Setting the swing start, the swing end and the retracement point through text object labels (referred to as label swing):
To use the label swing method for determining the swing start, the swing end and retracement point (if applicable), a text object matching the StartLabel input needs to be created on the chart for the swing start (referred to as start label, defaulted to S), a separate text object matching the EndLabel input needs to be created on the chart for the swing end (referred to as end label, defaulted to E) and a separate text object matching the RetraceLabel input needs to be created on the chart for the retracement point (referred to as retracement label, defaulted to R). To create text objects, either use the Text button (abc) from your toolbar strip or go to "Drawing" - "Text" and type in the corresponding labels on your chart. Then select the small pointer tool again and move the text objects to the desired swing start, swing end and retracement (if applicable) points. Then select the Analysis Commentary (TradeStation 8/9) or the Expert Commentary (2000i, TradeStation 4.0 and SuperCharts) toolbar button and click anywhere on the chart. This opens up the Analysis Commentary/Expert Commentary window, which can be closed immediately or left open for additional information. Whenever the start label, end label and/or retracement label are moved to measure a new swing, the indicator needs to be recalculated by clicking anywhere on the chart again with the Analysis Commentary/Expert Commentary tool. Another method of recalculating is by going to "Format" - "Analysis Techniques" and turning the status of the Alchemy FibRetrace indicator off and then on.
Switching from retracement extension to swing start extension:
If the retracement label is deleted, the indicator will extend the fibonacci extensions from the swing start instead of the retracement point.
If either the swing start label or the swing end label are deleted, the indicator will automatically switch to input swing.
|
StartLabel |
Specifies the label to be used for the swing start. Always needs to be in quotation marks and it is caps sensitive. A blank ("") disables the label swing and looks for the input swing for swing start and end. |
|
EndLabel |
Specifies the label to be used for the swing end. Always needs to be in quotation marks and it is caps sensitive. A blank ("") disables the label swing and looks for the input swing for swing start and end. |
|
RetraceLabel |
Specifies the label to be used for the retracement point. Always needs to be in quotation marks and it is caps sensitive. If this input is blank ("") the indicator will extend the fibonacci extensions from the swing start instead of the retracement. |
Remainder of inputs:
|
X1 |
1st Extension percentage, whereas a negative value disables this extension level. |
|
X2 |
2nd Extension percentage, whereas a negative value disables this extension level. |
|
X3 |
3rd Extension percentage*, whereas a negative value disables this extension level. |
|
X4 |
4th Extension percentage*, whereas a negative value disables this extension level. |
|
X5 |
5th Extension percentage*, whereas a negative value disables this extension level. |
|
X6 |
6th Extension percentage*, whereas a negative value disables this extension level. |
|
X7 |
7th Extension percentage*, whereas a negative value disables this extension level. |
|
PlotBegEnd |
Enables or disables the dots at the swing start, swing end and retracement point. |
|
TxtVertOff |
A positive value raises the text displaying the extension prices higher from the extension lines and a negative value lowers the text displaying the extension prices lower from the extension lines |
|
TxtHorOff |
A positive value moves the text displaying the extension prices further to the left and a negative value moves the text displaying the extension prices further to the right. |
|
HorAlign |
"Left" left aligns the text displaying the extension prices, "Right" right aligns the text displaying the extension prices and "Center" center aligns the text displaying the extension prices. |
|
SwingColor |
Specifies the color of the line drawn from swing start to swing end. |
|
RetraceColor |
Specifies the color of the line drawn from the swing end to the retracement point. |
|
F1Color |
Specifies the color of the X1 line drawn |
|
F2Color |
Specifies the color of the X2 line drawn |
|
F3Color |
Specifies the color of the X3 line drawn* |
|
F4Color |
Specifies the color of the X4 line drawn* |
|
F5Color |
Specifies the color of the X5 line drawn* |
|
F6Color |
Specifies the color of the X6 line drawn* |
|
F7Color |
Specifies the color of the X7 line drawn* |
|
Fraction |
Specifies if the text showing the extension prices is displayed in fractions or decimals. For symbols that trade in ½ ticks such as the 10 year US Treasury Notes, the “Decimal” input needs to be set to a negative number. |
|
Decimal |
Specifies the number of decimals of the displayed extension prices. |
|
PercDec |
Specifies the number of decimals of the displayed extension percentages. |
* not available in TradeStation 4.0 or SuperCharts
To view chart, go to http://www.tradingalchemy.com/ViewChartsFibRetracements.htm
Candlestick Engulfment & Reversal Indicators
Spot the most powerful candlestick engulfment and reversal patterns while still using your Open,High,Low,Close Charts. Identify potential turning points in the market with the Alchemy Engulfment and Reversal Indicators. Combine the Engulfment and Reversal Indicators with other indicators such as Stochastics, Alchemy Divergence or the Alchemy Support and Resistance Indicator to help you determine the strength of any potential turning point in the market.
The Alchemy Candlestick Engulfment and Reversal Indicators consist of three separate indicators, each designed to identify potential turning points or reversals in the market. One of the most important aspects of predicting future market prices is the action of the market price itself. Current price action is represented by the chart formations it creates. The Alchemy Candlestick Engulfment and Reversal Indicators were designed to assist you in finding these chart formations which usually lead to turning points in the market. The formations spotted by these indicators are classic to all charting techniques, but the ones presented here are particularly important to short-term trading and daytrading.
The Alchemy Candlestick Engulfment and Reversal Indicators incorporate alert features and a user-defined input that allows you to determine and qualify the possible engulfment and reversal patterns over a pre-set period of time. This feature filters out the noise of insignificant market action and identifies only the strongest engulfment and reversal patterns occurring at or near new highs and new lows. The Alchemy Candlestick Engulfment and Reversal Indicators can be combined with other indicators such as stochastics, divergence, or the support and resistance pivot points indicators to help confirm strong turning point signals in the market.
The Alchemy Candlestick Engulfment and Reversal Indicators include:
Bullish or Bearish Candlestick Engulfment
This indicator gives an alert and displays a text label on your chart when either a bullish or bearish engulfment pattern is identified. A user-defined input gives you the flexibility to determine either bullish or bearish engulfments occurring at the lowest low or highest high over a pre-set number of price bars. This allows you to identify engulfments occurring at potential tops or bottoms.
A bullish engulfing pattern occurs when, during a downtrend, a price bar engulfs the previous price bar. In other words, the current bar’s open is lower than the previous bar’s close (the bar opens down), and it’s close is higher than the previous bar’s open (the bar closed up significantly). Bullish engulfing patterns generally indicate a trend reversal up and the beginning of an uptrend.
A bearish engulfing pattern occurs when, during an uptrend, a price bar engulfs the previous bar, in other words, the bar’s open is higher than the previous bar’s close (the bar opens up), and it’s close is lower than the previous bar’s open (the bar closed down significantly). Bearish engulfing patterns generally indicate a trend reversal and the beginning of a downtrend.
The Alchemy Engulfment Indicator
To view chart, go to: http://www.tradingalchemy.com/ViewChartsEngulfmentReversal.htm
User Defined Inputs for the Alchemy Engulfment Indicator:
BullAlrt: Allows you to disable the alert for a bullish engulfment bar. A setting of "True" enables the alert and a setting of "False" disables the alert. It is defaulted to True.
BearAlrt: Allows you to disable the alert for a bearish engulfment bar. A setting of "True" enables the alert and a setting of "False" disables the alert. It is defaulted to True.
PivStren: This user-defined input determines the minimum required number of bars over which a bullish engulfment bar needs to make a new low or a bearish engulfment bar needs to make a new high. It is defaulted to 10 bars.
PlotVert: Allows you to vertically adjust the engulfment dots. A greater value will raise the bearish engulfment dots and lower the bullish engulfment dots. A smaller value will lower the bearish engulfment dots and raise the bullish engulfment dots. It is defaulted to 5 ticks.
TextVert: Allows you to vertically adjust the displayed text for the bullish and the bearish engulfment. A greater value will raise the displayed text for the bearish engulfment and lower the displayed text for the bullish engulfment. A smaller value will lower the displayed text for the bearish engulfment and raise the displayed text for the bullish engulfment. It is defaulted to 0 ticks.
TextHor: Allows you to horizontally adjust the displayed text for the bullish and the bearish engulfment. Each increment will move the text one bar further to the left. It is defaulted to 2 bars.
The Alchemy Reversal Indicator (Alchemy Reversal)
This indicator gives an alert and displays a text label on your chart when either a Bullish or Bearish Reversal Bar occurs with current price action. A user-defined input gives you the flexibility to determine bullish or bearish reversal patterns at a lower low or higher high. This allows you to identify reversal patterns at potential tops or bottoms.
A bullish reversal bar occurs when price makes a lower low and a lower high than the previous bar and also closes above the open of the current bar and in the upper quarter of the current bar. A bullish reversal bar indicates a potential reversal to the upside.
A bearish reversal bar occurs when price makes a higher high and a higher low than the previous bar and closes below the open of the current bar and in the lower quarter of the current bar. A bearish reversal bar indicates a potential reversal to the downside.
To view chart, go to: http://www.tradingalchemy.com/ViewChartsEngulfmentReversal.htm
User Defined Inputs for the Alchemy Reversal Indicator:
|
ClosingRange: |
Specifies the closing range in relation to the bar range, whereas a value of 25 requires for a bullish reversal bar to close in the upper 25% of it's bar range and for a bearish reversal bar to close in the lower 25% of it's bar range |
|
UpDownClose: |
With a value of true, a bullish reversal bar has to close higher than it's open and a bearish reversal bar has to close lower than it's open. A value of false disregards this criteria. |
|
BullAlrt: |
Allows you to disable the alert for a bullish reversal bar. A setting of "True" enables the alert and a setting of "False" disables the alert. |
|
BearAlrt: |
Allows you to disable the alert for a bearish reversal bar. A setting of "True" enables the alert and a setting of "False" disables the alert. |
|
PivStren: |
This user-defined input determines the minimum required number of bars over which a bullish reversal bar needs to make a new low or a bearish reversal bar needs to make a new high. |
|
PlotVert: |
Allows you to vertically adjust the reversal crosses. A greater value will raise the bearish reversal crosses and lower the bullish reversal crosses. A smaller value will lower the bearish reversal crosses and raise the bullish reversal crosses. |
|
TextVert: |
Allows you to vertically adjust the displayed text for the bullish and the bearish reversal. A greater value will raise the displayed text for the bearish reversal and lower the displayed text for the bullish reversal. A smaller value will lower the displayed text for the bearish reversal and raise the displayed text for the bullish reversal. |
|
TextHor: |
Allows you to horizontally adjust the displayed text for the bullish and the bearish reversal. Each increment will move the text one bar further to the left. |
The Alchemy Reversal Bar Indicator (Alchemy ReversalBar)
The Alchemy Reversal Bar indicator displays a cross above the high of the bar if it closes above a specified percentage of its range and once this bar closes, it shows a text object displaying the price of the high of this previous up close bar during the next open bar. Vice versa, the indicator displays a cross below the low of the bar if it closes below a specified percentage of its range and once this bar closes, it shows a text object displaying the price of the low of this previous down close bar during the next open bar.
Indicator Inputs:
|
ClosePercent1: |
Specifies the bar percent. For example, with a setting of 75, a bar has to close 75% or higher of its range to qualify for an up close and it has to close 75% or lower of its range to qualify for a down close. |
|
ShowUpClosePlot: |
A setting of 0 disables the up close plot, a setting of 1 displays the up close intra-bar and a setting of 2 displays the up close at the bar close. |
|
ShowDownClosePlot: |
A setting of 0 disables the down close plot, a setting of 1 displays the down close intra-bar and a setting of 2 displays the down close at the bar close. |
|
PlotVerticalOffset: |
Specifies the number of cents, ticks or pips to offset the plots from the bar high and low. |
|
ShowText: |
Enables/disables the price text. |
|
Text_Decimals: |
Specifies the decimal points to display the price text. |
|
Text_HorizOffset: |
Specifies the number of bars to move the price text to the left of the current bar. |
|
Text_LeftSpace: |
With this input, additional blank space can be added to the left of the text label for the purpose of moving the text label into the extra space to the right of the last bar as created through Format > Space to the Right. For this purpose, both inputs Text_HorizOffset and Text_HorizAlign need to be set to 0. Please note that this is a string input and the quotation marks need to remain. For example, to move the text labels 10 spaces to the right of the most recent bar, the input value would be as follows " " Again, in order for the text object to be visible, the extra space needs to be created between the last bar and the right price axis via Format > Space to the Right |
|
Text_HorizAlign: |
Specifies the horizontal alignment of the text objects, whereas 0 equals left aligned, 1 equals right aligned and 3 equals centered aligned |
|
UpCloseAlert: |
A setting of 0 disables the up close alert, a setting of 1 triggers the up close alert intra-bar and a setting of 2 triggers the up close alert at the bar close. |
|
DownCloseAlert: |
A setting of 0 disables the down close alert, a setting of 1 triggers the down close alert intra-bar and a setting of 2 triggers the down close alert at the bar close. |
Double Bottom - Double Top
The Double Bottom – Double Top Indicator alerts you and displays a text label when a double bottom or a double top is formed. The indicator will give an alert and display text on your chart when a double bottom or double top pattern is identified.
A double bottom is formed when the low of the current bar is equal to the low of the previous bar and the current bar closes near its high. A double bottom can be an uptrend reversal signal or can confirm the end of the retracement countertrend down move in an uptrending market.
A double top is formed when the high of the current bar is equal to the high of the previous bar and the current bar closes near its low. A double top can be a downtrend reversal signal or can confirm the end of the retracement countertrend up move in a downtrending market.
The Alchemy DoubleBotTop Indicator
To view chart, go to: http://www.tradingalchemy.com/ViewChartsEngulfmentReversal.htm
User Defined Inputs for the Alchemy Double Bottom Top Indicator:
|
BullAlrt |
Allows you to disable the alert for a double bottom bar. A setting of "True" enables the alert and a setting of "False" disables the alert. |
|
BearAlrt |
Allows you to disable the alert for a double top bar. A setting of "True" enables the alert and a setting of "False" disables the alert. |
|
PivStren |
This user-defined input determines the minimum required number of bars over which a double bottom bar needs to make a new low or a double top bar needs to make a new high. It is defaulted to 10 bars. |
|
ClosingRangePercent |
Specifies the required closing percent of its range. For example, with a setting of 25, a double bottom bar has to close in the upper 25 percent of its range and a double top bar would have to close in the lower 25 percent of its range. |
|
PlotVert |
Specifies the range percent to place the Show Me above the high or below the low of the bar. |
|
TextVert |
Specifies the range percent to place the text object above the high or below the low of the bar. |
|
TextHor |
Allows you to horizontally adjust the displayed text for the double bottom and double top. Each increment will move the text one bar further to the left. It is defaulted to 2 bars. |
|
AlchemyBearEngulfmnt identifies a bearish engulfment bar. If the criteria of a bearish engulfment bar is met, the AlchemyBearEngulfmnt function returns 1, otherwise a -1 will be returned. |
|
|
AlchemyBullEngulfmnt identifies a bullish engulfment bar. If the criteria of a bullish engulfment bar is met, the AlchemyBullEngulfmnt function returns 1, otherwise a -1 will be returned. |
|
|
AlchemyBearReversal identifies a bearish reversal bar. If the criteria of a bearish reversal bar is met, the AlchemyBearReversal function returns 1, otherwise a -1 will be returned. |
|
|
AlchemyBullReversal identifies a bullish reversal bar. If the criteria of a bullish reversal bar is met, the AlchemyBullReversal function returns 1, otherwise a -1 will be returned. |
|
|
AlchemyDoubleHighBar identifies a double top bar. If the criteria of a double top bar is met, the AlchemyDoubleHighBar function returns 1, otherwise a -1 will be returned. |
|
|
AlchemyDoubleLowBar identifies a double bottom bar. If the criteria of a double bottom bar is met, the AlchemyDoubleLowBar function returns 1, otherwise a -1 will be returned. |
|
|
AlchemyTripleHighBar identifies a triple top bar. If the criteria of a triple top bar is met, the AlchemyTripleHighBar function returns 1, otherwise a -1 will be returned. |
|
|
AlchemyTripleLowBar identifies a triple bottom bar. If the criteria of a triple bottom bar is met, the AlchemyTripleLowBar function returns 1, otherwise a -1 will be returned. |
Open High Low Close Indicator
The Open High Low Close Indicator displays the open, high, low and close of a specified trading period.
User Defined Inputs:
|
|
Calculations: |
|
|
PivotType |
Specifies the type of pivot to be calculated. Type in "Daily" for daily Floor Traders Pivots, type in "Weekly" for weekly Floor Traders Pivots, type in "Monthly" for monthly Floor Traders Pivots, type in "Quarterly" for quarterly Floor Traders Pivots and type in "Yearly" for yearly Floor Traders Pivots. Please note that the first letter needs to be upper case. |
|
|
PeriodsAgo |
Specifies the period that the open/high/low/close is displayed, whereas 0 uses the current period, 1 uses the previous period and so fourth. |
|
|
NumBars |
This input enables the feature of displaying the highest high and lowest low over the last “NumBars” number of bars back. This input overwrites all other settings and a setting of 0 disables this feature. |
|
|
SessionAvg |
The session average level displays the session open-high-low-close average and this input specifies the session prices to be used for calculating the average. This is a string input, which needs to be bracketed by quotation marks. The first digit enables/disables the open, the second digit enables/disables the high, the third digit enables/disables the low and the fourth digit enables/disables the close, whereas a value of 0 disables the corresponding price and a value of 1 enables the corresponding price. All 4 digits set to 0 disables the session average level. |
|
|
InsideSession |
With this input enabled, at session close, the indicator displays the last closed session high and last closed session low only if either previous closed session high or previous closed session low has been penetrated, otherwise it displays the same session high and low as before until this high or low is penetrated. |
|
|
ManualOp |
Allows the user to manually enter the open value. A setting of 0 automatically displays the open of the specified period based on the chart. |
|
|
ManualHi |
Allows the user to manually enter the high value. A setting of 0 automatically displays the high of the specified period based on the chart |
|
|
ManualLo |
Allows the user to manually enter the low value. A setting of 0 automatically displays the low of the specified period based on the chart |
|
|
ManualCl |
Allows the user to manually enter the close value. A setting of 0 automatically displays the close of the specified period based on the chart |
|
|
StartT |
Specifies the session start time. This is a special feature that gives this indicator the flexibility to specify the session times. With this feature, the open/high/low/close can be displayed based on a predetermined session while plotted on an all sessions symbol. |
|
|
EndT |
Specifies the session end time. This is a special feature that gives this indicator the flexibility to specify the session times. With this feature, the open/high/low/close can be displayed based on a predetermined session while plotted on an all sessions symbol. |
|
|
XDayOfWeek |
Specifies a certain day of the week to be excluded from a session to be used for the open/high/low/close. 0=Sunday, 1=Monday, 2=Tuesday, 3=Wednesday, 4=Thursday, 5=Friday, 6=Saturday and a negative value disables this feature. |
|
|
|
Text: Each text color is controlled with its corresponding plot under Format Indicator > Color. Please note that when making a color or weight change, the indicator needs to be disabled and then re-enabled again before the changes will take affect. |
|
|
ShowText |
Enables and disables the displayed text for any one of the specified open/high/low/close values. |
|
|
OText |
Enables/disables the text object for the open. |
|
|
HText |
Enables/disables the text object for the high. |
|
|
LText |
Enables/disables the text object for the low. |
|
|
CText |
Enables/disables the text object for the close. |
|
|
ShowPeriodText |
Enables and disables the period portion of the displayed text for any one of the specified open/high/low/close values. |
|
|
ShowPriceText |
Enables and disables the price portion of the displayed text for any one of the specified open/high/low/close values. |
|
|
BarLabel |
Specifies the bar label of the displayed text when NumBars is used. Please note that this is a string input and the text needs to stay within quotation marks. For a blank label, please type "". |
|
|
DailyLabel |
Specifies the daily label of the displayed text. Please note that this is a string input and the text needs to stay within quotation marks. For a blank label, please type "". |
|
|
WeeklyLabel |
Specifies the weekly label of the displayed text. Please note that this is a string input and the text needs to stay within quotation marks. For a blank label, please type "". |
|
|
MonthlyLabel |
Specifies the monthly label of the displayed text. Please note that this is a string input and the text needs to stay within quotation marks. For a blank label, please type "". |
|
|
YearlyLabel |
Specifies the yearly label of the displayed text. Please note that this is a string input and the text needs to stay within quotation marks. For a blank label, please type "". |
|
|
QuarterlyLabel |
Specifies the quarterly label of the displayed text. Please note that this is a string input and the text needs to stay within quotation marks. For a blank label, please type "". |
|
|
OpenLabel |
Specifies the open label of the displayed text. Please note that this is a string input and the text needs to stay within quotation marks. For a blank label, please type "". |
|
|
HighLabel |
Specifies the high label of the displayed text. Please note that this is a string input and the text needs to stay within quotation marks. For a blank label, please type "". |
|
|
LowLabel |
Specifies the low label of the displayed text. Please note that this is a string input and the text needs to stay within quotation marks. For a blank label, please type "". |
|
|
CloseLabel |
Specifies the close label of the displayed text. Please note that this is a string input and the text needs to stay within quotation marks. For a blank label, please type "". |
|
|
TextVert |
Allows you to vertically adjust the displayed text for any one of the specified open/high/low/close. If the text sits below the plot line or trendline, a positive value will raise the text and a negative value will lower the text. If the text sits above the plot line or trendline, a positive value will lower the text and a negative value raise the text. |
|
|
TextHor |
Allows you to horizontally adjust the displayed text for the any one of the specified open/high/low/close. Each increment will move the text one bar further to the left. The window's bar spacing affects the alignment of the text objects. We recommend adjusting this input according to the bar spacing of your charts until the text objects are aligned to the left edge of your screen. |
|
|
LeftTextSpace |
With this input, additional blank space can be added to the left of the text label for the purpose of moving the text labels into the extra space to the right of the last bar as created through Format > Space to the Right. For this purpose, both inputs TextHor and TextAlign need to be set to 0. Please note that this is a string input and the quotation marks need to remain. For example, to move the text labels 5 spaces to the right of the most recent bar, the input value would be as follows " " Again, in order for the text object to be visible, the extra space needs to be created between the last bar and the right price axis via Format > Space to the Right |
|
|
TextAlign |
Specifies the horizontal alignment of the text objects, whereas 0 equals left aligned, 1 equals right aligned and 3 equals centered aligned |
|
|
Decimal |
Allows you to adjust the number of decimals in which the text for any one of the specified open/high/low/close is displayed. |
|
|
Fraction |
If you are applying the Alchemy OHLC indicator to any symbol that reads in fractions, such as bonds, you can set this input to True and the displayed text for any one of the specified open/high/low/close values will read in fractions (e.g. 106^30). For symbols that trade in ½ ticks such as the 10 year US Treasury Notes, the “Decimal” input needs to be set to a negative number. |
|
|
|
Plots: |
|
|
ShowPlots |
Enables/disables all plot lines. |
|
|
ShowOpenPlot |
Enables/disables the open plot line. |
|
|
ShowHighPlot |
Enables/disables the high plot line. |
|
|
ShowLowPlot |
Enables/disables the low plot line. |
|
|
ShowClosePlot |
Enables/disables the close plot line. |
|
|
|
Trendlines: Each trend line color is controlled with its corresponding plot under Format Indicator > Color and each trend line weight is controlled with its corresponding plot under Format Indicator > Style. Please note that when making a color or weight change, the indicator needs to be disabled and then re-enabled again before the changes will take affect. |
|
|
ShowLines |
Enables/disables all trend lines. |
|
|
OLine |
Allows you to display the open as a trendline. |
|
|
HLine |
Allows you to display the high as a trendline. |
|
|
LLine |
Allows you to display the low as a trendline. |
|
|
CLine |
Allows you to display the close as a trendline. |
|
|
OStyle |
Specifies the trendline style for the open. The options are as follows: tool_solid or 1, tool_dashed or 2, tool_dotted or 3, tool_dashed2 or 4, tool_dashed3 or 5 |
|
|
HStyle |
Specifies the trendline style for the high. The options are as follows: tool_solid or 1, tool_dashed or 2, tool_dotted or 3, tool_dashed2 or 4, tool_dashed3 or 5 |
|
|
LStyle |
Specifies the trendline style for the low. The options are as follows: tool_solid or 1, tool_dashed or 2, tool_dotted or 3, tool_dashed2 or 4, tool_dashed3 or 5 |
|
|
Ctyle |
Specifies the trendline style for the close. The options are as follows: tool_solid or 1, tool_dashed or 2, tool_dotted or 3, tool_dashed2 or 4, tool_dashed3 or 5 |
|
|
|
Alerts: |
|
|
AlertStartTime |
Specifies the earliest time for any alert to be generated. The time needs to be entered in military charting time. For example, 1:00pm would be entered as 1300. A negative value disables this feature and alerts will be generated anytime throughout the day. On daily, weekly or monthly charts, this feature is inactive. |
|
|
AlertEndTime |
Specifies the latest time for any alert to be generated. The time needs to be entered in military charting time. For example, 1:00pm would be entered as 1300. When AlertStartTime is set to a specific time and AlertEndTime is set to a negative value, the alert is automatically de-activated at the first bar of a new day. It will then get re-activated at the AlertStartTime. On daily, weekly or monthly charts, this feature is inactive. This feature also allows for the AlertStartTime to be greater than the AlertEndTime. For example, AlertStartTime set to 1600 and AlertEndTime set to 700 will keep alerts active from 4:00pm to 7:00am. |
|
|
OAlrt |
Allows you to disable the alert when the market approaches or breaks the. A setting of "True" enables the alert and a setting of "False" disables the alert. |
|
|
HAlrt |
Allows you to disable the alert when the market approaches or breaks the high. A setting of "True" enables the alert and a setting of "False" disables the alert. |
|
|
LAlrt |
Allows you to disable the alert when the market approaches or breaks the low. A setting of "True" enables the alert and a setting of "False" disables the alert. |
|
|
CAlrt |
Allows you to disable the alert when the market approaches or breaks the close. A setting of "True" enables the alert and a setting of "False" disables the alert. |
|
|
AlrtDist |
Allows you to adjust the distance in ticks by how far the market can approach any one of the specified open/high/low/close before an alert is generated. |
|
|
MinBreak |
Allows you to adjust the minimum distance in ticks by how far the market needs to break any one of the specified open/high/low/close before an alert is generated. |
|
To view chart, go to: http://www.tradingalchemy.com/ViewChartsOpenHighLowClose.htm
Floor Traders Pivot Points
The traders in the pits know these trigger points, do you? They use them to buy and sell every day. This indicator automatically calculates the classic floor traders pivot points and displays the various support and resistance areas that the pit traders use on your chart.
These indicators
can be used to display daily, monthly, weekly or yearly pivots. Here are
the features of these indicators:
Multi pivots to display daily, monthly, weekly or yearly pivots!
Additional pivots S3 and R3 as well as their corresponding mid-points!
Start and end time inputs for custom sessions that are especially useful for
markets such as the Forex market!
Ability to simultaneously display pivots for multiple periods!
Manually override the high/low/close in order to adjust for official closing
numbers!
Custom input to specify the base pivot calculation.
Floor traders pivot points are a well-known technique used by floor traders (locals) and market makers in the trading pits to calculate intraday support and resistance points. This technique has been around for decades, yet is still much in use today. Before the advent of computers and sophisticated analysis techniques, floor traders used a set of calculations to determine key support and resistance points in the market. They calculated these points from the previous days open, high, low and close. The floor traders today still use these points in their intraday trading. Since the floor traders in the pits are using these points for support and resistance, it just makes good sense to keep track of these key points and be aware of them if you are doing any type of intraday trading.
For any market, there is an equilibrium point around which trading activity occurs. In the absence of large numbers of new buyers or sellers, this point serves as the pivot or focal point for the floor traders (locals) and the market makers as they adjust their bids and offers. When prices move away from the pivot, there are zones of support and resistance that can be derived from the established value area in that particular market. Penetration of these zones leads to perceived changes in valuation and usually results in the entry of new players and orders into the market.
The Alchemy Floor Traders Pivot Points consist of the following:
|
Fifth Bullish Target and Resistance Point |
R5 |
|
Fourth Bullish Target and Resistance Point |
R4 |
|
Third Bullish Target and Resistance Point |
R3 |
|
Second Bullish Target and Resistance Point |
R2 |
|
First Resistance Point |
R1 |
|
Pivot Point |
P |
|
First Support Point |
S1 |
|
Second Bearish Target and Support Point |
S2 |
|
Third Bearish Target and Support Point |
S3 |
|
Fourth Bearish Target and Support Point |
S4 |
|
Fifth Bearish Target and Support Point |
S5 |
Trading for the day will usually remain between the first support and resistance points as the floor traders make their markets. If either of these first points are penetrated, off-floor traders are attracted to the market. The range of trading has now expanded and if a second support or resistance point is broken, then even longer-term traders will be attracted into the market.
Knowledge of the levels at which different types of traders are likely to enter the market can assist in determining when a shift in valuation by the locals has occurred. This is especially useful when there is little outside influence on the market and the local floor traders dominate trading. As long as no significant market news has occurred between yesterday’s close and today’s opening, the local floor traders and market makers tend to move the market between the pivot point (P) and the first band of support (S1) and resistance (R1). If these first levels are broken, look for the market to test the level of support (S2) or resistance (R2) and if these second levels are broken, look for the market to test the next level of support (S3) or resistance (R3).
Combining the Alchemy Floor Traders Pivot Points with other indicators such as overbought/oversold indicators is easy and helpful. Several examples are: if price moves up to the first resistance level (R1) and one or more of your other indicators have moved into overbought territory, the confirmation provided can create a higher confidence sell signal. However, if price reaches the first resistance level (R1) and the other indicators are in a bullish mode, you could make a higher confidence buy decision with an upside target of the second resistance level (R2). It is also possible to combine the Alchemy Floor Traders Pivot Points with the Alchemy Support and Resistance Pivot Point indicator to give you additional support and resistance points.
Knowing where the floor traders levels of support and resistance are located can give you a good framework for what is going on in the pits and should help you in your intraday buy and sell decisions.
The Alchemy FlrTrdPivots Indicator
To view chart, go to: http://www.tradingalchemy.com/ViewChartsFTPivotPoints.htm
User Defined Inputs:
|
PivotType |
Specifies the type of pivot to be calculated. Type in "Daily" for daily Floor Traders Pivots, type in "Weekly" for weekly Floor Traders Pivots, type in "Monthly" for monthly Floor Traders Pivots, type in "Quarterly" for quarterly Floor Traders Pivots and type in "Yearly" for yearly Floor Traders Pivots. Please note that the first letter needs to be upper case. |
|
PeriodsAgo |
Specifies the period that the pivot calculations are based on, whereas 0 uses the current periods high, low close, 1 uses the previous periods high, low close and so fourth. |
|
OpenPrice |
Specifies the price to be used for the session open. |
|
HighPrice |
Specifies the price to be used for the session high. |
|
LowPrice |
Specifies the price to be used for the session low. |
|
ClosePrice |
Specifies the price to be used for the session. |
|
ManualHi |
Allows the user to manually enter the previous day, month, week or year high. A setting of 0 automatically calculates the previous day, month, week or year high based on the chart. |
|
ManualLo |
Allows the user to manually enter the previous day, month, week or year low. A setting of 0 automatically calculates the previous day, month, week or year low based on the chart. |
|
ManualCl |
Allows the user to manually enter the previous day, month, week or year close. A setting of 0 automatically calculates the previous day, month, week or year close based on the chart. |
|
PivotFormula |
This input allows you to specify the formula for the base pivot. With this input set to 0, the indicator uses the standard formula for the daily base pivot which is: (previous days' high + previous days' low + previous days' close)/3. Another example of a common formula used for the daily Floor Traders base pivots is (previous days' low + previous days' high + previous days' low + previous days' close)/4 and in order to use this formula the following would be typed into this input: ( highd(1)+lowd(1)+closed(1) )/3. |
|
HighFormula |
This input works in conjunction with the PivotFormula input and it specifies the high price to calculate S1. For the above example, this input would need the formula highd(1). |
|
LowFormula |
This input works in conjunction with the PivotFormula input and it specifies the low price to calculate R1. For the above example, this input would need the formula lowd(1). |
|
CalculationMode |
Setting of 0: Uses alternate calculations for R3, R4, R5 and S3, S4, S5 as follows: R3=2*(Pivot-Previous Session Low)+Previous Session High; S3=Previous Session Low-( 2*(Previous Session High-Pivot) ); R4=3*(Pivot-Previous Session Low)+Previous Session High; S4=Previous Session Low-( 3*(Previous Session High-Pivot) ); R5=4*(Pivot-Previous Session Low)+Previous Session High; S5=Previous Session Low-( 4*(Previous Session High-Pivot) );
Setting of 1: Uses alternate calculations for R3, R4, R5 and S3, S4, S5 as follows: R3=(Pivot-S1)+R2; S3=S2-(R1-Pivot); R4=(Pivot-S2)+R3; S4=S3-(R2-Pivot); R5=(Pivot-S3)+R4; S5=S4-(R3-Pivot);
Setting of 2: Uses alternate calculations for R3, R4, R5 and S3, S4, S5 as follows: R3=Pivot+( (Previous Session High-Previous Session Low)*2 ); S3=Pivot-( (Previous Session High-Previous Session Low)*2 ); R4=Pivot+( (Previous Session High-Previous Session Low)*3 ); S4=Pivot-( (Previous Session High-Previous Session Low)*3 ); R5=Pivot+( (Previous Session High-Previous Session Low)*4 ); S5=Pivot-( (Previous Session High-Previous Session Low)*4 );
Setting of 3: Uses the Camarilla Pivots
|
|
StartT |
Specifies the session start time. This is a special feature that gives this indicator the flexibility to specify the session times. With this feature, the pivots can be calculated based on the high, low and close of a predetermined day session while plotted on an all sessions symbol. A negative setting uses TradeStation's day high, day low and day close function that is based on a calendar day. This format is in military charting time without the colon. For example, 1:30pm would be entered as 1330. Please note that when using a custom session, the reserved word Sess1StartTime can not be used. |
|
EndT |
Specifies the session end time. This is a special feature that gives this indicator the flexibility to specify the session times. With this feature, the pivots can be calculated based on the high, low and close of a predetermined day session while plotted on an all sessions symbol. A negative setting uses TradeStation's day high, day low and day close function that is based on a calendar day. This format is in military charting time without the colon. For example, 1:30pm would be entered as 1330. Please note that when using a custom session, the reserved word Sess1EndTime can not be used. |
|
XDayOfWeek |
Specifies a certain day of the week to be excluded from a session to be used for a pivot calculation. 0=Sunday, 1=Monday, 2=Tuesday, 3=Wednesday, 4=Thursday, 5=Friday, 6=Saturday and a negative value disables this feature. |
|
AutoSessionEndTme |
Specifies the session end time for calculating the pivots for the next session if the inputs StartT and EndT are not being used. This format is in military charting time without the colon. For example, 1:30pm would be entered as 1330. Please note that when using a custom session, the reserved word Sess1EndTime can not be used. |
|
TL_LeftLength |
Specifies the number of bars to the left from the current bar to start drawing the trend lines. A setting of 0 starts the trend lines at the start of the session and a negative setting extends the trend lines to the left. |
|
R1Line |
Allows you to display R1 as a trendline. Plotlines adjust the screen scaling of the chart to the extreme high and low prices of the plot values, whereas trendlines move into view as the current market price approaches them. If the range between the highest and the lowest plot value is very large, it may compress the entire chart to a point where it becomes very hard to read the bars. Since the Floor Traders Pivot Points at times may encompass a very large range, we defaulted the R1 pivot point to a trendline, however, giving you the choice to change it to a plotline as well. Setting R1 to a plotline will give you the advantage to view the R1 value over the entire chart instead of the current day only. |
|
R2Line |
Allows you to display R2 as a trendline. Plotlines adjust the screen scaling of the chart to the extreme high and low prices of the plot values, whereas trendlines move into view as the current market price approaches them. If the range between the highest and the lowest plot value is very large, it may compress the entire chart to a point where it becomes very hard to read the bars. Since the Floor Traders Pivot Points at times may encompass a very large range, we defaulted the R2 pivot point to a trendline, however, giving you the choice to change it to a plotline as well. Setting R2 to a plotline will give you the advantage to view the R2 value over the entire chart instead of the current day only. |
|
R3Line |
Allows you to display R3 as a trendline. Plotlines adjust the screen scaling of the chart to the extreme high and low prices of the plot values, whereas trendlines move into view as the current market price approaches them. If the range between the highest and the lowest plot value is very large, it may compress the entire chart to a point where it becomes very hard to read the bars. Since the Floor Traders Pivot Points at times may encompass a very large range, we defaulted the R3 pivot point to a trendline, however, giving you the choice to change it to a plotline as well. Setting R3 to a plotline will give you the advantage to view the R3 value over the entire chart instead of the current day only. |
|
R4Line |
Allows you to display R4 as a trendline. Plotlines adjust the screen scaling of the chart to the extreme high and low prices of the plot values, whereas trendlines move into view as the current market price approaches them. If the range between the highest and the lowest plot value is very large, it may compress the entire chart to a point where it becomes very hard to read the bars. Since the Floor Traders Pivot Points at times may encompass a very large range, we defaulted the R4 pivot point to a trendline, however, giving you the choice to change it to a plotline as well. Setting R4 to a plotline will give you the advantage to view the R4 value over the entire chart instead of the current day only. |
|
R5Line |
Allows you to display R5 as a trendline. Plotlines adjust the screen scaling of the chart to the extreme high and low prices of the plot values, whereas trendlines move into view as the current market price approaches them. If the range between the highest and the lowest plot value is very large, it may compress the entire chart to a point where it becomes very hard to read the bars. Since the Floor Traders Pivot Points at times may encompass a very large range, we defaulted the R5 pivot point to a trendline, however, giving you the choice to change it to a plotline as well. Setting R5 to a plotline will give you the advantage to view the R5 value over the entire chart instead of the current day only. |
|
S1Line |
Allows you to display S1 as a trendline. Plotlines adjust the screen scaling of the chart to the extreme high and low prices of the plot values, whereas trendlines move into view as the current market price approaches them. If the range between the highest and the lowest plot value is very large, it may compress the entire chart to a point where it becomes very hard to read the bars. Since the Floor Traders Pivot Points at times may encompass a very large range, we defaulted the S1 pivot point to a trendline, however, giving you the choice to change it to a plotline as well. Setting S1 to a plotline will give you the advantage to view the S1 value over the entire chart instead of the current day only. |
|
S2Line |
Allows you to display S2 as a trendline. Plotlines adjust the screen scaling of the chart to the extreme high and low prices of the plot values, whereas trendlines move into view as the current market price approaches them. If the range between the highest and the lowest plot value is very large, it may compress the entire chart to a point where it becomes very hard to read the bars. Since the Floor Traders Pivot Points at times may encompass a very large range, we defaulted the S2 pivot point to a trendline, however, giving you the choice to change it to a plotline as well. Setting S2 to a plotline will give you the advantage to view the S2 value over the entire chart instead of the current day only. |
|
S3Line |
Allows you to display S3 as a trendline. Plotlines adjust the screen scaling of the chart to the extreme high and low prices of the plot values, whereas trendlines move into view as the current market price approaches them. If the range between the highest and the lowest plot value is very large, it may compress the entire chart to a point where it becomes very hard to read the bars. Since the Floor Traders Pivot Points at times may encompass a very large range, we defaulted the S3 pivot point to a trendline, however, giving you the choice to change it to a plotline as well. Setting S3 to a plotline will give you the advantage to view the S3 value over the entire chart instead of the current day only. |
|
S4Line |
Allows you to display S4 as a trendline. Plotlines adjust the screen scaling of the chart to the extreme high and low prices of the plot values, whereas trendlines move into view as the current market price approaches them. If the range between the highest and the lowest plot value is very large, it may compress the entire chart to a point where it becomes very hard to read the bars. Since the Floor Traders Pivot Points at times may encompass a very large range, we defaulted the S4 pivot point to a trendline, however, giving you the choice to change it to a plotline as well. Setting S4 to a plotline will give you the advantage to view the S4 value over the entire chart instead of the current day only. |
|
S5Line |
Allows you to display S5 as a trendline. Plotlines adjust the screen scaling of the chart to the extreme high and low prices of the plot values, whereas trendlines move into view as the current market price approaches them. If the range between the highest and the lowest plot value is very large, it may compress the entire chart to a point where it becomes very hard to read the bars. Since the Floor Traders Pivot Points at times may encompass a very large range, we defaulted the S5 pivot point to a trendline, however, giving you the choice to change it to a plotline as well. Setting S5 to a plotline will give you the advantage to view the S5 value over the entire chart instead of the current day only. |
|
PLine |
Allows you to display P as a trendline. Plotlines adjust the screen scaling of the chart to the extreme high and low prices of the plot values, whereas trendlines move into view as the current market price approaches them. If the range between the highest and the lowest plot value is very large, it may compress the entire chart to a point where it becomes very hard to read the bars. Since the Floor Traders Pivot Points at times may encompass a very large range, we defaulted the P pivot point to a trendline, however, giving you the choice to change it to a plotline as well. Setting P to a plotline will give you the advantage to view the P value over the entire chart instead of the current day only. |
|
HLine |
Allows you to display the session high as a trendline. Plotlines adjust the screen scaling of the chart to the extreme high and low prices of the plot values, whereas trendlines move into view as the current market price approaches them. If the range between the highest and the lowest plot value is very large, it may compress the entire chart to a point where it becomes very hard to read the bars. Since the Floor Traders Pivot Points at times may encompass a very large range, we defaulted the high to a trendline, however, giving you the choice to change it to a plotline as well. Setting the high to a plotline will give you the advantage to view the high value over the entire chart instead of the current day only. |
|
LLine |
Allows you to display the session low as a trendline. Plotlines adjust the screen scaling of the chart to the extreme high and low prices of the plot values, whereas trendlines move into view as the current market price approaches them. If the range between the highest and the lowest plot value is very large, it may compress the entire chart to a point where it becomes very hard to read the bars. Since the Floor Traders Pivot Points at times may encompass a very large range, we defaulted the low to a trendline, however, giving you the choice to change it to a plotline as well. Setting the low to a plotline will give you the advantage to view the low value over the entire chart instead of the current day only. |
|
|
|
|
|
Inputs for TradeStation 8/9: |
|
PlotR1 |
Enables/disables the plot for R1. |
|
PlotR2 |
Enables/disables the plot for R2. |
|
PlotR3 |
Enables/disables the plot for R3. |
|
PlotR4 |
Enables/disables the plot for R4. |
|
PlotR5 |
Enables/disables the plot for R5. |
|
PlotS1 |
Enables/disables the plot for S1. |
|
PlotS2 |
Enables/disables the plot for S2. |
|
PlotS3 |
Enables/disables the plot for S3. |
|
PlotS4 |
Enables/disables the plot for S4. |
|
PlotS5 |
Enables/disables the plot for S5. |
|
PlotPivot |
Enables/disables the plot for the base pivot. |
|
PlotHigh |
Enables/disables the plot for the session high. |
|
PlotLow |
Enables/disables the plot for the session low. |
|
|
|
|
|
Inputs for TradeStation 4.0 and TradeStation 2000i: |
|
ShowPlot1 |
Assigns a pivot to plot 1. Type in "R3" to assign R3 to plot 1. Type in "R2" to assign R2 to plot 1. Type in "R1" to assign R1 to plot 1. Type in "P" to assign P to plot 1. Type in "S1" to assign S1 to plot 1. Type in "S2" to assign S2 to plot 1. Type in "S3" to assign S3 to plot 1. |
|
ShowPlot2 |
Assigns a pivot to plot 2. Type in "R3" to assign R3 to plot 2. Type in "R2" to assign R2 to plot 2. Type in "R1" to assign R1 to plot 2. Type in "P" to assign P to plot 2. Type in "S1" to assign S1 to plot 2. Type in "S2" to assign S2 to plot 2. Type in "S3" to assign S3 to plot 2. |
|
ShowPlot3 |
Assigns a pivot to plot 3. Type in "R3" to assign R3 to plot 3. Type in "R2" to assign R2 to plot 3. Type in "R1" to assign R1 to plot 3. Type in "P" to assign P to plot 3. Type in "S1" to assign S1 to plot 3. Type in "S2" to assign S2 to plot 3. Type in "S3" to assign S3 to plot 3. |
|
ShowPlot4 |
Assigns a pivot to plot 4. Type in "R3" to assign R3 to plot 4. Type in "R2" to assign R2 to plot 4. Type in "R1" to assign R1 to plot 4. Type in "P" to assign P to plot 4. Type in "S1" to assign S1 to plot 4. Type in "S2" to assign S2 to plot 4. Type in "S3" to assign S3 to plot 4. |
|
R1Col |
Specifies the text and trendline color for R1. |
|
R2Col |
Specifies the text and trendline color for R2. |
|
R3Col |
Specifies the text and trendline color for R3. |
|
S1Col |
Specifies the text and trendline color for S1. |
|
S2Col |
Specifies the text and trendline color for S2. |
|
S3Col |
Specifies the text and trendline color for S3. |
|
PCol |
Specifies the text and trendline color for P. |
|
|
|
|
|
Remaining inputs for all versions: |
|
ShowPriceText |
Enables/disables the display of the pivot prices in the text labels. |
|
ShowPeriodText |
Enables/disables the display of the period text if Periods ago is 0 or greater than 1. For example, with PeriodsAgo set to 0, the daily period text would display CurrentDay... or with PeriodsAgo set to 2, the daily period text would display 2DaysAgo... |
|
DailyLabel |
Specifies the label that is being printed for the daily portion of the text label of daily pivots. Please note that this is a string input and the quotation marks need to remain. |
|
WeeklyLabel |
Specifies the label that is being printed for the weekly portion of the text label of weekly pivots. Please note that this is a string input and the quotation marks need to remain. |
|
MonthlyLabel |
Specifies the label that is being printed for the monthly portion of the text label of monthly pivots. Please note that this is a string input and the quotation marks need to remain. |
|
YearlyLabel |
Specifies the label that is being printed for the yearly portion of the text label of yearly pivots. Please note that this is a string input and the quotation marks need to remain. |
|
QuarterlyLabel |
Specifies the label that is being printed for the quarterly portion of the text label of quarterly pivots. Please note that this is a string input and the quotation marks need to remain. |
|
R1Label |
Specifies the label that is being printed for R1. Please note that this is a string input and the quotation marks need to remain. |
|
R2Label |
Specifies the label that is being printed for R2. Please note that this is a string input and the quotation marks need to remain. |
|
R3Label |
Specifies the label that is being printed for R3. Please note that this is a string input and the quotation marks need to remain. |
|
R4Label |
Specifies the label that is being printed for R4. Please note that this is a string input and the quotation marks need to remain. |
|
R5Label |
Specifies the label that is being printed for R5. Please note that this is a string input and the quotation marks need to remain. |
|
S1Label |
Specifies the label that is being printed for S1. Please note that this is a string input and the quotation marks need to remain. |
|
S2Label |
Specifies the label that is being printed for S2. Please note that this is a string input and the quotation marks need to remain. |
|
S3Label |
Specifies the label that is being printed for S3. Please note that this is a string input and the quotation marks need to remain. |
|
S4Label |
Specifies the label that is being printed for S4. Please note that this is a string input and the quotation marks need to remain. |
|
S5Label |
Specifies the label that is being printed for S5. Please note that this is a string input and the quotation marks need to remain. |
|
PivotLabel |
Specifies the label that is being printed for the base pivot. Please note that this is a string input and the quotation marks need to remain. |
|
HighLabel |
Specifies the label that is being printed for the session high. Please note that this is a string input and the quotation marks need to remain. |
|
LowLabel |
Specifies the label that is being printed for the session low. Please note that this is a string input and the quotation marks need to remain. |
|
LeftSpace |
With this input, additional blank space can be added to the left of the text label for the purpose of moving the text labels into the extra space to the right of the last bar as created through Format > Space to the Right. For this purpose, both inputs TextHor and TextAlign need to be set to 0. Please note that this is a string input and the quotation marks need to remain. For example, to move the text labels 10 spaces to the right of the most recent bar, the input value would be as follows " " Again, in order for the text object to be visible, the extra space needs to be created between the last bar and the right price axis via Format > Space to the Right |
|
R1Style |
Specifies the trendline style for R1. |
|
R2Style |
Specifies the trendline style for R2. |
|
R3Style |
Specifies the trendline style for R3. |
|
R4Style |
Specifies the trendline style for R4. |
|
R5Style |
Specifies the trendline style for R5. |
|
S1Style |
Specifies the trendline style for S1. |
|
S2Style |
Specifies the trendline style for S2. |
|
S3Style |
Specifies the trendline style for S3. |
|
S4Style |
Specifies the trendline style for S4. |
|
S5Style |
Specifies the trendline style for S5. |
|
PStyle |
Specifies the trendline style for P. |
|
HStyle |
Specifies the trendline style for the session high. |
|
LStyle |
Specifies the trendline style for the session low. |
|
R1Size |
Specifies the trendline size for R1. |
|
R2Size |
Specifies the trendline size for R2. |
|
R3Size |
Specifies the trendline size for R3. |
|
R4Size |
Specifies the trendline size for R4. |
|
R5Size |
Specifies the trendline size for R5. |
|
S1Size |
Specifies the trendline size for S1. |
|
S2Size |
Specifies the trendline size for S2. |
|
S3Size |
Specifies the trendline size for S3. |
|
S4Size |
Specifies the trendline size for S4. |
|
S5Size |
Specifies the trendline size for S5. |
|
PSize |
Specifies the trendline size for P. |
|
HSize |
Specifies the trendline size for the session high. |
|
LSize |
Specifies the trendline size for the session low. |
|
R1Alrt |
Allows you to disable the alert when the market approaches or breaks R1. A setting of "True" enables the alert and a setting of "False" disables the alert. It is defaulted to True. |
|
R2Alrt |
Allows you to disable the alert when the market approaches or breaks R2. A setting of "True" enables the alert and a setting of "False" disables the alert. It is defaulted to True. |
|
R3Alrt |
Allows you to disable the alert when the market approaches or breaks R3. A setting of "True" enables the alert and a setting of "False" disables the alert. It is defaulted to True. |
|
R4Alrt |
Allows you to disable the alert when the market approaches or breaks R4. A setting of "True" enables the alert and a setting of "False" disables the alert. It is defaulted to True. |
|
R5Alrt |
Allows you to disable the alert when the market approaches or breaks R5. A setting of "True" enables the alert and a setting of "False" disables the alert. It is defaulted to True. |
|
S1Alrt |
Allows you to disable the alert when the market approaches or breaks S1. A setting of "True" enables the alert and a setting of "False" disables the alert. It is defaulted to True. |
|
S2Alrt |
Allows you to disable the alert when the market approaches or breaks S2. A setting of "True" enables the alert and a setting of "False" disables the alert. It is defaulted to True. |
|
S3Alrt |
Allows you to disable the alert when the market approaches or breaks S3. A setting of "True" enables the alert and a setting of "False" disables the alert. It is defaulted to True. |
|
S4Alrt |
Allows you to disable the alert when the market approaches or breaks S4. A setting of "True" enables the alert and a setting of "False" disables the alert. It is defaulted to True. |
|
S5Alrt |
Allows you to disable the alert when the market approaches or breaks S5. A setting of "True" enables the alert and a setting of "False" disables the alert. It is defaulted to True. |
|
AlrtDist |
Allows you to adjust the distance in ticks by how far the market can approach R3, R2, R1, S1, S2 or S3 before an alert is generated. It is defaulted to 10 ticks. |
|
MinBreak |
Allows you to adjust the minimum distance in ticks by how far the market needs to break R3, R2, R1, S1, S2 or S3 before an alert is generated. It is defaulted to 0 ticks. |
|
Gap |
Adds opening gap to all pivots if enabled. |
|
R1Text |
Enables and disables the displayed text for R1. |
|
R2Text |
Enables and disables the displayed text for R2. |
|
R3Text |
Enables and disables the displayed text for R3. |
|
R4Text |
Enables and disables the displayed text for R4. |
|
R5Text |
Enables and disables the displayed text for R5. |
|
S1Text |
Enables and disables the displayed text for S1. |
|
S2Text |
Enables and disables the displayed text for S2. |
|
S3Text |
Enables and disables the displayed text for S3. |
|
S4Text |
Enables and disables the displayed text for S4. |
|
S5Text |
Enables and disables the displayed text for S5. |
|
SText |
Enables and disables the displayed text for P. |
|
HText |
Enables and disables the displayed text for the session high. |
|
LText |
Enables and disables the displayed text for the session low. |
|
ShowText |
Enables and disables the displayed text for all of the pivot points |
|
TextVert |
Allows you to vertically adjust the displayed text for the R3, R2, R1, P, S1 S2 and S3 values. If the text sits below the plot line or trendline, a positive value will raise the text and a negative value will lower the text. If the text sits above the plot line or trendline, a positive value will lower the text and a negative value raise the text. It is defaulted to 0 ticks. |
|
TextHor |
Allows you to horizontally adjust the displayed text for the R3, R2, R1, P, S1, S2 and S3 values. Each increment will move the text one bar further to the left. It is defaulted to 300 bars. The window's bar spacing affects the alignment of the text objects. We recommend adjusting this input according to the bar spacing of your charts until the text objects are aligned to the left edge of your screen. |
|
TextAlign |
Specifies the horizontal alignment of the text objects, whereas 0 equals left aligned, 1 equals right aligned and 3 equals centered aligned |
|
Decimal |
Allows you to adjust the number of decimals in which the text for the R3, R2, R1, P, S1, S2 and S3 values display. It is defaulted to 2 decimals. |
|
Fraction |
If you are applying the Alchemy Floor Traders Pivot Points indicator to any symbol that reads in fractions, such as bonds, you can set this input to True and the displayed text for the R3, R2, R1, P, S1, S2 and S3 values will read in fractions (e.g. 106^30). For symbols that trade in ½ ticks such as the 10 year US Treasury Notes, the “Decimal” input needs to be set to a negative number. |
|
AlchemyFTPivots is a multiple-output function that provides the pivots for P, R1, R2, R3, S1, S2 and S3 of the Alchemy Floor Traders Pivots indicator. |
Floor Traders Mid Points
Stay in sync with the traders in the pits with these new trigger points. This indicator plots the mid points of the classic floor traders pivot points. In recent times, the mid points have become important areas of support and resistance.
The Alchemy Mid Points indicator simply identifies the mid points between the classic floor traders pivot points. These points have become more widely used by floor traders in recent times. The Alchemy Mid Points indicator can be used alone or can be applied to the same chart with the Alchemy Floor Traders Pivot Points indicator. The Alchemy Mid Points indicator should be considered as an enhancement to the classic floor traders pivots points and will assist the trader in identifying additional key points of support and resistance.
The Alchemy MidPoints Indicator
To view chart, go to: http://www.tradingalchemy.com/ViewChartsFTMidPoints.htm
User Defined Inputs:
|
PivotType |
Specifies the type of pivot to be calculated. Type in "Daily" for daily Floor Traders Pivots, type in "Weekly" for weekly Floor Traders Pivots, type in "Monthly" for monthly Floor Traders Pivots, type in "Quarterly" for quarterly Floor Traders Pivots and type in "Yearly" for yearly Floor Traders Pivots. Please note that the first letter needs to be upper case. |
|
|
PeriodsAgo |
Specifies the period that the mid point calculations are based on, whereas 0 uses the current periods high, low close, 1 uses the previous periods high, low close and so fourth. |
|
| OpenPrice | Specifies the price to be used for the session open. | |
| HighPrice | Specifies the price to be used for the session high. | |
| LowPrice | Specifies the price to be used for the session low. | |
| ClosePrice | Specifies the price to be used for the session. | |
|
ManualHi |
Allows the user to manually enter the previous day, month, week or year high. A setting of 0 automatically calculates the previous day, month, week or year high based on the chart. |
|
|
ManualLo |
Allows the user to manually enter the previous day, month, week or year low. A setting of 0 automatically calculates the previous day, month, week or year low based on the chart. |
|
|
ManualCl |
Allows the user to manually enter the previous day, month, week or year close. A setting of 0 automatically calculates the previous day, month, week or year close based on the chart. |
|
|
StartT |
Specifies the session start time. This is a special feature that gives this indicator the flexibility to specify the session times. With this feature, the mid points can be calculated based on the high, low and close of a predetermined day session while plotted on an all sessions symbol. A negative setting uses TradeStation's day high, day low and day close function that is based on a calendar day. This format is in military charting time without the colon. For example, 1:30pm would be entered as 1330. Please note that when using a custom session, the reserved word Sess1StartTime can not be used. |
|
|
EndT |
Specifies the session end time. This is a special feature that gives this indicator the flexibility to specify the session times. With this feature, the mid points can be calculated based on the high, low and close of a predetermined day session while plotted on an all sessions symbol. A negative setting uses TradeStation's day high, day low and day close function that is based on a calendar day. This format is in military charting time without the colon. For example, 1:30pm would be entered as 1330. Please note that when using a custom session, the reserved word Sess1EndTime can not be used. |
|
|
PivotFormula |
This input allows you to specify the formula for the base pivot. With this input set to 0, the indicator uses the standard formula for the daily base pivot which is: (previous days' high + previous days' low + previous days' close)/3. Another example of a common formula used for the daily Floor Traders base pivots is (previous days' low + previous days' high + previous days' low + previous days' close)/4 and in order to use this formula the following would be typed into this input: ( highd(1)+lowd(1)+closed(1) )/3. |
|
|
HighFormula |
This input works in conjunction with the PivotFormula input and it specifies the high price to calculate S1. For the above example, this input would need the formula highd(1). |
|
|
LowFormula |
This input works in conjunction with the PivotFormula input and it specifies the low price to calculate R1. For the above example, this input would need the formula lowd(1). |
|
|
CalculationMode |
Setting of 0: Uses alternate calculations for R3, R4, R5 and S3, S4, S5 as follows: R3=2*(Pivot-Previous Session Low)+Previous Session High; S3=Previous Session Low-( 2*(Previous Session High-Pivot) ); R4=3*(Pivot-Previous Session Low)+Previous Session High; S4=Previous Session Low-( 3*(Previous Session High-Pivot) ); R5=4*(Pivot-Previous Session Low)+Previous Session High; S5=Previous Session Low-( 4*(Previous Session High-Pivot) );
Setting of 1: Uses alternate calculations for R3, R4, R5 and S3, S4, S5 as follows: R3=(Pivot-S1)+R2; S3=S2-(R1-Pivot); R4=(Pivot-S2)+R3; S4=S3-(R2-Pivot); R5=(Pivot-S3)+R4; S5=S4-(R3-Pivot);
Setting of 2: Uses alternate calculations for R3, R4, R5 and S3, S4, S5 as follows: R3=Pivot+( (Previous Session High-Previous Session Low)*2 ); S3=Pivot-( (Previous Session High-Previous Session Low)*2 ); R4=Pivot+( (Previous Session High-Previous Session Low)*3 ); S4=Pivot-( (Previous Session High-Previous Session Low)*3 ); R5=Pivot+( (Previous Session High-Previous Session Low)*4 ); S5=Pivot-( (Previous Session High-Previous Session Low)*4 );
Setting of 3: Uses the Camarilla Pivots
|
|
|
XDayOfWeek |
Specifies a certain day of the week to be excluded from a session to be used for a mid point calculation. 0=Sunday, 1=Monday, 2=Tuesday, 3=Wednesday, 4=Thursday, 5=Friday, 6=Saturday and a negative value disables this feature. |
|
| AutoSessionEndTme | Specifies the session end time for calculating the pivots for the next session if the inputs StartT and EndT are not being used. This format is in military charting time without the colon. For example, 1:30pm would be entered as 1330. Please note that when using a custom session, the reserved word Sess1EndTime can not be used. | |
|
PRM_Pcnt |
Specifies the mid point percentage between the pivot and R1. An increasing number moves the mid point higher towards R1. |
|
|
PSM_Pcnt |
Specifies the mid point percentage between the pivot and S1. An increasing number moves the mid point lower towards S1. |
|
|
R12M_Pcnt |
Specifies the mid point percentage between R1 and R2. An increasing number moves the mid point higher towards R2. |
|
|
R23M_Pcnt |
Specifies the mid point percentage between R2 and R3. An increasing number moves the mid point higher towards R3. |
|
|
S12M_Pcnt |
Specifies the mid point percentage between S1 and S2. An increasing number moves the mid point lower towards S2. |
|
|
S23M_Pcnt |
Specifies the mid point percentage between S2 and S3. An increasing number moves the mid point lower towards S3. |
|
|
TL_LeftLength |
Specifies the number of bars to the left from the current bar to start drawing the trend lines. A setting of 0 starts the trend lines at the start of the session and a negative setting extends the trend lines to the left. |
|
|
PRMidLne |
Allows you to display the pivot to R1 midpoint as a trendline. Plotlines adjust the screen scaling of the chart to the extreme high and low prices of the plot values, whereas trendlines move into view as the current market price approaches them. If the range between the highest and the lowest plot value is very large, it may compress the entire chart to a point where it becomes very hard to read the bars. Since the Floor Traders Pivot Points at times may encompass a very large range, we defaulted the pivot to R1 midpoint to a trendline, however, giving you the choice to change it to a plotline as well. Setting the pivot to R1 midpoint to a plotline will give you the advantage to view the pivot to R1 midpoint over the entire chart instead of the current day only. See ShowPlot1 through ShowPlot4 for an explanation on how to display the pivot to R1 midpoint as a plotline. |
|
|
R12MidLine |
Allows you to display the R1 to R2 midpoint as a trendline. Plotlines adjust the screen scaling of the chart to the extreme high and low prices of the plot values, whereas trendlines move into view as the current market price approaches them. If the range between the highest and the lowest plot value is very large, it may compress the entire chart to a point where it becomes very hard to read the bars. Since the Floor Traders Pivot Points at times may encompass a very large range, we defaulted the R1 to R2 midpoint to a trendline, however, giving you the choice to change it to a plotline as well. Setting the R1 to R2 midpoint to a plotline will give you the advantage to view the R1 to R2 midpoint over the entire chart instead of the current day only. See ShowPlot1 through ShowPlot4 for an explanation on how to display the R1 to R2 midpoint as a plotline. |
|
|
R23MidLine |
Allows you to display the R2 to R3 midpoint as a trendline. Plotlines adjust the screen scaling of the chart to the extreme high and low prices of the plot values, whereas trendlines move into view as the current market price approaches them. If the range between the highest and the lowest plot value is very large, it may compress the entire chart to a point where it becomes very hard to read the bars. Since the Floor Traders Pivot Points at times may encompass a very large range, we defaulted the R2 to R3 midpoint to a trendline, however, giving you the choice to change it to a plotline as well. Setting the R2 to R3 midpoint to a plotline will give you the advantage to view the R2 to R3 midpoint over the entire chart instead of the current day only. See ShowPlot1 through ShowPlot4 for an explanation on how to display the R2 to R3 midpoint as a plotline. |
|
|
R34MidLine |
Allows you to display the R3 to R4 midpoint as a trendline. Plotlines adjust the screen scaling of the chart to the extreme high and low prices of the plot values, whereas trendlines move into view as the current market price approaches them. If the range between the highest and the lowest plot value is very large, it may compress the entire chart to a point where it becomes very hard to read the bars. Since the Floor Traders Pivot Points at times may encompass a very large range, we defaulted the R3 to R4 midpoint to a trendline, however, giving you the choice to change it to a plotline as well. Setting the R3 to R4 midpoint to a plotline will give you the advantage to view the R3 to R4 midpoint over the entire chart instead of the current day only. See ShowPlot1 through ShowPlot4 for an explanation on how to display the R3 to R4 midpoint as a plotline. |
|
|
R45MidLine |
Allows you to display the R4 to R5 midpoint as a trendline. Plotlines adjust the screen scaling of the chart to the extreme high and low prices of the plot values, whereas trendlines move into view as the current market price approaches them. If the range between the highest and the lowest plot value is very large, it may compress the entire chart to a point where it becomes very hard to read the bars. Since the Floor Traders Pivot Points at times may encompass a very large range, we defaulted the R4 to R5 midpoint to a trendline, however, giving you the choice to change it to a plotline as well. Setting the R4 to R5 midpoint to a plotline will give you the advantage to view the R4 to R5 midpoint over the entire chart instead of the current day only. See ShowPlot1 through ShowPlot4 for an explanation on how to display the R4 to R5 midpoint as a plotline. |
|
|
PSMidLne |
Allows you to display the pivot to S1 midpoint as a trendline. Plotlines adjust the screen scaling of the chart to the extreme high and low prices of the plot values, whereas trendlines move into view as the current market price approaches them. If the range between the highest and the lowest plot value is very large, it may compress the entire chart to a point where it becomes very hard to read the bars. Since the Floor Traders Pivot Points at times may encompass a very large range, we defaulted the pivot to S1 midpoint to a trendline, however, giving you the choice to change it to a plotline as well. Setting the pivot to S1 midpoint to a plotline will give you the advantage to view the pivot to S1 midpoint over the entire chart instead of the current day only. See ShowPlot1 through ShowPlot4 for an explanation on how to display the pivot to S1 midpoint as a plotline |
|
|
S12MidLine |
Allows you to display the S1 to S2 midpoint as a trendline. Plotlines adjust the screen scaling of the chart to the extreme high and low prices of the plot values, whereas trendlines move into view as the current market price approaches them. If the range between the highest and the lowest plot value is very large, it may compress the entire chart to a point where it becomes very hard to read the bars. Since the Floor Traders Pivot Points at times may encompass a very large range, we defaulted the S1 to S2 midpoint to a trendline, however, giving you the choice to change it to a plotline as well. Setting the S1 to S2 midpoint to a plotline will give you the advantage to view the S1 to S2 midpoint over the entire chart instead of the current day only. See ShowPlot1 through ShowPlot4 for an explanation on how to display the S1 to S2 midpoint as a plotline. |
|
|
S23MidLine |
Allows you to display the S2 to S3 midpoint as a trendline. Plotlines adjust the screen scaling of the chart to the extreme high and low prices of the plot values, whereas trendlines move into view as the current market price approaches them. If the range between the highest and the lowest plot value is very large, it may compress the entire chart to a point where it becomes very hard to read the bars. Since the Floor Traders Pivot Points at times may encompass a very large range, we defaulted the S2 to S3 midpoint to a trendline, however, giving you the choice to change it to a plotline as well. Setting the S2 to S3 midpoint to a plotline will give you the advantage to view the S2 to S3 midpoint over the entire chart instead of the current day only. See ShowPlot1 through ShowPlot4 for an explanation on how to display the S2 to S3 midpoint as a plotline. |
|
|
S34MidLine |
Allows you to display the S3 to S4 midpoint as a trendline. Plotlines adjust the screen scaling of the chart to the extreme high and low prices of the plot values, whereas trendlines move into view as the current market price approaches them. If the range between the highest and the lowest plot value is very large, it may compress the entire chart to a point where it becomes very hard to read the bars. Since the Floor Traders Pivot Points at times may encompass a very large range, we defaulted the S3 to S4 midpoint to a trendline, however, giving you the choice to change it to a plotline as well. Setting the S3 to S4 midpoint to a plotline will give you the advantage to view the S3 to S4 midpoint over the entire chart instead of the current day only. See ShowPlot1 through ShowPlot4 for an explanation on how to display the S3 to S4 midpoint as a plotline. |
|
|
S45MidLine |
Allows you to display the S4 to S5 midpoint as a trendline. Plotlines adjust the screen scaling of the chart to the extreme high and low prices of the plot values, whereas trendlines move into view as the current market price approaches them. If the range between the highest and the lowest plot value is very large, it may compress the entire chart to a point where it becomes very hard to read the bars. Since the Floor Traders Pivot Points at times may encompass a very large range, we defaulted the S4 to S5 midpoint to a trendline, however, giving you the choice to change it to a plotline as well. Setting the S4 to S5 midpoint to a plotline will give you the advantage to view the S4 to S5 midpoint over the entire chart instead of the current day only. See ShowPlot1 through ShowPlot4 for an explanation on how to display the S4 to S5 midpoint as a plotline. |
|
|
Inputs for TradeStation 8/9: |
||
|
PlotPRMidLne |
Enables/disables the plot for the mid line between the base pivot and R1. |
|
|
PlotR12MidLine |
Enables/disables the plot for the mid line between R1 and R2. |
|
|
PlotR23MidLine |
Enables/disables the plot for the mid line between R2 and R3. |
|
|
PlotR34MidLine |
Enables/disables the plot for the mid line between R3 and R4. |
|
|
PlotR45MidLine |
Enables/disables the plot for the mid line between R4 and R5. |
|
|
PlotPSMidLn |
Enables/disables the plot for the mid line between the base pivot and S1. |
|
|
PlotS12MidLine |
Enables/disables the plot for the mid line between S1 and S2. |
|
|
PlotS23MidLine |
Enables/disables the plot for the mid line between S2 and S3. |
|
|
PlotS34MidLine |
Enables/disables the plot for the mid line between S3 and S4. |
|
|
PlotS45MidLine |
Enables/disables the plot for the mid line between S4 and S5. |
|
|
Inputs for TradeStation 4.0 and TradeStation 2000i: |
||
|
ShowPlot1 |
Assigns a mid point to plot 1. Type in "PR" to assign the pivot to R1 midpoint to plot 1. Type in "R12" to assign the R1 to R2 midpoint to plot 1. Type in "R23" to assign the R2 to R3 midpoint to plot 1. Type in "PS" to assign the pivot to S1 midpoint to plot 1. Type in "S12" to assign the S1 to S2 midpoint to plot 1. Type in "S23" to assign the S2 to S3 midpoint to plot 1. |
|
|
ShowPlot2 |
Assigns a mid point to plot 2. Type in "PR" to assign the pivot to R1 midpoint to plot 2. Type in "R12" to assign the R1 to R2 midpoint to plot 2. Type in "R23" to assign the R2 to R3 midpoint to plot 2. Type in "PS" to assign the pivot to S1 midpoint to plot 2. Type in "S12" to assign the S1 to S2 midpoint to plot 2. Type in "S23" to assign the S2 to S3 midpoint to plot 2. |
|
|
ShowPlot3 |
Assigns a mid point to plot 3. Type in "PR" to assign the pivot to R1 midpoint to plot 3. Type in "R12" to assign the R1 to R2 midpoint to plot 3. Type in "R23" to assign the R2 to R3 midpoint to plot 3. Type in "PS" to assign the pivot to S1 midpoint to plot 3. Type in "S12" to assign the S1 to S2 midpoint to plot 3. Type in "S23" to assign the S2 to S3 midpoint to plot 3. |
|
|
ShowPlot4 |
Assigns a mid point to plot 4. Type in "PR" to assign the pivot to R1 midpoint to plot 4. Type in "R12" to assign the R1 to R2 midpoint to plot 4. Type in "R23" to assign the R2 to R3 midpoint to plot 4. Type in "PS" to assign the pivot to S1 midpoint to plot 4. Type in "S12" to assign the S1 to S2 midpoint to plot 4. Type in "S23" to assign the S2 to S3 midpoint to plot 4. |
|
|
PRMidCol |
Specifies the text and trendline color for assign the pivot to R1 midpoint. |
|
|
R12MidCol |
Specifies the text and trendline color for the R1 to R2 midpoint. |
|
|
R23MidCol |
Specifies the text and trendline color for the R2 to R3 midpoint. |
|
|
PSMidCol |
Specifies the text and trendline color for the pivot to S1 midpoint. |
|
|
S12MidCol |
Specifies the text and trendline color for the S1 to S2 midpoint. |
|
|
S23MidCol |
Specifies the text and trendline color for the S2 to S3 midpoint. |
|
|
Remaining inputs for all versions: |
||
|
ShowPriceText |
Enables/disables the display of the pivot prices in the text labels. |
|
|
ShowPeriodText |
Enables/disables the display of the period text if Periods ago is 0 or greater than 1. For example, with PeriodsAgo set to 0, the daily period text would display CurrentDay... or with PeriodsAgo set to 2, the daily period text would display 2DaysAgo... |
|
|
DailyLabel |
Specifies the label that is being printed for the daily portion of the text label of daily pivots. Please note that this is a string input and the quotation marks need to remain. |
|
|
WeeklyLabel |
Specifies the label that is being printed for the weekly portion of the text label of weekly pivots. Please note that this is a string input and the quotation marks need to remain. |
|
|
MonthlyLabel |
Specifies the label that is being printed for the monthly portion of the text label of monthly pivots. Please note that this is a string input and the quotation marks need to remain. |
|
|
YearlyLabel |
Specifies the label that is being printed for the yearly portion of the text label of yearly pivots. Please note that this is a string input and the quotation marks need to remain. |
|
|
QuarterlyLabel |
Specifies the label that is being printed for the quarterly portion of the text label of quarterly pivots. Please note that this is a string input and the quotation marks need to remain. |
|
|
PRMLabel |
Specifies the label that is being printed for the mid line between the base pivot and R1. Please note that this is a string input and the quotation marks need to remain. |
|
|
R12MLabel |
Specifies the label that is being printed for the mid line between R1 and R2. Please note that this is a string input and the quotation marks need to remain. |
|
|
R23MLabel |
Specifies the label that is being printed for the mid line between R2 and R3. Please note that this is a string input and the quotation marks need to remain. |
|
|
R34MLabel |
Specifies the label that is being printed for the mid line between R3 and R4. Please note that this is a string input and the quotation marks need to remain. |
|
|
R45MLabel |
Specifies the label that is being printed for the mid line between R4 and R5. Please note that this is a string input and the quotation marks need to remain. |
|
|
PSMLabel |
Specifies the label that is being printed for the mid line between the base pivot and S1. Please note that this is a string input and the quotation marks need to remain. |
|
|
S12MLabel |
Specifies the label that is being printed for the mid line between S1 and S2. Please note that this is a string input and the quotation marks need to remain. |
|
|
S23MLabel |
Specifies the label that is being printed for the mid line between S2 and S3. Please note that this is a string input and the quotation marks need to remain. |
|
|
S34MLabel |
Specifies the label that is being printed for the mid line between S3 and S4. Please note that this is a string input and the quotation marks need to remain. |
|
|
S45MLabel |
Specifies the label that is being printed for the mid line between S4 and S5. Please note that this is a string input and the quotation marks need to remain. |
|
| LeftSpace | With this input, additional blank space can be added to the left of the text label for the purpose of moving the text labels into the extra space to the right of the last bar as created through Format > Space to the Right. For this purpose, both inputs TextHor and TextAlign need to be set to 0. Please note that this is a string input and the quotation marks need to remain. For example, to move the text labels 10 spaces to the right of the most recent bar, the input value would be as follows " " Again, in order for the text object to be visible, the extra space needs to be created between the last bar and the right price axis via Format > Space to the Right | |
|
PRMStyle |
Specifies the trendline for the pivot to R1 mid point. |
|
|
R12MStyle |
Specifies the trendline for the R1 to R2 mid point. |
|
|
R23MStyle |
Specifies the trendline for the R2 to R3 mid point. |
|
|
R34MStyle |
Specifies the trendline for the R3 to R4 mid point. |
|
|
R45MStyle |
Specifies the trendline for the R4 to R5 mid point. |
|
|
PSMStyle |
Specifies the trendline for the pivot to S1 mid point. |
|
|
S12MStyle |
Specifies the trendline for the S1 to S2 mid point. |
|
|
S23MStyle |
Specifies the trendline for the S2 to S3 mid point. |
|
|
S34MStyle |
Specifies the trendline for the S3 to S4 mid point. |
|
|
S45MStyle |
Specifies the trendline for the S4 to S5 mid point. |
|
|
PRMSize |
Specifies the trendline size the pivot to R1 mid point. |
|
|
R12MSize |
Specifies the trendline size the R1 to R2 mid point. |
|
|
R23MSize |
Specifies the trendline size the R2 to R3 mid point. |
|
|
R34MSize |
Specifies the trendline size the R3 to R4 mid point. |
|
|
R45MSize |
Specifies the trendline size the R4 to R5 mid point. |
|
|
PSMSize |
Specifies the trendline size the pivot to S1 mid point. |
|
|
S12MSize |
Specifies the trendline size the S1 to S2 mid point. |
|
|
S23MSize |
Specifies the trendline size the S2 to S3 mid point. |
|
|
S34MSize |
Specifies the trendline size the S3 to S4 mid point. |
|
|
S45MSize |
Specifies the trendline size the S4 to S5 mid point. |
|
|
PRMidAlr |
Allows you to disable the alert when the market approaches or the pivot to R1 midpoint. A setting of "True" enables the alert and a setting of "False" disables the alert. It is defaulted to True. |
|
|
R12MidAlrt |
Allows you to disable the alert when the market approaches or breaks the R1 to R2 midpoint. A setting of "True" enables the alert and a setting of "False" disables the alert. It is defaulted to True. |
|
|
R23MidAlrt |
Allows you to disable the alert when the market approaches or breaks the R2 to R3 midpoint. A setting of "True" enables the alert and a setting of "False" disables the alert. It is defaulted to True. |
|
|
R34MidAlrt |
Allows you to disable the alert when the market approaches or breaks the R3 to R4 midpoint. A setting of "True" enables the alert and a setting of "False" disables the alert. It is defaulted to True. |
|
|
PSMidAlr |
Allows you to disable the alert when the market approaches or breaks the pivot to S1 midpoint. A setting of "True" enables the alert and a setting of "False" disables the alert. It is defaulted to True. |
|
|
S12MidAlrt |
Allows you to disable the alert when the market approaches or breaks the S1 to S2 midpoint. A setting of "True" enables the alert and a setting of "False" disables the alert. It is defaulted to True. |
|
|
S23MidAlrt |
Allows you to disable the alert when the market approaches or breaks the S2 to S3 midpoint. A setting of "True" enables the alert and a setting of "False" disables the alert. It is defaulted to True. |
|
|
S34MidAlrt |
Allows you to disable the alert when the market approaches or breaks the S3 to S4 midpoint. A setting of "True" enables the alert and a setting of "False" disables the alert. It is defaulted to True. |
|
|
S45MidAlrt |
Allows you to disable the alert when the market approaches or breaks the S4 to S5 midpoint. A setting of "True" enables the alert and a setting of "False" disables the alert. It is defaulted to True. |
|
|
AlrtDist |
Allows you to adjust the distance in ticks by how far the market can approach any one of the mid points before an alert is generated. It is defaulted to 10 ticks. |
|
|
MinBreak |
Allows you to adjust the minimum distance in ticks by how far the market needs to break any one of the mid points before an alert is generated. It is defaulted to 0 ticks. |
|
|
Gap |
Adds opening gap to all pivots if enabled. |
|
|
ShowText |
Enables and disables the displayed text for all of the mid points. |
|
|
TextVert |
Allows you to vertically adjust the displayed text any one of the mid points values. If the text sits below the plot line or trendline, a positive value will raise the text and a negative value will lower the text. If the text sits above the plot line or trendline, a positive value will lower the text and a negative value raise the text. It is defaulted to 0 ticks. |
|
|
TextHor |
Allows you to horizontally adjust the displayed text for the any one of the mid points values. Each increment will move the text one bar further to the left. It is defaulted to 300 bars. The window's bar spacing affects the alignment of the text objects. We recommend adjusting this input according to the bar spacing of your charts until the text objects are aligned to the left edge of your screen. |
|
|
TextAlign |
Specifies the horizontal alignment of the text objects, whereas 0 equals left aligned, 1 equals right aligned and 3 equals centered aligned |
|
|
Decimal |
Allows you to adjust the number of decimals in which the text for any one of the mid points values display. It is defaulted to 2 decimals. |
|
|
Fraction |
If you are applying the Alchemy Floor Traders Pivot Points indicator to any symbol that reads in fractions, such as bonds, you can set this input to True and the displayed text for any one of the mid points values will read in fractions (e.g. 106^30). For symbols that trade in ½ ticks such as the 10 year US Treasury Notes, the “Decimal” input needs to be set to a negative number. |
|
All-In-One Pivots Indicator (Alchemy Pivots All-In-One) Available for TradeStation 9/10 only!
The Alchemy All-In-One Pivots indicator combines the Floor Traders Pivots, Floor Traders Mid Points, Open-High-Low-Close and Rolling Pivots into one indicator. This indicator accesses bar information from other specified time intervals such as tick, minute, daily, weekly or monthly intervals from any chart, therefore efficiently providing accurately calculated pivots for any time frame on any chart. This indicator can display daily, weekly and monthly Floor Traders Pivots, Floor Traders Mid Points and the Open-High-Low-Close on any chart, even on tick charts. All of these pivots can also be displayed for intra-day minute, tick or volume charts such as hourly Rolling Pivots when specified as 60 minute for example.
The Alchemy All-In-One Pivots indicator contains the following plots:
|
R5 Avg |
Indicator Inputs:
|
Global: |
|
|
PeriodsAgo |
Specifies the period for which the pivot calculations are based on, whereas 1 uses the last closed period, 2 uses the period before the last closed period and so fourth. This indicator accesses the data for closed periods and a setting of 0 automatically uses the last closed period as a setting of 1 would. For displaying the open, high, low and close of the current period, we offer our Open High Low Close Indicator |
|
PivotType |
Specifies the type of pivot to be calculated. Type in "Daily", "daily", "D" or "d" for daily pivots, type in "Weekly", "weekly", "W" or "w" for weekly Pivots, type in "Monthly", "monthly", "M" or "m" for monthly Pivots, type in "IM", "iM", "Im" or "im" for intra-day minute pivots, type in "IT", "iT", "It" or "it" for intra-day tick bar pivots or type in "IV", "iV", "Iv" or "iv" for intra-day volume bar pivots . Please note that this is a string input which always needs to stay within quotation marks. |
|
PivotsSymbol |
Specifies the symbol to be used for the pivots calculations. The reserved word getsymbolname automatically uses the symbol of the chart on which the indicator is applied on. Please note that this is a string input which always needs to stay within quotation marks. |
|
BarsToLoad |
Specifies the historical number of bars to load from the current date and time for calculating the pivots. If this input is not set to load in enough bars for calculating all the way back to the beginning of the chart, the pivot calculations won't start until later on the chart. Therefore, it is better to load in more bars then not enough. However, as this number increases, it will substantially slow down the load in time of this indicator. If the last bar of the chart is not the current date, to save unnecessary processing power, we recommend using the FirstDate and LastDate inputs for specifying the dates to load the historical bars for calculating the pivots. If you receive an error message Not enough Data, you need to either reduce the value of this input and/or increase the date range of your symbol setting. |
|
IntervalSpan |
Specifies the interval span such as 60 for a 60 minute period. For daily, weekly and monthly periods, this input value needs to be set to 1. |
|
FirstDate |
Specifies the earliest date for loading the historical bars to calculate the pivots. In order to use this method of loading the historical bars to calculate the pivots, the input BarsToLoad has to be set to 0. As explained above, if the last bar of the chart is not the current date, to save unnecessary processing power, we recommend using the FirstDate and LastDate inputs for specifying the dates to load the historical bars for calculating the pivots. This is a string input and when used, the precise format has to be "month/day/year". For example a date of February 1st, 2012 would be entered as "2/1/2012". When not used, this input should be left blank with 2 quotation marks as follows "". If the format of this input is not correct, the indicator will generate an invalid date time format error message. |
|
LastDate |
Specifies the latest date for loading the historical bars to calculate the pivots. In order to use this method of loading the historical bars to calculate the pivots, the input BarsToLoad has to be set to 0. As explained above, if the last bar of the chart is not the current date, to save unnecessary processing power, we recommend using the FirstDate and LastDate inputs for specifying the dates to load the historical bars for calculating the pivots. This is a string input and when used, the precise format has to be "month/day/year". For example a date of February 1st, 2012 would be entered as "2/1/2012". When not used, this input should be left blank with 2 quotation marks as follows "". If the format of this input is not correct, the indicator will generate an invalid date time format error message. |
|
CalculationMode |
Uses alternate calculations for R3, R4, R5 and S3, S4, S5 as follows: Setting of 0: Classic Pivot Point Calculation R3=2*(Pivot-Previous Session Low)+Previous Session High; S3=Previous Session Low-( 2*(Previous Session High-Pivot) ); R4=3*(Pivot-Previous Session Low)+Previous Session High; S4=Previous Session Low-( 3*(Previous Session High-Pivot) ); R5=4*(Pivot-Previous Session Low)+Previous Session High; S5=Previous Session Low-( 4*(Previous Session High-Pivot) );
Setting of 1: R3=(Pivot-S1)+R2; S3=S2-(R1-Pivot); R4=(Pivot-S2)+R3; S4=S3-(R2-Pivot); R5=(Pivot-S3)+R4; S5=S4-(R3-Pivot);
Setting of 2: R3=Pivot+( (Previous Session High-Previous Session Low)*2 ); S3=Pivot-( (Previous Session High-Previous Session Low)*2 ); R4=Pivot+( (Previous Session High-Previous Session Low)*3 ); S4=Pivot-( (Previous Session High-Previous Session Low)*3 ); R5=Pivot+( (Previous Session High-Previous Session Low)*4 ); S5=Pivot-( (Previous Session High-Previous Session Low)*4 );
Setting of 4: Woodie Pivot Point Calculation
Setting of 5: Camarilla Pivot Point Calculation, version 1
Setting of 6: Camarilla Pivot Point Calculation, version 2, which is the more widely use Camarilla Pivots calculation
|
|
Gap |
Adds opening gap to all pivots if enabled. |
|
|
|
|
Pivots: |
|
|
ShowPivots |
Enables/disables all Floor Traders Pivots from S5 all the way up to R5 |
|
ShowR1 |
Enables/disables R1. |
|
ShowR2 |
Enables/disables R2. |
|
ShowR3 |
Enables/disables R3. |
|
ShowR4 |
Enables/disables R4. |
|
ShowR5 |
Enables/disables R5. |
|
ShowS1 |
Enables/disables S1. |
|
ShowS2 |
Enables/disables S2. |
|
ShowS3 |
Enables/disables S3. |
|
ShowS4 |
Enables/disables S4. |
|
ShowS5 |
Enables/disables S5. |
|
ShowPivot |
Enables/disables the base pivot. |
|
|
|
|
Mid Points: |
|
|
ShowMidPoints |
Enables/disables all Floor Traders Mid Points from S4 to S5 mid all the way up to R4 to R5 mid |
|
PRM_Pcnt |
Specifies the midpoint percentage between the base pivot and R1, whereas a setting of 0 disables the midpoint between the base pivot and R1. |
|
PSM_Pcnt |
Specifies the midpoint percentage between the base pivot and S1, whereas a setting of 0 disables the midpoint between the base pivot and S1. |
|
R12M_Pcnt |
Specifies the midpoint percentage between R1 and R2, whereas a setting of 0 disables the midpoint between R1 and R2. |
|
R23M_Pcnt |
Specifies the midpoint percentage between R2 and R3, whereas a setting of 0 disables the midpoint between R2 and R3. |
|
R34M_Pcnt |
Specifies the midpoint percentage between R3 and R4, whereas a setting of 0 disables the midpoint between R3 and R4. |
|
R45M_Pcnt |
Specifies the midpoint percentage between R4 and R5, whereas a setting of 0 disables the midpoint between R4 and R5. |
|
S12M_Pcnt |
Specifies the midpoint percentage between S1 and S2, whereas a setting of 0 disables the midpoint between S1 and S2. |
|
S23M_Pcnt |
Specifies the midpoint percentage between S2 and S3, whereas a setting of 0 disables the midpoint between S2 and S3. |
|
S34M_Pcnt |
Specifies the midpoint percentage between S3 and S4, whereas a setting of 0 disables the midpoint between S3 and S4. |
|
S45M_Pcnt |
Specifies the midpoint percentage between S4 and S5, whereas a setting of 0 disables the midpoint between S4 and S5. |
|
|
|
|
Open-High-Low-Close: |
|
|
ShowOHLC |
Enables/disables all open-high-low-close pivots from the low all the way up to the high |
|
ShowOpen |
Enables/disables the open |
|
ShowHigh |
Enables/disables the high |
|
ShowLow |
Enables/disables the low |
|
ShowClose |
Enables/disables the close |
|
SessionAvg |
The session average level displays the session open-high-low-close average and this input specifies the session prices to be used for calculating the average. This is a string input, which needs to be bracketed by quotation marks. The first digit enables/disables the open, the second digit enables/disables the high, the third digit enables/disables the low and the fourth digit enables/disables the close, whereas a value of 0 disables the corresponding price and a value of 1 enables the corresponding price. All 4 digits set to 0 disables the session average level. |
|
|
|
|
Trendlines: |
|
|
ShowTL |
Enables/disables all horizontal trendlines |
|
TL_LeftLength |
Specifies the number of bars to the left from the current bar to start drawing the trend lines. A setting of 0 starts the trend lines at the start of the session and a negative setting extends the trend lines to the left. |
|
PLine |
Enables/disables the base pivot horizontal trendline. |
|
R1Line |
Enables/disables the R1 horizontal trendline. |
|
R2Line |
Enables/disables the R2 horizontal trendline. |
|
R3Line |
Enables/disables the R3 horizontal trendline. |
|
R4Line |
Enables/disables the R4 horizontal trendline. |
|
R5Line |
Enables/disables the R5 horizontal trendline. |
|
S1Line |
Enables/disables the S1 horizontal trendline. |
|
S2Line |
Enables/disables the S2 horizontal trendline. |
|
S3Line |
Enables/disables the S3 horizontal trendline. |
|
S4Line |
Enables/disables the S4 horizontal trendline. |
|
S5Line |
Enables/disables the S5 horizontal trendline. |
|
PRMidLne |
Enables/disables the horizontal trendline for the midpoint between the base pivot and R1. |
|
R12MidLne |
Enables/disables the horizontal trendline for the midpoint between R1 and R2. |
|
R23MidLne |
Enables/disables the horizontal trendline for the midpoint between R2 and R3. |
|
R34MidLne |
Enables/disables the horizontal trendline for the midpoint between R3 and R4. |
|
R45MidLne |
Enables/disables the horizontal trendline for the midpoint between R4 and R5. |
|
PSMidLne |
Enables/disables the horizontal trendline for the midpoint between the base pivot and S1. |
|
S12MidLne |
Enables/disables the horizontal trendline for the midpoint between S1 and S2. |
|
S23MidLne |
Enables/disables the horizontal trendline for the midpoint between S2 and S3. |
|
S34MidLne |
Enables/disables the horizontal trendline for the midpoint between S3 and S4. |
|
S45MidLne |
Enables/disables the horizontal trendline for the midpoint between S4 and S5. |
|
OLine |
Enables/disables the horizontal trendline for the session open. |
|
HLine |
Enables/disables the horizontal trendline for the session high. |
|
LLine |
Enables/disables the horizontal trendline for the session low. |
|
CLine |
Enables/disables the horizontal trendline for the session close. |
|
AvgLine |
Enables/disables the horizontal trendline for the session average. |
|
|
|
|
Trendline Styles: Each trend line color is controlled with its corresponding plot under Format Indicator > Color and each trend line weight is controlled with its corresponding plot under Format Indicator > Style. Please note that when making a color or weight change, the indicator needs to be disabled and then re-enabled again before the changes will take affect. |
|
|
PStyle |
Specifies the horizontal trendline style for P. The options are as follows: tool_solid or 1, tool_dashed or 2, tool_dotted or 3, tool_dashed2 or 4, tool_dashed3 or 5 |
|
R1Style |
Specifies the horizontal trendline style for R1. The options are as follows: tool_solid or 1, tool_dashed or 2, tool_dotted or 3, tool_dashed2 or 4, tool_dashed3 or 5 |
|
R2Style |
Specifies the horizontal trendline style for R2. The options are as follows: tool_solid or 1, tool_dashed or 2, tool_dotted or 3, tool_dashed2 or 4, tool_dashed3 or 5 |
|
R3Style |
Specifies the horizontal trendline style for R3. The options are as follows: tool_solid or 1, tool_dashed or 2, tool_dotted or 3, tool_dashed2 or 4, tool_dashed3 or 5 |
|
R4Style |
Specifies the horizontal trendline style for R4. The options are as follows: tool_solid or 1, tool_dashed or 2, tool_dotted or 3, tool_dashed2 or 4, tool_dashed3 or 5 |
|
R5Style |
Specifies the horizontal trendline style for R5. The options are as follows: tool_solid or 1, tool_dashed or 2, tool_dotted or 3, tool_dashed2 or 4, tool_dashed3 or 5 |
|
S1Style |
Specifies the horizontal trendline style for S1. The options are as follows: tool_solid or 1, tool_dashed or 2, tool_dotted or 3, tool_dashed2 or 4, tool_dashed3 or 5 |
|
S2Style |
Specifies the horizontal trendline style for S2. The options are as follows: tool_solid or 1, tool_dashed or 2, tool_dotted or 3, tool_dashed2 or 4, tool_dashed3 or 5 |
|
S3Style |
Specifies the horizontal trendline style for S3. The options are as follows: tool_solid or 1, tool_dashed or 2, tool_dotted or 3, tool_dashed2 or 4, tool_dashed3 or 5 |
|
S4Style |
Specifies the horizontal trendline style for S4. The options are as follows: tool_solid or 1, tool_dashed or 2, tool_dotted or 3, tool_dashed2 or 4, tool_dashed3 or 5 |
|
S5Style |
Specifies the horizontal trendline style for S5. The options are as follows: tool_solid or 1, tool_dashed or 2, tool_dotted or 3, tool_dashed2 or 4, tool_dashed3 or 5 |
|
PRMStyle |
Specifies the horizontal trendline style for the midpoint between the base pivot and R1. The options are as follows: tool_solid or 1, tool_dashed or 2, tool_dotted or 3, tool_dashed2 or 4, tool_dashed3 or 5 |
|
R12MStyle |
Specifies the horizontal trendline style for the midpoint between R1 and R2. The options are as follows: tool_solid or 1, tool_dashed or 2, tool_dotted or 3, tool_dashed2 or 4, tool_dashed3 or 5 |
|
R23MStyle |
Specifies the horizontal trendline style for the midpoint between R2 and R3. The options are as follows: tool_solid or 1, tool_dashed or 2, tool_dotted or 3, tool_dashed2 or 4, tool_dashed3 or 5 |
|
R34MStyle |
Specifies the horizontal trendline style for the midpoint between R3 and R4. The options are as follows: tool_solid or 1, tool_dashed or 2, tool_dotted or 3, tool_dashed2 or 4, tool_dashed3 or 5 |
|
R45MStyle |
Specifies the horizontal trendline style for the midpoint between R4 and R5. The options are as follows: tool_solid or 1, tool_dashed or 2, tool_dotted or 3, tool_dashed2 or 4, tool_dashed3 or 5 |
|
PSMStyle |
Specifies the horizontal trendline style for the midpoint between the base pivot and S1. The options are as follows: tool_solid or 1, tool_dashed or 2, tool_dotted or 3, tool_dashed2 or 4, tool_dashed3 or 5 |
|
S12MStyle |
Specifies the horizontal trendline style for the midpoint between S1 and S2. The options are as follows: tool_solid or 1, tool_dashed or 2, tool_dotted or 3, tool_dashed2 or 4, tool_dashed3 or 5 |
|
S23MStyle |
Specifies the horizontal trendline style for the midpoint between S2 and S3. The options are as follows: tool_solid or 1, tool_dashed or 2, tool_dotted or 3, tool_dashed2 or 4, tool_dashed3 or 5 |
|
S34MStyle |
Specifies the horizontal trendline style for the midpoint between S3 and S4. The options are as follows: tool_solid or 1, tool_dashed or 2, tool_dotted or 3, tool_dashed2 or 4, tool_dashed3 or 5 |
|
S45MStyle |
Specifies the horizontal trendline style for the midpoint between S4 and S5. The options are as follows: tool_solid or 1, tool_dashed or 2, tool_dotted or 3, tool_dashed2 or 4, tool_dashed3 or 5 |
|
OStyle |
Specifies the horizontal trendline style for the session open. The options are as follows: tool_solid or 1, tool_dashed or 2, tool_dotted or 3, tool_dashed2 or 4, tool_dashed3 or 5 |
|
HStyle |
Specifies the horizontal trendline style for the session high. The options are as follows: tool_solid or 1, tool_dashed or 2, tool_dotted or 3, tool_dashed2 or 4, tool_dashed3 or 5 |
|
LStyle |
Specifies the horizontal trendline style for the session low. The options are as follows: tool_solid or 1, tool_dashed or 2, tool_dotted or 3, tool_dashed2 or 4, tool_dashed3 or 5 |
|
CStyle |
Specifies the horizontal trendline style for the session close. The options are as follows: tool_solid or 1, tool_dashed or 2, tool_dotted or 3, tool_dashed2 or 4, tool_dashed3 or 5 |
|
AvgStyle |
Specifies the horizontal trendline style for the session average. The options are as follows: tool_solid or 1, tool_dashed or 2, tool_dotted or 3, tool_dashed2 or 4, tool_dashed3 or 5 |
|
|
|
|
Plotlines: |
|
|
ShowPlotLines |
Enables/disables all plot lines |
|
PlotR1 |
Enables/disables the plot for R1. |
|
PlotR2 |
Enables/disables the plot for R2. |
|
PlotR3 |
Enables/disables the plot for R3. |
|
PlotR4 |
Enables/disables the plot for R4. |
|
PlotR5 |
Enables/disables the plot for R5. |
|
PlotS1 |
Enables/disables the plot for S1. |
|
PlotS2 |
Enables/disables the plot for S2. |
|
PlotS3 |
Enables/disables the plot for S3. |
|
PlotS4 |
Enables/disables the plot for S4. |
|
PlotS5 |
Enables/disables the plot for S5. |
|
PlotPivot |
Enables/disables the plot for the base pivot. |
|
PlotOpen |
Enables/disables the plot for the session open. |
|
PlotHigh |
Enables/disables the plot for the session high. |
|
PlotLow |
Enables/disables the plot for the session low. |
|
PlotClose |
Enables/disables the plot for the session close. |
|
PlotAvg |
Enables/disables the plot for the session average. |
|
|
|
|
Text: Each text color is controlled with its corresponding plot under Format Indicator > Color. Please note that when making a color or weight change, the indicator needs to be disabled and then re-enabled again before the changes will take affect. |
|
|
ShowText |
Enables/disables all text objects. |
|
ShowPriceText |
Enables/disables the display of the pivot prices in the text labels. |
|
ShowPeriodText |
Enables/disables the display of the period text if Periods ago is 0 or greater than 1. For example, with PeriodsAgo set to 0, the daily period text would display CurrentDay... or with PeriodsAgo set to 2, the daily period text would display 2DaysAgo... |
|
ShowSymbol |
Enables/disables the display of the symbol that the pivots are calculated on within the text label. |
|
PText |
Enables and disables the displayed text for P. |
|
R1Text |
Enables and disables the displayed text for R1. |
|
R2Text |
Enables and disables the displayed text for R2. |
|
R3Text |
Enables and disables the displayed text for R3. |
|
R4Text |
Enables and disables the displayed text for R4. |
|
R5Text |
Enables and disables the displayed text for R5. |
|
S1Text |
Enables and disables the displayed text for S1. |
|
S2Text |
Enables and disables the displayed text for S2. |
|
S3Text |
Enables and disables the displayed text for S3. |
|
S4Text |
Enables and disables the displayed text for S4. |
|
S5Text |
Enables and disables the displayed text for S5. |
|
PRMText |
Enables and disables the displayed text for the midpoint between the base pivot and R1. |
|
R12MText |
Enables and disables the displayed text for the midpoint between R1 and R2. |
|
R23MText |
Enables and disables the displayed text for the midpoint between R2 and R3. |
|
R34MText |
Enables and disables the displayed text for the midpoint between R3 and R4. |
|
R45MText |
Enables and disables the displayed text for the midpoint between R4 and R5. |
|
PSMText |
Enables and disables the displayed text for the midpoint between the base pivot and S1. |
|
S12MText |
Enables and disables the displayed text for the midpoint between S1 and S2. |
|
S23MText |
Enables and disables the displayed text for the midpoint between S2 and S3. |
|
S34MText |
Enables and disables the displayed text for the midpoint between S3 and S4. |
|
S45MText |
Enables and disables the displayed text for the midpoint between S4 and S5. |
|
OText |
Enables and disables the displayed text for the session open. |
|
HText |
Enables and disables the displayed text for the session high. |
|
LText |
Enables and disables the displayed text for the session low. |
|
CText |
Enables and disables the displayed text for the session close. |
|
AvgText |
Enables and disables the displayed text for the session average. |
|
TextVert |
Allows you to vertically adjust the displayed text for the pivot values. If the text sits below the plot line or trendline, a positive value will raise the text and a negative value will lower the text. If the text sits above the plot line or trendline, a positive value will lower the text and a negative value raise the text. |
|
TextHor |
Allows you to horizontally adjust the displayed text for the pivot values. Each increment will move the text one bar further to the left. The window's bar spacing affects the alignment of the text objects. |
|
TextAlign |
Specifies the horizontal alignment of the text objects, whereas 0 equals left aligned, 1 equals right aligned and 3 equals centered aligned |
|
Decimal |
Allows you to adjust the number of decimals in which the text for the pivot values display. |
|
Fraction |
If you are applying the indicator to any symbol that reads in fractions, such as bonds, you can set this input to True and the displayed text for the pivot values will read in fractions (e.g. 106^30). For symbols that trade in ½ ticks such as the 10 year US Treasury Notes, the “Decimal” input needs to be set to a negative number. |
|
|
|
|
Text Labels: |
|
|
TickLabel |
Specifies the label that is being printed for the intra-day tick portion of the text label of intra-day tick pivots. Please note that this is a string input and the quotation marks need to remain. |
|
MinuteLabel |
Specifies the label that is being printed for the intra-day minute portion of the text label of intra-day minute pivots. Please note that this is a string input and the quotation marks need to remain. |
|
DailyLabel |
Specifies the label that is being printed for the daily portion of the text label of daily pivots. Please note that this is a string input and the quotation marks need to remain. |
|
WeeklyLabel |
Specifies the label that is being printed for the weekly portion of the text label of weekly pivots. Please note that this is a string input and the quotation marks need to remain. |
|
MonthlyLabel |
Specifies the label that is being printed for the monthly portion of the text label of monthly pivots. Please note that this is a string input and the quotation marks need to remain. |
|
PivotLabel |
Specifies the label that is being printed for the base pivot. Please note that this is a string input and the quotation marks need to remain. |
|
R1Label |
Specifies the label that is being printed for R1. Please note that this is a string input and the quotation marks need to remain. |
|
R2Label |
Specifies the label that is being printed for R2. Please note that this is a string input and the quotation marks need to remain. |
|
R3Label |
Specifies the label that is being printed for R3. Please note that this is a string input and the quotation marks need to remain. |
|
R4Label |
Specifies the label that is being printed for R4. Please note that this is a string input and the quotation marks need to remain. |
|
R5Label |
Specifies the label that is being printed for R5. Please note that this is a string input and the quotation marks need to remain. |
|
S1Label |
Specifies the label that is being printed for S1. Please note that this is a string input and the quotation marks need to remain. |
|
S2Label |
Specifies the label that is being printed for S2. Please note that this is a string input and the quotation marks need to remain. |
|
S3Label |
Specifies the label that is being printed for S3. Please note that this is a string input and the quotation marks need to remain. |
|
S4Label |
Specifies the label that is being printed for S4. Please note that this is a string input and the quotation marks need to remain. |
|
S5Label |
Specifies the label that is being printed for S5. Please note that this is a string input and the quotation marks need to remain. |
|
PRMLabel |
Specifies the label that is being printed for the midpoint between the base pivot and R1. Please note that this is a string input and the quotation marks need to remain. |
|
R12MLabel |
Specifies the label that is being printed for the midpoint between R1 and R2. Please note that this is a string input and the quotation marks need to remain. |
|
R23MLabel |
Specifies the label that is being printed for the midpoint between R2 and R3. Please note that this is a string input and the quotation marks need to remain. |
|
R34MLabel |
Specifies the label that is being printed for the midpoint between R3 and R4. Please note that this is a string input and the quotation marks need to remain. |
|
R45MLabel |
Specifies the label that is being printed for the midpoint between R4 and R5. Please note that this is a string input and the quotation marks need to remain. |
|
PSMLabel |
Specifies the label that is being printed for the midpoint between the base pivot and S1. Please note that this is a string input and the quotation marks need to remain. |
|
S12MLabel |
Specifies the label that is being printed for the midpoint between S1 and S2. Please note that this is a string input and the quotation marks need to remain. |
|
S23MLabel |
Specifies the label that is being printed for the midpoint between S2 and S3. Please note that this is a string input and the quotation marks need to remain. |
|
S34MLabel |
Specifies the label that is being printed for the midpoint between S3 and S4. Please note that this is a string input and the quotation marks need to remain. |
|
S45MLabel |
Specifies the label that is being printed for the midpoint between S4 and S5. Please note that this is a string input and the quotation marks need to remain. |
|
OpenLabel |
Specifies the label that is being printed for the session open. Please note that this is a string input and the quotation marks need to remain. |
|
HighLabel |
Specifies the label that is being printed for the session high. Please note that this is a string input and the quotation marks need to remain. |
|
LowLabel |
Specifies the label that is being printed for the session low. Please note that this is a string input and the quotation marks need to remain. |
|
CloseLabel |
Specifies the label that is being printed for the session close. Please note that this is a string input and the quotation marks need to remain. |
|
AvgLabel |
Specifies the label that is being printed for the session average. Please note that this is a string input and the quotation marks need to remain. |
|
LeftSpace |
With this input, additional blank space can be added to the left of the text label for the purpose of moving the text labels into the extra space to the right of the last bar as created through Format > Space to the Right. For this purpose, both inputs TextHor and TextAlign need to be set to 0. Please note that this is a string input and the quotation marks need to remain. For example, to move the text labels 10 spaces to the right of the most recent bar, the input value would be as follows " " Again, in order for the text object to be visible, the extra space needs to be created between the last bar and the right price axis via Format > Space to the Right |
|
|
|
|
Alerts: |
|
|
EnableAlerts |
Enables/disables all alerts. |
|
R1Alrt |
Allows you to enable or disable the alert when the market approaches or breaks R1. |
|
R2Alrt |
Allows you to enable or disable the alert when the market approaches or breaks R2. |
|
R3Alrt |
Allows you to enable or disable the alert when the market approaches or breaks R3. |
|
R4Alrt |
Allows you to enable or disable the alert when the market approaches or breaks R4. |
|
R5Alrt |
Allows you to enable or disable the alert when the market approaches or breaks R5. |
|
S1Alrt |
Allows you to enable or disable the alert when the market approaches or breaks S1. |
|
S2Alrt |
Allows you to enable or isable the alert when the market approaches or breaks S2. |
|
S3Alrt |
Allows you to enable or disable the alert when the market approaches or breaks S3. |
|
S4Alrt |
Allows you to enable or disable the alert when the market approaches or breaks S4. |
|
S5Alrt |
Allows you to enable or disable the alert when the market approaches or breaks S5. |
|
PRMAlrt |
Allows you to enable or disable the alert when the market approaches or breaks the midpoint between the base pivot and R1. |
|
R12MAlrt |
Allows you to enable or disable the alert when the market approaches or breaks the midpoint between R1 and R2. |
|
R23MAlrt |
Allows you to enable or disable the alert when the market approaches or breaks the midpoint between R2 and R3. |
|
R34MAlrt |
Allows you to enable or disable the alert when the market approaches or breaks the midpoint between R3 and R4. |
|
R45MAlrt |
Allows you to enable or disable the alert when the market approaches or breaks the midpoint between R4 and R5. |
|
PSMAlrt |
Allows you to enable or disable the alert when the market approaches or breaks the midpoint between the base pivot and S1. |
|
S12MAlrt |
Allows you to enable or disable the alert when the market approaches or breaks the midpoint between S1 and S2. |
|
S23MAlrt |
Allows you to enable or disable the alert when the market approaches or breaks the midpoint between S2 and S3. |
|
S34MAlrt |
Allows you to enable or disable the alert when the market approaches or breaks the midpoint between S3 and S4. |
|
S45MAlrt |
Allows you to enable or disable the alert when the market approaches or breaks the midpoint between S4 and S5. |
|
OHLC_AlertStartTime |
Specifies the earliest alert time for the open-high-low-close alerts to be triggered. A negative setting disables this time feature. This format is in military charting time without the colon. For example, 1:30pm would be entered as 1330. Please note that when using a custom session, the reserved word Sess1StartTime can not be used. |
|
OHLC_AlertEndTime |
Specifies the latest alert time for the open-high-low-close alerts to be triggered. A negative setting disables this time feature. This format is in military charting time without the colon. For example, 1:30pm would be entered as 1330. Please note that when using a custom session, the reserved word Sess1StartTime can not be used. |
|
OAlrt |
Allows you to enable or disable the alert when the market approaches or breaks the session open. |
|
HAlrt |
Allows you to enable or disable the alert when the market approaches or breaks the session high. |
|
LAlrt |
Allows you to enable or disable the alert when the market approaches or breaks the session low. |
|
CAlrt |
Allows you to enable or disable the alert when the market approaches or breaks the session close. |
|
AvgAlrt |
Allows you to enable or disable the alert when the market approaches or breaks the session average. |
|
AlrtDist |
Allows you to adjust the distance in cents, ticks or pips by how far the market can approach any specified pivot before an alert is generated. |
|
MinBreak |
Allows you to adjust the minimum distance in cents, ticks or pips by how far the market needs to break any specified pivot before an alert is generated. |
The Alchemy CCI Average Indicator (Alchemy CCI Average)
Additionally to the CCI and CC Average line of the standard CCI indicator, the Alchemy CCI Average indicator contains a cross plots and cross alerts when the CCI crosses the CCI average.
Indicator Inputs:
|
CCILength |
Specifies the CCI length. |
|
CCIAvgLength |
Specifies the CCI average length, whereas a setting of 0 disables the average line as well as all of its cross plots and alerts. |
|
OverSold |
Specifies the oversold value for the oversold line. |
|
OverBought |
Specifies the overbought value for the overbought line. |
|
ShowCCI |
Enables/disables the CCI line. |
|
AvgCross |
A setting of 0 disables the CCI-Average cross plots and alerts, a setting of 1 displays the CCI-Average cross on the CCI line and a setting of 2 displays the CCI-Average cross on the CCI Average line. |
|
ShowOverboughtOversold |
Enables/disables the overbought and oversold lines. |
|
OverSoldAlert |
Specifies the text to be displayed in the alert notification window when the CCI Average crosses over the oversold line. This is a string input which needs to stay within quotation marks. A blank field such as "" disables this alert. |
|
OverBoughtAlert |
Specifies the text to be displayed in the alert notification window when the CCI Average crosses under the oversold line. This is a string input which needs to stay within quotation marks. A blank field such as "" disables this alert. |
|
CrossUpAlert |
Specifies the text to be displayed in the alert notification window when the CCI crosses over the CCI Average. This is a string input which needs to stay within quotation marks. A blank field such as "" disables this alert. |
|
CrossDownAlert |
Specifies the text to be displayed in the alert notification window when the CCI crosses under the CCI Average. This is a string input which needs to stay within quotation marks. A blank field such as "" disables this alert. |
Detrended Price Oscillator (Alchemy DPO)
The Alchemy Detrended Price Oscillator plots the detrend which returns the difference between price and an offset average referred to as DPO and additionally, it plots the average line of its DPO. Both, the detrend and the average line contain a slope coloring feature. It also contains a cross alert and show me when the DPO crosses its average.
Indicator Inputs:
|
Price |
Specifies the price to be used for the detrend calculation |
|
DPO_Length |
Specifies the length of the offset average. |
|
AvgLength |
Specifies the length of the DPO average. |
|
AvgType |
Specifies the moving average type of the DPO average. A setting of 1 uses a simple moving average, a setting of 2 uses an exponential moving average, a setting of 3 uses a weighted moving average, a setting o 4 uses a triangular moving average, a setting of 5 uses a Mid Keltner, a setting of 6 uses a Hull moving average, a setting of 7 uses price as specified with the input Price. |
|
ShowDPO |
Enables/disables the DPO line |
|
ShowAvg |
Enables/disables the average line |
|
ShowZeroLine |
Enables/disables the zero line. |
|
CrossLineNumber |
A setting of 0 disables the DPO/average cross show me. With a setting of 1, the DPO/average cross show me is plotted on the DPO line and with a setting of 2, the DPO/average cross show me is plotted on the average line. |
|
DPO_ColorOffset |
Specifies the number of bars to offset the sloping color change of the DPO. For a histogram, point, cross, left tic or right tic, this input should be set to 0 and for lines, this input should be set to 1 bar. The up slope color is specified with the DPO Up plot and the down slope color is specified with the DPO Dn plot. Please note that when making a color change, the indicator needs to be disabled and then re-enabled again before the color changes will take affect. |
|
DPO_ColorNormLength |
Specifies the number of bars back for considering the gradient coloring for the DPO. With a setting of 0, the length of the DPO as specified with the input DPO_Length is automatically used. With a setting of -1, the colors change with positive and negative values and with a setting of -2, the colors change with a positive and negative slope without the gradient coloring effect. The up slope color is specified with the DPO Up plot and the down slope color is specified with the DPO Dn plot. Please note that when making a color change, the indicator needs to be disabled and then re-enabled again before the color changes will take affect. |
|
Avg_ColorOffset |
Specifies the number of bars to offset the color change of the average line. For a histogram, point, cross, left tic or right tic, this input should be set to 0 and for lines, this input should be set to 1 bar. The up slope color is specified with the Avg Up plot and the down slope color is specified with the Avg Dn plot. Please note that when making a color change, the indicator needs to be disabled and then re-enabled again before the color changes will take affect. |
|
Avg_ColorNormLength |
Specifies the number of bars back for considering the gradient coloring for the average line. With a setting of 0, the length of the average as specified with the input AvgLength is automatically used. With a setting of -1, the colors change with positive and negative values and with a setting of -2, the colors change with a positive and negative slope without the gradient coloring effect. The up slope color is specified with the Avg Up plot and the down slope color is specified with the Avg Dn plot. Please note that when making a color change, the indicator needs to be disabled and then re-enabled again before the color changes will take affect. |
|
DPO_ColorNormLength |
Enables/disables the zero line. |
|
ZeroCrossOverAlert |
Enables/disables the alert notification when the DPO crosses over the zero line. |
|
ZeroCrossUnderAlert |
Enables/disables the alert notification when the DPO crosses under the zero line. |
|
AvgCrossOverAlert |
Enables/disables the alert notification when the DPO crosses over the average line. |
|
AvgCrossUnderAlert |
Enables/disables the alert notification when the DPO crosses under the average line. |
Positive Negative Oscillator(Alchemy PositiveNegativeOscillator)
The Alchemy Positive Negative Oscillator converts a range bound oscillator such as a Stochastic or RSI into a positive/negative oscillator, using a specified mid point as the zeroline. Additionally, it plots the cumulative value of this oscillator.
Indicator Inputs:
|
Oscillator |
Specifies the oscillator to be used such as the RSI or Stochastic function. For example, to specify a 14 length RSI, type in rsi(close,14) |
|
ZeroLine |
Specifies the mid point to be used as the center line such as 50 for the RSI or Stochastic |
|
MaximumValue |
Specifies the maximum value of the oscillator such as 100 for the RSI or Stochastic |
|
MinimumValue |
Specifies the minimum value of the oscillator such as 0 for the RSI or Stochastic |
|
ShowOscillator |
Enables/disables the oscillator line |
|
Length |
Specifies the number of bars back for calculating the cumulative oscillator line. A setting of 0 disables the cumulative oscillator line. |
|
ShowZeroLine |
Enables/disables the zero line. |
RSI Indicators
The Alchemy RSI Indicator (Alchemy RSI)
The Alchemy RSI indicator contains a RSI and a RSI average line as well as multiple coloring and alert features such as an overbought/oversold coloring and alert feature as well as a above /below average coloring and alert feature. The overbought and oversold thresholds can be specified as fixed values or they can be calculated dynamically (Available for TradeStation 9/10 only!). This indicator also contains a separate cycle count plot that counts the number of bars up from the time that the RSI crosses under the oversold threshold until it crosses over the overbought threshold and it counts the number of bars down from the time that the RSI crosses over the overbought threshold until it crosses under the oversold threshold. In conjunction with the cycle bar count plot, it also contains a positive line that displays the average number of up cycle bars over the last x number of up cycles and a negative line that displays the average number of down cycle bars over the last x number of down cycles (Available for TradeStation 9/10 only!). For a detailed explanation of this indicator please refer to the indicator inputs description below.
Indicator Inputs:
|
|
RSI Parameters: |
|
RSI_Price |
Specifies the price to be used for the RSI such as open , high low or close. |
|
RSI_Length |
Specifies the RSI length. |
|
AverageLength |
Specifies the RSI average length, whereas a setting of 0 disables the average. |
|
AverageType |
Specifies the RSI average type. A setting of 1 uses a simple moving average, a setting of 2 uses an exponential moving average, a setting of 3 uses a weighted moving average, a setting of 4 uses a triangular moving average, a setting of 5 uses a Mid Keltner and a setting of 6 uses a Hull moving average. A setting of 0 disables the RSI average |
|
|
Overbought-Oversold Parameters: |
|
OverSoldThreshold |
Specifies the oversold value for the oversold line, coloring and alert. |
|
OverBoughtThreshold |
Specifies the overbought value for the overbought line, coloring and alert. |
|
DynamicThresholdLength Available for TradeStation 9/10 only! |
Specifies the look back length for calculating the dynamic overbought threshold by averaging out all of the RSI peaks over the last DynamicThresholdLength number of bars that have been above the value as specified with the input OverBoughtThreshold and the dynamic oversold threshold by averaging out all of the RSI valleys over the last DynamicThresholdLength number of bars that have been below the value as specified with the input OverSoldThreshold. A setting of 0 uses a fixed overbought threshold as specified with the input OverBoughtThreshold and a fixed oversold threshold as specified with the input OverSoldThreshold. With the dynamic threshold calculation enabled, there will be bars that won't return any overbought or oversold values because no peaks above the specified overbought threshold or valleys below the specified oversold threshold over the specified look back length can be found. Therefore, it is recommended to display the overbought-oversold lines as points, right tics or left tics instead of lines. |
|
CycleBarsAvgLength Available for TradeStation 9/10 only! |
This input enables a positive line that displays the average number of up cycle bars over the last x number of up cycles and a negative line that displays the average number of down cycle bars over the last x number of down cycles and it specifies the look back length for calculating the average number of up cycle bars over the last x number of up cycles and the average number of down cycle bars over the last x number of down cycles. These cycle bar average lines work in conjunction with the cycle histogram which requires for the input PlotCycle to be enabled. A setting of 0 disables these average lines. |
|
|
Plotting Parameters: |
|
ShowRSI |
Enables/disables the RSI line. |
|
ShowAverage |
Enables/disables the RSI average line. |
|
ShowOverboughtOversold |
Enables/disables the overbought and oversold lines. |
|
PlotCycle |
Enables/disables the up/down cycle histogram that counts the number of bars up from the time that the RSI crosses under the oversold threshold until it crosses over the overbought threshold and the number of bars down from the time that the RSI crosses over the overbought threshold until it crosses under the oversold threshold. Since the cycle is expressed in number of bars, this plot is scaled differently from the RSI values and it can't be plotted together with the RSI. Therefore, all other plots such as the RSI, RSI average, overbought and oversold lines will be automatically disabled in a charting window when this plot is enabled and it needs to be inserted as a separate indicator. |
|
|
Coloring Parameters: |
|
OvbOvsColorOffset |
Specifies the number of bars to offset the color change of the RSI when it is above the overbought line or below the oversold line. For a histogram, point, cross, left tic or right tic, or in RadarScreen, this input should be set to 0 and for lines, this input should be set to 1 bar. A negative setting disables this coloring feature. |
|
OverBColor |
Specifies the color of the RSI line when it is above the overbought threshold. |
|
OverSColor |
Specifies the color of the RSI line when it is below the oversold threshold. |
|
AvgColorOffset |
Specifies the number of bars to offset the color change of the RSI when it is above or below its average. For a histogram, point, cross, left tic or right tic, or in RadarScreen, this input should be set to 0 and for lines, this input should be set to 1 bar. A negative setting disables this coloring feature. Please note that the Overbought/Oversold coloring feature takes priority over this coloring feature. Therefore, the input OvbOvsColorOffset needs to be set to a negative value in order to use this feature. |
|
AboveAvgColor |
Specifies the color of the RSI line when it is above its average. |
|
BelowAvgColor |
Specifies the color of the RSI line when it is below its average. |
|
CycleColorOffset |
Specifies the number of bars to offset the color change of the cycle plot when it is positive or negative. For a histogram, point, cross, left tic or right tic, or in RadarScreen, this input should be set to 0 and for lines, this input should be set to 1 bar. A negative setting disables this coloring feature. |
|
CycleUpColor |
Specifies the color of the cycle plot when it is cycling up. |
|
CycleDownColor |
Specifies the color of the cycle plot when it is cycling down. |
|
|
Alert Parameters: |
|
OverSoldAlert |
Enables/disables the alert when the RSI crosses over the oversold line. |
|
OverBoughtAlert |
Enables/disables the alert when the RSI crosses under the overbought line. |
|
AboveAverageAlert |
Enables/disables the alert when the RSI crosses over the RSI average line. |
|
BelowAverageAlert |
Enables/disables the alert when the RSI crosses under the RSI average line. |
Spike Indicators
The Alchemy Spike Indicator (Alchemy Spike)
The Alchemy Spike indicator paints price bars with extreme up and down spikes that are associated with expanded range bars. These types of spike bars are often followed by sharp price reversals. The up spike paint bar color is controlled with the SpikeHigh plot color and the down spike paint bar color is controlled with the SpikeLow plot color. Please note that when making a color change, the indicator needs to be disabled and then re-enabled again before the color changes will take affect.
Indicator Inputs:
|
SpikeStrength: |
Specifies the number of bars back above which a spike bar has to spike above or below. |
|
SpikeLength: |
Specifies the number of bars to consider for calculating the average spike distance. |
|
SpikeFactor: |
Specifies the sensitivity factor for calculating the average spike distance. The greater this number, the bigger of a spike is required. |
| RangeLength: | Specifies the number of bars to consider for calculating the average bar range, whereas a setting of 0 disables the expanded bar range criteria. |
| RangeFactor: | Specifies the sensitivity factor for calculating the average bar range, whereas a setting of 0 disables the expanded bar range criteria. The greater this number, the more expanded the spike bar is required to be. |
| HighPrice: | Specifies the paint bar high price such as high or open. |
| LowPrice: | Specifies the paint bar low price such as low or close. |
| ShowUpSpike: | Enables/disables the paint bars for up spike bars. |
| ShowDnSpike: | Enables/disables the paint bars for down spike bars. |
| UpAlert: | Enables/disables the up spike bar alert. |
| DnAlert: | Enables/disables the down spike bar alert. |
Range Indicators
The Alchemy Average Range Indicator (Alchemy AverageRange)
The Alchemy Average Range indicator contains a range plot, an average range plot, a highest range plot and a lowest range plot. The range can be defined as either the high to low of a bar or as the candlestick body range, defined as open to close. Additionally, it can also be defined as the current bar's range or as the true range, meaning that if the previous bars' close is above the current bars' high, the previous bars' close will be considered as the high for calculating the current bar's range. Vice versa, if the previous bars' close is below the current bars' low, the previous bars' close will be considered as the low for calculating the current bar's range. All of these range calculation methods can be determined with the inputs as explained below. The highest and lowest range plots look for the highest and lowest range over the last number of bars as specified with the Length input, which also is used for calculating the average range. The range plot can be set to change colors and increase width when the range reaches or exceeds the average range or the highest range. In TradeStation 8/9, these alert colors are controlled with the Color Plots under Format Indicator > Color. Please note that when making a color change, the indicator needs to be disabled and then re-enabled again before the color changes will take affect. In SuperCharts, TradeStation 4 and TradeStation 2000i, these alert colors are controlled with the indicator inputs as explained below.
Indicator Inputs:
|
Length: |
Specifies the average length, whereas a setting of 0 automatically disables the average range, highest range and lowest range plots. |
|
Type: |
Specifies the average type. A setting of 1 uses a simple moving average, a setting of 2 uses an exponential moving average, a setting of 3 uses a weighted moving average, a setting of 4 uses a triangular moving average, a setting of 5 uses a Mid Keltner and a setting of 6 uses a Hull moving average. |
|
BarsAgo: |
Specifies the number of bars ago for starting to calculate the average, the highest and the lowest range. For example, with a setting of 1, the average range starts with the previous bar and does not include the current range, whereas with a setting of 0, the avergae range includes the current bar's range. |
| UseBody: | With a setting of true, the range is calculated as the candlestick body range, defined as open to close and with a setting of false, the range is calculated as the high to the low of a bar. |
| UseTrueRange: | With a setting of true, the range is calculated as the true range, meaning that if the previous bars' close is above the current bars' high, the previous bars' close will be considered as the high for calculating the current bar's range and vice versa, if the previous bars' close is below the current bars' low, the previous bars' close will be considered as the low for calculating the current bar's range. |
| ShowRange: | Enables/disables the Range plot. |
| ShowAvgRange: | Enables/disables the AvgRange plot. |
| ShowHighestRnge: | Enables/disables the HighestRnge plot. |
| ShowLowestRnge: | Enables/disables the LowestRnge plot. |
| AvgRangeAlert: | Enables/disables the range plot color change and width increase as well as the alert when the range reaches or exceeds the average range. |
| HighestRangeAlert: | Enables/disables the range plot color change and width increase as well as the alert when the range reaches or exceeds the highest range. |
| RangeAlertPlotoffset: | Specifies the number of bars to offset the range plot alert color change and width increase. For histograms, this input should be set to 0 and for lines, this input should be set to 1 bar. |
| TradeStation 8/9: | |
| AvgRngeAlertWidthIncrease: | Specifies the range plot width increase when the range reaches or exceeds the average range. |
| HiRngeAlertWidthIncrease: | Specifies the range plot width increase when the range reaches or exceeds the highest range. |
| SuperCharts, TradeStation 4 and TradeStation 2000i: | |
| RngeWidth: | Specifies the range plot width when the range is below the average range. |
| AvgRngeAlertWidth: | Specifies the range plot width when the range reaches or exceeds the average range. |
| HiRngeAlertWidth: | Specifies the range plot width when the range reaches or exceeds the highest range. |
| RngeCol: | Specifies the range plot color when the range is below the average range. |
| AvgRngeAlertCol: | Specifies the range plot color when the range reaches or exceeds the average range. |
| HiRngeAlertCol: | Specifies the range plot color when the range reaches or exceeds the highest range. |
The Alchemy Average True Range Percent Charting Indicator (Alchemy ATR%)
The Alchemy Average True Range Percent indicator displays text objects of the current average true range, current bar's range percent in relation to the average true range, the current bar's high and the current bar's low. It also draws lines of the current bar's high and the current bar's low. The range can be defined as either the high to low of a bar or as the candlestick body range, defined as open to close. Additionally, it can also be defined as the regular bar range or as the true range, meaning that if the previous bars' close is above the current bars' high, the previous bars' close will be considered as the high for calculating the current bar's range. Vice versa, if the previous bars' close is below the current bars' low, the previous bars' close will be considered as the low for calculating the current bar's range. All of these range calculation methods can be determined with the inputs as explained below. The text and line colors are controlled with the corresponding plot colors under Format Indicator > Color and the line sizes are controlled with the corresponding plot weight under Format Indicator > Style. Please note that when making a color change or a line weight change, the indicator needs to be disabled and then re-enabled again before the changes will take effect.
Indicator Inputs:
| Range: | |
|
AvgLength: |
Specifies the average range length. |
|
AvgType: |
Specifies the average range type. A setting of 1 uses a simple moving average, a setting of 2 uses an exponential moving average, a setting of 3 uses a weighted moving average, a setting of 4 uses a triangular moving average, a setting of 5 uses a Mid Keltner and a setting of 6 uses a Hull moving average. |
| ATR_UseBody: | With a setting of true, the average range is calculated as the candlestick body range, defined as open to close and with a setting of false, the average range is calculated as the high to the low of a bar. |
| ATR_UseTrueRange: | With a setting of true, the average range is calculated as the true range, meaning that if the previous bars' close is above the current bars' high, the previous bars' close will be considered as the high for calculating the current bar's range and vice versa, if the previous bars' close is below the current bars' low, the previous bars' close will be considered as the low for calculating the current bar's range. |
| Range_UseBody: | With a setting of true, the current bar's range is calculated as the candlestick body range, defined as open to close and with a setting of false, the current bar's range is calculated as the high to the low of a bar. |
| Range_UseTrueRange: | With a setting of true, the current bar's range is calculated as the true range, meaning that if the previous bars' close is above the current bars' high, the previous bars' close will be considered as the high for calculating the current bar's range and vice versa, if the previous bars' close is below the current bars' low, the previous bars' close will be considered as the low for calculating the current bar's range. |
| ATR Text: | |
| ShowATR_Text: | Enables/disables the ATR text. |
| ATR_Text_Price | Specifies the vertical price of the current bar for the ATR text to be displayed such as open, high, low or close. |
|
ATR_Text_LeftSpace: |
With this input, additional blank space can be added to the left of the text label for the purpose of moving the text labels into the extra space to the right of the last bar as created through Format > Space to the Right. For this purpose, the input ATR_Text_HorizOffset has to be set to 0 and the input ATR_Text_HorizAlign has to be set to "right". Please note that this is a string input and the quotation marks need to remain. For example, to move the text labels 10 spaces to the right of the most recent bar, the input value would be as follows " " Again, in order for the text object to be visible, the extra space needs to be created between the last bar and the right price axis via Format > Space to the Right |
| ATR_Decimal: | Specifies the decimal points for the ATR value to be displayed. |
| ATR_Text_HorizOffset: | Specifies the number of bars to move the ATR text to the left of the current bar. |
| ATR_Text_HorizAlign: | Specifies the horizontal alignment of the ATR text and the options are "right", "left" and "center". Please note that this is a string input and the quotation marks need to remain. |
| ATR_Text_VertAlign: | Specifies the vertical alignment of the ATR text and the options are "top", "bottom" and "center". Please note that this is a string input and the quotation marks need to remain. |
| ATR Percent Text: | |
| ShowATR_Percent_Text: | Enables/disables the ATR percent text. |
| ATR_Percent_Text_Price | Specifies the vertical price of the current bar for the ATR percent text to be displayed such as open, high, low or close. |
|
ATR_Percent_Text_LeftSpace: |
With this input, additional blank space can be added to the left of the text label for the purpose of moving the text labels into the extra space to the right of the last bar as created through Format > Space to the Right. For this purpose, the input ATR_Percent_Text_HorizOffset has to be set to 0 and the input ATR_Percent_Text_HorizAlign has to be set to "right". Please note that this is a string input and the quotation marks need to remain. For example, to move the text labels 10 spaces to the right of the most recent bar, the input value would be as follows " " Again, in order for the text object to be visible, the extra space needs to be created between the last bar and the right price axis via Format > Space to the Right |
| ATR_Percent_Decimal: | Specifies the decimal points for the ATR percent value to be displayed. |
| ATR_Percent_Text_HorizOffset: | Specifies the number of bars to move the ATR percent text to the left of the current bar. |
| ATR_Percent_Text_HorizAlign: | Specifies the horizontal alignment of the ATR percent text and the options are "right", "left" and "center". Please note that this is a string input and the quotation marks need to remain. |
| ATR_Percent_Text_VertAlign: | Specifies the vertical alignment of the ATR percent text and the options are "top", "bottom" and "center". Please note that this is a string input and the quotation marks need to remain. |
| High-Low: | |
| Price_Decimal: | Specifies the decimal points for the high and low values to be displayed. |
| High Text: | |
| ShowHigh_Text: | Enables/disables the high text. |
| High_Text_VertOffset: | Specifies the number of cents, ticks or pips to move the high text above or below the current bar's high, whereas a positive number moves the text above the high and a negative number moves the text below the high. |
|
High_Text_LeftSpace: |
With this input, additional blank space can be added to the left of the text label for the purpose of moving the text labels into the extra space to the right of the last bar as created through Format > Space to the Right. For this purpose, the input High_Text_HorizOffset has to be set to 0 and the input High_Text_HorizAlign has to be set to "right". Please note that this is a string input and the quotation marks need to remain. For example, to move the text labels 10 spaces to the right of the most recent bar, the input value would be as follows " " Again, in order for the text object to be visible, the extra space needs to be created between the last bar and the right price axis via Format > Space to the Right |
| High_Text_HorizOffset: | Specifies the number of bars to move the high text to the left of the current bar. |
| High_Text_HorizAlign: | Specifies the horizontal alignment of the high text and the options are "right", "left" and "center". Please note that this is a string input and the quotation marks need to remain. |
| High_Text_VertAlign: | Specifies the vertical alignment of the high text and the options are "top", "bottom" and "center". Please note that this is a string input and the quotation marks need to remain. |
| Low Text: | |
| ShowLow_Text: | Enables/disables the low text. |
| Low_Text_VertOffset: | Specifies the number of cents, ticks or pips to move the low text above or below the current bar's low, whereas a positive number moves the text above the low and a negative number moves the text below the low. |
|
Low_Text_LeftSpace: |
With this input, additional blank space can be added to the left of the text label for the purpose of moving the text labels into the extra space to the right of the last bar as created through Format > Space to the Right. For this purpose, the input Low_Text_HorizOffset has to be set to 0 and the input Low_Text_HorizAlign has to be set to "right". Please note that this is a string input and the quotation marks need to remain. For example, to move the text labels 10 spaces to the right of the most recent bar, the input value would be as follows " " Again, in order for the text object to be visible, the extra space needs to be created between the last bar and the right price axis via Format > Space to the Right |
| Low_Text_HorizOffset: | Specifies the number of bars to move the low text to the left of the current bar. |
| Low_Text_HorizAlign: | Specifies the horizontal alignment of the low text and the options are "right", "left" and "center". Please note that this is a string input and the quotation marks need to remain. |
| Low_Text_VertAlign: | Specifies the vertical alignment of the low text and the options are "top", "bottom" and "center". Please note that this is a string input and the quotation marks need to remain. |
| Lines: | |
| Line_HorizOffset: | Specifies the number of bars to move the beginning of the lines to the left of the current bar, whereas a setting of 0 starts the lines at the current bar. |
| High Line: | |
| ShowHigh_Line: | Enables/disables the high line. |
| High_Line_Style: | Specifies the style of the high line. The options are as follows: tool_solid or 1, tool_dashed or 2, tool_dotted or 3, tool_dashed2 or 4, tool_dashed3 or 5. |
| Low Line: | |
| ShowLow_Line: | Enables/disables the low line. |
| Low_Line_Style: | Specifies the style of the high line. The options are as follows: tool_solid or 1, tool_dashed or 2, tool_dotted or 3, tool_dashed2 or 4, tool_dashed3 or 5. |
The Alchemy Average True Range Percent RadarScreen Indicator (Alchemy ATR% RS)
The Alchemy Average True Range Percent RadarScreen indicator contains a column for the current bar's range percent difference in relation to the average true range, a column for the current bar's range and a column for the current average true range. It contains an alert feature that changes the cell color and generates an alert notification when a specified percent difference threshold is reached or exceeded.
Indicator Inputs:
|
AvgLength: |
Specifies the average range length. |
|
AvgType: |
Specifies the average range type. A setting of 1 uses a simple moving average, a setting of 2 uses an exponential moving average, a setting of 3 uses a weighted moving average, a setting of 4 uses a triangular moving average, a setting of 5 uses a Mid Keltner and a setting of 6 uses a Hull moving average. |
| ATR_UseBody: | With a setting of true, the average range is calculated as the candlestick body range, defined as open to close and with a setting of false, the average range is calculated as the high to the low of a bar. |
| ATR_UseTrueRange: | With a setting of true, the average range is calculated as the true range, meaning that if the previous bars' close is above the current bars' high, the previous bars' close will be considered as the high for calculating the current bar's range and vice versa, if the previous bars' close is below the current bars' low, the previous bars' close will be considered as the low for calculating the current bar's range. |
| Range_UseBody: | With a setting of true, the current bar's range is calculated as the candlestick body range, defined as open to close and with a setting of false, the current bar's range is calculated as the high to the low of a bar. |
| Range_UseTrueRange: | With a setting of true, the current bar's range is calculated as the true range, meaning that if the previous bars' close is above the current bars' high, the previous bars' close will be considered as the high for calculating the current bar's range and vice versa, if the previous bars' close is below the current bars' low, the previous bars' close will be considered as the low for calculating the current bar's range. |
| AlertPercent: | Specifies the percent difference threshold that changes the %Diff cell color and generates an alert notification when reached or exceeded. A setting of 0 disables this alert feature. |
| PercentDifferenceForeGrdColor: | Specifies the default text color for the %Diff column. |
| PercentDifferenceBackGrdColor: | Specifies the default background color for the %Diff column. |
| PercentDifferenceAlertForeGrdColor: | Specifies the text color for the %Diff column when a specified percent difference threshold is reached or exceeded.. |
| PercentDifferenceAlertBackGrdColor: | Specifies the background color for the %Diff column when a specified percent difference threshold is reached or exceeded. |
The Alchemy Opening Bar Range Indicator (Alchemy OpenBarRange)
The Alchemy Opening Bar Range indicator displays a specified intra-day opening bar range high and low as well as 2 optional distances above and below the high and the low. The trend line colors are controlled with their corresponding plot colors under Format Indicator > Color and the line sizes are controlled with their corresponding plot weight under Format Indicator > Style. Please note that when making a color change or a line weight change, the indicator needs to be disabled and then re-enabled again before the changes will take effect. This indicator is designed for intra-day charts only.
This indicator also contains 3 additional columns for RadarScreen and TradeStation Scanner as follows:
%AboveHigh column: Displays the distance percentage between the current price and the opening bar high.
%AboveLow column: Displays the distance percentage between the current price and the opening bar low.
Range/ATR% column: Displays the ratio between a specified ATR and the opening bar range. Available for TradeStation 9/10 only!
User Defined Inputs:
| Global: | |
|
SessionStartTme |
Specifies the session start time in military charting time without the colon. |
|
RangeMinutes |
Specifies the number of minutes past the session start time for determining the end time of the opening bar. |
| Plots: | |
|
ShowHigh |
Enables/disables the opening bar high together with its corresponding distance lines. |
|
ShowLow |
Enables/disables the opening bar low together with its corresponding distance lines. |
|
Distance1 |
Specifies the distance in number of cents, ticks or pips for the first distance lines above and below the opening bar session high and low. A setting of 0 disables the first distance lines. |
|
Distance1 |
Specifies the distance in number of cents, ticks or pips for the second distance lines above and below the opening bar session high and low. A setting of 0 disables the second distance lines. |
|
HighPlot |
Enables/disables the opening bar high plot line. The plot lines run all the way through the entire chart for each session. |
|
LowPlot |
Enables/disables the opening bar low plot line. The plot lines run all the way through the entire chart for each session. |
|
Distance1Plot |
Enables/disables the plot lines for the first distance lines. The plot lines run all the way through the entire chart for each session. |
|
Distance2Plot |
Enables/disables the plot lines for the second distance lines. The plot lines run all the way through the entire chart for each session. |
| Trend Lines: | |
|
HighTL |
Enables/disables the opening bar high trend line. The trend lines display for the current session only and they extend to the right. |
|
LowL |
Enables/disables the opening bar low trend line. The trend lines display for the current session only and they extend to the right. |
|
Distance1TL |
Enables/disables the trend lines for the first distance lines. The trend lines display for the current session only and they extend to the right. |
|
Distance2TL |
Enables/disables the trend lines for the second distance lines. The trend lines display for the current session only and they extend to the right. |
|
TL_StyleHigh |
Specifies the trendline style for the opening bar high trend line. The options are as follows: tool_solid or 1, tool_dashed or 2, tool_dotted or 3, tool_dashed2 or 4, tool_dashed3 or 5 |
|
TL_StyleLow |
Specifies the trendline style for the opening bar low trend line. The options are as follows: tool_solid or 1, tool_dashed or 2, tool_dotted or 3, tool_dashed2 or 4, tool_dashed3 or 5 |
|
TL_StyleDistance1 |
Specifies the trendline style for the first distance trend lines. The options are as follows: tool_solid or 1, tool_dashed or 2, tool_dotted or 3, tool_dashed2 or 4, tool_dashed3 or 5 |
|
TL_StyleDistance2 |
Specifies the trendline style for the second distance trend lines. The options are as follows: tool_solid or 1, tool_dashed or 2, tool_dotted or 3, tool_dashed2 or 4, tool_dashed3 or 5 |
| RadarScreen: | |
| %AboveHigh/%AboveLow columns: | |
|
HighPrice |
Specifies the price to be used to display the percent distance between the opening bar high and the specified price. |
|
LowPrice |
Specifies the price to be used to display the percent distance between the opening bar low and the specified price. |
|
PositivePercentColor |
Specifies the text color of the %AboveHigh and %AboveLow columns for positive percentages. |
|
NegativePercentColor |
Specifies the text color of the %AboveHigh and %AboveLow columns for negative percentages. |
| Range/ATR% column: Available for TradeStation 9/10 only! | |
|
ATR_Interval |
Specifies the interval setting for a Tick, Volume or Intra-Day interval for calculating the ATR. |
|
ATR_IntervalBarType |
Specifies the interval for calculating the ATR. A setting of -1 uses a Volume interval. A setting of 0 uses a Tick interval. A setting of 1 uses an Intra-Day Minute interval. A setting of 2 uses a Daily interval. A setting of 3 uses a Weekly interval. A setting of 4 uses a Monthly interval. |
|
ATR_Length |
Specifies the look back length for calculating the ATR. |
| Alerts: | |
|
HighAlert_CrossUp |
Specifies the alert notification text when price closes above the opening bar high. This is a string input which always needs to be within quotation marks. A blank field such as "" disables the high alert. |
|
HighAlert_CrossDown |
Specifies the alert notification text when price crosses and closes below the opening bar high. This is a string input which always needs to be within quotation marks. A blank field such as "" disables the high alert. |
|
LowAlert_CrossDown |
Specifies the alert notification text when price closes below the opening bar low. This is a string input which always needs to be within quotation marks. A blank field such as "" disables the low alert. |
|
LowAlert_CrossUp |
Specifies the alert notification text when price crosses and closes above the opening bar low. This is a string input which always needs to be within quotation marks. A blank field such as "" disables the low alert. |
The Alchemy Opening Bar Range RadarScreen Indicator (Alchemy OpenBarRangeRS)
The Alchemy Opening Bar Range RadarScreen indicator displays the number of bars that breakout through the opening bar range and it colors the cells based on the number of breakout bars.
User Defined Inputs:
|
SessionStartTme |
Specifies the session start time in military charting time without the colon. |
|
RangeMinutes |
Specifies the number of minutes past the session start time for determining the end time of the opening bar. |
|
MinBarRangePcnt |
Specifies the minimum bar range percentage for price of the breakout bar to close within. |
|
FirstHighBrkOutColor |
Specifies the cell color of the first bar that breaks through the opening bar range high. |
|
FirstLowBrkOutColor |
Specifies the cell color of the first bar that breaks through the opening bar range low. |
|
ConsecHighBrkOutColor |
Specifies the cell color of each consecutive bar that breaks through the high of the opening bar range. |
|
ConsecLowBrkOutColor |
Specifies the cell color of each consecutive bar that breaks through the low of the opening bar range. |
|
AlertBars |
Specifies the maximum number of bars that break out of the opening bar range at which to trigger a breakout alert. |
The Alchemy Range Alert Indicator (Alchemy RangeAlert)
The Alchemy Range Alert indicator paints the price bar and generates an alert when the candle range exceeds a specified amount. In TradeStation 8/9, the paint bar color for an up candle is specified with the plot color of the RangeHigh plot and the paint bar color for a down candle is specified with the plot color of the RangeLow plot. In SuperCharts, TradeStation 4 and TradeStation 2000i, the paint bar color for an up candle is specified with the indicator input UpColor and the paint bar color for a down candle is specified with the indicator input DownColor. Please note that when making a color change, the indicator needs to be disabled and then re-enabled again before the color changes will take affect.
User Defined Inputs:
|
RangeHigh: |
Specifies the bar high for calculating the candle range. For using the candle body range, RangeHigh can be set to close and RangeLow can be set to open, otherwise RangeHigh can be set to high and RangeLow can be set to low. |
|
RangeLow: |
Specifies the bar low for calculating the candle range. For using the candle body range, RangeHigh can be set to close and RangeLow can be set to open, otherwise RangeHigh can be set to high and RangeLow can be set to low. |
|
MinimumRange: |
Specifies the minimum range in cents, ticks or pips at which the price bar is being painted and an alert is generated. |
|
PB_High: |
Specifies the bar high for painting the candle. For painting the candle body only, PB_High can be set to close and PB_Low can be set to open, otherwise PB_High can be set to high and PB_Low can be set to low. |
|
PB_Low: |
Specifies the bar low for painting the candle. For painting the candle body only, PB_High can be set to close and PB_Low can be set to open, otherwise PB_High can be set to high and PB_Low can be set to low. |
|
|
SuperCharts, TradeStation 4 and TradeStation 2000i: |
|
UpColor: |
Specifies the paint bar color for an up candle. |
|
DownColor: |
Specifies the paint bar color for a down candle. |
The Alchemy Range Alert Percent Indicator (Alchemy RangeAlert%)
The Alchemy Range Alert Percent indicator paints the price bar and generates an alert when the candle range exceeds a specified percentage. The bullish paint bar color is specified with the BullRangeHi plot color and the bearish paint bar color is specified with the BearRangeHi plot color.
User Defined Inputs:
|
RangeHigh: |
Specifies the bar high for calculating the candle range. For using the candle body range, RangeHigh can be set to close and RangeLow can be set to open, otherwise RangeHigh can be set to high and RangeLow can be set to low. |
|
RangeLow: |
Specifies the bar low for calculating the candle range. For using the candle body range, RangeHigh can be set to close and RangeLow can be set to open, otherwise RangeHigh can be set to high and RangeLow can be set to low. |
|
MinimumRangePcnt: |
Specifies the minimum range percentage at which the price bar is being painted and an alert is generated. |
|
PB_High: |
Specifies the bar high for painting the candle. For painting the candle body only, PB_High can be set to close and PB_Low can be set to open, otherwise PB_High can be set to high and PB_Low can be set to low. |
|
PB_Low: |
Specifies the bar low for painting the candle. For painting the candle body only, PB_High can be set to close and PB_Low can be set to open, otherwise PB_High can be set to high and PB_Low can be set to low. |
|
BullAlertText: |
Specifies the alert text to be displayed in the alert notification window when the candle range exceeds the specified percentage and closes up. This is a string input which needs to have a quotation mark at the beginning and the end. To disable this alert, this input needs to be blank ("'). |
|
BearAlertText: |
Specifies the alert text to be displayed in the alert notification window when the candle range exceeds the specified percentage and closes down. This is a string input which needs to have a quotation mark at the beginning and the end. To disable this alert, this input needs to be blank ("'). |
The Alchemy Range Bearish/Bullish Alert Indicator (Alchemy RangeAlert BearBull)
The Alchemy Range Bearish/Bullish Alert indicator paints the price bar with a bullish color and generates a bullish alert when the candle range exceeds the specified bullish amount and closes up. The bullish paint bar color is specified with the BullHigh plot color. Vice versa, it paints the price bar with a bearish color and generates a bearish alert when the candle range exceeds the specified bearish amount and closes down. The bearish paint bar color is specified with the BearHigh plot color.
User Defined Inputs:
|
RangeHigh: |
Specifies the bar high for calculating the candle range. For using the candle body range, RangeHigh can be set to close and RangeLow can be set to open, otherwise RangeHigh can be set to high and RangeLow can be set to low. |
|
RangeLow: |
Specifies the bar low for calculating the candle range. For using the candle body range, RangeHigh can be set to close and RangeLow can be set to open, otherwise RangeHigh can be set to high and RangeLow can be set to low. |
|
MinimumRange_Bearish: |
Specifies the minimum range in cents, ticks or pips that is required for a down candle's range, in order to paint the price bar with a bearish color and generate a bearish alert. |
|
MinimumRange_Bullish: |
Specifies the minimum range in cents, ticks or pips that is required for an up candle's range, in order to paint the price bar with a bullish color and generate a bearish alert. |
|
PB_High: |
Specifies the bar high for painting the candle. For painting the candle body only, PB_High can be set to close and PB_Low can be set to open, otherwise PB_High can be set to high and PB_Low can be set to low. |
|
PB_Low: |
Specifies the bar low for painting the candle. For painting the candle body only, PB_High can be set to close and PB_Low can be set to open, otherwise PB_High can be set to high and PB_Low can be set to low. |
The Alchemy Range Expansion Indicator (Alchemy RangeExpansion)
The Alchemy Range Expansion indicator detects expanded range bars that close in the upper or lower bar range. These type of bars indicate a follow through into the direction of the bar close, either as a trend continuation or a trend reversal, depending on the previous trend direction.
This indicator contains the following plots:
|
X BearClose% |
Displays the bearish closing percentage within the bar range of an expanded range bar in relation to the bar low, whereas 0% represents a bar close at the bar low, making it the strongest bearish closing bar. This plot is designed to be displayed in a chart window as a histogram in a separate sub-graph from the underlying symbol or in a RadarScreen window. |
|
X BullClose% |
Displays the bullish closing percentage within the bar range of an expanded range bar in relation to the bar high, whereas 0% represents a bar close at the bar high, making it the strongest bullish closing bar. This plot is designed to be displayed in a chart window as a histogram in a separate sub-graph from the underlying symbol or in a RadarScreen window. |
|
BearClose% |
Displays the bearish closing percentage within the bar range of a non expanded range bar in relation to the bar low, whereas 0% represents a bar close at the bar low, making it the strongest bearish closing bar. This plot is designed to be displayed in a chart window as a histogram in a separate sub-graph from the underlying symbol or in a RadarScreen window. |
|
BullClose% |
Displays the bullish closing percentage within the bar range of a non expanded range bar in relation to the bar high, whereas 0% represents a bar close at the bar high, making it the strongest bullish closing bar. This plot is designed to be displayed in a chart window as a histogram in a separate sub-graph from the underlying symbol or in a RadarScreen window. |
|
X Range% |
Displays the bar range percentage of an expanded range bar in relation to the average bar range of the previous x-number of bars, whereas 200% represents a bar range the average bar range of the previous x-number of bars. This plot is designed to be displayed in a chart window as a histogram in a separate sub-graph from the underlying symbol or in a RadarScreen window. |
|
X BearClose |
Displays a ShowMe underneath a price bar with a bearish close that qualifies as an expanded range bar. This plot is designed to be displayed in a chart window together with the underlying symbol. |
|
X BullClose |
Displays a ShowMe above a price bar with a bullish close that qualifies as an expanded range bar. This plot is designed to be displayed in a chart window together with the underlying symbol. |
|
BearClose |
Displays a ShowMe underneath a price bar with a bearish close that does not qualify as an expanded range bar. This plot is designed to be displayed in a chart window together with the underlying symbol. |
|
BullClose |
Displays a ShowMe above a price bar with a bullish close that does not qualify as an expanded range bar. This plot is designed to be displayed in a chart window together with the underlying symbol. |
|
X Range |
Displays the PaintBar high when a price bar qualifies as an expanded range bar. This plot is designed to be displayed in a chart window together with the underlying symbol. |
|
X Range |
Displays the PaintBar low when a price bar qualifies as an expanded range bar. This plot is designed to be displayed in a chart window together with the underlying symbol. |
Indicator Inputs:
|
BarHigh: |
Specifies the bar high. For using the candle body range, BarHigh can be set to close and BarLow can be set to open, otherwise BarHigh can be set to high and BarLow can be set to low. |
|
BarLow: |
Specifies the bar low. For using the candle body range, BarHigh can be set to close and BarLow can be set to open, otherwise BarHigh can be set to high and BarLow can be set to low. |
|
MinimumBarRangeExpansionPercentage: |
Specifies the minimum bar range percentage for qualifying as an expanded bar range, whereas 200 would require for the current bar's range to be twice the size of the average bar range of the previous x-number of bars. |
|
LookbackBars: |
Specifies the number of previous bars for calculating the average bar range in comparison to the current bar range for qualifying as an expanded range bar. |
|
MaximumBarClosePercentage: |
Specifies the maximum bar close percentage within the bar range in relation to the bar high or low, whereas 25 would require for a bar close within the upper or lower quarter of the bar range. |
|
ShowPaintBar: |
Enables/disables the X Range PaintBar |
|
ShowShowMe: |
Enables/disables the ShowMe's of the plots X BearClose, X BullClose, BearClose and BullClose |
|
ShowExpandedRangePercentage: |
Enables/disables the the plot X Range% |
|
ShowTrendClosePercentage: |
Enables/disables the plots X BearClose%, X BullClose%, BearClose%, and BullClose% |
|
ShowExpandedRange: |
Enables/disables both expanded range bar plots X Range% and X Range |
|
ShowTrendClose: |
Enables/disables the non expanded bar trend closing plots BearClose, BearClose%, BullClose and BullClose% |
|
ShowExpandedRangeTrendClose: |
Enables/disables the expanded bar trend closing plots X BearClose, X BearClose%, X BullClose and X BullClose% |
|
TrendCloseOffset: |
Specifies the vertical offset from the bar high or from the bar low for the ShowMe's of non expanded trend closing bars in cents, ticks or pips. |
|
ExpandedTrendCloseOffset: |
Specifies the vertical offset from the bar high or from the bar low for the ShowMe's of expanded trend closing bars in cents, ticks or pips. |
|
ExpandedRangeAlert: |
Enables/disables the alerts for expanded range bars. |
|
TrendCloseAlert: |
Enables/disables the alerts for non expanded range bars with a trending bar close. |
|
ExpandedTrendCloseAlert: |
Enables/disables the alerts for expanded range bars with a trending bar close. |
Rolling Floor Traders Pivot Points
For the very short term trader who wants to stay current with the floor action. This indicator calculates the classic floor traders pivots on an hourly basis in order to identify shorter term areas of support and resistance.
The Alchemy Rolling Floor Trader’s Pivot Points calculates the classic floor traders pivot points on an hourly basis. The primary purpose is to identify short term support and resistance points based on the last hour of market activity. Many short term traders rely on these support and resistance points in their short term trading.
The Alchemy RollingPivot Indicator
The Alchemy Rolling Pivot indicator calculates the Floor Traders Pivots off a larger time frame based on a 2nd data stream. Therefore, it is necessary to insert the same symbol with a larger time frame (60 minute in hidden subgraph for hourly rolling pivots) into your chart before applying our Rolling Pivots indicator.
Here are the instructions on how to set up your chart:
To view chart, go to: http://www.tradingalchemy.com/ViewChartsRollingFTPivots.htm
Note: Do not select "Update Every Tick" for the Rolling Floor Traders Pivots Indicator.
User Defined Inputs:
|
DataSer: |
Specifies the data series number to which the higher time frame is applied to. |
|
ChngAlrt: |
Allows you to disable the alert when R2, R1, P, S1 or S2 change prices. A setting of "True" enables the alert and a setting of "False" disables the alert. It is defaulted to True. |
|
R1Alrt: |
Allows you to disable the alert when the market approaches or breaks R1. A setting of "True" enables the alert and a setting of "False" disables the alert. It is defaulted to True. |
|
R2Alrt: |
Allows you to disable the alert when the market approaches or breaks R2. A setting of "True" enables the alert and a setting of "False" disables the alert. It is defaulted to True. |
|
S1Alrt: |
Allows you to disable the alert when the market approaches or breaks S1. A setting of "True" enables the alert and a setting of "False" disables the alert. It is defaulted to True. |
|
S2Alrt: |
Allows you to disable the alert when the market approaches or breaks S2. A setting of "True" enables the alert and a setting of "False" disables the alert. It is defaulted to True |
|
AlrtDist: |
Allows you to adjust the distance in ticks by how far the market can approach R2, R1, S1 or S2 before an alert is generated. It is defaulted to 10 ticks. |
|
MinBreak: |
Allows you to adjust the minimum distance in ticks by how far the market needs to break R2, R1, S1 or S2 before an alert is generated. It is defaulted to 0 ticks. |
|
ShowText: |
Enables/disables text objects. |
|
TextHor: |
An increasing value moves the text objects to the left by specified number of bars. A negative value disables all text objects. |
|
TextVert: |
Allows you to vertically adjust the displayed text for the R2, R1, P, S1 and S2 values. If the text sits below the plot line or trendline, a positive value will raise the text and a negative value will lower the text. If the text sits above the plot line or trendline, a positive value will lower the text and a negative value raise the text. It is defaulted to 0 ticks. |
|
Decimal: |
Allows you to adjust the number of decimals in which the text for the R2, R1, P, S1 and S2 values display. It is defaulted to 2 decimals |
|
Fraction: |
If you are applying the Alchemy RollingPivot Indicator to any symbol that reads in fractions, such as bonds, you can set this input to True and the displayed text for the R2, R1, P, S1 and S2 values will read in fractions (e.g. 106^30). For symbols that trade in ½ ticks such as the 10 year US Treasury Notes, the “Decimal” input needs to be set to a negative number. |
Gap
Market news, world news, Greenspan speaks? All of these events can move markets overnight creating gap trade opportunities. The Gap Indicator identifies, labels and alerts you to any gap opening in the market. In addition, the indicator provides a visual alert when any gap opening is then filled by market activity. This indicator will assist those traders with gap open trading methods.
The Gap Indicator alerts you to a gap up or gap down opening in today’s market. A gap up occurs when today’s opening price is above the previous day’s closing price and a gap down occurs when today’s opening price is below the previous day’s close. Gap openings can be important to shorter time-frame traders and daytraders. A gap opening can indicate an early bullish or bearish market bias and usually occurs when important market news or events have happened prior to the opening of the market.
In addition to alerting you when a gap opening has occurred, the Gap Indicator will also alert you when the gap has been filled. Filled gaps are important to many shorter time-frame traders and daytraders. The Gap Indicator will assist those traders who have developed trading techniques involving gap openings and filled gap openings.
The Alchemy Gap Indicator
The Gap
Indicator alerts you to a gap up or gap down opening in today’s market. A gap up
occurs when today’s opening price is above the previous day’s closing price and
a gap down occurs when today’s opening price is below the previous day’s close.
Gap openings can be important to shorter time-frame traders and daytraders. A
gap opening can indicate an early bullish or bearish market bias and usually
occurs when important market news or events have happened prior to the opening
of the market. This indicator also displays the 1/2 gap which becomes an
important target when the market experiences bigger gaps.
In addition to alerting you when a gap opening has occurred, the Gap Indicator
will also alert you when the gap has been filled. Filled gaps are important to
many shorter time-frame traders and daytraders. The Gap Indicator will assist
those traders who have developed trading techniques involving gap openings and
filled gap openings.
Just like with our Floor Traders Pivot Points indicators and Open/High/Low/Close
indicator, our Alchemy Gap indicator contains session start and end times inputs
that can be used to specify the daily session start and end time on all session
symbols.
To view chart, go to: http://www.tradingalchemy.com/ViewChartsGap.htm
User Defined Inputs:
|
MinGap |
Specifies the minimum required point gap in order to display the gap open and its corresponding labels. |
|
|
MinHalfGap |
Specifies the minimum required point half gap in order to display the half gap and its corresponding labels. |
|
|
ManualOp |
Allows the user to manually enter the current opening price. A setting of 0 automatically displays the opening price of the current trading session based on the chart. |
|
|
ManualCl |
Allows the user to manually enter the previous days' closing price. A setting of 0 automatically displays the closing price of the previous trading session based on the chart |
|
|
SessionStartTme |
Specifies the session start time. This is a special feature that gives this indicator the flexibility to specify the session times. With this feature, the opening and closing prices can be calculated based on a predetermined session while plotted on an all sessions symbol. A negative setting uses TradeStation's open/close functions that are based on a calendar day. |
|
|
SessionEndTme |
Specifies the session end time. This is a special feature that gives this indicator the flexibility to specify the session times. With this feature, the opening and closing prices can be calculated based on a predetermined session while plotted on an all sessions symbol. A negative setting uses TradeStation's open/close functions that are based on a calendar day. |
|
|
ExcludeDayOfWeek |
Specifies a certain day of the week to be excluded from a session to be used for the open/close. 0=Sunday, 1=Monday, 2=Tuesday, 3=Wednesday, 4=Thursday, 5=Friday, 6=Saturday and a negative value disables this feature. |
|
|
GapLine |
Enables the horizontal line for the gap open price. When displayed as horizontal trend line, the gap open price will be visible for the current day only. In order to see the gap open price for each day on the entire chart, it needs to displayed as plot line by enabling the PlotGap input. The color of this horizontal line is controlled by plot1 (Gap) color through Format > Indicator > ChartColor. |
|
|
GapStyle |
Specifies the style of the horizontal line for the gap open price. |
|
|
GapSize |
Specifies the size of the horizontal line for the gap open price. |
|
|
HalfGapLine |
Enables the horizontal line for the half gap price. When displayed as horizontal trend line, the half gap price will be visible for the current day only. In order to see the half gap price for each day on the entire chart, it needs to displayed as plot line by enabling the PlotHalfGap input. The color of this horizontal line is controlled by plot2 (HalfGap) color through Format > Indicator > ChartColor. |
|
|
HalfGapStyle |
Specifies the style of the horizontal line for the half gap price. |
|
|
HalfGapSize |
Specifies the size of the horizontal line for the half gap price. |
|
|
CloseLine |
Enables the horizontal line for the closing price. When displayed as horizontal trend line, the closing price will be visible for the current day only. In order to see the closing price for each day on the entire chart, it needs to displayed as plot line by enabling the PlotClose input. The color of this horizontal line is controlled by plot3 (Close) color through Format > Indicator > ChartColor. |
|
|
CloseGapStyle |
Specifies the style of the horizontal line for the closing price. |
|
|
CloseGapSize |
Specifies the size of the horizontal line for the closing price. |
|
|
PlotGap |
Enables the plot line for the gap open price. When displayed as plot line, the gap open price will be visible for each day on the entire chart. In order to see the gap open price for the current day only, this input needs to be disabled and the input GapLine needs to enabled. The color of this plot line is controlled by plot1 (Gap) color through Format > Indicator > ChartColor. |
|
|
PlotHalfGap |
Enables the plot line for the half gap price. When displayed as plot line, the half gap price will be visible for each day on the entire chart. In order to see the half gap price for the current day only, this input needs to be disabled and the input HalfGapLine needs to enabled. The color of this plot line is controlled by plot2 (HalfGap) color through Format > Indicator > ChartColor. |
|
|
PlotClose |
Enables the plot line for the closing price. When displayed as plot line, the closing price will be visible for each day on the entire chart. In order to see the closing price for the current day only, this input needs to be disabled and the input CloseLine needs to enabled. The color of this plot line is controlled by plot3 (Close) color through Format > Indicator > ChartColor. |
|
|
ShowText |
Enables/disables all text objects that label prices and the gap. |
|
|
ShowHalfGapText |
Enables/disables the half gap text objects. |
|
|
GapFillCol |
Specifies the color for the text that displays if the gap has been filled or not. |
|
|
TextAlign |
Specifies the horizontal alignment of the text objects, whereas 0 equals left aligned, 1 equals right aligned and 3 equals centered aligned |
|
|
NumTextHor |
Allows you to horizontally adjust the displayed text for the gap, half gap and closing prices. Each increment will move the text one bar further to the left. The window's bar spacing affects the alignment of the text objects. We recommend adjusting this input according to the bar spacing of your charts until the text objects are aligned to the left edge of your screen. |
|
|
GapTextHor |
Allows you to horizontally adjust the displayed text for the gap distance and gap filled. Each increment will move the text one bar further to the left. The window's bar spacing affects the alignment of the text objects. We recommend adjusting this input according to the bar spacing of your charts until the text objects are aligned to the left edge of your screen. |
|
|
TextVert |
Allows you to vertically adjust the displayed text for all text objects that label prices and the gap. If the text sits below the plot line or trendline, a positive value will raise the text and a negative value will lower the text. If the text sits above the plot line or trendline, a positive value will lower the text and a negative value raise the text. |
|
|
Fraction |
If you are applying the Alchemy Gap indicator to any symbol that reads in fractions, such as bonds, you can set this input to True and the displayed text that labels prices will read in fractions (e.g. 106^30). For symbols that trade in ½ ticks such as the 10 year US Treasury Notes, the “Decimal” input needs to be set to a negative number. |
|
|
Decimal |
Allows you to adjust the number of decimals in which the displayed text that labels prices is displayed. |
|
Support & Resistance Pivot Points
Some of the best traders in the world use logical support and resistance levels to make trading decisions. Let us help you find those levels. This indicator identifies and labels actual support and resistance points created by market action. In addition, the indicator will also alert you when any support or resistance point is approached by current price.
The Alchemy Support and Resistance Pivot Point indicator identifies actual support and resistance points in real time and labels the chart for easy identification. The indicator also identifies and labels the previous day high and low. Many traders regard the previous day high and low as significant support and resistance points. In addition to labeling support and resistance points, the indicator will also alert you with a pop-up window when current price is approaching a support or resistance pivot point.
What is support and resistance?
Support and resistance represent key points where the forces of supply and demand meet in a head to head clash. In all financial markets, prices are driven by excessive supply (bearish) and demand (bullish). Excess supply of a certain stock or commodity will cause prices to decline. Excess demand for a certain stock or commodity will cause prices to rise. When supply and demand is equal, prices will stabilize and move sideways as bulls and bears fight it out for control.
Support is the price where demand is thought to be strong enough to prevent price from falling further. Resistance is the price where selling is thought to be strong enough to prevent price from rising further. Support pivot points are below current price and resistance pivot points are above current price.
If a stock or commodity is declining and approaching a support point, it can act as an alert to look for signs of increased buying pressure and a potential reversal to the upside. If a stock or commodity is rising and approaching a resistance point, it can act as an alert to look for signs of increased selling pressure and a potential reversal to the downside. If a particular support or resistance point is broken, it signals that the relationship between supply and demand has fundamentally changed. A resistance point breakout signals that demand (bulls) has gained the upper hand and a support point breakout signals that supply (bears) has won the battle. The Alchemy Support & Resistance Pivot point indicator will label these key points and warn you when current price approaches them.
How are support and resistance pivot points used?
Many traders use support and resistance pivot points to determine entry points in the market, exit points to take profits and areas to adjust stop orders. In a sideways market, many traders use pivot points to range trade by buying near support and selling near resistance. Breakout traders use pivot points to identify price breakout areas. Counter-trend traders use the pivots to help identify possible turning points in the market.
The Alchemy Support and Resistance Pivot Point indicator is easily combined with other indicators to help identify possible trade set-ups. For example, it could be used with the Alchemy Bar Pattern Analysis to help identify potential turning points, the Strong Trend Indicator for entry points in an established trend or the Alchemy Fib Retracement indicator for entries on pullbacks to support or resistance areas.
Identification of key support and resistance pivot points is usually considered an important ingredient to successful technical analysis. Being aware of these pivot points can greatly enhance a trader’s ability to analyze and forecast future price action. Using the Alchemy Support and Resistance Pivot Point indicator can help structure the market by identifying the key points of support and resistance.
The Alchemy Pivots Indicator
For TradeStation 4.0 or SuperCharts RT, use the following indicators:
Alchemy DailyRes
Alchemy DailySup
Alchemy PivotRes
Alchemy PivotSupport
To view chart, go to: http://www.tradingalchemy.com/ViewChartsSupportResistance.htm
User Defined Inputs:
|
ShowPivR: |
Allows you to display the Pivot Resistance as a trendline or as a plotline. Plotlines adjust the screen scaling of the chart to the extreme high and low prices of the plot values, whereas trendlines move into view as the current market price approaches them. If the range between the highest and the lowest plot value is very large, it may compress the entire chart to a point where it becomes very hard to read the bars. Since the Pivot Resistance at times may encompass a very large range, we defaulted the Pivot Resistance to a trendline, however, giving you the choice to change it to a plotline as well. Setting the Pivot Resistance to a plotline will give you the advantage to view the Pivot Resistance over the entire chart instead of the current value only. To change the Pivot Resistance to a plotline, type "Plot" into this user defined input. |
|
ShowPivS: |
Allows you to display the Pivot Support as a trendline or as a plotline. Plotlines adjust the screen scaling of the chart to the extreme high and low prices of the plot values, whereas trendlines move into view as the current market price approaches them. If the range between the highest and the lowest plot value is very large, it may compress the entire chart to a point where it becomes very hard to read the bars. Since the Pivot Support at times may encompass a very large range, we defaulted the Pivot Support to a trendline, however, giving you the choice to change it to a plotline as well. Setting the Pivot Support to a plotline will give you the advantage to view the Pivot Support over the entire chart instead of the current value only. To change the Pivot Support to a plotline, type "Plot" into this user defined input. |
|
ShowDayR: |
Allows you to display the Working Daily High Resistance as a trendline or as a plotline. Plotlines adjust the screen scaling of the chart to the extreme high and low prices of the plot values, whereas trendlines move into view as the current market price approaches them. If the range between the highest and the lowest plot value is very large, it may compress the entire chart to a point where it becomes very hard to read the bars. Since the Working Daily High Resistance at times may encompass a very large range, we defaulted the Working Daily High Resistance to a trendline, however, giving you the choice to change it to a plotline as well. Setting the Working Daily High Resistance to a plotline will give you the advantage to view the Working Daily High Resistance over the entire chart instead of the current value only. To change the Working Daily High Resistance to a plotline, type "Plot" into this user defined input. |
|
ShowDayS: |
Allows you to display the Working Daily Low Support as a trendline or as a plotline. Plotlines adjust the screen scaling of the chart to the extreme high and low prices of the plot values, whereas trendlines move into view as the current market price approaches them. If the range between the highest and the lowest plot value is very large, it may compress the entire chart to a point where it becomes very hard to read the bars. Since the the Working Daily Low Support at times may encompass a very large range, we defaulted the Working Daily Low Support to a trendline, however, giving you the choice to change it to a plotline as well. Setting the Working Daily Low Support to a plotline will give you the advantage to view the the Working Daily Low Support over the entire chart instead of the current value only. To change S2 to a plotline, type "Plot" into this user defined input. |
|
TLStyle: |
Specifies the trendline style |
|
TLSize: |
Specifies the trendline weight |
|
MatchRCo: |
Specifies the color for matching pivot and working daily highs |
|
MatchSCo: |
Specifies the color for matching pivot and working daily lows |
|
PivSR: |
Enables/disables pivot support and resistances |
|
DaySR: |
Enables/disables daily working highs and lows |
|
AlrtPivH: |
Enables/disables the alert when the pivot high has changed. A setting of "True" enables the alert and a setting of "False" disables the alert. It is defaulted to True. |
|
AlrtPivL: |
Enables/disables the alert when the pivot low has changed. A setting of "True" enables the alert and a setting of "False" disables the alert. It is defaulted to True. |
|
AlrtPivHBrk: |
Enables/disables the alert when the market tests or breaks the Pivot Resistance. A setting of "True" enables the alert and a setting of "False" disables the alert. It is defaulted to True. |
|
AlrtPivLBrk: |
Enables/disables the alert when the market tests or breaks the Pivot Support. A setting of "True" enables the alert and a setting of "False" disables the alert. It is defaulted to True. |
|
AlrtPivHAppr: |
Enables/disables the alert when the market approaches the Pivot Resistance. A setting of "True" enables the alert and a setting of "False" disables the alert. It is defaulted to True. |
|
AlrtPivLAppr: |
Enables/disables the alert when the market approaches the Pivot Support. A setting of "True" enables the alert and a setting of "False" disables the alert. It is defaulted to True. |
|
AlrtDayH: |
Enables/disables the alert when the Working Daily Resistance has changed. A setting of "True" enables the alert and a setting of "False" disables the alert. It is defaulted to True. |
|
AlrtDayL: |
Enables/disables the alert when the Working Daily Support has changed. A setting of "True" enables the alert and a setting of "False" disables the alert. It is defaulted to True. |
|
AlrtDayHBrk: |
Enables/disables the alert when the market tests or breaks the Working Daily Resistance. A setting of "True" enables the alert and a setting of "False" disables the alert. It is defaulted to True. |
|
AlrtDayLBrk: |
Enables/disables the alert when the market tests or breaks the Working Daily Support. A setting of "True" enables the alert and a setting of "False" disables the alert. It is defaulted to True. |
|
AlrtDayHAppr: |
Enables/disables the alert when the market approaches the Working Daily Resistance. A setting of "True" enables the alert and a setting of "False" disables the alert. It is defaulted to True. |
|
AlrtDayLAppr: |
Enables/disables the alert when the market approaches the Working Daily Support. A setting of "True" enables the alert and a setting of "False" disables the alert. It is defaulted to True. |
|
PivAlrtD: |
Specifies the minimum distance in number of cents/ticks/pips between the current market price and the closest pivot support/resistance at which the alerts that are enabled by the inputs AlrtPivH, AlrtPivL, AlrtPivHBrk, AlrtPivLBrk, AlrtPivHAppr and AlrtPivLAppr will be triggered. |
|
DayAlrtD: |
Specifies the minimum distance in number of cents/ticks/pips between the current market price and the closest working daily support/resistance at which the alerts that are enabled by the inputs AlrtDayH, AlrtDayL, AlrtDayHBrk, AlrtDayLBrk, AlrtDayHAppr and AlrtDayLAppr will be triggered. |
|
ShowPivotText: |
Enables/disables the PivotH and PivotL text. |
|
PivVert: |
Specifies the distance in number of cents/ticks/pips to move the PivotL text below the low of the corresponding pivot low and it specifies the distance in number of cents/ticks/pips to move the PivotH text above the high of the corresponding pivot high. |
|
ShowSupResText: |
Enables/disables the support/resistance numbers text. |
|
TextVert: |
Specifies the distance in number of cents/ticks/pips to move the resistance numbers text below the low of the corresponding resistance line and it specifies the distance in number of cents/ticks/pips to move the support numbers text above the high of the corresponding support line. |
|
PivHor: |
Allows you to horizontally adjust the displayed text for the Pivot High and the Pivot Low labels. Each increment will move the text one bar further to the left. It is defaulted to 1 bar. |
|
TextHor: |
Allows you to horizontally adjust the displayed text for the Pivot Resistance, the Pivot Support, the Working Daily High Resistance and the Working Daily Low Support values. Each increment will move the text one bar further to the left. It is defaulted to 2 bars. |
|
MaxPiv: |
Specifies the maximum number of higher pivot resistances/lower pivot supports to store |
|
MaxDays: |
Specifies the maximum number of higher working daily highs/lower working daily lows to store |
|
PivLeftStrength: |
Sets the required number of bars on the left side of the pivot bar. |
|
PivRightStrength: |
Sets the required number of bars on the right side of the pivot bar. |
|
MinPenetration: |
Specifies the number of cents, ticks or pips by which price has to penetrate a support or resistance in order to look for the next higher resistance or lower support. With a setting of 0, price has to penetrate a support or resistance by a minimum amount such as 1 cent, tick or pip. |
|
SessionStartTme: |
Specifies the session start time for calculating the working daily support and resistances. A negative setting uses the calendar date for the beginning of a new session. This input is ignored on daily, weekly and monthly charts. The format is in military charting time without the colon, e.g. 1:00pm would be entered as 1300. |
|
SessionEndTme: |
Specifies the session end time for calculating the working daily support and resistances. A negative setting uses the calendar date for the beginning of a new session. This input is ignored on daily, weekly and monthly charts. The format is in military charting time without the colon, e.g. 1:00pm would be entered as 1300. |
|
ExcludeDayOfWeek: |
Specifies the day of the week to exclude or calculating the working daily support and resistances, whereas 0=Sunday, 1=Monday, 2=Tuesday, 3=Wednesday, 4=Thursday, 5=Friday, 6=Saturday and a negative setting disables this feature. |
|
Decimal: |
Allows you to adjust the number of decimals in which the text for the Pivot Resistance, the Pivot Support, the Working Daily High Resistance and the Working Daily Low Support values display. It is defaulted to 2 decimals. |
|
Fraction: |
If you are applying the Alchemy Pivots indicator to any symbol that reads in fractions, such as bonds, you can set this input to True and the displayed text the Pivot Resistance, the Pivot Support, the Working Daily High Resistance and the Working Daily Low Support values will read in fractions (e.g. 106^30). For symbols that trade in ½ ticks such as the 10 year US Treasury Notes, the “Decimal” input needs to be set to a negative number. |
TrendCatcher (Legacy) Indicator (Alchemy TrendCatcher)
The Alchemy TrendCatcher indicator consists of a charting indicator and a separate RadarScreen indicator. This indicator identifies the market trend and displays a logical trailing stop in order to stay with the trend for longer moves. With the Alchemy TrendCatcher, you will never miss a big market move. We've developed a proprietary market trend and volatility calculation that works in any market and on any time frame. This indicator will help you to stay in the right direction of any market move. The Alchemy TrendCatcher's trailing indicator is self-adaptive to the market's current volatility, therefore minimizing the initial risk while staying with the trend. Our Alchemy TrendCatcher indicator is a powerful trend trading tool that is very easy to use.
The Alchemy TrendCatcher charting indicator paints the price bars cyan in an uptrend and magenta in a down trend, which provides an overall trend direction. A trailing line keeps a trailing distance that is self adaptive to the market's volatility. Once the market penetrates the trailing line, the trend changes and marks a market reversal.
A separate RadarScreen indicator displays the trailing stop price and indicates if the market is in an up trend or in a down trend. The Alchemy TrendCatcherRS RadarScreen indicator contains 3 columns. The first column displays the trailing stop price, the second column displays the up trend and the third column displays the down trend.
The Alchemy TrendCatcher (Legacy) Charting Indicator (Alchemy TrendCatcher)
The Alchemy TrendCatcher paints the price bars cyan in an uptrend and magenta in a down trend. The color of the price bars can be specified by the plot2 and plot3 colors through Format Indicator > Chart Color, whereas the TrendPBHigh plot color specifies the uptrend color and the TrendPBLow plot color specifies the downtrend color. A separate set of dots keeps a trailing distance that is self adaptive to the market's volatility. Once the market penetrates this trailing stop, the trend changes and marks a market reversal.
For TradeStation 4.0 and SuperCharts, this indicator is broken up into 3 separate indicators as follows:
AlchemyTrendCatcherBull: uptrend paint bars (cyan)
AlchemyTrendCatcherBear: downtrend paint bars (magenta)
AlchemyTrendCatcherLine: trailing line (yellow)
These indicators include only the Length and the Factor inputs.
The Alchemy TrendCatcher (Legacy) RadarScreen Indicator (Alchemy TrendCatchRS)
The Alchemy TrendCatcher RadarScreen indicator contains 3 columns. The first column displays the trailing stop price, the second column displays the up trend and the 3rd column displays the down trend. This RadarScreen indicator is not available for TradeStation 4.0 or SuperCharts.
For TradeStation 4.0 or SuperCharts, use the following indicators:
Alchemy TC Bearish
Alchemy TC Bullish
User Defined Inputs:
|
Length |
Specifies the number of trailing bars to include in the volatility calculation. |
|
Factor |
Specifies the volatility multiplication factor. |
|
UseCloseTrail |
Specifies the price to set the trailing distance from. When set to true it uses the close. When set to false, it uses the high in an uptrend and the low in a downtrend. |
|
UseCloseStop |
Specifies the price to use for changing the trend direction when the trailing stop is penetrated. When set to true it uses the close. When set to false, it uses the low in an uptrend and the high in a downtrend. |
|
StopAdd |
Specifies the minimum distance in number of cents, ticks or pips by which price has to break through the TrendCatcher trailing stop in order for the trend to change direction. With a setting of 0, the trend changes direction when price touches the trailing stop. |
|
Confirmation Bar Feature: |
The confirmation bar feature requires a confirmation bar that is followed immediately after a signal bar in order for the trend to change directions, whereas the signal bar is the bar that touches or penetrates the TrendCatcher stop and the confirmation bar is the next bar that touches or penetrates the previous TrendCatcher stop or the signal bar. |
|
ConfirmBar |
With ConfirmBar set to 1, the low of the next bar (confirmation bar) has to touch or penetrate the previous TrendCatcher stop or the signal bar in order for the TrendCatcher to change direction to the downside and vice versa, the high of the next bar (confirmation bar) has to touch or penetrate the previous TrendCatcher stop or the signal bar in order for the TrendCatcher to change direction to the upside. With ConfirmBar set to 2, the close of the next bar (confirmation bar) has to touch or penetrate the previous TrendCatcher stop or the signal bar in order for the TrendCatcher to change direction. A setting of 0 disables this confirmation feature. |
|
ConfirmAdd |
This input works in conjunction with the ConfirmBar input above and it specifies the minimum distance in number of cents, ticks or pips by which price has to break through the TrendCatcher trailing stop or the signal bar on the next bar in order for the trend to change direction. With a setting of 0, the trend changes direction when price touches the trailing stop or the signal bar on the next bar. |
|
ConfirmStop |
This input works in conjunction with the ConfirmBar input above and it specifies the price that needs to be touched or penetrated by the confirmation bar. With ConfirmStop set to 0, the confirmation bar needs to touch or penetrate the previous bar's TrendCatcher stop in order for the TrendCatcher to change directions. With ConfirmStop set to 1, the confirmation bar needs to touch or penetrate the low of the previous bar in order for the TrendCatcher to change direction to the downside and vice versa, the confirmation bar needs to touch or penetrate the high of the previous bar in order for the TrendCatcher to change direction to the upside. With ConfirmBar set to 2, the confirmation bar needs to touch or penetrate the close of the previous bar in order for the TrendCatcher to change direction. |
|
|
|
|
DetectStrategyPosition |
Set to true, the TrendCatcher indicator automatically re-starts its calculation at the entry bar of a new strategy position into the same direction of this position. With this feature enabled, the TrendCatcher trend will always stay in sync with any strategy applied on the chart in order to display the corresponding trailing stop. |
|
|
|
|
PlotStop |
Enables/disables the trailing line. |
|
PlotTrend |
Enables/disables the trend paint bars. |
|
|
|
|
|
TradeStation 4.0 and Tradestation 2000i only: |
|
TrailUpCol |
Specifies the color of the trailing stop (plot1, TrendStop) in an up trend. |
|
TrailDownCol |
Specifies the color of the trailing stop (plot1, TrendStop) in a down trend. |
|
|
|
|
|
Color Controls for TradeStation 8/9: Go to the Chart Color tab and change the plot colors as follows: |
|
BullUpCandle Plot |
Controls the paint bar color for an up candle in an up trend. |
|
BullDnCandle Plot |
Controls the paint bar color for a down candle in an up trend. |
|
BearUpCandle Plot |
Controls the paint bar color for an up candle in a down trend. |
|
BearDnCandle Plot |
Controls the paint bar color for a down candle in a down trend. |
|
BullStopCol Plot |
Controls the color for the long trailing stop. |
|
BearStopCol Plot |
Controls the color for the short trailing stop. |
|
|
|
|
|
Remaining inputs for all versions: |
|
StopAlert |
Enables/disables the alert when the trailing stop changes. |
|
TrendAlert |
Enables/disables the alert when the trend changes. |
|
AlertDec |
Specifies the number of decimals that is displayed in the alert window for the trailing stop. |
|
BarHigh |
Specifies the high price of the paint bar. When using this indicator on a candle stick chart in TradeStation 8/9.2 or higher, BarHigh can be set to close and BarLow can be set to open in order to fill the candle body only. |
|
BarLow |
Specifies the low price of the paint bar. When using this indicator on a candle stick chart in TradeStation 8/9.2 or higher, BarHigh can be set to close and BarLow can be set to open in order to fill the candle body only. |
Alchemy Function for the Alchemy TrendCatcher Indicator (for a function definition, click on the function name):
|
The AlchemyTrender is a multiple-output function that provides the trailing stop value, trend direction and the highest high or lowest low the Alchemy Trend Catcher indicator. |
TrendDirection Indicator (Alchemy TrendDirection)
The Alchemy TrendDirection indicator consists of a charting indicator and a separate RadarScreen indicator. This indicator identifies the market trend and displays a logical trailing stop in order to stay with the trend for longer moves. With the Alchemy TrendDirection, you will never miss a big market move. We've developed a proprietary market trend and volatility calculation that works in any market and on any time frame. This indicator will help you to stay in the right direction of any market move. The Alchemy TrendDirection's trailing indicator is self-adaptive to the market's current volatility, therefore minimizing the initial risk while staying with the trend. Our Alchemy TrendDirection indicator is a powerful trend trading tool that is very easy to use. The TrendDirection is an improved version of our old TrendCatcher formula in order to account for the more volatile recent markets.
The Alchemy TrendDirection charting indicator paints the price bars cyan in an uptrend and magenta in a down trend, which provides an overall trend direction. A trailing line keeps a trailing distance that is self adaptive to the market's volatility. Once the market penetrates the trailing line, the trend changes and marks a market reversal.
A separate RadarScreen indicator displays the trailing stop price and indicates if the market is in an up trend or in a down trend. The Alchemy TrendDirection RadarScreen indicator contains 3 columns. The first column displays the trailing stop price, the second column displays the up trend and the third column displays the down trend.
The Alchemy TrendDirection Charting Indicator (Alchemy TrendDirection)
The Alchemy Trend Catcher paints the price bars cyan in an uptrend and magenta in a down trend. The color of the price bars can be specified by the plot2 and plot3 colors through Format Indicator > Chart Color, whereas the TrendPBHigh plot color specifies the uptrend color and the TrendPBLow plot color specifies the downtrend color. A separate set of dots keeps a trailing distance that is self adaptive to the market's volatility. Once the market penetrates this trailing stop, the trend changes and marks a market reversal.
For TradeStation 4.0 and SuperCharts, this indicator is broken up into 3 separate indicators as follows:
AlchemyTrendCatcherBull: uptrend paint bars (cyan)
AlchemyTrendCatcherBear: downtrend paint bars (magenta)
AlchemyTrendCatcherLine: trailing line (yellow)
These indicators include only the Length and the Factor inputs.
The Alchemy TrendDirection RadarScreen Indicator (Alchemy TrendDirectionRS)
The Alchemy TrendDirection RadarScreen indicator contains 3 columns. The first column displays the trailing stop price, the second column displays the up trend and the 3rd column displays the down trend. This RadarScreen indicator is not available for TradeStation 4.0 or SuperCharts.
User Defined Inputs:
|
Length |
Specifies the number of trailing bars to include in the volatility calculation. |
|
Factor |
Specifies the volatility multiplication factor. |
|
UseCloseTrail |
Specifies the price to set the trailing distance from. When set to true it uses the close. When set to false, it uses the high in an uptrend and the low in a downtrend. |
|
UseCloseStop |
Specifies the price to use for changing the trend direction when the trailing stop is penetrated. When set to true it uses the close. When set to false, it uses the low in an uptrend and the high in a downtrend. |
|
StopAdd |
Specifies the minimum distance in number of cents, ticks or pips by which price has to break through the TrendDirection trailing stop in order for the trend to change direction. With a setting of 0, the trend changes direction when price touches the trailing stop. |
|
Confirmation Bar Feature: |
The confirmation bar feature requires a confirmation bar that is followed immediately after a signal bar in order for the trend to change directions, whereas the signal bar is the bar that touches or penetrates the TrendDirection stop and the confirmation bar is the next bar that touches or penetrates the previous TrendDirection stop or the signal bar. |
|
ConfirmBar |
With ConfirmBar set to 1, the low of the next bar (confirmation bar) has to touch or penetrate the previous TrendDirection stop or the signal bar in order for the TrendDirection to change direction to the downside and vice versa, the high of the next bar (confirmation bar) has to touch or penetrate the previous TrendDirection stop or the signal bar in order for the TrendDirection to change direction to the upside. With ConfirmBar set to 2, the close of the next bar (confirmation bar) has to touch or penetrate the previous TrendDirection stop or the signal bar in order for the TrendDirection to change direction. A setting of 0 disables this confirmation feature. |
|
ConfirmAdd |
This input works in conjunction with the ConfirmBar input above and it specifies the minimum distance in number of cents, ticks or pips by which price has to break through the TrendDirection trailing stop or the signal bar on the next bar in order for the trend to change direction. With a setting of 0, the trend changes direction when price touches the trailing stop or the signal bar on the next bar. |
|
ConfirmStop |
This input works in conjunction with the ConfirmBar input above and it specifies the price that needs to be touched or penetrated by the confirmation bar. With ConfirmStop set to 0, the confirmation bar needs to touch or penetrate the previous bar's TrendDirection stop in order for the TrendDirection to change directions. With ConfirmStop set to 1, the confirmation bar needs to touch or penetrate the low of the previous bar in order for the TrendDirection to change direction to the downside and vice versa, the confirmation bar needs to touch or penetrate the high of the previous bar in order for the TrendDirection to change direction to the upside. With ConfirmBar set to 2, the confirmation bar needs to touch or penetrate the close of the previous bar in order for the TrendDirection to change direction. |
|
|
|
|
DetectStrategyPosition |
Set to true, the TrendDirection indicator automatically re-starts its calculation at the entry bar of a new strategy position into the same direction of this position. With this feature enabled, the TrendDirection trend will always stay in sync with any strategy applied on the chart in order to display the corresponding trailing stop. |
|
|
|
|
PlotStop |
Enables/disables the trailing line. |
|
PlotTrend |
Enables/disables the trend paint bars. |
|
|
|
|
|
Color Controls for TradeStation 8/9: Go to the Chart Color tab and change the plot colors as follows: |
|
BullUpCandle Plot |
Controls the paint bar color for an up candle in an up trend. |
|
BullDnCandle Plot |
Controls the paint bar color for a down candle in an up trend. |
|
BearUpCandle Plot |
Controls the paint bar color for an up candle in a down trend. |
|
BearDnCandle Plot |
Controls the paint bar color for a down candle in a down trend. |
|
BullStopCol Plot |
Controls the color for the long trailing stop. |
|
BearStopCol Plot |
Controls the color for the short trailing stop. |
|
|
|
|
|
Remaining inputs for all versions: |
|
StopAlert |
Enables/disables the alert when the trailing stop changes. |
|
TrendAlert |
Enables/disables the alert when the trend changes. |
|
AlertDec |
Specifies the number of decimals that is displayed in the alert window for the trailing stop. |
|
BarHigh |
Specifies the high price of the paint bar. When using this indicator on a candle stick chart in TradeStation 8/9.2 or higher, BarHigh can be set to close and BarLow can be set to open in order to fill the candle body only. |
|
BarLow |
Specifies the low price of the paint bar. When using this indicator on a candle stick chart in TradeStation 8/9.2 or higher, BarHigh can be set to close and BarLow can be set to open in order to fill the candle body only. |
Strong Trend Indicators
Ever feel like the train left the station and you were not on it? The Strong Trend indicator is designed to identify strong trending markets and then locate possible entry points in that strong trend. This indicator is self-adaptive and responds to market volatility.
The Alchemy Strong Trend Indicator uses our Alchemy Bands indicator to detect strong trending markets and then identify possible entry points in the direction of the trend. Many traders feel frustrated when the market races strongly in one direction or the other and the trader is not “on board” riding the trend. The strong trend indicator was developed in response to this dilemma and can provide possible entry points in the direction of any strong trending market in any time frame.
When a strong trend is identified, the indicator will paint the price bars cyan in the event of a bullish trend or magenta in the event of a bearish trend. A bullish strong trend is defined as price penetrating the upper band of the Keltner Channel. A bearish strong trend is defined as price penetrating the lower band of the Alchemy Bands indicator. Once the strong trend is identified and color-coded, a possible entry zone will pop up on your screen giving possible entry points in that trend. The entry zone is defined as the mid line and lower channel band in a bullish strong trend and the mid line and upper channel band in a bearish strong trend. The “buy zone” is identified with a green and cyan band of dots. The green dot represents the first level of entry and the cyan dot represents the last entry level in a strong up trend. The price bar will change to green when price enters the “buy zone” in a strong up trend. The “sell zone” is identified with a red and magenta band of dots. The red dot represents the first level of entry and the magenta dot represents the last entry level in a strong down trend. The price bar will change to red when price enters the “sell zone” in a strong downtrend.
The strong trend indicator is self-adaptive and responds to market volatility to adjust the potential entry points in real time. The strong trend indicator can be used in conjunction with other indicators to assist traders with identification of strong trends.
The Alchemy StrongTrend and TrendEntry Indicators
For TradeStation 4.0 or SuperCharts, use the following indicators:
Strong Trend Paint Bars:
Alchemy ST Bearish
Alchemy ST Bullish
Alchemy ST Buy
Alchemy ST Sell
Strong Trend Entry:
Alchemy ST Entry
To view chart, go to: http://www.tradingalchemy.com/ViewChartsStrongTrend.htm
User Defined Inputs for the Alchemy StrongTrend Indicator:
|
Price: |
This user-defined input determines if the Keltner Channel is calculated off the open, the high, the low or the close. It is defaulted to the close. |
|
Length: |
This user-defined input determines the number of bars over which the Keltner Channel is calculated. We optimized this input to a setting of 8 bars. |
|
Factor: |
This user-defined input determines the bandwidth for the Keltner Channel calculation. We optimized this input to a factor of 1.3. |
|
UpPrice: |
Price for which the up trend is based on whereas “high” is a more sensitive setting and “low” requires a much stronger up move before an uptrend is detected. |
|
DwnPrice: |
Price for which the down trend is based on whereas “low” is a more sensitive setting and “high” requires a much stronger down move before a downtrend is detected. |
|
MinBars: |
Minimum number of bars for a trend confirmation. |
|
Retest: |
Specifies the minimum penetration amount of the outside Keltner band for a new trend to set up. |
|
|
|
|
|
TradeStation 4.0 and Tradestation 2000i only: |
|
UpCol: |
Specifies the paint bar color when a strong up trend is detected. |
|
BuyCol: |
Specifies the paint bar color when price enters the buy zone. |
|
DownCol: |
Specifies the paint bar color when a strong down trend is detected. |
|
SellCol: |
Specifies the paint bar color when price enters the sell zone. |
|
|
|
|
|
Color Controls for TradeStation 8/9: Go to the Chart Color tab and change the plot colors as follows: |
|
BullTrendUp Plot |
Specifies the paint bar color for an up candle when a strong up trend is detected. |
|
BullTrendDn Plot |
Specifies the paint bar color for a down candle when a strong up trend is detected. |
|
BullEntryUp Plot |
Specifies the paint bar color for an up candle when when price enters the buy zone. |
|
BullEntryDn Plot |
Specifies the paint bar color for a down candle when when price enters the buy zone. |
|
BearTrendUp Plot |
Specifies the paint bar color for an up candle when a strong down trend is detected. |
|
BearTrendDn Plot |
Specifies the paint bar color for a down candle when a strong down trend is detected. |
|
BearEntryUp Plot |
Specifies the paint bar color for an up candle when when price enters the sell zone. |
|
BearEntryDn Plot |
Specifies the paint bar color or a down candle when when price enters the sell zone. |
|
|
|
|
|
Remaining inputs for all versions: |
|
StrongTrendAlert: |
Enables/disables the strong trend alert, which alerts to a strong trend being detected and when the market enters the strong trend entry zone. |
|
TrendChngAlert: |
Enables/disables the trend change alert, which alerts to a change in trend at the first strong up trend paint bar followed by a down trend and at the first strong down trend paint bar followed by an up trend. |
|
PlotTrend: |
Enables/disables the trend paint bars (cyan/magenta). |
|
PlotEntry: |
Enables/disables the entry paint bars (green/red). |
|
Decimal: |
Allows you to adjust the number of decimals in which the entry zone values in the Expert Commentary are displayed. It is defaulted to 2 decimals. |
|
Fraction: |
If you are applying the Alchemy StrongTrend indicator to any symbol that reads in fractions, such as bonds, you can set this input to True and the displayed entry zone values in the Expert Commentary will read in fractions (e.g. 106^30). For symbols that trade in ½ ticks such as the 10 year US Treasury Notes, the “Decimal” input needs to be set to a negative number. |
|
UseCandleStick: |
When using this indicator on a candle stick chart in TradeStation 8/9.2 or higher, the entire candle body will be filled when this input is set to true. |
User Defined Inputs for the Alchemy TrendEntry Indicator:
|
Price: |
This user-defined input determines if the Keltner Channel is calculated off the open, the high, the low or the close. It is defaulted to the close. |
|
Length: |
This user-defined input determines the number of bars over which the Keltner Channel is calculated. We optimized this input to a setting of 8 bars. |
|
Factor: |
This user-defined input determines the bandwidth for the Keltner Channel calculation. We optimized this input to a factor of 1.3. |
|
UpPrice: |
Price for which the up trend is based on whereas “high” is a more sensitive setting and “low” requires a much stronger up move before an uptrend is detected. |
|
DwnPrice: |
Price for which the down trend is based on whereas “low” is a more sensitive setting and “high” requires a much stronger down move before a downtrend is detected. |
|
MinBars: |
Minimum number of bars for a trend confirmation. |
|
Retest: |
Specifies the minimum penetration amount of the outside Keltner band for a new trend to set up. |
|
Buy1Col: |
Specifies the plot color of the dot that represents the closest and more aggressive buy zone (Plot1, Entry1). |
|
Buy2Col: |
Specifies the plot color of the dot that represents the furthest and more conservative buy zone (Plot2, Entry2). |
|
Sell1Col: |
Specifies the plot color of the dot that represents the closest and more aggressive sell zone (Plot1, Entry1). |
|
Sell2Col: |
Specifies the plot color of the dot that represents the furthest and more conservative sell zone (Plot2, Entry2). |
|
StrongTrendAlert: |
Enables/disables the strong trend alert, which alerts to a strong trend being detected and when the market enters the strong trend entry zone. |
|
TrendChngAlert: |
Enables/disables the trend change alert, which alerts to a change in trend at the first displayed buy zone followed by a down trend and at the first displayed sell zone followed by an up trend. |
|
EndOfEntryAlert: |
Enables/disables the alert that triggers on the bar when the entry dots disappear. |
|
Decimal: |
Allows you to adjust the number of decimals in which the entry zone values in the Expert Commentary are displayed. It is defaulted to 2 decimals. |
|
Fraction: |
If you are applying the Alchemy TrendEntry indicator to any symbol that reads in fractions, such as bonds, you can set this input to True and the displayed entry zone values in the Expert Commentary will read in fractions (e.g. 106^30). For symbols that trade in ½ ticks such as the 10 year US Treasury Notes, the “Decimal” input needs to be set to a negative number. |
The Alchemy Strong Trend RadarScreen Indicator (Alchemy StrongTrndRS)
The Alchemy Strong Trend RadarScreen indicator contains 4 columns. The first column (ST UpTrend) displays when the Alchemy Strong Trend indicator detects a strong up trend, the second column (ST Buy) displays when the price retraces into the buy zone of the Alchemy Strong Trend indicator, the third column (ST DownTrend) displays when the Alchemy Strong Trend indicator detects a strong down trend and the fourth column (ST Sell) displays when price retraces back into the sell zone of the Alchemy Strong Trend indicator. This RadarScreen indicator is not available for TradeStation 4.0 or SuperCharts. The input parameters match those of the Alchemy Strong Trend charting indicator.
|
AlchemyBearStrength function returns the market's bearish strength based on the Keltner Channel's downside running pattern. A Keltner Channel downside running pattern is defined as a downside penetration of the lower Keltner band by a minimum number of bars. |
|
|
AlchemyBullStrength function returns the market's bullish strength based on the Keltner Channel's upside running pattern. A Keltner Channel upside running pattern is defined as an upside penetration of the upper Keltner band by a minimum number of bars. |
|
|
AlchemyLowerKeltner function returns the lower band of the Keltner Channel. Keltner Channel is a channel that is based on a multiple of average true ranges above and below a moving average. KeltnerChannel is most commonly used with studies or strategies that measure or take advantage of market volatility. It is similar in concept to the BollingerBand function. |
|
|
AlchemyMidKeltner function returns the Mid Keltner. Keltner Channel is a channel that is based on a multiple of average true ranges above and below a moving average. KeltnerChannel is most commonly used with studies or strategies that measure or take advantage of market volatility. It is similar in concept to the BollingerBand function. |
|
|
AlchemyTrendBuy function returns values representing buy signals based on the Keltner Channel's upside running pattern. A Keltner Channel upside running pattern is defined as an upside penetration of the upper Keltner band by a minimum number of bars. |
|
|
AlchemyTrendSell function returns values representing sell signals based on the Keltner Channel's downside running pattern. A Keltner Channel downside running pattern is defined as a downside penetration of the lower Keltner band by a minimum number of bars. |
|
|
AlchemyUpperKeltner function returns the upper band of the Keltner Channel. Keltner Channel is a channel that is based on a multiple of average true ranges above and below a moving average. KeltnerChannel is most commonly used with studies or strategies that measure or take advantage of market volatility. It is similar in concept to the BollingerBand function. |
The Alchemy TrendCatcher Indicators
The Alchemy TrendCatcher indicator combines 2 separate trend modules, the Alchemy TrendDirection module and the Alchemy Strong Trend module. This indicator is a powerful trend trading tool that is very easy to use.
The TrendDirection module of this indicator identifies the market trend on 2 separate time frames and displays a logical trailing stop in order to stay with the trend for longer moves. With this TrendDirection, you will never miss a big market move. We've developed a proprietary market trend and volatility calculation that works in any market and on any time frame. This indicator will help you to stay in the right direction of any market move. The Alchemy TrendDirection trailing stop is self-adaptive to the market's current volatility, therefore minimizing the initial risk while staying with the trend.
Additionally, this indicator uses the Alchemy Strong Trend module as a strong trend detector. It signals the strength of a developing trend and increases the reliability of a follow through of a previous reversal or breakout. When a strong trend is detected, the indicator color codes the price bars and displays an entry zone at a logical retracement area, which provides a better entry price into the direction of the new trend. This trend confirmation method eliminates a large percentage of whipsaws and filters out a significant amount of noise when the market is in a non-trending, consolidating phase. At the same time, it catches all major market moves.
For chart examples that demonstrate on how to use our Alchemy TrendCatcher Complete indicator, please go to our web page at http://www.tradingalchemy.com/ViewChartsTrender.htm
The Alchemy TrendCatcher Chart Analysis Indicator (Alchemy TrendCatcherComplete):
The TrendDirection module paints the price bars cyan in an uptrend and magenta in a down trend, which provides an overall trend direction. The TrendDirection can be applied on 2 separate time frames on any chart applied and each time frame can be individually enabled or disabled. A trailing line keeps a trailing distance that is self adaptive to the market's volatility. Once the market penetrates the trailing line, the trend changes and marks a market reversal. When the Strong Trend Entry module detects a strong trending market after such a trend reversal, the price bars are colored with a thicker weight and separate dots display an entry zone. The most aggressive entry would be to enter the market when the thicker paint bars detect a strong trending market. A more conservative entry would be to enter into the direction of the trend when the market retraces back into the entry zone at which time, the portion of the bar that enters the entry zone is painted green for a long entry zone and painted red for a short entry zone.
The Alchemy TrendCatcherComplete indicator contains the following plots:
TrendDirection module:
TrendDirection 1 module (primary TrendDirection calculated on applied chart):
Trailing stop dots: TD1 BullStop and TD1 BearStop
Bullish paint bars: TD1 BullPBHi and TD1 BullPBLo
Bearish paint bars: TD1 BearPBHi and TD1 BearPBLo
TrendDirection 2 module (TrendDirection calculated on a second time frame as specified):
Trailing stop dots: TD2 BullStop and TD2 BearStop
Bullish paint bars: TD2 BullPBHi and TD2 BullPBLo
Bearish paint bars: TD2 BearPBHi and TD2 BearPBLo
Strong Trend Entry module:
Strong up trend paint bars: ST BullPBHi and ST BullPBLo.
Strong down trend paint bars: ST BearPBHi and ST BearPBLo.
Strong trend bullish entry paint bars: ST BullEntHi and ST BullEntLo.
Strong trend bearish entry paint bars: ST BearEntHi and ST BearEntLo.
Strong trend bullish entry 1 dots: ST BullEnt1
Strong trend bullish entry 2 dots: ST BullEnt2
Strong trend bearish entry 1 dots: ST BearEnt1
Strong trend bearish entry 2 dots: ST BearEnt2
Status module:
Status text: Status
|
|
Modules: |
|
TD1_Use |
Enables/disables all functionalities for the TrendDirection 1 module |
|
TD2_Use |
Enables/disables all functionalities for the TrendDirection 2 module |
|
ST_Use |
Enables/disables all functionalities for the Strong Trend module |
|
|
TrendDirection_Filters: |
|
TD1_Filter |
Enables/disables the TrendDirection 1 filter. With this filter enabled, all plots will display in the same direction as the TrendDirection 1 module only. |
|
TD2_Filter |
Enables/disables the TrendDirection 2 filter. With this filter enabled, all plots will display in the same direction as the TrendDirection 2 module only. |
|
|
Plotting: |
|
TD1_ShowStop |
Enables/disables the TrendDirection 1 trailing stop plot TD1 Stop. With a negative setting such as -1, the TrendDirection 1 trailing stop is allowed to display even if it is opposite to the TrendDirection 2 trend. A setting of 0 disables the TrendDirection 1 trailing stop. With a positive setting such as 1, the TrendDirection 1 trailing stop is allowed to display only if it is in the same trend direction as TrendDirection 2. |
|
TD2_ShowStop |
Enables/disables the TrendDirection 2 trailing stop plot TD2 Stop. With a negative setting such as -1, the TrendBullishChartExampleTD2 stop is allowed to display even if it is opposite to the TrendDirection 1 trend. A setting of 0 disables the TrendDirection 2 trailing stop. With a positive setting such as 1, the TrendDirection 2 trailing stop is allowed to display only if it is in the same trend direction as TrendDirection 1. |
|
TD_ShowTrend |
A setting of 0 disables the TrendDirection paint bars. A setting of 1 enables the TrendDirection 1 paint bars TD1 BullPBHi, TD1 BullPBLo, TD1 BearPBHi and TD1 BearPBLo. A setting of 2 enables the TrendDirection 2 paint bars TD2 BullPBHi, TD2 BullPBLo, TD2 BearPBHi and TD2 BearPBLo. |
|
TD_BarHigh |
Specifies the price to be used for the TrendDirection paint bar high prices. To paint the entire bar range, TD_BarHigh needs to be specified as high and TD_BarLow needs to be specified as low. To paint the candle body, TD_BarHigh needs to be specified as close and TD_BarLow needs to be specified as open. |
|
TD_BarLow |
Specifies the price to be used for the TrendDirection paint bar low prices. To paint the entire bar range, TD_BarHigh needs to be specified as high and TD_BarLow needs to be specified as low. To paint the candle body, TD_BarHigh needs to be specified as close and TD_BarLow needs to be specified as open. |
|
ST_ShowEntryZone |
Enables/disables the Strong Trend entry dots ST BullEntry1, ST BullEntry2, ST BearEntry1 and ST BearEntry2. A negative setting such as -1 enables these plots and they will always display, independent of any of the TrendDirection trailing stops. A setting of 0 disables these plots. A setting of 1 enables these plots and they will display only if their values don't break the TrendDirection 1 trailing stop. A setting of 2 enables these plots and they will display only if their values don't break the TrendDirection 2 trailing stop. A setting of 3 enables these plots and they will display only if their values don't break either the TrendDirection 1 or the TrendDirection 2 trailing stop. |
|
ST_ShowTrendPaintBar |
Enables/disables the Strong Trend paint bars ST BullPBHi, ST BullPBLo, ST BearPBHi and ST BearPBLo. |
|
ST_ShowEntryPaintBar |
Enables/disables the Strong Trend Entry paint bars ST BullEntryPBHi, ST BullEntryPBLo, ST BearEntryPBHi and ST BearEntryPBLo. |
|
ST_BarHigh |
Specifies the price to be used for the Strong Trend paint bar high prices. To paint the entire bar range, ST_BarHigh needs to be specified as high and ST_BarLow needs to be specified as low. To paint the candle body, ST_BarHigh needs to be specified as close and ST_BarLow needs to be specified as open. |
|
ST_BarLow |
Specifies the price to be used for the Strong Trend paint bar low prices. To paint the entire bar range, ST_BarHigh needs to be specified as high and ST_BarLow needs to be specified as low. To paint the candle body, ST_BarHigh needs to be specified as close and ST_BarLow needs to be specified as open. |
|
PaintBarColoringMode |
With a setting of 1, all paint bars are colored as specified with their corresponding paint bar high color. With a setting of 2, all paint bars are colored as specified with their corresponding paint bar low color. With a setting of 3, for all up candles, all paint bars are colored as specified with their corresponding paint bar high color and for all down candles, all paint bars are colored as specified with their corresponding paint bar low color. |
|
ShowClose |
Enables/disables the close plots TC UpClose which displays the close for an up candle, TC DnClose which displays the close for a down candle and TC DojiClose which displays the close for a doji. The color and weight for each candle type can be specified with each corresponding plot. |
|
ShowStatus |
Enables/disables the Status text which displays in the Status Line, Datatip and Data Window. With a setting of 1, the text color is automatically matched with its corresponding paint bar color and with a setting of 2, the text color is fixed based on its specified plot color. A setting of 0 disables the Status text. The text reads as follows: BullishTD1, BearishTD1, BullishTD2, BearishTD2, StrongUpTrend, StrongTrendBuy, BuyRetrace, SellRetrace, StrongDownTrend or StrongTrendSell. |
|
|
TrendDirection: |
|
|
Primary TrendDirection 1 (calculated on applied chart): |
|
TD1_Length |
Specifies the number of trailing bars to include in the TrendDirection 1 calculation. A setting of 0 disables the TrendDirection 1 with all of its plots as well as its trend filter. |
|
TD1_Factor |
Specifies the TrendDirection 1 sensitivity factor. For a more long term trend calculation, this factor can be increased and for a more short term trend calculation, this factor can be decreased. A setting of 0 disables the TrendDirection 1 with all of its plots as well as its trend filter. |
|
TD1_Smoothing |
Specifies the smoothing factor of the TrendDirection 1 calculations and the options are whole numbers from 1 through 6. |
|
TD1_Range |
Specifies the range factor of the TrendDirection 1 calculations and the options are whole numbers from 1 through 4. |
|
TD1_Method |
Specifies the calculation method of the TrendDirection 1 and the options are whole numbers from 1 through 4. |
|
TD1_DetectStrategyPosition |
When enabled, the TrendDirection 1 detects all strategy positions on the chart to stay in sync with these strategy positions. For example, when the TrendDirection 1 displays bullish and a strategy enters a short position, the TrendDirection 1 automatically reverses to bearish and starts its bearish calculation with this new short entry bar. |
|
|
TrendDirection 2 (calculated on a second time frame or on the same time frame with different parameters): |
|
Please note that when using a higher time frame for TrendDirection 2, the symbol range of the applied chart needs to encompass a sufficient amount of historical data in order to accurately calculate the TrendDirection 2 values. For example, in order to accurately calculate the monthly TrendDirection values on a 1 minute chart, we recommend setting the 1 minute symbol range to at least 1 year to 2 years back. In order to accurately calculate the weekly TrendDirection values on a 1 minute chart, we recommend setting the 1 minute symbol range to at least 1 year back. In order to accurately calculate the daily TrendDirection values on a 1 minute chart, we recommend setting the 1 minute symbol range to at least 3 months back. Also, due to some bar close timing conflicts between certain intra-day minute, tick and volume interval setting combinations, there might be slight value discrepancies when using certain intra-day minute, tick and volume interval setting combinations. |
|
|
TD2_Length |
Specifies the number of trailing bars to include in the TrendDirection 2 calculation. A setting of 0 disables the TrendDirection 2 with all of its plots as well as its trend filter. |
|
TD2_Factor |
Specifies the TrendDirection 2 sensitvity factor. For a more long term trend calculation, this factor can be increased and for a more short term trend calculation, this factor can be decreased. A setting of 0 disables the TrendDirection 2 with all of its plots as well as its trend filter. |
|
TD2_Smoothing |
Specifies the smoothing factor of the TrendDirection 2 calculations and the options are whole numbers from 1 through 6. The primary TrendDirection 1 is defaulted to smoothing factor 2 which is our preferred smoothing method. However, smoothing method 2 for the TrendDirection calculation on a second time frame, is much more memory intensive and therefore, we defaulted TD2_Smoothing to 1 which is more memory efficient and it produces very similar results. |
|
TD2_Method |
Specifies the calculation method of the TrendDirection 2 and the options are whole numbers from 1 through 4. |
|
TD2_DetectStrategyPosition |
When enabled, the TrendDirection 2 detects all strategy positions on the chart to stay in sync with these strategy positions. For example, when the TrendDirection 2 displays bullish and a strategy enters a short position, the TrendDirection 2 automatically reverses to bearish and starts its bearish calculation with this new short entry bar. |
|
TD2_NumberBarsBack |
Specifies the historical number of bars to load from the current date and time for calculating the TrendDirection of the second time frame. For example, when applied on a 5 minute chart with a range of 90 days back and the second time frame uses a 15 minute chart, the TD2_NumberBarsBack should be set to approximately 2,400 bars in order to load in enough 15 minute bars to the beginning of the 5 minute chart. If TD2_NumberBarsBack is not set to load in enough bars for calculating all the way back to the beginning of the chart, the TrendDirection 2 calculations won't start until later on the chart. Therefore, it is better to load in more bars then not enough. However, as this number increases, it will substantially slow down the load in time of this indicator. If the last bar of the chart is not the current date, to save unnecessary processing power, we recommend using the TD2_FirstDate and TD2_LastDate inputs for specifying the dates to load the historical bars for calculating the TrendDirection of the second time frame. With a setting of 0, TD2_FirstDate and TD2_LastDate left blank, TrendDirection 2 is calculated on the same time frame applied. With this feature, TrendDirection 2 can be used on the same time frame but with different Length, Factor, Smoothing and/or Method settings. If you receive an error message Not enough Data, you need to either reduce the value of this input and/or increase the date range of your symbol setting. |
|
TD2_FirstDate |
Specifies the earliest date for loading the historical bars to calculate the TrendDirection of the second time frame. In order to use this method of loading the historical bars to calculate the TrendDirection of the second time frame, the input TD2_NumberBarsBack has to be set to 0. As explained above, if the last bar of the chart is not the current date, to save unnecessary processing power, we recommend using the TD2_FirstDate and TD2_LastDate inputs for specifying the dates to load the historical bars for calculating the TrendDirection of the second time frame. This is a string input and when used, the precise format has to be "month/day/year". For example a date of February 1st, 2012 would be entered as "2/1/2012". When not used, this input should be left blank with 2 quotation marks as follows "". If the format of this input is not correct, the indicator will generate an invalid date time format error message. With TD2_NumberBarsBack set to 0, TD2_FirstDate and TD2_LastDate left blank, TrendDirection 2 is calculated on the same time frame applied. With this feature, TrendDirection 2 can be used on the same time frame but with different Length, Factor, Smoothing and/or Method settings. |
|
TD2_LastDate |
Specifies the latest date for loading the historical bars to calculate the TrendDirection of the second time frame. In order to use this method of loading the historical bars to calculate the TrendDirection of the second time frame, the input TD2_NumberBarsBack has to be set to 0. As explained above, if the last bar of the chart is not the current date, to save unnecessary processing power, we recommend using the TD2_FirstDate and TD2_LastDate inputs for specifying the dates to load the historical bars for calculating the TrendDirection of the second time frame. This is a string input and when used, the precise format has to be "month/day/year". For example a date of February 1st, 2012 would be entered as "2/1/2012". When not used, this input should be left blank with 2 quotation marks as follows "". If the format of this input is not correct, the indicator will generate an invalid date time format error message. With TD2_NumberBarsBack set to 0, TD2_FirstDate and TD2_LastDate left blank, TrendDirection 2 is calculated on the same time frame applied. With this feature, TrendDirection 2 can be used on the same time frame but with different Length, Factor, Smoothing and/or Method settings. |
|
TD2_Interval |
Specifies the interval setting for a Tick, Volume or Intra-Day interval of the second time frame TrendDirection. As a universal example, we set this input to barinterval*3 which automatically uses a time frame that is 3 times higher from the chart that the indicator is applied on. However, with TD2_IntervalBarType set to either a daily, weekly or monthly interval, the TD2_Interval does not have an affect. With a setting of 0, TrendDirection 2 is calculated on the same time frame applied. With this feature, TrendDirection 2 can be used on the same time frame but with different Length, Factor, Smoothing and/or Method settings. |
|
TD2_IntervalBarType |
Specifies the interval of the second time frame TrendDirection. A setting of -1 uses a Volume chart. A setting of 0 uses a Tick chart. A setting of 1 uses an Intra-Day Minute chart. A setting of 2 uses a Daily chart. A setting of 3 uses a Weekly chart. A setting of 4 uses a Monthly chart. With a setting of -2, TrendDirection 2 is calculated on the same time frame applied. With this feature, TrendDirection 2 can be used on the same time frame but with different Length, Factor, Smoothing and/or Method settings. |
|
|
Strong Trend: |
|
ST_Price |
Specifies the price to be used for the Strong Trend calculation such as open, high, low or close. |
|
ST_Length |
Specifies the number of trailing bars to include in the Strong Trend calculation. |
|
ST_Factor |
Specifies the Strong Trend sensitivity factor. For a less sensitive Strong Trend calculation, this factor can be increased and for a more sensitive Strong Trend calculation, this factor can be decreased. |
|
ST_Method |
Specifies the calculation method of the Strong Trend and the options are whole numbers from 1 through 4. |
|
ST_UpType |
Specifies the method type for calculating a strong up trend whereas a setting of 1 is the most sensitive setting and a setting of 4 is the least sensitive setting that requires a much stronger up move before an uptrend is detected. The options are whole numbers from 1 through 4. |
|
ST_DnType |
Specifies the method type for calculating a strong down trend whereas a setting of 1 is the most sensitive setting and a setting of 4 is the least sensitive setting that requires a much stronger down move before a downtrend is detected. The options are whole numbers from 1 through 4. |
|
ST_BuyType |
Specifies the method type for signaling a strong trend buy entry paint bar as follows: With a setting of 1, the bar has to open within the buy entry zone. With a setting of 2, the high of the bar has to be within the buy entry zone. With a setting of 3, the low of the bar has to be within the buy entry zone. With a setting of 4, the bar has to close within the buy entry zone. |
|
ST_SellType |
Specifies the method type for signaling a strong trend sell entry paint bar as follows: With a setting of 1, the bar has to open within the sell entry zone. With a setting of 2, the high of the bar has to be within the sell entry zone. With a setting of 3, the low of the bar has to be within the sell entry zone. With a setting of 4, the bar has to close within the sell entry zone. |
|
ST_MinBars |
Specifies the minimum number of bars for a trend confirmation. |
|
ST_Retest |
Specifies the minimum factor for detecting a new strong trend. |
|
ST_EntryPercent |
Specifies the entry percent between Strong Trend Entry 1 and Strong Trend Entry 2 as to where to display the St Buy and the ST Sell entry dots. For example, a value of 50 displays the entry dot at the mid point between Strong Trend Entry 1 and Strong Trend Entry 2. A negative value disables these entry plots. |
|
|
Alerts: |
|
TD1_StopAlert |
Enables/disables the alert when the TrendDirection 1 trailing stop changes. |
|
TD1_BullTrendAlert |
Enables/disables the alert when the TrendDirection 1 changes from a bearish to a bullish direction. |
|
TD1_BearTrendAlert |
Enables/disables the alert when the TrendDirection 1 changes from a bullish to a bearish direction. |
|
TD2_StopAlert |
Enables/disables the alert when the TrendDirection 2 trailing stop changes. |
|
TD2_BullTrendAlert |
Enables/disables the alert when the TrendDirection 2 changes from a bearish to a bullish direction. |
|
TD2_BearTrendAlert |
Enables/disables the alert when the TrendDirection 2 changes from a bullish to a bearish direction. |
|
ST_BullTrendAlert |
Enables/disables the alert when the Strong Trend module changes from a bearish to a bullish direction. |
|
ST_BearTrendAlert |
Enables/disables the alert when the Strong Trend module changes from a bullish to a bearish direction. |
|
ST_BullEntryAlert |
Enables/disables the alert when the market enters the bullish strong trend entry zone. |
|
ST_BearEntryAlert |
Enables/disables the alert when the market enters the bearish strong trend entry zone. |
|
AlertDec |
Specifies the decimal points for price to display in the alert notification window. |
The Alchemy TrendCatcher RadarScreen Indicator (Alchemy TrendCatcherComplete RS):
The Alchemy TrendCatcher RadarScreen module contains the following columns:
|
Status |
The Status column displays the current status of the TrendCatcher indicator as follows:
Bullish Status:
Bearish Status:
|
||||||||||||||||||||||||
|
|
Bullish Columns: |
||||||||||||||||||||||||
|
ST UpTrend |
This column is displayed when a Strong Up Trend is detected. This occurs when the ST Bull paint bars of the *Alchemy TrendCatcher charting indicator are painted. |
||||||||||||||||||||||||
|
ST Buy |
This column is displayed when the market has retraced back into the Strong Trend buy zone. This occurs when the ST BullEnt paint bars of the *Alchemy TrendCatcher charting indicator are painted. |
||||||||||||||||||||||||
|
ST Buy1 |
This column displays the value for the Strong Trend Entry1 buy zone. This occurs when the ST BullEnt1 dots of the *Alchemy TrendCatcher charting indicator are displayed. |
||||||||||||||||||||||||
|
ST Buy2 |
This column displays the value for the Strong Trend Entry2 buy zone. This occurs when the ST BullEnt2 dots of the *Alchemy TrendCatcher charting indicator are displayed. |
||||||||||||||||||||||||
|
TD1 UpTrend |
This column is displayed when TrendDirection 1 is bullish. This occurs when the TD1 Bull paint bars of the *Alchemy TrendCatcher charting indicator are painted. |
||||||||||||||||||||||||
|
TD1 BullStop |
This column displays the value for the bullish TrendDirection 1 stop. This occurs when the TD1 BullStop dots of the *Alchemy TrendCatcher charting indicator are displayed. |
||||||||||||||||||||||||
|
TD2 UpTrend |
This column is displayed when TrendDirection 2 is bullish. This occurs when the TD2 Bull paint bars of the *Alchemy TrendCatcher charting indicator are painted. |
||||||||||||||||||||||||
|
TD2 BullStop |
This column displays the value for the bullish TrendDirection 2 stop. This occurs when the TD2 BullStop dots of the *Alchemy TrendCatcher charting indicator are displayed. |
||||||||||||||||||||||||
|
|
Bearish Columns: |
||||||||||||||||||||||||
|
ST DnTrend |
This column is displayed when a Strong Down Trend is detected. This occurs when the ST Bear paint bars of the *Alchemy TrendCatcher charting indicator are painted. |
||||||||||||||||||||||||
|
ST Sell |
This column is displayed when the market has retraced back into the Strong Trend sell zone. This occurs when the ST BearEnt paint bars of the *Alchemy TrendCatcher charting indicator are painted. |
||||||||||||||||||||||||
|
ST Sell1 |
This column displays the value for the Strong Trend Entry1 sell zone. This occurs when the ST BearEnt1 dots of the *Alchemy TrendCatcher charting indicator are displayed. |
||||||||||||||||||||||||
|
ST Sell2 |
This column displays the value for the Strong Trend Entry2 sell zone. This occurs when the ST BearEnt2 dots of the *Alchemy TrendCatcher charting indicator are displayed. |
||||||||||||||||||||||||
|
TD1 DnTrend |
This column is displayed when TrendDirection 1 is bearish. This occurs when the TD1 Bear paint bars of the *Alchemy TrendCatcher charting indicator are painted. |
||||||||||||||||||||||||
|
TD1 BearStop |
This column displays the value for the bearish TrendDirection 1 stop. This occurs when the TD1 BearStop dots of the *Alchemy TrendCatcher charting indicator are displayed. |
||||||||||||||||||||||||
|
TD2 DnTrend |
This column is displayed when TrendDirection 2 is bearish. This occurs when the TD2 Bear paint bars of the *Alchemy TrendCatcher charting indicator are painted. |
||||||||||||||||||||||||
|
TD2 BearStop |
This column displays the value for the bearish TrendDirection 2 stop. This occurs when the TD2 BearStop dots of the *Alchemy TrendCatcher charting indicator are displayed. |
|
|
Modules: |
|
TD1_Use |
Enables/disables all functionalities for the TrendDirection 1 module |
|
TD2_Use |
Enables/disables all functionalities for the TrendDirection 2 module |
|
ST_Use |
Enables/disables all functionalities for the Strong Trend module |
|
|
TrendDirection_Filters: |
|
TD1_Filter |
Enables/disables the TrendDirection 1 filter. With this filter enabled, all columns will display in the same direction as the TrendDirection 1 module only. |
|
TD2_Filter |
Enables/disables the TrendDirection 2 filter. With this filter enabled, all columns will display in the same direction as the TrendDirection 2 module only. |
|
TD1_StopEntry |
This input affects the TD1 Buy/Sell status text. With a setting of true, this status text is displayed on the first bar when a new trend of the primary TrendDirection starts. With a setting of false, this status text is displayed on the second bar when a new trend of the primary TrendDirection starts. |
|
|
Text: |
|
Bullish Text: |
|
|
StatusText_StrongTrendBuy |
Specifies the text to be displayed in the Status column when the ST Buy cell is displayed. This is a string input which needs to be within quotation marks. When blank (""), the status text for the ST Buy won't be displayed. The cell background for this status is automatically colored with the color as specified with the input ST_BuyBackGrdColor. |
|
StatusText_StrongTrendBuyRetrace |
Specifies the text to be displayed in the Status column when the market is in a retracement phase after a strong up trend signal has been detected but it is not within the Strong Trend buy zone. At this time, the ST Buy cells are displayed. This is a string input which needs to be within quotation marks. When blank (""), the status text for this status won't be displayed. The cell background for this status is automatically colored with the color as specified with the input ST_BuyRetraceBackGrdColor. |
|
StatusText_StrongUpTrend |
Specifies the text to be displayed in the Status column when the ST UpTrend cell is displayed. This is a string input which needs to be within quotation marks. When blank (""), the status text for the ST UpTrend won't be displayed. The cell background for this status is automatically colored with the color as specified with the input ST_UpTrendBackGrdColor. |
|
StatusText_BullishTD1 |
Specifies the text to be displayed in the Status column when the TD1 UpTrend cell is displayed. This is a string input which needs to be within quotation marks. When blank (""), the status text for the TD1 UpTrend won't be displayed. The cell background for this status is automatically colored with the color as specified with the input TD1_UpTrendBackGrdColor. |
|
StatusText_BullishTD2 |
Specifies the text to be displayed in the Status column when the TD2 UpTrend cell is displayed. This is a string input which needs to be within quotation marks. When blank (""), the status text for the TD2 UpTrend won't be displayed. The cell background for this status is automatically colored with the color as specified with the input TD2_UpTrendBackGrdColor. |
|
StatusText_TD1Buy |
Specifies the text to be displayed in the Status column when TrendDirection 1 just turned bullish which would signal a possible buy for an aggressive primary TrendDirection long entry. This occurs when the TD1 Bull paint bars of the Alchemy TrendCatcherComplete charting indicator just started painting. The cell background for this status is automatically colored with the color as specified with the input TD1_BuyBackGrdColor. |
|
ST_UpTrendText |
Specifies the text to be displayed in the ST UpTrend column. This is a string input which needs to be within quotation marks. |
|
ST_BuyText |
Specifies the text to be displayed in the ST Buy column. This is a string input which needs to be within quotation marks. |
|
TD1_UpTrendText |
Specifies the text to be displayed in the TD1 UpTrend column. This is a string input which needs to be within quotation marks. |
|
TD2_UpTrendText |
Specifies the text to be displayed in the TD2 UpTrend column. This is a string input which needs to be within quotation marks. |
|
Bearish Text: |
|
|
StatusText_StrongTrendSell |
Specifies the text to be displayed in the Status column when the ST Sell cell is displayed. This is a string input which needs to be within quotation marks. When blank (""), the status text for the ST Sell won't be displayed. The cell background for this status is automatically colored with the color as specified with the input ST_SellBackGrdColor. |
|
StatusText_StrongTrendSellRetrace |
Specifies the text to be displayed in the Status column when the market is in a retracement phase after a strong down trend signal has been detected but it is not within the Strong Trend sell zone. At this time, the ST Sell cells are displayed. When blank (""), the status text for this status won't be displayed. The cell background for this status is automatically colored with the color as specified with the input ST_SellRetraceBackGrdColor. |
|
StatusText_StrongDownTrend |
Specifies the text to be displayed in the Status column when the ST DnTrend cell is displayed. This is a string input which needs to be within quotation marks. When blank (""), the status text for the ST DnTrend won't be displayed. The cell background for this status is automatically colored with the color as specified with the input ST_DnTrendBackGrdColor. |
|
StatusText_BearishTD1 |
Specifies the text to be displayed in the Status column when the TD1 DnTrend cell is displayed. This is a string input which needs to be within quotation marks. When blank (""), the status text for the TD1 DnTrend won't be displayed. The cell background for this status is automatically colored with the color as specified with the input TD1_DnTrendBackGrdColor. |
|
StatusText_BearishTD2 |
Specifies the text to be displayed in the Status column when the TD2 DnTrend cell is displayed. This is a string input which needs to be within quotation marks. When blank (""), the status text for the TD2 DnTrend won't be displayed. The cell background for this status is automatically colored with the color as specified with the input TD2_DnTrendBackGrdColor. |
|
StatusText_TD1Sell |
Specifies the text to be displayed in the Status column when TrendDirection 1 just turned bearish which would signal a possible sell for an aggressive primary TrendDirection short entry. This occurs when the TD1 Bear paint bars of the Alchemy TrendCatcherComplete charting indicator just started painting. The cell background for this status is automatically colored with the color as specified with the input TD1_SellBackGrdColor. |
|
ST_DnTrendText |
Specifies the text to be displayed in the ST DnTrend column. This is a string input which needs to be within quotation marks. |
|
ST_SellText |
Specifies the text to be displayed in the ST Sell column. This is a string input which needs to be within quotation marks. |
|
TD1_DnTrendText |
Specifies the text to be displayed in the TD DnTrend column. This is a string input which needs to be within quotation marks. |
|
TD2_DnTrendText |
Specifies the text to be displayed in the TD DnTrend column. This is a string input which needs to be within quotation marks. |
|
|
Colors: |
|
|
To offer more color choices besides the existing TradeStation Legacy colors, we added our own coloring syntax that can be easily typed into the color inputs below without having to call up their RGB values. These colors are named as follows: ta.color_darklilac, ta.color_darkorange, ta.color_darkpurple, ta.color_darkteal, ta.color_lightblue, ta.color_lightpink, ta.color_lilac, ta.color_maroon, ta.color_orange, ta.color_pink, ta.color_purple, ta.color_salmon and ta.color_teal |
|
Bullish Colors: |
|
|
ST_BuyBackGrdColor |
Specifies the cell background color of the ST Buy column. |
|
ST_Buy1BackGrdColor |
Specifies the cell background color of the ST Buy1 column. |
|
ST_Buy2BackGrdColor |
Specifies the cell background color of the ST Buy2 column. |
|
ST_BuyRetraceBackGrdColor |
Specifies the cell background color to be displayed in the Status column when the ST Buy1 cell is displayed but the price has not entered the buy zone as of yet. |
|
ST_UpTrendBackGrdColor |
Specifies the cell background color of the ST UpTrend column. |
|
TD1_UpTrendBackGrdColor |
Specifies the cell background color of the TD1 UpTrend column. |
|
TD1_TrailBullBackGrdColor |
Specifies the cell background color of the TD1 BullStop column. |
|
TD2_UpTrendBackGrdColor |
Specifies the cell background color of the TD2 UpTrend column. |
|
TD2_TrailBullBackGrdColor |
Specifies the cell background color of the TD2 BullStop column. |
|
TD1_BuyBackGrdColor |
Specifies the cell background color to be displayed in the Status column when the TD1 Buy status text is displayed. |
|
Bearish Colors: |
|
|
ST_SellBackGrdColor |
Specifies the cell background color of the ST Sell column. |
|
ST_Sell1BackGrdColor |
Specifies the cell background color of the ST Sell1 column. |
|
ST_Sell2BackGrdColor |
Specifies the cell background color of the ST Sell1 column. |
|
ST_SellRetraceBackGrdColor |
Specifies the cell background color to be displayed in the Status column when the ST Sell1 cell is displayed but the price has not entered the sell zone as of yet. |
|
ST_DnTrendBackGrdColor |
Specifies the cell background color of the ST DnTrend column. |
|
TD1_DnTrendBackGrdColor |
Specifies the cell background color of the TD1 DnTrend column. |
|
TD1_TrailBearBackGrdColor |
Specifies the cell background color of the TD1 BearStop column. |
|
TD2_DnTrendBackGrdColor |
Specifies the cell background color of the TD2 DnTrend column. |
|
TD2_TrailBearBackGrdColor |
Specifies the cell background color of the TD2 BearStop column. |
|
TD1_SellBackGrdColor |
Specifies the cell background color to be displayed in the Status column when the TD1 Sell status text is displayed. |
|
|
TrendDirection: |
|
|
Primary TrendDirection 1 (calculated on applied window): |
|
TD1_Length |
Specifies the number of trailing bars to include in the TrendDirection 1 calculation. A setting of 0 disables the TrendDirection 1 with all of its plots as well as its trend filter. |
|
TD1_Factor |
Specifies the TrendDirection 1 sensitvity factor. For a more long term trend calculation, this factor can be increased and for a more short term trend calculation, this factor can be decreased. A setting of 0 disables the TrendDirection 1 with all of its plots as well as its trend filter. |
|
TD1_Smoothing |
Specifies the smoothing factor of the TrendDirection 1 calculations and the options are whole numbers from 1 through 6. |
|
TD1_Range |
Specifies the range factor of the TrendDirection 1 calculations and the options are whole numbers from 1 through 4. |
|
TD1_Method |
Specifies the calculation method of the TrendDirection 1 and the options are whole numbers from 1 through 4. |
|
|
TrendDirection 2 (calculated on a second time frame or on the same time frame with different parameters): |
|
Please note that when using a higher time frame for TrendDirection 2, the symbol range of the applied chart needs to encompass a sufficient amount of historical data in order to accurately calculate the TrendDirection 2 values. For example, in order to accurately calculate the monthly TrendDirection values on a 1 minute interval, we recommend setting the indicator to load in at least 100,000 to 200,000 bars from the Format Indicator > General window. In order to accurately calculate the weekly TrendDirection values on a 1 minute interval, we recommend setting the indicator to load in at least 100,000 bars from the Format Indicator > General window. In order to accurately calculate the daily TrendDirection values on a 1 minute interval, we recommend setting the indicator to load in at least 26,000 bars from the Format Indicator > General window. Otherwise, the default setting of 500 bars is sufficient in general. Also, due to some bar close timing conflicts between certain intra-day minute, tick and volume interval setting combinations, there might be slight value discrepancies when using certain intra-day minute, tick and volume interval setting combinations. |
|
|
TD2_Length |
Specifies the number of trailing bars to include in the TrendDirection 2 calculation. A setting of 0 disables the TrendDirection 2 with all of its plots as well as its trend filter. |
|
TD2_Factor |
Specifies the TrendDirection 2 sensitvity factor. For a more long term trend calculation, this factor can be increased and for a more short term trend calculation, this factor can be decreased. A setting of 0 disables the TrendDirection 2 with all of its plots as well as its trend filter. |
|
TD2_Smoothing |
Specifies the smoothing factor of the TrendDirection 2 calculations and the options are whole numbers from 1 through 6. The primary TrendDirection 1 is defaulted to smoothing factor 2 which is our preferred smoothing method. However, smoothing method 2 for the TrendDirection calculation on a second time frame, is much more memory intensive and therefore, we defaulted TD2_Smoothing to 1 which is more memory efficient and it produces very similar results. |
|
TD2_Method |
Specifies the calculation method of the TrendDirection 2 and the options are whole numbers from 1 through 4. |
|
TD2_NumberBarsBack |
Specifies the historical number of bars to load for calculating the TrendDirection of the second time frame. This input is defaulted to 100 bars which will always be enough historical data to correctly calculate the second time frame TrendDirection on any interval setting. Therefore, we recommend not to increase this number as this number increases, it will substantially slow down the load in time of this indicator. When the TrendDirection 2 module is inactive by for example disabling TD2_Use, this calculation is bypassed, therefore, in this case, it is not necessary to set this input to 0 to increase processing speed. With a setting of 0, TrendDirection 2 is calculated on the same time frame applied. With this feature, TrendDirection 2 can be used on the same time frame but with different Length, Factor, Smoothing and/or Method settings. |
|
TD2_Interval |
Specifies the interval setting for a Tick, Volume or Intra-Day interval of the second time frame TrendDirection. As a universal example, we set this input to barinterval*3 which automatically uses a time frame that is 3 times higher from the window that the indicator is applied on. However, with TD2_IntervalBarType set to either a daily, weekly or monthly interval, the TD2_Interval does not have an affect. With a setting of 0, TrendDirection 2 is calculated on the same time frame applied. With this feature, TrendDirection 2 can be used on the same time frame but with different Length, Factor, Smoothing and/or Method settings. |
|
TD2_IntervalBarType |
Specifies the interval of the second time frame TrendDirection. A setting of -1 uses a Volume chart. A setting of 0 uses a Tick chart. A setting of 1 uses an Intra-Day Minute chart. A setting of 2 uses a Daily chart. A setting of 3 uses a Weekly chart. A setting of 4 uses a Monthly chart. With a setting of -2, TrendDirection 2 is calculated on the same time frame applied. With this feature, TrendDirection 2 can be used on the same time frame but with different Length, Factor, Smoothing and/or Method settings. |
|
|
Strong Trend: |
|
ST_Price |
Specifies the price to be used for the Strong Trend calculation such as open, high, low or close. |
|
ST_Length |
Specifies the number of trailing bars to include in the Strong Trend calculation. |
|
ST_Factor |
Specifies the Strong Trend sensitivity factor. For a less sensitive Strong Trend calculation, this factor can be increased and for a more sensitive Strong Trend calculation, this factor can be decreased. |
|
ST_Method |
Specifies the calculation method of the Strong Trend and the options are whole numbers from 1 through 4. |
|
ST_UpType |
Specifies the method type for calculating a strong up trend whereas a setting of 1 is the most sensitive setting and a setting of 4 is the least sensitive setting that requires a much stronger up move before an uptrend is detected. The options are whole numbers from 1 through 4. |
|
ST_DnType |
Specifies the method type for calculating a strong down trend whereas a setting of 1 is the most sensitive setting and a setting of 4 is the least sensitive setting that requires a much stronger down move before a downtrend is detected. The options are whole numbers from 1 through 4. |
|
ST_BuyType |
Specifies the method type for signaling a strong trend buy entry paint bar as follows: With a setting of 1, the bar has to open within the buy entry zone. With a setting of 2, the high of the bar has to be within the buy entry zone. With a setting of 3, the low of the bar has to be within the buy entry zone. With a setting of 4, the bar has to close within the buy entry zone. |
|
ST_SellType |
Specifies the method type for signaling a strong trend sell entry paint bar as follows: With a setting of 1, the bar has to open within the sell entry zone. With a setting of 2, the high of the bar has to be within the sell entry zone. With a setting of 3, the low of the bar has to be within the sell entry zone. With a setting of 4, the bar has to close within the sell entry zone. |
|
ST_MinBars |
Specifies the minimum number of bars for a trend confirmation. |
|
ST_Retest |
Specifies the minimum factor for detecting a new strong trend. |
|
|
TrendDirection: |
|
TD_Length |
Specifies the number of trailing bars to include in the TrendDirection calculation. A setting of 0 disables the TrendDirection with all of its plots as well as its trend filter. |
|
TD_Factor |
Specifies the TrendDirection sensitvity factor. For a more long term trend calculation, this factor can be increased and for a more short term trend calculation, this factor can be decreased. A setting of 0 disables the TrendDirection with all of its plots as well as its trend filter. |
|
TD_Smoothing |
Specifies the smoothing factor of the TrendDirection calculations and the options are whole numbers from 1 through 6. |
|
TD_Range |
Specifies the range factor of the TrendDirection calculations and the options are whole numbers from 1 through 4. |
|
TD_Method |
Specifies the calculation method of the TrendDirection and the options are whole numbers from 1 through 4. |
|
TD_Filter |
When set to true, the indicator displays the bullish Strong Trend Paint Bars and entry dots only when the TrendDirection is bullish and vice versa, it displays the bearish Strong Trend Paint Bars and entry dots only when the TrendDirection is bearish. |
|
|
Strong Trend: |
|
ST_Price |
Specifies the price to be used for the Strong Trend calculation such as open, high, low or close. |
|
ST_Length |
Specifies the number of trailing bars to include in the Strong Trend calculation. |
|
ST_Factor |
Specifies the Strong Trend sensitivity factor. For a less sensitive Strong Trend calculation, this factor can be increased and for a more sensitive Strong Trend calculation, this factor can be decreased. |
|
ST_Method |
Specifies the calculation method of the Strong Trend and the options are whole numbers from 1 through 4. |
|
ST_UpType |
Specifies the method type for calculating a strong up trend whereas a setting of 1 is the most sensitive setting and a setting of 4 is the least sensitive setting that requires a much stronger up move before an uptrend is detected. The options are whole numbers from 1 through 4. |
|
ST_DnType |
Specifies the method type for calculating a strong down trend whereas a setting of 1 is the most sensitive setting and a setting of 4 is the least sensitive setting that requires a much stronger down move before a downtrend is detected. The options are whole numbers from 1 through 4. |
|
ST_BuyType |
Specifies the method type for signaling a strong trend buy entry paint bar as follows: With a setting of 1, the bar has to open within the buy entry zone. With a setting of 2, the high of the bar has to be within the buy entry zone. With a setting of 3, the low of the bar has to be within the buy entry zone. With a setting of 4, the bar has to close within the buy entry zone. |
|
ST_SellType |
Specifies the method type for signaling a strong trend sell entry paint bar as follows: With a setting of 1, the bar has to open within the sell entry zone. With a setting of 2, the high of the bar has to be within the sell entry zone. With a setting of 3, the low of the bar has to be within the sell entry zone. With a setting of 4, the bar has to close within the sell entry zone. |
|
ST_MinBars |
Specifies the minimum number of bars for a trend confirmation. |
|
ST_Retest |
Specifies the minimum factor for detecting a new strong trend. |
|
ST_ShowEntryZone |
Specifies the method as to how the Strong Trend Entry Zone value columns ST Buy1, ST Buy2, ST Sell1 and ST Sell2 are displayed. A negative setting such as -1 enables these columns and they will always display, independent of any of the TrendDirection trailing stops. A setting of 0 disables these columns. A setting of 1 enables these columns and they will display only if their values don't break the TrendDirection 1 trailing stop. A setting of 2 enables these columns and they will display only if their values don't break the TrendDirection 2 trailing stop. A setting of 3 enables these columns and they will display only if their values don't break either the TrendDirection 1 or the TrendDirection 2 trailing stop. |
|
|
Alerts: |
|
|
Bullish Alerts: |
|
ST_BullEntryAlert |
Enables/disables the alert when the market enters the bullish strong trend entry zone as displayed in the ST Buy columns. |
|
ST_BullTrendAlert |
Enables/disables the alert when the Strong Trend module changes from a bearish to a bullish direction and the ST UpTrend column is displayed for the first time. |
|
TD1_BullTrendAlert |
Enables/disables the alert when the TrendDirection 1 changes from a bearish to a bullish direction and the TD1 UpTrend column is displayed for the first time. |
|
TD2_BullTrendAlert |
Enables/disables the alert when the TrendDirection 2 changes from a bearish to a bullish direction and the TD1 UpTrend column is displayed for the first time. |
|
|
Bearish Alerts: |
|
ST_BearEntryAlert |
Enables/disables the alert when the market enters the bearish strong trend entry zone as displayed in the ST Sell columns. |
|
ST_BearTrendAlert |
Enables/disables the alert when the Strong Trend module changes from a bullish to a bearish direction and the ST DnTrend column is displayed for the first time. |
|
TD1_BearTrendAlert |
Enables/disables the alert when the TrendDirection changes from a bullish to a bearish direction and the TD1 DnTrend column is displayed for the first time. |
|
TD2_BearTrendAlert |
Enables/disables the alert when the TrendDirection changes from a bullish to a bearish direction and the TD2 DnTrend column is displayed for the first time. |
|
|
Global Alerts: |
|
TD1_StopAlert |
Enables/disables the alert when the TrendDirection 1 trailing stop changes. |
|
TD2_StopAlert |
Enables/disables the alert when the TrendDirection 2 trailing stop changes. |
|
AlertDec |
Specifies the decimal points for price to display in the alert notification window. |
For our RadarScreen indicator Alchemy TrendCatcherCompleteRS, we are providing a workspace which contains 2 RadarScreen windows with our Alchemy TrendCatcherCompleteRS indicator applied and 2 linked chart windows with our Alchemy TrendCatcherComplete indicator applied. The upper RadarScreen window page is named Buy with the Alchemy TrendCatcherCompleteRS columns Status, ST Buy1, ST Buy2, TD1 BullStop and TD2 BullStop enabled. The window sorts the Status column in ascending order every 30 seconds. In order to sort in the order of the highest buy priority, we added numbers in front of the Buy Status text and deleted the Sell Status text as follows:
|
|
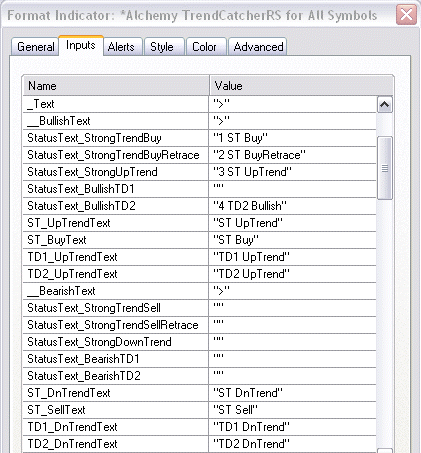
The lower RadarScreen window page is named Sell with the Alchemy TrendCatcherCompleteRS columns Status, ST Sell1, ST Sell2, TD1 BearStop and TD2 BearStop enabled. The window sorts the Status column in ascending order every 30 seconds. In order to sort in the order of the highest sell priority, we added numbers in front of the Sell Status text and deleted the Buy Status text as follows:
|
|

To the right of each RadarScreen window, we added a linked chart with our Alchemy TrendCatcherComplete indicator applied so that each corresponding chart can be easily viewed by clicking on the symbol in the RadarScreen window.
Here is a description of the chart layout:
|
The upper windows show an instrument that has retraced back into the Strong Trend buy zone. |
|
|
|
The lower windows show an instrument that has retraced back into the Strong Trend sell zone. |
|
The upper windows show an instrument that is in a retracement phase after a strong up trend signal has been detected but it is not within the Strong Trend buy zone. |
|
|
|
The lower windows show an instrument that is in a retracement phase after a strong down trend signal has been detected but it is not within the Strong Trend sell zone. |
|
The upper windows show an instrument that is in a Strong Up Trend. |
|
|
|
The lower windows show an instrument that is in a Strong Down Trend. |
|
The upper windows show an instrument with a bullish TrendDirection. |
|
|
|
The lower windows show an instrument with a bearish TrendDirection. |

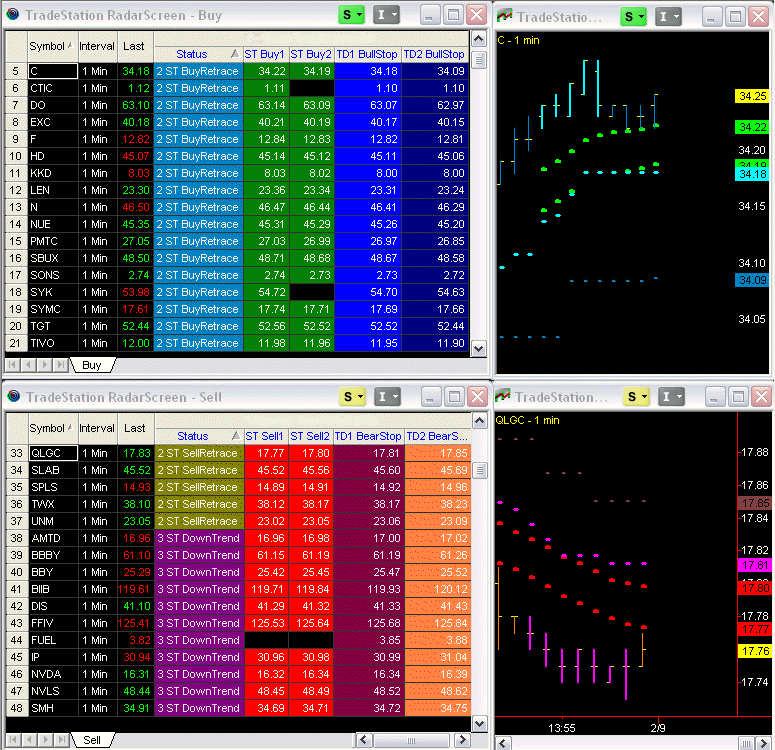

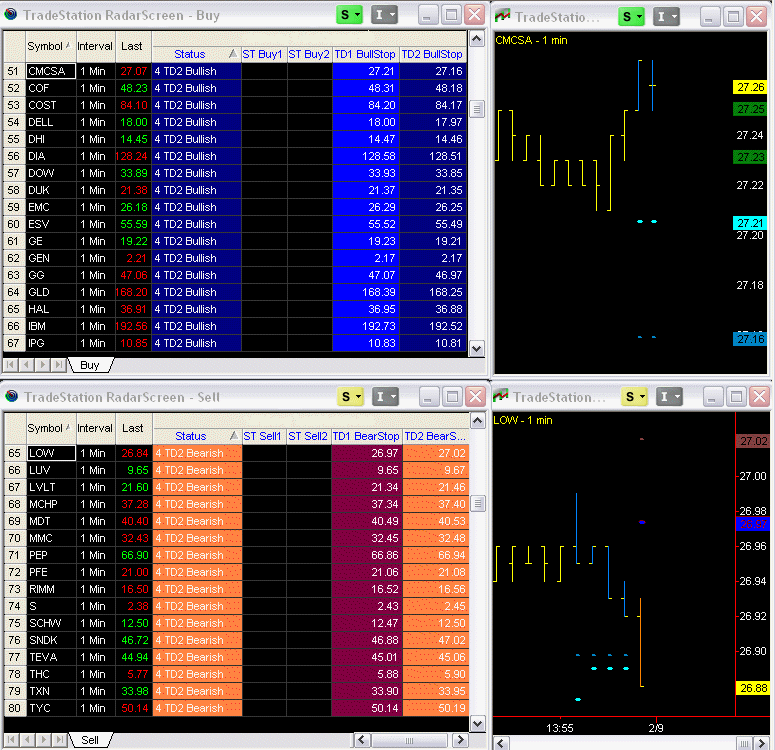
TradeStation 8 and MultiCharts:
The TrendDirection module of this indicator identifies the market trend and displays a logical trailing stop in order to stay with the trend for longer moves. With this TrendDirection, you will never miss a big market move. We've developed a proprietary market trend and volatility calculation that works in any market and on any time frame. This indicator will help you to stay in the right direction of any market move. The Alchemy TrendDirection trailing stop is self-adaptive to the market's current volatility, therefore minimizing the initial risk while staying with the trend.
Additionally this indicator package uses the Alchemy Strong Trend Entry module as strong trend detectors. They signal the strength of a developing trend and increase the reliability of a follow through of a previous reversal or breakout. When a strong trend is detected, the indicators color code the price bars and display an entry zone at a logical retracement area, which provides a better entry price into the direction of the new trend. This trend confirmation method eliminates a large percentage of whipsaws and filters out a significant amount of noise when the market is in a non-trending, consolidating phase. At the same time, they catch all major market moves.
The Alchemy TrendCatcher Charting Indicator (Alchemy TrendCatchC):
The TrendDirection module paints the price bars cyan in an uptrend and magenta in a down trend, which provides an overall trend direction. A trailing line keeps a trailing distance that is self adaptive to the market's volatility. Once the market penetrates the trailing line, the trend changes and marks a market reversal. When the Strong Trend Entry module detects a strong trending market after such a trend reversal, the price bars are colored with a thicker weight and separate dots display an entry zone. The most aggressive entry would be to enter the market when the thicker paint bars detect a strong trending market. A more conservative entry would be to enter into the direction of the trend when the market retraces back into the entry zone at which time, the portion of the bar that enters the entry zone is painted green for a long entry zone and painted red for a short entry zone.
The Alchemy TrendCatcher Complete indicator contains the following plots:
TrendDirection module:
Trailing stop dots: TD BullStop and TD BearStop.
Bullish paint bars: TD BullPB Hi and TD BullPB Lo.
Bearish paint bars: TD BearPB Hi and TD BearPB Lo.
Strong Trend Entry module:
Strong up trend paint bars: ST BullPB Hi and ST BullPB Lo.
Strong down trend paint bars: ST BearPB Hi and ST BearPB Lo.
Strong trend bullish entry paint bars: ST BullEntHi and ST BullEntLo.
Strong trend bearish entry paint bars: ST BearEntHi and ST BearEntLo.
Strong trend bullish entry 1 dots: ST BullEnt1
Strong trend bullish entry 2 dots: ST BullEnt2
Strong trend bearish entry 1 dots: ST BearEnt1
Strong trend bearish entry 2 dots: ST BearEnt2
Status module:
Status text: Status
Indicator Inputs:
|
|
Plotting: |
|
TD_ShowStop |
Enables/disables the TrendDirection trailing stop plot TD Stop. |
|
TD_ShowTrend |
Enables/disables the TrendDirection paint bars TD BullPB High and TD BullPB Low. |
|
TD_BarHigh |
Specifies the price to be used for the TrendDirection paint bar high prices. To paint the entire bar range, TD_BarHigh needs to be specified as high and TD_BarLow needs to be specified as low. To paint the candle body, TD_BarHigh needs to be specified as close and TD_BarLow needs to be specified as open. |
|
TD_BarLow |
Specifies the price to be used for the TrendDirection paint bar low prices. To paint the entire bar range, TD_BarHigh needs to be specified as high and TD_BarLow needs to be specified as low. To paint the candle body, TD_BarHigh needs to be specified as close and TD_BarLow needs to be specified as open. |
|
ST_ShowEntryZone |
Enables/disables the Strong Trend entry dots ST BullEntry1, ST BullEntry2, ST BearEntry1 and ST BearEntry2. |
|
ST_ShowTrendPaintBar |
Enables/disables the Strong Trend paint bars ST BullPB High, ST BullPB Low, ST BearPB High and ST BearPB Low. |
|
ST_ShowEntryPaintBar |
Enables/disables the Strong Trend Entry paint bars ST BullEntry PB High, ST BullEntry PB Low, ST BearEntry PB High and ST BearEntry PB Low. |
|
ST_BarHigh |
Specifies the price to be used for the Strong Trend paint bar high prices. To paint the entire bar range, ST_BarHigh needs to be specified as high and ST_BarLow needs to be specified as low. To paint the candle body, ST_BarHigh needs to be specified as close and ST_BarLow needs to be specified as open. |
|
ST_BarLow |
Specifies the price to be used for the Strong Trend paint bar low prices. To paint the entire bar range, ST_BarHigh needs to be specified as high and ST_BarLow needs to be specified as low. To paint the candle body, ST_BarHigh needs to be specified as close and ST_BarLow needs to be specified as open. |
|
PaintBarColoringMode |
With a setting of 1, all paint bars are colored as specified with their corresponding paint bar high color. With a setting of 2, all paint bars are colored as specified with their corresponding paint bar low color. With a setting of 3, for all up candles, all paint bars are colored as specified with their corresponding paint bar high color and for all down candles, all paint bars are colored as specified with their corresponding paint bar low color. |
|
ShowStatus |
Enables/disables the Status text which displays in the Status Line, Datatip and Data Window. With a setting of 1, the text color is automatically matched with its corresponding paint bar color and with a setting of 2, the text color is fixed based on its specified plot color. A setting of 0 disables the Status text. The text reads as follows: BullishTD, BearishTD, StrongUpTrend, StrongTrendBuy, BuyRetrace, SellRetrace, StrongDownTrend or StrongTrendSell. |
|
|
TrendDirection: |
|
TD_Length |
Specifies the number of trailing bars to include in the TrendDirection calculation. A setting of 0 disables the TrendDirection with all of its plots as well as its trend filter. |
|
TD_Factor |
Specifies the TrendDirection sensitvity factor. For a more long term trend calculation, this factor can be increased and for a more short term trend calculation, this factor can be decreased. A setting of 0 disables the TrendDirection with all of its plots as well as its trend filter. |
|
TD_Smoothing |
Specifies the smoothing factor of the TrendDirection calculations and the options are whole numbers from 1 through 6. |
|
TD_Range |
Specifies the range factor of the TrendDirection calculations and the options are whole numbers from 1 through 4. |
|
TD_Method |
Specifies the calculation method of the TrendDirection and the options are whole numbers from 1 through 4. |
|
TD_DetectStrategyPosition |
When enabled, the TrendDirection detects all strategy positions on the chart to stay in sync with these strategy positions. For example, when the TrendDirection displays bullish and a strategy enters a short position, the TrendDirection automatically reverses to bearish and starts its bearish calculation with this new short entry bar. |
|
TD_Filter |
When set to true, the indicator displays the bullish Strong Trend Paint Bars and entry dots only when the TrendDirection is bullish and vice versa, it displays the bearish Strong Trend Paint Bars and entry dots only when the TrendDirection is bearish. |
|
|
Strong Trend: |
|
ST_Price |
Specifies the price to be used for the Strong Trend calculation such as open, high, low or close. |
|
ST_Length |
Specifies the number of trailing bars to include in the Strong Trend calculation. |
|
ST_Factor |
Specifies the Strong Trend sensitivity factor. For a less sensitive Strong Trend calculation, this factor can be increased and for a more sensitive Strong Trend calculation, this factor can be decreased. |
|
ST_Method |
Specifies the calculation method of the Strong Trend and the options are whole numbers from 1 through 4. |
|
ST_UpType |
Specifies the method type for calculating a strong up trend whereas a setting of 1 is the most sensitive setting and a setting of 4 is the least sensitive setting that requires a much stronger up move before an uptrend is detected. The options are whole numbers from 1 through 4. |
|
ST_DnType |
Specifies the method type for calculating a strong down trend whereas a setting of 1 is the most sensitive setting and a setting of 4 is the least sensitive setting that requires a much stronger down move before a downtrend is detected. The options are whole numbers from 1 through 4. |
|
ST_BuyType |
Specifies the method type for signaling a strong trend buy entry paint bar as follows: With a setting of 1, the bar has to open within the buy entry zone. With a setting of 2, the high of the bar has to be within the buy entry zone. With a setting of 3, the low of the bar has to be within the buy entry zone. With a setting of 4, the bar has to close within the buy entry zone. |
|
ST_SellType |
Specifies the method type for signaling a strong trend sell entry paint bar as follows: With a setting of 1, the bar has to open within the sell entry zone. With a setting of 2, the high of the bar has to be within the sell entry zone. With a setting of 3, the low of the bar has to be within the sell entry zone. With a setting of 4, the bar has to close within the sell entry zone. |
|
ST_MinBars |
Specifies the minimum number of bars for a trend confirmation. |
|
ST_Retest |
Specifies the minimum factor for detecting a new strong trend. |
|
|
Alerts: |
|
TD_StopAlert |
Enables/disables the alert when the TrendDirection trailing stop changes. |
|
TD_BullTrendAlert |
Enables/disables the alert when the TrendDirection changes from a bearish to a bullish direction. |
|
TD_BearTrendAlert |
Enables/disables the alert when the TrendDirection changes from a bullish to a bearish direction. |
|
ST_BullTrendAlert |
Enables/disables the alert when the Strong Trend module changes from a bearish to a bullish direction. |
|
ST_BearTrendAlert |
Enables/disables the alert when the Strong Trend module changes from a bullish to a bearish direction. |
|
ST_BullEntryAlert |
Enables/disables the alert when the market enters the bullish strong trend entry zone. |
|
ST_BearEntryAlert |
Enables/disables the alert when the market enters the bearish strong trend entry zone. |
|
AlertDec |
Specifies the decimal points for price to display in the alert notification window. |
The Alchemy TrendCatcher RadarScreen Indicator (Alchemy TrendC C RS):
The Alchemy TrendCatcher RadarScreen module contains the following columns:
Status
Strong Trend Entry module:
ST UpTrend, ST DnTrend, STBuy, ST Sell, ST Buy1, ST Buy2, ST Sell1 and ST Sell2
TrendDirection module:
TD UpTrend, TD DnTrend, TD BullStop and TD BearStop,
Indicator Inputs:
|
|
Text: |
|
TD_UpTrendText |
Specifies the text to be displayed in the TD UpTrend column. This is a string input which needs to be within quotation marks. |
|
TD_DnTrendText |
Specifies the text to be displayed in the TD DnTrend column. This is a string input which needs to be within quotation marks. |
|
ST_UpTrendText |
Specifies the text to be displayed in the ST UpTrend column. This is a string input which needs to be within quotation marks. |
|
ST_DnTrendText |
Specifies the text to be displayed in the ST DnTrend column. This is a string input which needs to be within quotation marks. |
|
ST_BuyText |
Specifies the text to be displayed in the ST Buy column. This is a string input which needs to be within quotation marks. |
|
ST_SellText |
Specifies the text to be displayed in the ST Sell column. This is a string input which needs to be within quotation marks. |
|
StatusText_BullishTD |
Specifies the text to be displayed in the Status column when the TD UpTrend cell is displayed. This is a string input which needs to be within quotation marks. When blank (""), the status text for the TD UpTrend won't be displayed. The cell background for this status is automatically colored with the color as specified with the input TD_UpTrendBackGrdColor. |
|
StatusText_BearishTD |
Specifies the text to be displayed in the Status column when the TD DnTrend cell is displayed. This is a string input which needs to be within quotation marks. When blank (""), the status text for the TD DnTrend won't be displayed. The cell background for this status is automatically colored with the color as specified with the input TD_DnTrendBackGrdColor. |
|
StatusText_StrongUpTrend |
Specifies the text to be displayed in the Status column when the ST UpTrend cell is displayed. This is a string input which needs to be within quotation marks. When blank (""), the status text for the ST UpTrend won't be displayed. The cell background for this status is automatically colored with the color as specified with the input ST_UpTrendBackGrdColor. |
|
StatusText_StrongTrendBuy |
Specifies the text to be displayed in the Status column when the ST Buy cell is displayed. This is a string input which needs to be within quotation marks. When blank (""), the status text for the ST Buy won't be displayed. The cell background for this status is automatically colored with the color as specified with the input ST_BuyBackGrdColor. |
|
StatusText_StrongDownTrend |
Specifies the text to be displayed in the Status column when the ST DnTrend cell is displayed. This is a string input which needs to be within quotation marks. When blank (""), the status text for the ST DnTrend won't be displayed. The cell background for this status is automatically colored with the color as specified with the input ST_DnTrendBackGrdColor. |
|
StatusText_StrongTrendSell |
Specifies the text to be displayed in the Status column when the ST Sell cell is displayed. This is a string input which needs to be within quotation marks. When blank (""), the status text for the ST Sell won't be displayed. The cell background for this status is automatically colored with the color as specified with the input ST_SellBackGrdColor. |
|
StatusText_StrongTrendBuyRetrace |
Specifies the text to be displayed in the Status column when the ST Buy1 cell is displayed but the price has not entered the buy zone as of yet. This is a string input which needs to be within quotation marks. When blank (""), the status text for this status won't be displayed. The cell background for this status is automatically colored with the color as specified with the input ST_BuyRetraceBackGrdColor. |
|
StatusText_StrongTrendSellRetrace |
Specifies the text to be displayed in the Status column when the ST Sell1 cell is displayed but the price has not entered the sell zone as of yet. This is a string input which needs to be within quotation marks. When blank (""), the status text for this status won't be displayed. The cell background for this status is automatically colored with the color as specified with the input ST_SellRetraceBackGrdColor. |
|
|
Colors: |
|
TrailBullBackGrdColor |
Specifies the cell background color of the TD BullStop column. |
|
TrailBearBackGrdColor |
Specifies the cell background color of the TD BearStop column. |
|
TD_UpTrendBackGrdColor |
Specifies the cell background color of the TD UpTrend column. |
|
TD_DnTrendBackGrdColor |
Specifies the cell background color of the TD DnTrend column. |
|
ST_UpTrendBackGrdColor |
Specifies the cell background color of the ST UpTrend column. |
|
ST_DnTrendBackGrdColor |
Specifies the cell background color of the ST DnTrend column. |
|
ST_BuyBackGrdColor |
Specifies the cell background color of the ST Buy column. |
|
ST_SellBackGrdColor |
Specifies the cell background color of the ST Sell column. |
|
ST_BuyRetraceBackGrdColor |
Specifies the cell background color to be displayed in the Status column when the ST Buy1 cell is displayed but the price has not entered the buy zone as of yet. |
|
ST_SellRetraceBackGrdColor |
Specifies the cell background color to be displayed in the Status column when the ST Sell1 cell is displayed but the price has not entered the sell zone as of yet. |
|
ST_Buy1BackGrdColor |
Specifies the cell background color of the ST Buy1 column. |
|
ST_Buy2BackGrdColor |
Specifies the cell background color of the ST Buy2 column. |
|
ST_Sell1BackGrdColor |
Specifies the cell background color of the ST Sell1 column. |
|
ST_Sell2BackGrdColor |
Specifies the cell background color of the ST Sell1 column. |
|
|
TrendDirection: |
|
TD_Length |
Specifies the number of trailing bars to include in the TrendDirection calculation. A setting of 0 disables the TrendDirection with all of its plots as well as its trend filter. |
|
TD_Factor |
Specifies the TrendDirection sensitvity factor. For a more long term trend calculation, this factor can be increased and for a more short term trend calculation, this factor can be decreased. A setting of 0 disables the TrendDirection with all of its plots as well as its trend filter. |
|
TD_Smoothing |
Specifies the smoothing factor of the TrendDirection calculations and the options are whole numbers from 1 through 6. |
|
TD_Range |
Specifies the range factor of the TrendDirection calculations and the options are whole numbers from 1 through 4. |
|
TD_Method |
Specifies the calculation method of the TrendDirection and the options are whole numbers from 1 through 4. |
|
TD_Filter |
When set to true, the indicator displays the bullish Strong Trend Paint Bars and entry dots only when the TrendDirection is bullish and vice versa, it displays the bearish Strong Trend Paint Bars and entry dots only when the TrendDirection is bearish. |
|
|
Strong Trend: |
|
ST_Price |
Specifies the price to be used for the Strong Trend calculation such as open, high, low or close. |
|
ST_Length |
Specifies the number of trailing bars to include in the Strong Trend calculation. |
|
ST_Factor |
Specifies the Strong Trend sensitivity factor. For a less sensitive Strong Trend calculation, this factor can be increased and for a more sensitive Strong Trend calculation, this factor can be decreased. |
|
ST_Method |
Specifies the calculation method of the Strong Trend and the options are whole numbers from 1 through 4. |
|
ST_UpType |
Specifies the method type for calculating a strong up trend whereas a setting of 1 is the most sensitive setting and a setting of 4 is the least sensitive setting that requires a much stronger up move before an uptrend is detected. The options are whole numbers from 1 through 4. |
|
ST_DnType |
Specifies the method type for calculating a strong down trend whereas a setting of 1 is the most sensitive setting and a setting of 4 is the least sensitive setting that requires a much stronger down move before a downtrend is detected. The options are whole numbers from 1 through 4. |
|
ST_BuyType |
Specifies the method type for signaling a strong trend buy entry paint bar as follows: With a setting of 1, the bar has to open within the buy entry zone. With a setting of 2, the high of the bar has to be within the buy entry zone. With a setting of 3, the low of the bar has to be within the buy entry zone. With a setting of 4, the bar has to close within the buy entry zone. |
|
ST_SellType |
Specifies the method type for signaling a strong trend sell entry paint bar as follows: With a setting of 1, the bar has to open within the sell entry zone. With a setting of 2, the high of the bar has to be within the sell entry zone. With a setting of 3, the low of the bar has to be within the sell entry zone. With a setting of 4, the bar has to close within the sell entry zone. |
|
ST_MinBars |
Specifies the minimum number of bars for a trend confirmation. |
|
ST_Retest |
Specifies the minimum factor for detecting a new strong trend. |
|
|
Alerts: |
|
TD_StopAlert |
Enables/disables the alert when the TrendDirection trailing stop changes. |
|
TD_BullTrendAlert |
Enables/disables the alert when the TrendDirection changes from a bearish to a bullish direction. |
|
TD_BearTrendAlert |
Enables/disables the alert when the TrendDirection changes from a bullish to a bearish direction. |
|
ST_BullTrendAlert |
Enables/disables the alert when the Strong Trend module changes from a bearish to a bullish direction. |
|
ST_BearTrendAlert |
Enables/disables the alert when the Strong Trend module changes from a bullish to a bearish direction. |
|
ST_BullEntryAlert |
Enables/disables the alert when the market enters the bullish strong trend entry zone. |
|
ST_BearEntryAlert |
Enables/disables the alert when the market enters the bearish strong trend entry zone. |
|
AlertDec |
Specifies the decimal points for price to display in the alert notification window. |
Strategy Indicators
The Alchemy Strategy Alert Indicator (Alchemy StrategyAlrt)
The Alchemy Strategy Alert Indicator generates real time alerts when a strategy that is applied to the same chart. enters long, short or exits an existing position.
Indicator Input:
|
ShowPlot: |
Enables/disables the plots that display the entry price when a strategy that is applied to the same chart enters a position as well as the exit price when a strategy that is applied to the same chart exits a position |
The Alchemy Strategy Entry Indicator (Alchemy StratEntry) Available for TradeStation 9/10 only!
The Alchemy Strategy Entry Indicator places order macros to buy long or sell short when a when a strategy that is applied to the same chart. enters long or short.
Indicator Input:
|
AccountNumber: |
Specifies the trading account number that the indicator looks for placing orders. This is a string input which always requires the quotation marks and it is caps sensitive. |
Breakout
Whether it’s new highs or new lows, you will always know when it happens with Trading Alchemy’s breakout indicator. This Indicator detects price breakouts on a user-defined basis. The indicator gives alerts whenever a breakout occurs and labels the actual breakout points on your chart.
The price breakout is one of the simplest and most powerful concepts in trading. It occurs when price moves forcefully out of a consolidation or trading range (a period of relatively narrow, sideways price action) or moves above or below an established price level (support or resistance area), initiating either temporary follow-through or a sustained trend.
The act of pushing to new highs or lows, especially if the price level in question has been tested numerous times in the past, is evidence of strong momentum and suggests the market has the potential to continue in the direction of the breakout. The basic theory behind breakout trading is that a market making new highs (and with potential for further price gain) is exhibiting strength and should be bought, while a market making new lows (and with potential for further price decline) is exhibiting weakness and should be sold.
For example, the reason new 52 week highs or lows in stocks are so commonly referenced is because of the implied significance of price breaking through these levels. This concept of price movement is valid on intraday time frames as well as daily or monthly time frames.
Traders using breakouts are basing their trades on the following principle: If price momentum is strong enough (either up or down) to push through a significant technical level, there is a good chance price will continue in that direction for at least some time. As a result, these price levels represent logical trade entry and exit points with well-defined risk, both for traders who expect follow through in the direction of the breakout and for traders who want to fade breakouts.
Price breakouts are typically used as trend following signals. The greater the number of price bars used to determine the breakout, the longer-term trend the trading system will reflect and attempt to exploit. For example, a 20 day (or 20 bar) breakout would capture shorter trends than a 40 day breakout, which in turn would reflect shorter trends than an 80 day breakout setting. Generally, in terms of trend-following approaches, the longer-term the breakout, the more significant the price move and the greater the likelihood of a sustained follow through of the breakout.
Breakout trading can also simplify risk control because stop-loss levels are often easy to identify. For example, if price breaks out of the upside of an established trading range, traders who go long on the breakout can place protective stops in a number of technically logical places, in relation to the trading range. First, the stop could be placed below the low of the trading range. Second, a more conservative stop placement would be the mid-point of the trading range at the time of the breakout. Finally, the most conservative alternative is a stop just below the original breakout level, which might be used by a very short-term trader.
Because of the possibility of false moves at popular breakout levels, many traders looking to capture trending moves use confirming signals from price action itself or through the use of other indicators to improve the likelihood of success. For example, after an initial upside breakout, the trader may wait for the market to stay above the breakout level (or close above it) for a certain time, or penetrate it by a certain percentage. Such techniques can delay entry and limit profit potential, but they can also cut down on false breakout signals. A great variety of entry and exit techniques can be developed and tested using the Alchemy Breakout Indicator.
The Alchemy Breakout Indicator
To view chart, go to: http://www.tradingalchemy.com/ViewChartsBreakout.htm
User Defined Inputs:
HighPrice: Specifies the price to be used for calculating the break out high.
LowPrice: Specifies the price to be used for calculating the break out low.
Length: This user-defined input determines the minimum required number of bars for a breakout high or a breakout low. It is defaulted to 20 bars.
PltBrk: Allows you to disable the breakout marks. A setting of "True" enables the marks and a setting of "False" disables the marks. It is defaulted to True.
HighAlrt: Allows you to disable the alert when the market breaks through the high. A setting of "True" enables the alert and a setting of "False" disables the alert. It is defaulted to True.
LowAlrt: Allows you to disable the alert when the market breaks through the low. A setting of "True" enables the alert and a setting of "False" disables the alert. It is defaulted to True.
MidAlert: Allows you to disable the alert when the market breaks the mid point. A setting of "True" enables the alert and a setting of "False" disables the alert. It is defaulted to True.
Decimal: Allows you to adjust the number of decimals in which the text for the daily high, low and mid point values display. It is defaulted to 2 decimals.
Fraction: If you are applying the Alchemy Breakout indicator to any symbol that reads in fractions, such as bonds, you can set this input to True and the displayed text for daily high, low and mid point values will read in fractions (e.g. 106^30). For symbols that trade in ½ ticks such as the 10 year US Treasury Notes, the “Decimal” input needs to be set to a negative number.
Bar Counter Indicator (Alchemy BarCounter)
The Alchemy Bar Counter indicator counts the number of bars within a specified period.
Indicator Inputs:
| StartTme: | Specifies the start period time. The time is specified in military time without the colon. For example, 1:00 PM is expressed as 1300. With a setting of 0 the start period time is automatically the first bar of the new calendar date. |
| EndTme: | Specifies the end period time. The time is specified in military time without the colon. For example, 1:00 PM is expressed as 1300. With a setting of 0 the end time is automatically disabled. |
| StartDate_YYYYMMDD: | Specifies the start period date. The date is specified as the year, then the month and then the day. For example, February 25th, 2014 is expressed as 20140225. With a setting of 0 the current date is used as the start period date. |
| EndDate_YYYYMMDD: | Specifies the end period date. The date is specified as the year, then the month and then the day. For example, February 25th, 2014 is expressed as 20140225. With a setting of 0 the current date is used as the end period date. |
| PeriodColor: | Specifies the color when the bar count is within the specified period. |
| PastPeriodColor: | Specifies the color when the bar count is past the specified period. |
Bar Pattern Analysis
Price bars, through the distribution of prices, leave footsteps in the sand. Get inside market action and know, bar by bar, what the price bars are telling you. The Alchemy Bar Pattern Analysis indicator identifies and labels price bars according to bullish or bearish patterns. In addition, the indicator identifies price bars that act as support and resistance or indicate unusual or significant price movements.
Bar Pattern Analysis is a basic but often overlooked concept in trading and can be used by all traders. It makes no difference whether you are a long-term trader or a daytrader, understanding bar pattern analysis and incorporating it into your trading will give you a better understanding of the relationship between current price, price history and the most probable future price movement.
The Alchemy Bar Pattern Analysis indicator automatically determines the various bar patterns, then labels and color codes the bars for easy identification. You may use the Expert Commentary Tool provided in your TradeStation software to obtain a quick reference and definition of each bar pattern.
Keep in mind that bar pattern analysis is considered by traders to be more reliable on longer time–frame charts such as weekly, daily and 90 or 60 minute intra-day charts. Shorter time-frame charts give less reliable indications.
The Alchemy Bar Pattern indicator will identify the following price bar patterns:
Green Mark at the Close of the Bar
Bullish Bar:
The Bullish Bar occurs when the closing price of the bar is above the opening price of that bar and closes in it’s upper range . A bullish bar indicates that there was upward price momentum when the bar closed and further increases in price are likely.
Strong Bullish Bar:
A Strong Bullish Bar is the same as the Bullish Bar except that the close price of the bar is very near the high of the price bar. The closer the close of the bar is to the high of the bar, the more likely the market will continue to rise.
Outside Bullish Bar:
An Outside Bullish Bar occurs when the high and low of the bar exceeds the high and low of the previous bar and price closes near the upper area of the bar. The low of the Outside Bullish Bar is commonly used by traders as an important area of support in an uptrending market.
Bullish Reversal Bar:
A Bullish Reversal Bar occurs when price makes a lower low and a lower high than the previous bar and closes above the open of the current bar and in the upper quarter of the current bar. A Bullish Reversal Bar indicates a possible reversal to the upside, at least for the short-term.
Double Bottom Bar:
A double bottom bar is formed when the low of the current bar is equal to the low of the previous bar and the current bar closes near its high. A double bottom can be an uptrend reversal signal or can confirm the end of the retracement countertrend down move in an uptrending market.
Red Mark at the Close of the Bar
Bearish Bar:
The Bearish Bar occurs when the closing price of the bar is below the opening price of that bar and closes in it’s lower range. A Bearish Bar indicates that there was downward price momentum when the bar closed and further decreases in price are likely.
Strong Bearish Bar:
A Strong Bearish Bar is the same as the Bearish Bar except that the close of the bar is very near the low of the price bar. The closer the close of the bar is to the low of the bar, the more likely the market will continue to decline.
Outside Bearish Bar:
An Outside Bearish Bar occurs when the high and low of the bar exceeds the high and low of the previous bar and price closes near the lower area of the bar. The high of the Outside Bearish Bar is commonly used by traders as an important area of resistance in a downtrending market.
Bearish Reversal Bar:
A Bearish Reversal Bar occurs when price makes a higher high and a higher low than the previous bar and closes below the open of the current bar and in the lower quarter of the current bar. A Bearish Reversal Bar indicates a possible reversal to the downside, at least for the short-term.
Double Top Bar:
A double top bar is formed when the high of the current bar is equal to the high of the previous bar and the current bar closes near its low. A double top can be a downtrend reversal signal or can confirm the end of the retracement countertrend up move in a downtrending market.
White Marks at the High and the Low of the Bar
Inside Bar:
An Inside Bar occurs when the high and low are both inside the high and low of the previous bar. An Inside Bar indicates a possible reversal in the market when near a previous high or low, or can indicate a continuation of trend if the market is trending. Volatility can increase after an Inside Bar. The high and low of the Inside Bar are commonly used as breakout points by traders.
Cyan Marks at the High and the Low of the Bar
Largest Range Bar:
A Largest Range Bar occurs when the high to low range of the bar is much greater than the average range of the most recent bars. Many times this bar becomes an Outside Bar. The high and low of a Largest Range Bar can act as resistance or support for the market.
The Alchemy BarPatterns Indicator
For TradeStation 4.0 or SuperCharts RT, use the following indicators:
Alchemy RangeBars
Alchemy TrendBars
To view chart, go to: http://www.tradingalchemy.com/ViewChartsBarPatterns.htm
User Defined Inputs for the Alchemy BarPatterns Indicator:
| BullAlrt: | Allows you to disable the alert for a bullish bar. A setting of "True" enables the alert and a setting of "False" disables the alert. It is defaulted to True. |
| BearAlrt: | Allows you to disable the alert for a bearish bar. A setting of "True" enables the alert and a setting of "False" disables the alert. It is defaulted to True. |
| InAlrt: | Allows you to disable the alert for an inside bar. A setting of "True" enables the alert and a setting of "False" disables the alert. It is defaulted to True. |
| OutAlrt: |
Allows you to disable the alert for an outside bar. A setting of "True" enables the alert and a setting of "False" disables the alert. It is defaulted to True. |
| ShowText: | A positive value enables the text objects and a setting of 0 disables the text objects. |
| TextVert: | Allows you to vertically adjust the displayed text for the bullish, bearish, inside and outside bar. A greater value will raise the displayed text for the bullish, bearish, inside and outside bar. A smaller value will lower the displayed text for the bullish, bearish, inside and outside bar. It is defaulted to 0 ticks. |
| TextHor: | Allows you to horizontally adjust the displayed text for the bullish, bearish, inside and outside bar. Each increment will move the text one bar further to the left. It is defaulted to 1 bar. |
The Alchemy BarPatterns Complete Indicator (Alchemy BarPattCompl)
The Alchemy BarPatterns Complete indicator displays separate show me dots and customizable text labels for each of the following bar patterns:
Range Bar Patterns: weak range bars, inside bars, weak inside bars, outside bars and expanded range bars.
Bullish Bar Patterns: bullish bars, strong bullish bars, extreme bullish bars, bullish reversal bars, double low bars, triple low bars and outside bullish bars.
Bearish Bar Patterns: bearish bars, strong bearish bars, extreme bearish bars, bearish reversal bars, double high bars, triple high bars and outside bearish bars.
For a detailed explanation of this indicator, please refer to the indicator inputs explanation below.
Indicator Inputs:
There are a total of 19 bar patterns and instead of listing each bar pattern input in the input description, each type of input is explained only once. The name of the bar pattern is indicated as ...nbp...
|
|
Plot inputs: |
|
|
|
|
Show...nbp...Plot |
Enables/disables each bar pattern show me dot plot. |
|
|
|
|
|
PlotIncrement, ...nbp...PlotOffset, and ...nbp...Price: |
|
|
The show me dot plots are offset from the bar price as specified with the inputs ...nbp...Price, based on the ...nbp...PlotOffset multiplied by PlotIncrement. For example, with PlotIncrement set to range*0.1, WeakRangePrice set to high, WeakRangePlotOffset set to 2 and a current bar range of 1, the WeakRange show me dot will be placed 2 times 10 percent of 1 point above the high of the bar. The PlotIncrement input can also be used as a fixed distance such as 0.25 points or 2*AlchemyPriceTicks which would be equal to 2 ticks, pips or cents. In order to move the show me dot below a bar, the PlotOffset inputs need to be set to a negative number. As another example, in order to move the bullish show me dot 2 ticks below the low of a bar, the following input settings would be required: PlotIncrement=2*AlchemyPriceTicks, BullishPlotOffset=-2, BullishPrice=low |
|
|
|
|
|
Text inputs: |
|
|
|
|
|
TextSeparator and ...nbp...Text: |
|
|
The inputs ...nbp...Text specifies the text label for each bar pattern and the input TextSeparator specifies the separator text between each bar pattern text. These inputs are string inputs and they always needs to have quotation marks. For example, with a sTextSeparator etting of "+", each bar pattern text will be separated with +. As a specific example, with BullishText set to "B" and OutsideBullishText set to "OB", a bullish bar that is also an outside bullish bar would be labeled as B+OB. The text separator can also be used with spaces. For example, to separate the labels with one space this input would be specified as " ". To disable the text for a specific bar pattern the ...nbp...Text can be set to "". |
|
|
|
|
|
Range text, bullish text and bearish text: |
|
|
The bar patterns are grouped into 3 text groups such as range text, bullish text and bearish text as outlined above. Instead of listing each bar pattern group input in the input description, each bar pattern group input is explained only once. The name of the bar pattern group is indicated as ...nbpg.... The text group label colors are controlled with the color plots RangeBars, BullishBars and BearishBars under Format Indicator > Color. Please note that when making a color change, the indicator needs to be disabled and then re-enabled again before the color changes will take affect. |
|
|
|
|
|
TextIncrement, ...nbpg...TextPrice and ...nbpg...TextOffset: |
|
|
The text labels are offset from the bar price as specified with the inputs ...nbpg...TextPrice, based on the ...nbpg...TextOffset multiplied by TextIncrement. For example, with TextIncrement set to range*0.1, RangeTextPrice set to high, RangeTextOffset set to 2 and a current bar range of 1, the range text label will be placed 2 times 10 percent of 1 point above the high of the bar. The TextIncrement input can also be used as a fixed distance such as 0.25 points or 2*AlchemyPriceTicks which would be equal to 2 ticks, pips or cents. In order to move the show me dot below a bar, the TextOffset inputs need to be set to a negative number. As another example, in order to move the bullish text 2 ticks below the low of a bar, the following input settings would be required: TextIncrement=2*AlchemyPriceTicks, BullishTextOffset=-2, BullishTextPrice=low |
|
|
|
|
...nbpg...LeftSpace |
With this input, additional blank space can be added to the left of the text labels for the purpose of moving the text labels into the extra space to the right of the last bar as created through Format > Space to the Right. For this purpose, both inputs ...nbpg...TextHorizontalOffset and ...nbpg...TextHorizontalAlignment need to be set to 0. Please note that this is a string input and the quotation marks need to remain. For example, to move the text labels 10 spaces to the right of the most recent bar, the input value would be as follows " " Again, in order for the text object to be visible, the extra space needs to be created between the last bar and the right price axis via Format > Space to the Right |
|
...nbpg...HorizontalOffset |
Specifies the number of bars to move the text labels to the left of the current bar. |
|
...nbpg...HorizontalAlignment |
Specifies the horizontal alignment of the text labels, whereas 2 = center aligned, 1 = left aligned, 0 = right aligned. |
|
...nbpg...VerticalAlignment |
Specifies the vertical alignment of the text whereas 2 = center aligned, 1 = top aligned, 0 = bottom aligned |
|
|
|
|
|
RemoveText and TextRemovePrice: |
|
|
With RemoveText set to true, the text group labels will be moved to the price as specified with the input TextRemovePrice when a text group label does not apply to the current bar. When applied on a price chart, a TextRemovePrice input setting of 0, automatically moves the text group label out of sight and makes it invisible. With RemoveText set to false, each text group label will stay on the last bar where it occurred. |
|
|
|
|
|
Alert inputs: |
|
|
|
|
...nbp...Alert |
Enables/disables the alert notification for each bar pattern. |
|
ShowAlchemyCommentary |
With a setting of -1, the analysis commentary window displays the alert notification text for each bar. A setting of 0 disables the analysis commentary window text. With a setting of 1, the analysis commentary window displays an extensive bar pattern commentary for each bar. With a setting of 2, the analysis commentary window displays the alert notification text and an extensive bar pattern commentary for each bar. |
|
|
|
|
|
Range Bar Parameter inputs: |
|
|
|
|
ShowRangeBars |
Enables/disables all range bar patterns |
|
ExpandedRangeLength |
Specifies the number of bars to look back for identifying an expanded range bar pattern. |
|
ExpandedRangePercent |
Specifies the minimum bar range percentage for qualifying as an expanded range bar pattern. |
|
|
|
|
|
Trend Bar Parameter inputs: |
|
|
|
|
ShowTrendBars |
Enables/disables all trend bar patterns |
|
TrendingClosingRangePercent |
Specifies the minimum closing range percentage within its high and low for qualifying as a bullish or bearish bar pattern. |
|
NeutralClosingRangePercent |
Specifies the closing range percentage for qualifying as a neutral bar pattern. |
|
|
|
|
AlchemyBearishBar identifies a bearish bar. If the criteria of a bearish bar is met, the AlchemyBearishBar function returns 1, otherwise a -1 will be returned. |
|
|
AlchemyBearReversal identifies a bearish reversal bar. If the criteria of a bearish reversal bar is met, the AlchemyBearReversal function returns 1, otherwise a -1 will be returned. |
|
|
AlchemyBullishBar identifies a bullish bar. If the criteria of a bullish bar is met, the AlchemyBullishBar function returns 1, otherwise a -1 will be returned. |
|
|
AlchemyBullReversal identifies a bullish reversal bar. If the criteria of a bullish reversal bar is met, the AlchemyBullReversal function returns 1, otherwise a -1 will be returned. |
|
|
AlchemyDoubleHighBar identifies a double top bar. If the criteria of a double top bar is met, the AlchemyDoubleHighBar function returns 1, otherwise a -1 will be returned. |
|
|
AlchemyDoubleLowBar identifies a double bottom bar. If the criteria of a double bottom bar is met, the AlchemyDoubleLowBar function returns 1, otherwise a -1 will be returned. |
|
|
AlchemyExpandedRange identifies an expanded range bar. If the criteria of an expanded range bar is met, the AlchemyExpandedRange function returns 1, otherwise a -1 will be returned. |
|
|
AlchemyInsideBar identifies an inside bar. If the criteria of an inside bar is met, the AlchemyInsideBar function returns 1, otherwise a -1 will be returned. |
|
|
AlchemyOutsideBar identifies an outside bar. If the criteria of an outside bar is met, the AlchemyOutsideBar function returns 1, otherwise a -1 will be returned |
|
|
AlchemyTripleHighBar identifies a triple top bar. If the criteria of a triple top bar is met, the AlchemyTripleHighBar function returns 1, otherwise a -1 will be returned. |
|
|
AlchemyTripleLowBar identifies a triple bottom bar. If the criteria of a triple bottom bar is met, the AlchemyTripleLowBar function returns 1, otherwise a -1 will be returned. |
|
|
AlchemyWeakInsideBar identifies a weak inside bar. If the criteria of a weak inside bar is met, the AlchemyWeakInsideBar function returns 1, otherwise a -1 will be returned. |
|
|
AlchemyWeakRangeBar identifies an weak range bar. If the criteria of a weak range bar is met, the AlchemyWeakRangeBar function returns 1, otherwise a -1 will be returned |
The Alchemy Bar Value Comparison Indicator (Alchemy BarValueComp)
The Alchemy Bar Value Comparison Indicator displays a text that shows the values of a specified oscillator or indicator over the last specified number of bars. This gives a reading of an oscillator or indicator without having to plot it on the chart.
Indicator Inputs:
|
Price: |
Specifies the price, oscillator or indicator to be used for displaying the values. When using an oscillator or indicator, the corresponding function for this oscillator or indicator can be pasted into this input through the EasyLanguage Dictionary button. |
|
NumberBars: |
Specifies the number of bars back to display the price values, whereas a setting of 2 displays the values in the following sequence: 2 bars ago, then 1 bar ago, then the current bar. |
|
TextPrice: |
Specifies the price as to where to anchor the text to. |
|
HorizontalAlignment: |
Specifies the horizontal alignment of the text object, whereas a value of 0 results in a right horizontal alignment, a value of 1 results in a left horizontal alignment and a value of 2 results in a centered horizontal alignment. |
|
VerticalAlignment: |
Specifies the vertical alignment of the text object, whereas a value of 0 results in a bottom vertical alignment, a value of 1 results in a top vertical alignment and a value of 2 results in a centered vertical alignment. |
|
Decimal: |
Specifies the decimal point to display the prices with. |
|
PriceName: |
Specifies the name of the oscillator, indicator or price to be displayed to the left of the price values. This is a text input which needs to be bracketed with quotation marks. In order to not display any name description, this input can be set to "". |
|
LeftSpace: |
Specifies the number of spaces to place to the left of the text object. With this feature, the text object can be moved to the right of the current price bar without interfering with any price bars. This is a text string input and the blank spaces need to stay within quotation marks. The more blank spaces are inserted into this input, the further the text object will move to the right, away from the current price bar. Please note that the blank space to the right needs to be created on the chart by setting enough bars to the right under Format > Space to the Right, otherwise, the text object won't be visible. |
|
ConnectCharacter: |
Specifies the character to be placed in between, for separating each bar's value. This is a text input which needs to be bracketed with quotation marks. |
|
MoveIntraBar: |
When set to true, the text object moves up and down as the price as specified with the input TextPrice changes intra-bar and when set to false, the text object re-adjusts its vertical position only at the close of each bar. Please note that this setting does not affect the actual price value updates for the current bar. |
|
HorizontalOffset: |
Specifies the number of bars to move this text object to the left of the current price bar. |
The text color is controlled by the plot "TextColor" under Format Indicator > Color. Please note that when making a color change, the indicator needs to be disabled and then re-enabled again before the color changes will take affect.
Multiple Moving Averages Crossover Indicators
Detect momentum changes in the market with Trading Alchemy’s Crossover Indicator. Take the lag out of spotting moving average crossovers. Know for certain and in real-time the exact point when the moving averages cross. The Alchemy Crossover Indicator fills an important void in the standard TradeStation set of indicators. This indicator gives you the flexibility to combine or mix different types of moving averages together with a crossover feature. In addition, the indicator labels and provides an alert whenever an actual moving average crossover occurs.
The Alchemy Multiple Moving Averages Crossover Indicator was designed to allow a trader to take advantage of the various types of moving averages available in TradeStation and combine them into a 2 line or 3 line moving average indicator with a crossover feature. Currently, different types of moving averages i.e.; simple, exponential, weighted, etc., cannot be mixed with the standard set of indicators in a crossover feature. The Alchemy Multiple Moving Averages Crossover Indicator removes that limitation and allows any combination of moving averages to be used with a crossover alert feature. This gives the trader much more flexibility in defining and observing moving average crossovers.
Moving averages are one of the oldest and most used technical indicators in existence. Traders can use the Alchemy Multiple Moving Averages Crossover Indicator to customize their moving average crossovers with all the available moving averages included in TradeStation.
Many traders use moving averages and crossings of different moving averages to help them determine trend changes or the strength of a trend. For example, using a 2 line simple moving average with lengths of 5 for the fast average and 20 for the slow, a cross of the 5 period moving average up through the 20 period would signal the possibility of a bullish trend change. Also, if the 5 period crossed up through the 20 period and began to separate and continue moving further away from the 20 period average, this would indicate a strengthening trend. A popular moving average method is the use of 3 moving averages with different lengths. Use the flexibility of the Alchemy Multiple Moving Averages Crossover Indicator to customize and monitor your own moving average method.
The Alchemy MvgAvg2Line Indicator
The Alchemy MvgAvg2Line indicator contains a 2 line moving average cross plot as well as a separate optional ShowMe dot and/or paint bar which display when the price bars' high and low touches both moving averages and either closes bullish or bearish. The moving average lines contain various coloring features based on their slope or their relative positioning. For all of the details, please reference the indicator inputs description below. The sloping or MACD coloring of the moving averages can be controlled through the Format Indicator > Color window with the color plots. Please note that when making a color change, the indicator needs to be disabled and then re-enabled again before the color changes will take affect.
To view chart, go to: http://www.tradingalchemy.com/ViewChartsMovingAverages.htm
Indicator Inputs:
|
Avg1Name |
Optional input to display the name of the first moving average in the status line. This is a string input which needs to have a quotation mark at the beginning and at the end. |
|
Avg1Name |
Optional input to display the name of the second moving average in the status line. This is a string input which needs to have a quotation mark at the beginning and at the end. |
|
Price1 |
Specifies the price for the first moving average. With Average1Type set to 0, a formula or an EasyLanguage function can be typed into this input to specify line 1. |
|
Price2 |
Specifies the price for the second moving average. With Average2Type set to 0, a formula or an EasyLanguage function can be typed into this input to specify line 2. |
|
Length1 |
This user-defined input determines the number of bars over which the first moving average is calculated. |
|
Length2 |
This user-defined input determines the number of bars over which the second moving average is calculated. |
|
Factor1: |
This input is activated when the first moving average is specified as an exponential moving average and a setting of 1 returns a Wilders Smoothing Moving Average and a setting of 2 returns a standard exponential moving average. The Factor can be specified as any number and it increases the reaction of the moving average as the Factor is increased, therefore making it a faster moving average with a higher Factor. |
|
Factor2: |
This input is activated when the second moving average is specified as an exponential moving average and a setting of 1 returns a Wilders Smoothing Moving Average and a setting of 2 returns a standard exponential moving average. The Factor can be specified as any number and it increases the reaction of the moving average as the Factor is increased, therefore making it a faster moving average with a higher Factor. |
|
Smoothing1: |
This input is activated when the first moving average is specified as an exponential moving average and a setting of 0 returns a Wilders Smoothing Moving Average and a setting of 1 returns a standard exponential moving average. The Smoothing can be specified as any number and it smooths the moving average as the Smoothing is increased, therefore making it a slower moving average with a higher Smoothing. |
|
Smoothing2: |
This input is activated when the second moving average is specified as an exponential moving average and a setting of 0 returns a Wilders Smoothing Moving Average and a setting of 1 returns a standard exponential moving average. The Smoothing can be specified as any number and it smooths the moving average as the Smoothing is increased, therefore making it a slower moving average with a higher Smoothing. |
|
Average1Type |
This input determines the type of moving average for Line1. A setting of 0 uses the formula as specified with Price1, a setting of 1 uses a simple moving average, a setting of 2 uses an exponential moving average, a setting of 3 uses a weighted moving average, a setting of 4 uses a triangular moving average, a setting of 5 uses a Mid Keltner, a setting of 6 uses a Hull moving average and a setting of 7 uses a MAMA moving average (Price1=Price, Length1=FastLimit, Length2=SlowLimit) |
|
Average2Type |
This input determines the type of moving average for Line2. A setting of 0 uses the formula as specified with Price2, a setting of 1 uses a simple moving average, a setting of 2 uses an exponential moving average, a setting of 3 uses a weighted moving average, a setting of 4 uses a triangular moving average, a setting of 5 uses a Mid Keltner, a setting of 6 uses a Hull moving average and a setting of 7 uses a FAMA moving average (Price1=Price, Length1=FastLimit, Length2=SlowLimit) |
|
Displace1 |
This user-defined input allows you to displace the first moving averages by number of bars. |
|
Displace2 |
This user-defined input allows you to displace the second moving averages by number of bars. |
|
Color1Offset |
Specifies the number of bars to offset the color change of the first moving average. For a histogram, point, cross, left tic or right tic, this input should be set to 0 and for lines, this input should be set to 1 bar. |
|
Color2Offset |
Specifies the number of bars to offset the color change of the second moving average. For a histogram, point, cross, left tic or right tic, this input should be set to 0 and for lines, this input should be set to 1 bar. |
|
MinSlope1 |
Specifies the minimum required slope in order to change the 1st moving average color as specified by UpCol1. The slope is expressed as difference in value from one bar to the next. A negative setting disables this feature. |
|
MinSlope2 |
Specifies the minimum required slope in order to change the 2nd moving average color as specified by UpCol2. The slope is expressed as difference in value from one bar to the next. A negative setting disables this feature. |
|
Color1Length: |
Specifies the number of bars back for considering the gradient coloring for the first moving average. With a setting of 0, the length of the first moving average as specified with the input Length1 is automatically used. With a negative setting, the gradient coloring effect is disabled and the specified up and down colors are used. |
|
Color2Length: |
Specifies the number of bars back for considering the gradient coloring for the second moving average. With a setting of 0, the length of the second moving average as specified with the input Length2 is automatically used. With a negative setting, the gradient coloring effect is disabled and the specified up and down colors are used. |
|
MACDColoring1 |
Enables/disables the coloring of the 1st moving average when it is above or below the 2nd moving average. In order to use this feature, MinSlope1 needs to be set to a negative setting. |
|
MACDColoring2 |
Enables/disables the coloring of the 2nd moving average when the 1st moving average is above or below the 2nd moving average. In order to use this feature, MinSlope2 needs to be set to a negative setting. |
|
ShowCrossOver |
Enables/disables the moving averages Line Crosss over plot for a standard moving averages crossing |
|
ShowCrossUnder |
Enables/disables the moving averages Line Crosss under plot for a standard moving averages crossing |
|
PrimaryX |
Allows you to set the alert and the crossing marks for a moving averages crossing. A setting of 1 alerts you to any crossing of the first moving average. A setting of 2 alerts you to any crossing of the second moving average. A setting of 0 disables the crossing marks and any crossing alerts. |
|
BullCrossPrice |
Specifies the price to be used for a minimum cross up distance for a cross up plot and alert to be triggered such as high, low or close. A setting of 0 uses the moving average as specified with the input PrimaryX. |
|
BearCrossPrice |
Specifies the price to be used for a minimum cross down distance for a cross down plot and alert to be triggered such as low, high or close. A setting of 0 uses the moving average as specified with the input PrimaryX. |
|
MinimumCrossDistance |
Specifies the minimum crossing distance in cents, ticks or pips in order to plot a cross or to trigger a cross alert. |
|
MinimumResetDistance |
Specifies the minimum distance in cents, ticks or pips for a cross into the opposite direction in order to allow a new cross signal in to the same direction as the previous cross signal. |
|
ShowPaintBar |
Enables/disables the paint bar which paints the price bar when its high and low touches both moving averages. The bullish color is controlled with the PG High plot color and the bearish color is controlled with the PG Low plot color. Please note that when making a color change, the indicator needs to be disabled and then re-enabled again before the color changes will take affect. |
|
ShowMe |
Enables/disables the ShowMe which displays a dot above/below the price bar when its high and low touches both moving averages. The bullish color is controlled with the PG High plot color and the bearish color is controlled with the PG Low plot color. Please note that when making a color change, the indicator needs to be disabled and then re-enabled again before the color changes will take affect. |
|
ShowMeVertical |
Specifies the number of cents, ticks or pips to move the ShowMe above the high or below the low of the price bar. |
|
MinClosingRangePercent |
Specifies the minimum closing range percent for a bullish or bearish paint bar. For example, with a setting of 50, a price bar that touches both moving averages and closes in the upper half of its range is considered a bullish price bar and it gets painted with the color assigned to the PB High plot color. Vice versa, a price bar that is within both moving averages and closes in the lower half of its range is considered a bearish price bar and it gets painted with the color assigned to the PB Low plot color. |
|
BullishPaintBarAlert |
Enables/disables the bullish paint bar alert. |
|
BearishPaintBarAlert |
Enables/disables the bearish paint bar alert. |
The Alchemy 2 Line Moving Averages RadarScreen Indicator (Alchemy MovAvg2LineRS)
The Alchemy 2 Line Moving Averages RadarScreen indicator contains a separate column for each moving average value. It contains cross alert columns for a moving average cross between moving average 1 and 2. It contains a column that specifies the percent difference between moving average 1 and 2 as well as a column that displays "Long" when moving average 1 is above moving average 2 and it displays "Short" when moving average 1 is below moving average 2. It contains a column that marks the number of bars ago when moving average 1 last crossed over moving average 2 and it contains a column that marks the number of bars ago when moving average 1 last crossed under moving average 2. Each alert, "Long", "Short", "cross over" as well as "cross under" can be individually enabled and disabled. The moving average type for each moving average can be individually specified such as simple average, exponential average, weighted average, triangular average, mid Keltner average, Hull average, Wilders Smoothing average or even as a custom average formula.
Indicator Inputs:
|
Moving Average Parameters:
|
|
|
Price1 |
Specifies the price for the first moving average. |
|
Price2 |
Specifies the price for the second moving average. |
|
Length1 |
Specifies the number of bars over which the first moving average is calculated. |
|
Length2 |
Specifies the number of bars over which the second moving average is calculated. |
|
Factor1 |
This input is activated when the first moving average is specified as an exponential moving average and a setting of 1 returns a Wilders Smoothing Moving Average and a setting of 2 returns a standard exponential moving average. The Factor can be specified as any number and it increases the reaction of the moving average as the Factor is increased, therefore making it a faster moving average with a higher Factor. |
|
Factor2 |
This input is activated when the second moving average is specified as an exponential moving average and a setting of 1 returns a Wilders Smoothing Moving Average and a setting of 2 returns a standard exponential moving average. The Factor can be specified as any number and it increases the reaction of the moving average as the Factor is increased, therefore making it a faster moving average with a higher Factor. |
|
Smoothing1 |
This input is activated when the first moving average is specified as an exponential moving average and a setting of 0 returns a Wilders Smoothing Moving Average and a setting of 1 returns a standard exponential moving average. The Smoothing can be specified as any number and it smooths the moving average as the Smoothing is increased, therefore making it a slower moving average with a higher Smoothing. |
|
Smoothing2 |
This input is activated when the second moving average is specified as an exponential moving average and a setting of 0 returns a Wilders Smoothing Moving Average and a setting of 1 returns a standard exponential moving average. The Smoothing can be specified as any number and it smooths the moving average as the Smoothing is increased, therefore making it a slower moving average with a higher Smoothing. |
|
Type1 |
Specifies the type of moving average for the first moving average. A setting of 1 uses a simple moving average, a setting of 2 uses an exponential moving average, a setting of 3 uses a weighted moving average, a setting of 4 uses a triangular moving average, a setting of 5 uses a Mid Keltner, a setting of 6 uses a Hull moving average and a setting of 7 uses a custom formula as specified with the input Price1. |
|
Type2 |
Specifies the type of moving average for the second moving average. A setting of 1 uses a simple moving average, a setting of 2 uses an exponential moving average, a setting of 3 uses a weighted moving average, a setting of 4 uses a triangular moving average, a setting of 5 uses a Mid Keltner, a setting of 6 uses a Hull moving average and a setting of 7 uses a custom formula as specified with the input Price2. |
|
Text Parameters:
|
|
|
StatusLongText |
Specifies the text to be displayed in the Status column when moving average 1 is above moving average 2. This is a string input and the text always needs to be within quotation marks. |
|
StatusShortText |
Specifies the text to be displayed in the Status column when moving average 1 is below moving average 2. This is a string input and the text always needs to be within quotation marks. |
|
MA1MA2CrossOverText |
Specifies the text to be displayed in the Cut MA 1/2 column when moving average 1 crosses over moving average 2. This is a string input and the text always needs to be within quotation marks. |
|
MA1MA2CrossUnderText |
Specifies the text to be displayed in the Cut MA 1/2 column when moving average 1 crosses under moving average 2. This is a string input and the text always needs to be within quotation marks. |
|
PercentDecimal |
Specifies the decimal points of the percent difference between moving average 1 and 2 text to be displayed in the Dif MA1/MA2% column. |
|
Colors Parameters:
|
|
|
StatusLongForeGrdColor |
Specifies the color of the text to be displayed in the Status column when moving average 1 is above moving average 2. |
|
StatusShortForeGrdColor |
Specifies the color of the text to be displayed in the Status column when moving average 1 is below moving average 2. |
|
StatusLongBackGrdColor |
Specifies the background color of the cell in the Status column when moving average 1 is above moving average 2. |
|
StatusShortBackGrdColor |
Specifies the background color of the cell in the Status column when moving average 1 is below moving average 2. |
|
MA1MA2CrossOverForeGrdColor |
Specifies the color of the text to be displayed in the Cut MA 1/2 column when moving average 1 crosses over moving average 2. |
|
MA1MA2CrossUnderForeGrdColor |
Specifies the color of the text to be displayed in the Cut MA 1/2 column when moving average 1 crosses under moving average 2. |
|
MA1MA2CrossOverBackGrdColor |
Specifies the background color of the cell in the Cut MA 1/2 column when moving average 1 crosses over moving average 2. |
|
MA1MA2CrossUnderBackGrdColor |
Specifies the background color of the cell in the Cut MA 1/2 column when moving average 1 crosses under moving average 2. |
|
CrossOverAgoForeGrdColor |
Specifies the color of the text to be displayed in the CrossUpAgo column when moving average 1 crosses over both, moving average 2 and moving average3. |
|
CrossUnderAgoForeGrdColor |
Specifies the color of the text to be displayed in the CrossUpAgo column when moving average 1 crosses under both, moving average 2 and moving average3. |
|
CrossOverAgoBackGrdColor |
Specifies the background color of the cell in the CrossUpAgo column when moving average 1 crosses over both, moving average 2 and moving average3. |
|
CrossUnderAgoBackGrdColor |
Specifies the background color of the cell in the CrossUpAgo column when moving average 1 crosses under both, moving average 2 and moving average3. |
|
Alerts Parameters:
|
|
|
StatusLongAlert |
Enables/disables the alert notification when moving average 1 is above moving average 2. |
|
StatusShortAlert |
Enables/disables the alert notification when moving average 1 is below moving average 2. |
|
MA1MA2CrossOverAlert |
Enables/disables the alert notification when moving average 1 crosses over moving average 2. |
|
MA1MA2CrossUnderAlert |
Enables/disables the alert notification when moving average 1 crosses under moving average 2. |
The Alchemy 2 Line Pivot Moving Averages Indicator (Alchemy MovAvg2LnPiv)
The Alchemy 2 Line Pivot Moving Averages Indicator plots the moving average of the pivot price which is the average of the high, low and close of a specified number of bars ago. For a detailed explanation of this indicator, please refer to the indicator input description below.
User Defined Inputs:
|
PeriodsAgo |
Specifies the number of bars ago for calculating the pivot price, whereas a setting of 1 uses the pivot price of the previous bar and a setting of 0 uses the pivot price of the current bar. |
|
Average1 |
This input determines the type of moving average for Line1. You can select from the following averages: "Simple", "Exponential", "Weighted", "Adaptive" or "TriAngular". |
|
Length1 |
This user-defined input determines the number of bars over which the first moving average is calculated. |
|
Factor1: |
This input is activated when the first moving average is specified as an exponential moving average and a setting of 1 returns a Wilders Smoothing Moving Average and a setting of 2 returns a standard exponential moving average. The Factor can be specified as any number and it increases the reaction of the moving average as the Factor is increased, therefore making it a faster moving average with a higher Factor. |
|
Smoothing1: |
This input is activated when the first moving average is specified as an exponential moving average and a setting of 0 returns a Wilders Smoothing Moving Average and a setting of 1 returns a standard exponential moving average. The Smoothing can be specified as any number and it smooths the moving average as the Smoothing is increased, therefore making it a slower moving average with a higher Smoothing. |
|
MinSlope1 |
Specifies the minimum required slope in order to change the 1st moving average color as specified by UpCol1. The slope is expressed as difference in value from one bar to the next. This feature only works when Displace is set to 0. |
|
UpCol1 |
Specifies the color when the 1st moving average slopes up as specified by the minimum sloping requirements by MinSlope1. |
|
DownCol1 |
Specifies the color when the 1st moving average slopes down as specified by the minimum sloping requirements by MinSlope1. |
|
Average2 |
This input determines the type of moving average for Line2. You can select from the following averages: "Simple", "Exponential", "Weighted", "Adaptive" or "TriAngular". |
|
Length2 |
This user-defined input determines the number of bars over which the second moving average is calculated. |
|
Factor2: |
This input is activated when the second moving average is specified as an exponential moving average and a setting of 1 returns a Wilders Smoothing Moving Average and a setting of 2 returns a standard exponential moving average. The Factor can be specified as any number and it increases the reaction of the moving average as the Factor is increased, therefore making it a faster moving average with a higher Factor. |
|
Smoothing2: |
This input is activated when the second moving average is specified as an exponential moving average and a setting of 0 returns a Wilders Smoothing Moving Average and a setting of 1 returns a standard exponential moving average. The Smoothing can be specified as any number and it smooths the moving average as the Smoothing is increased, therefore making it a slower moving average with a higher Smoothing. |
|
MinSlope2 |
Specifies the minimum required slope in order to change the 2nd moving average color as specified by UpCol2. The slope is expressed as difference in value from one bar to the next. This feature only works when Displace is set to 0. |
|
UpCol2 |
Specifies the color when the 2nd moving average slopes up as specified by the minimum sloping requirements by MinSlope2. |
|
DownCol2 |
Specifies the color when the 2nd moving average slopes down as specified by the minimum sloping requirements by MinSlope2. |
|
PrimaryX |
Allows you to set the alert and the crossing marks for a moving averages crossing. A setting of 1 alerts you to any crossing of the first moving average. A setting of 2 alerts you to any crossing of the second moving average. A setting of 0 disables the crossing marks and any crossing alerts. |
|
XUpCol |
Specifies the color for the Line Cross Plot when there is an up cross. |
|
XDownCol |
Specifies the color for the Line Cross Plot when there is a down cross. |
|
AltAvg1 |
This input allows the user to chose any Moving Average function available in TradeStation for Line1. At its default setting of -1, it uses the proprietary Trading Alchemy Moving Averages functions, determined under the Average1 input. If you would like to use a standard TradeStation moving averages function in its place, click on "Dictionary…" and select any available moving average User Function such as Average or XAverage. Then type the desired values into the Parameters. |
|
AltAvg2 |
This input allows the user to chose any Moving Average function available in TradeStation for Line2. At its default setting of -1, it uses the proprietary Trading Alchemy Moving Averages functions, determined under the Average2 input. If you would like to use a standard TradeStation moving averages function in its place, click on "Dictionary…" and select any available moving average User Function such as Average or XAverage. Then type the desired values into the Parameters. |
The Alchemy MvgAvg3Line Indicator
To view chart, go to: http://www.tradingalchemy.com/ViewChartsMovingAverages.htm
User Defined Inputs:
The sloping or MACD coloring of the moving averages can be controlled through the Format Indicator > Color window with the color plots. Please note that when making a color change, the indicator needs to be disabled and then re-enabled again before the color changes will take affect.
|
Price1 |
Specifies the price for the first moving average. |
|
Price2 |
Specifies the price for the second moving average. |
|
Price3 |
Specifies the price for the third moving average. |
|
Length1 |
This user-defined input determines the number of bars over which the first moving average is calculated. |
|
Length2 |
This user-defined input determines the number of bars over which the second moving average is calculated. |
|
Length3 |
This user-defined input determines the number of bars over which the third moving average is calculated. |
|
Factor1 |
This input is activated when the first moving average is specified as an exponential moving average and a setting of 1 returns a Wilders Smoothing Moving Average and a setting of 2 returns a standard exponential moving average. The Factor can be specified as any number and it increases the reaction of the moving average as the Factor is increased, therefore making it a faster moving average with a higher Factor. |
|
Factor2 |
This input is activated when the second moving average is specified as an exponential moving average and a setting of 1 returns a Wilders Smoothing Moving Average and a setting of 2 returns a standard exponential moving average. The Factor can be specified as any number and it increases the reaction of the moving average as the Factor is increased, therefore making it a faster moving average with a higher Factor. |
|
Factor3 |
This input is activated when the third moving average is specified as an exponential moving average and a setting of 1 returns a Wilders Smoothing Moving Average and a setting of 2 returns a standard exponential moving average. The Factor can be specified as any number and it increases the reaction of the moving average as the Factor is increased, therefore making it a faster moving average with a higher Factor. |
|
Smoothing1 |
This input is activated when the first moving average is specified as an exponential moving average and a setting of 0 returns a Wilders Smoothing Moving Average and a setting of 1 returns a standard exponential moving average. The Smoothing can be specified as any number and it smooths the moving average as the Smoothing is increased, therefore making it a slower moving average with a higher Smoothing. |
|
Smoothing2 |
This input is activated when the second moving average is specified as an exponential moving average and a setting of 0 returns a Wilders Smoothing Moving Average and a setting of 1 returns a standard exponential moving average. The Smoothing can be specified as any number and it smooths the moving average as the Smoothing is increased, therefore making it a slower moving average with a higher Smoothing. |
|
Smoothing3 |
This input is activated when the third moving average is specified as an exponential moving average and a setting of 0 returns a Wilders Smoothing Moving Average and a setting of 1 returns a standard exponential moving average. The Smoothing can be specified as any number and it smooths the moving average as the Smoothing is increased, therefore making it a slower moving average with a higher Smoothing. |
|
Average1Type |
This input determines the type of moving average for Line1. A setting of 1 uses a simple moving average, a setting of 2 uses an exponential moving average, a setting of 3 uses a weighted moving average, a setting of 4 uses a triangular moving average, a setting of 5 uses a Mid Keltner and a setting of 6 uses a Hull moving average. |
|
Average2Type |
This input determines the type of moving average for Line2. A setting of 1 uses a simple moving average, a setting of 2 uses an exponential moving average, a setting of 3 uses a weighted moving average, a setting of 4 uses a triangular moving average, a setting of 5 uses a Mid Keltner and a setting of 6 uses a Hull moving average. |
|
Average3Type |
This input determines the type of moving average for Line3. A setting of 1 uses a simple moving average, a setting of 2 uses an exponential moving average, a setting of 3 uses a weighted moving average, a setting of 4 uses a triangular moving average, a setting of 5 uses a Mid Keltner and a setting of 6 uses a Hull moving average. |
|
AltAvg1 |
This input allows the user to chose any Moving Average function available in TradeStation for Line1. At its default setting of -1, it uses the proprietary Trading Alchemy Moving Averages functions, determined under the Average1 input. If you would like to use a standard TradeStation moving averages function in its place, click on "Dictionary…" and select any available moving average User Function such as Average or XAverage. Then type the desired values into the Parameters. |
|
AltAvg2 |
This input allows the user to chose any Moving Average function available in TradeStation for Line2. At its default setting of -1, it uses the proprietary Trading Alchemy Moving Averages functions, determined under the Average2 input. If you would like to use a standard TradeStation moving averages function in its place, click on "Dictionary…" and select any available moving average User Function such as Average or XAverage. Then type the desired values into the Parameters. |
|
AltAvg3 |
This input allows the user to chose any Moving Average function available in TradeStation for Line3. At its default setting of -1, it uses the proprietary Trading Alchemy Moving Averages functions, determined under the Average3 input. If you would like to use a standard TradeStation moving averages function in its place, click on "Dictionary…" and select any available moving average User Function such as Average or XAverage. Then type the desired values into the Parameters. |
|
Displace |
This user-defined input allows you to displace the moving averages by number of bars. |
|
ColorOffset |
Specifies the number of bars to offset the color change. For a histogram, point, cross, left tic or right tic, this input should be set to 0 and for lines, this input should be set to 1 bar. |
|
MinSlope1 |
Specifies the minimum required slope in order to change the 1st moving average color as specified by UpCol1. The slope is expressed as difference in value from one bar to the next. A negative value disables this coloring feature for the first moving average. |
|
MinSlope2 |
Specifies the minimum required slope in order to change the 2nd moving average color as specified by UpCol2. The slope is expressed as difference in value from one bar to the next. A negative value disables this coloring feature for the second moving average. |
|
MinSlope3 |
Specifies the minimum required slope in order to change the 3rd moving average color as specified by UpCol3. The slope is expressed as difference in value from one bar to the next. A negative value disables this coloring feature for the third moving average. |
|
HookAlert |
Enables/disables the hook alert. |
|
SlopeAlert |
Enables/disables the slope alert. |
|
|
|
|
|
Standard Moving Averages Crossing: |
|
PlotX |
Enables/disables the moving averages Line Crosss plot for a standard moving averages crossing |
|
ShowCrossOver |
Enables/disables the moving averages Line Crosss over plot for a standard moving averages crossing |
|
ShowCrossUnder |
Enables/disables the moving averages Line Crosss under plot for a standard moving averages crossing |
|
PrimaryX |
Allows you to set the alert and the crossing marks for a moving averages crossing. A setting of 1 alerts you to any crossing of the first moving average. A setting of 2 alerts you to any crossing of the second moving average. A setting of 0 disables the crossing marks and any crossing alerts. |
|
Crossee1Num |
With all 3 inputs "PrimaryX", "Crossee1Num" and "Crossee2Num" enabled, a cross alert plot shows a crossing when the average line number as specified with the input "PrimaryX", crosses over or under both average lines numbers as specified with the inputs "Crossee1Num" and "Crossee2Num". With anyone of these 3 inputs "PrimaryX", "Crossee1Num" and "Crossee2Num" set to 0 or greater than 3, it will disable this alert feature. With ReversalAlert set to true, a new cross over alert is only generated at the very first crossover in an uptrend and at the very first cross under in a down trend. |
|
Crossee2Num |
With all 3 inputs "PrimaryX", "Crossee1Num" and "Crossee2Num" enabled, a cross alert plot shows a crossing when the average line number as specified with the input "PrimaryX", crosses over or under both average lines numbers as specified with the inputs "Crossee1Num" and "Crossee2Num". With anyone of these 3 inputs "PrimaryX", "Crossee1Num" and "Crossee2Num" set to 0 or greater than 3, it will disable this alert feature. With ReversalAlert set to true, a new cross over alert is only generated at the very first crossover in an uptrend and at the very first cross under in a down trend. |
|
ReversalAlert |
With all 3 inputs "PrimaryX", "Crossee1Num" and "Crossee2Num" enabled, a cross alert plot shows a crossing when the average line number as specified with the input "PrimaryX", crosses over or under both average lines numbers as specified with the inputs "Crossee1Num" and "Crossee2Num". With anyone of these 3 inputs "PrimaryX", "Crossee1Num" and "Crossee2Num" set to 0 or greater than 3, it will disable this alert feature. With ReversalAlert set to true, a new cross over alert is only generated at the very first crossover in an uptrend and at the very first cross under in a down trend. |
|
SecondX |
Allows you to set the alert and the crossing marks for an additional moving averages crossing. A setting of 1 alerts you to any crossing of the first moving average. A setting of 2 alerts you to any crossing of the second moving average. A setting of 3 alerts you to any crossing of the third moving average. If a moving average that is set to secondary crossing, crosses over a moving average that is set to primary crossing, the primary crossing will take precedence. A setting of 0 disables the crossing marks and any crossing alerts for the secondary crossing. |
|
MACrossAlert |
Enables/disables the moving averages cross alert |
|
FastMA |
Specifies the plot number of the fast moving average. This input in conjunction with the SlowMA and PriceMA inputs triggers a “MA CROSSUP” alert when the fast average crosses over the slow average and price closes above the PriceMA. Vice versa, it triggers a “MA CROSSUNDER” alert when the fast average crosses under the slow average and price closes below the PriceMA. |
|
SlowMA |
Specifies the plot number of the slow moving average. This input in conjunction with the SlowMA and PriceMA inputs triggers a “MA CROSSUP” alert when the fast average crosses over the slow average and price closes above the PriceMA. Vice versa, it triggers a “MA CROSSUNDER” alert when the fast average crosses under the slow average and price closes below the PriceMA. |
|
PriceMA |
Specifies the plot number of the price moving average. This input in conjunction with the SlowMA and PriceMA inputs triggers a “MA CROSSUP” alert when the fast average crosses over the slow average and price closes above the PriceMA. Vice versa, it triggers a “MA CROSSUNDER” alert when the fast average crosses under the slow average and price closes below the PriceMA. |
|
|
|
|
|
Medium Line Crossing: |
|
|
The medium line crossing acts separately and independently from the standard moving averages crossing as described above. When activated with the inputs below, the medium line acts as the primary crossing line and it generates Line Cross plots and alerts as follows: The indicator generates a buy alert and crossing up Line Cross plot when the medium line crosses over the slow line while the fast line is above the medium line. If the fast line is below the medium line when the medium line crosses over the slow line, then the indicator waits for the fast line to cross over the medium line, while the slow line is still below the medium line, until it generates the buy alert and crossing up Line Cross plot. The indicator generates a sell alert and crossing down Line Cross plot when the medium line crosses under the slow line while the fast line is below the medium line. If the fast line is above the medium line when the medium line crosses under the slow line, then the indicator waits for the fast line to cross under the medium line, while the slow line is still above the medium line, until it generates the sell alert and crossing down Line Cross plot. In order to utilize this feature, either of the above inputs "PrimaryX", "Crossee1Num" or "Crossee2Num" need to be set to 0. |
|
|
|
|
FastX_MA_Number |
Specifies the plot number for the fast moving average, whereas a setting of 0 disables the fast line crossing requirement. |
|
MediumX_MA_Number |
Specifies the plot number for the medium moving average, whereas a setting of 0 disables the medium line crossing alert and Line Cross plot entirely. |
|
SlowX_MA_Number |
Specifies the plot number for the slow moving average, whereas a setting of 0 disables the medium line crossing alert and Line Cross plot entirely. |
|
MediumX_Alert |
Enables/disables the alert for a medium line crossing. With this alert enabled, it will automatically disable the standard moving averages crossing alert. The alert for a medium line crossing up will read "Buy Alert" and the alert for a medium line crossing down will read "Sell Alert". |
The Alchemy Moving Averages 2 Line - Linear Regression Curve - SMI RadarScreen Indicator (Alchemy MovAvg2Line-LinRegr-SMI RS)
The Alchemy Moving Averages 2 Line - Linear Regression Curve - SMI RadarScreen Indicator contains a separate column for each moving average value as well as the linear regression value and the SMI value. It contains cross alert columns for a moving average cross between moving average 1 and 2, price and the linear regression curve. It contains an alert column for when price is above or below the linear regression curve. It contains a column that specifies the percent difference between moving average 1 and 2 as well as a column that displays "Long" when moving average 1 is above moving average 2 while price is above the linear regression curve and it displays "Short" when moving average 1 is below moving average 2 while price is below the linear regression curve. Each alert, "Long", "Short", "cross over", "cross under", "above" or "below" can be individually enabled and disabled. The moving average type for each moving average can be individually specified such as simple average, exponential average, weighted average, triangular average, mid Keltner average, Hull average, Wilders Smoothing average or even as a custom average formula.
Indicator Inputs:
|
Moving Average Parameters:
|
|
|
Price1 |
Specifies the price for the first moving average. |
|
Price2 |
Specifies the price for the second moving average. |
|
Length1 |
Specifies the number of bars over which the first moving average is calculated. |
|
Length2 |
Specifies the number of bars over which the second moving average is calculated. |
|
Factor1 |
This input is activated when the first moving average is specified as an exponential moving average and a setting of 1 returns a Wilders Smoothing Moving Average and a setting of 2 returns a standard exponential moving average. The Factor can be specified as any number and it increases the reaction of the moving average as the Factor is increased, therefore making it a faster moving average with a higher Factor. |
|
Factor2 |
This input is activated when the second moving average is specified as an exponential moving average and a setting of 1 returns a Wilders Smoothing Moving Average and a setting of 2 returns a standard exponential moving average. The Factor can be specified as any number and it increases the reaction of the moving average as the Factor is increased, therefore making it a faster moving average with a higher Factor. |
|
Smoothing1 |
This input is activated when the first moving average is specified as an exponential moving average and a setting of 0 returns a Wilders Smoothing Moving Average and a setting of 1 returns a standard exponential moving average. The Smoothing can be specified as any number and it smooths the moving average as the Smoothing is increased, therefore making it a slower moving average with a higher Smoothing. |
|
Smoothing2 |
This input is activated when the second moving average is specified as an exponential moving average and a setting of 0 returns a Wilders Smoothing Moving Average and a setting of 1 returns a standard exponential moving average. The Smoothing can be specified as any number and it smooths the moving average as the Smoothing is increased, therefore making it a slower moving average with a higher Smoothing. |
|
Type1 |
Specifies the type of moving average for the first moving average. A setting of 1 uses a simple moving average, a setting of 2 uses an exponential moving average, a setting of 3 uses a weighted moving average, a setting of 4 uses a triangular moving average, a setting of 5 uses a Mid Keltner, a setting of 6 uses a Hull moving average and a setting of 7 uses a custom formula as specified with the input Price1. |
|
Type2 |
Specifies the type of moving average for the second moving average. A setting of 1 uses a simple moving average, a setting of 2 uses an exponential moving average, a setting of 3 uses a weighted moving average, a setting of 4 uses a triangular moving average, a setting of 5 uses a Mid Keltner, a setting of 6 uses a Hull moving average and a setting of 7 uses a custom formula as specified with the input Price2. |
|
Linear Regression Parameters:
|
|
|
LinRegrPrice |
Specifies the price to be used for the linear regression curve. |
|
LinRegrLength |
Specifies the number of bars over which the linear regression curve is calculated. |
|
LinRegrLongPrice |
Specifies the price that has to be above the linear regression curve for a long alert. |
|
LinRegrShortPrice |
Specifies the price that has to be below the linear regression curve for a short alert. |
|
SMI Parameters:
|
|
| Proprietary Alchemy Stochastic Momentum Index calculation: | |
| SMI_DLength | Specifies the Percent D length of the Stochastic Momentum Index. |
| SMI_KLength | Specifies the Percent K length of the Stochastic Momentum Index. |
| Standard TradeStation Stochastic Momentum Index calculation and in order to use these calculations, either DLength or KLength need to be set to 0: | |
| SMI_length1 | Specifies length 1 of the Stochastic Momentum Index. |
| SMI_length2 | Specifies length 2 of the Stochastic Momentum Index. |
| SMI_length3 | Specifies length 3 of the Stochastic Momentum Index.. |
|
Text Parameters:
|
|
|
StatusLongText |
Specifies the text to be displayed in the Status column when moving average 1 is above moving average 2 and price is above the linear regression curve. This is a string input and the text always needs to be within quotation marks. |
|
StatusShortText |
Specifies the text to be displayed in the Status column when moving average 1 is below moving average 2 and price is below the linear regression curve. This is a string input and the text always needs to be within quotation marks. |
|
StatusFlatText |
Specifies the text to be displayed in the Status column when neither the long nor the short condition as described above exists. This is a string input and the text always needs to be within quotation marks. |
|
MA1MA2CrossOverText |
Specifies the text to be displayed in the Cut MA 1/2 column when moving average 1 crosses over moving average 2. This is a string input and the text always needs to be within quotation marks. |
|
MA1MA2CrossUnderText |
Specifies the text to be displayed in the Cut MA 1/2 column when moving average 1 crosses under moving average 2. This is a string input and the text always needs to be within quotation marks. |
|
PriceLRAboveText |
Specifies the text to be displayed in the Last/LR column when price is above the linear regression curve. This is a string input and the text always needs to be within quotation marks. |
|
PriceLRBelowText |
Specifies the text to be displayed in the Last/LR column when price is below the linear regression curve. This is a string input and the text always needs to be within quotation marks. |
|
PriceLRCrossOverText |
Specifies the text to be displayed in the Cut Last/LR column when price crosses over the linear regression curve. This is a string input and the text always needs to be within quotation marks. |
|
PriceLRCrossUnderText |
Specifies the text to be displayed in the Cut Last/LR column when price crosses under the linear regression curve. This is a string input and the text always needs to be within quotation marks. |
|
PercentDecimal |
Specifies the decimal points of the percent difference between moving average 1 and 2 text to be displayed in the Dif MA1/MA2% column. |
|
Colors Parameters:
|
|
|
StatusLongForeGrdColor |
Specifies the color of the text to be displayed in the Status column when moving average 1 is above moving average 2 and price is above the linear regression curve. |
|
StatusShortForeGrdColor |
Specifies the color of the text to be displayed in the Status column when moving average 1 is below moving average 2 and price is below the linear regression curve. |
|
StatusFlatForeGrdColor |
Specifies the color of the text to be displayed in the Status column when neither the long nor the short condition as described above exists. |
|
StatusLongBackGrdColor |
Specifies the background color of the cell in the Status column when moving average 1 is above moving average 2 and price is above the linear regression curve. |
|
StatusShortBackGrdColor |
Specifies the background color of the cell in the Status column when moving average 1 is below moving average 2 and price is below the linear regression curve. |
|
StatusFlatBackGrdColor |
Specifies the background color of the cell in the Status column when neither the long nor the short condition as described above exists. |
|
MA1MA2CrossOverForeGrdColor |
Specifies the color of the text to be displayed in the Cut MA 1/2 column when moving average 1 crosses over moving average 2. |
|
MA1MA2CrossUnderForeGrdColor |
Specifies the color of the text to be displayed in the Cut MA 1/2 column when moving average 1 crosses under moving average 2. |
|
MA1MA2CrossOverBackGrdColor |
Specifies the background color of the cell in the Cut MA 1/2 column when moving average 1 crosses over moving average 2. |
|
MA1MA2CrossUnderBackGrdColor |
Specifies the background color of the cell in the Cut MA 1/2 column when moving average 1 crosses under moving average 2. |
|
PriceLRAboveForeGrdColor |
Specifies the color of the text to be displayed in the Last/LR column when price is above the linear regression curve. |
|
PriceLRBelowForeGrdColor |
Specifies the color of the text to be displayed in the Last/LR column when price is below the linear regression curve. |
|
PriceLRAboveBackGrdColor |
Specifies the background color of the cell in the Last/LR column when price is above the linear regression curve. |
|
PriceLRBelowBackGrdColor |
Specifies the background color of the cell in the Last/LR column when price is below the linear regression curve. |
|
PriceLRCrossOverForeGrdColor |
Specifies the color of the text to be displayed in the Cut Last/LR column when price crosses over the linear regression curve. |
|
PriceLRCrossUnderForeGrdColor |
Specifies the color of the text to be displayed in the Cut Last/LR column when price crosses under the linear regression curve. |
|
PriceLRCrossOverBackGrdColor |
Specifies the background color of the cell in the Cut Last/LR column when price crosses over the linear regression curve. |
|
PriceLRCrossUnderBackGrdColor |
Specifies the background color of the cell in the Cut Last/LR column when price crosses under the linear regression curve. |
|
Alerts Parameters:
|
|
|
StatusLongAlert |
Enables/disables the alert notification when moving average 1 is above moving average 2 and price is above the linear regression curve. |
|
StatusShortAlert |
Enables/disables the alert notification when moving average 1 is below moving average 2 and price is below the linear regression curve. |
|
StatusFlatAlert |
Enables/disables the alert notification when neither the long nor the short condition as described above exists. |
|
MA1MA2CrossOverAlert |
Enables/disables the alert notification when moving average 1 crosses over moving average 2. |
|
MA1MA2CrossUnderAlert |
Enables/disables the alert notification when moving average 1 crosses under moving average 2. |
|
PriceLRAboveAlert |
Enables/disables the alert notification when price is above the linear regression curve. |
|
PriceLRBelowAlert |
Enables/disables the alert notification when price is below the linear regression curve. |
|
PriceLRCrossOverAlert |
Enables/disables the alert notification when price crosses over the linear regression curve. |
|
PriceLRCrossOverAlert |
Enables/disables the alert notification when price crosses under the linear regression curve. |
The Alchemy Moving Averages 3 Line RadarScreen Indicator (Alchemy MovAvg3LineRS)
The Alchemy Moving Averages 3 Line RadarScreen indicator contains the following columns:
A separate column for each moving average value.
It contains cross alert columns for a moving average cross between moving average 1 and 2, moving average 1 and 3 as well as moving average 2 and 3.
It contains a column that specifies the percent difference between moving average 1 and 2 as well as a column that displays "Long" when moving average 1 is above moving average 2 and it displays "Short" when moving average 1 is below moving average 2.
It contains a column that marks the number of bars ago when moving average 1 last crossed over both, moving average 2 and average 3
It contains a column that marks the number of bars ago when moving average 1 last crossed under both, moving average 2 and average 3.
Each alert, "Long", "Short", "cross over" as well as "cross under" can be individually enabled and disabled.
It contains separate slope columns for each moving average that display the moving average slope percentage. The cell background for each column is colored based on a positive or negative slope.
It contains a Stacked column that displays a stacked up text when all 3 moving averages are sloping up while MA1 is above MA2 and MA2 is above MA3 and a stacked down text when all 3 moving averages are sloping down while MA1 is below MA2 and MA2 is below MA3
The moving average type for each moving average can be individually specified such as simple average, exponential average, weighted average, triangular average, mid Keltner average, Hull average, Wilders Smoothing average or even as a custom average formula.
Indicator Inputs:
|
Moving Average Parameters:
|
|
|
Price1 |
Specifies the price for the first moving average. |
|
Price2 |
Specifies the price for the second moving average. |
|
Price3 |
Specifies the price for the third moving average. |
|
Length1 |
Specifies the number of bars over which the first moving average is calculated. |
|
Length2 |
Specifies the number of bars over which the second moving average is calculated. |
|
Length3 |
Specifies the number of bars over which the third moving average is calculated. |
|
Factor1 |
This input is activated when the first moving average is specified as an exponential moving average and a setting of 1 returns a Wilders Smoothing Moving Average and a setting of 2 returns a standard exponential moving average. The Factor can be specified as any number and it increases the reaction of the moving average as the Factor is increased, therefore making it a faster moving average with a higher Factor. |
|
Factor2 |
This input is activated when the second moving average is specified as an exponential moving average and a setting of 1 returns a Wilders Smoothing Moving Average and a setting of 2 returns a standard exponential moving average. The Factor can be specified as any number and it increases the reaction of the moving average as the Factor is increased, therefore making it a faster moving average with a higher Factor. |
|
Factor3 |
This input is activated when the third moving average is specified as an exponential moving average and a setting of 1 returns a Wilders Smoothing Moving Average and a setting of 2 returns a standard exponential moving average. The Factor can be specified as any number and it increases the reaction of the moving average as the Factor is increased, therefore making it a faster moving average with a higher Factor. |
|
Smoothing1 |
This input is activated when the first moving average is specified as an exponential moving average and a setting of 0 returns a Wilders Smoothing Moving Average and a setting of 1 returns a standard exponential moving average. The Smoothing can be specified as any number and it smooths the moving average as the Smoothing is increased, therefore making it a slower moving average with a higher Smoothing. |
|
Smoothing2 |
This input is activated when the second moving average is specified as an exponential moving average and a setting of 0 returns a Wilders Smoothing Moving Average and a setting of 1 returns a standard exponential moving average. The Smoothing can be specified as any number and it smooths the moving average as the Smoothing is increased, therefore making it a slower moving average with a higher Smoothing. |
|
Smoothing3 |
This input is activated when the third moving average is specified as an exponential moving average and a setting of 0 returns a Wilders Smoothing Moving Average and a setting of 1 returns a standard exponential moving average. The Smoothing can be specified as any number and it smooths the moving average as the Smoothing is increased, therefore making it a slower moving average with a higher Smoothing. |
|
Type1 |
Specifies the type of moving average for the first moving average. A setting of 1 uses a simple moving average, a setting of 2 uses an exponential moving average, a setting of 3 uses a weighted moving average, a setting of 4 uses a triangular moving average, a setting of 5 uses a Mid Keltner, a setting of 6 uses a Hull moving average and a setting of 7 uses a custom formula as specified with the input Price1. |
|
Type2 |
Specifies the type of moving average for the second moving average. A setting of 1 uses a simple moving average, a setting of 2 uses an exponential moving average, a setting of 3 uses a weighted moving average, a setting of 4 uses a triangular moving average, a setting of 5 uses a Mid Keltner, a setting of 6 uses a Hull moving average and a setting of 7 uses a custom formula as specified with the input Price2. |
|
Type3 |
Specifies the type of moving average for the third moving average. A setting of 1 uses a simple moving average, a setting of 2 uses an exponential moving average, a setting of 3 uses a weighted moving average, a setting of 4 uses a triangular moving average, a setting of 5 uses a Mid Keltner, a setting of 6 uses a Hull moving average and a setting of 7 uses a custom formula as specified with the input Price3. |
|
MinSlope |
Specifies the minimum slope in order for the cell background of the MA1 through MA3 Slope columns to be colored for a positive or negative slope, whereas the slope is expressed as the moving average difference between 2 bars. In order to use a minimum slope percent, this input needs to be set to a negative value such as -1. |
|
MinSlopePercent |
Specifies the minimum slope percentage in order for the cell background of the MA1 through MA3 Slope Percent columns to be colored for a positive or negative slope. In order to use the minimum slope percent, the input MinSlope needs to be set to a negative value such as -1. |
|
Text Parameters:
|
|
|
StatusLongText |
Specifies the text to be displayed in the Status column when moving average 1 is above moving average 2. This is a string input and the text always needs to be within quotation marks. |
|
StatusShortText |
Specifies the text to be displayed in the Status column when moving average 1 is below moving average 2. This is a string input and the text always needs to be within quotation marks. |
|
MA1MA2CrossOverText |
Specifies the text to be displayed in the Cut MA 1/2 column when moving average 1 crosses over moving average 2. This is a string input and the text always needs to be within quotation marks. |
|
MA1MA2CrossUnderText |
Specifies the text to be displayed in the Cut MA 1/2 column when moving average 1 crosses under moving average 2. This is a string input and the text always needs to be within quotation marks. |
|
MA1MA3CrossOverText |
Specifies the text to be displayed in the Cut MA 1/3 column when moving average 1 crosses over moving average 3. This is a string input and the text always needs to be within quotation marks. |
|
MA1MA3CrossUnderText |
Specifies the text to be displayed in the Cut MA 1/3 column when moving average 1 crosses under moving average 3. This is a string input and the text always needs to be within quotation marks. |
|
MA2MA3CrossOverText |
Specifies the text to be displayed in the Cut MA 2/3 column when moving average 2 crosses over moving average 3. This is a string input and the text always needs to be within quotation marks. |
|
MA2MA3CrossUnderText |
Specifies the text to be displayed in the Cut MA 2/3 column when moving average 2 crosses under moving average 3. This is a string input and the text always needs to be within quotation marks. |
|
StackedUpText |
Specifies the text to be displayed in the Stacked column when all 3 moving averages are sloping up and MA1 is above MA2 and MA2 is above MA3. This is a string input and the text always needs to be within quotation marks. |
|
StackedDownText |
Specifies the text to be displayed in the Stacked column when all 3 moving averages are sloping down and MA1 is below MA2 and MA2 is below MA3. This is a string input and the text always needs to be within quotation marks. |
|
PercentDecimal |
Specifies the decimal points of the percent difference between moving average 1 and 2 text to be displayed in the Dif MA1/MA2% column. |
|
Colors Parameters:
|
|
|
StatusLongForeGrdColor |
Specifies the color of the text to be displayed in the Status column when moving average 1 is above moving average 2. |
|
StatusShortForeGrdColor |
Specifies the color of the text to be displayed in the Status column when moving average 1 is below moving average 2. |
|
StatusLongBackGrdColor |
Specifies the background color of the cell in the Status column when moving average 1 is above moving average 2. |
|
StatusShortBackGrdColor |
Specifies the background color of the cell in the Status column when moving average 1 is below moving average 2. |
|
MA1MA2CrossOverForeGrdColor |
Specifies the color of the text to be displayed in the Cut MA 1/2 column when moving average 1 crosses over moving average 2. |
|
MA1MA2CrossUnderForeGrdColor |
Specifies the color of the text to be displayed in the Cut MA 1/2 column when moving average 1 crosses under moving average 2. |
|
MA1MA2CrossOverBackGrdColor |
Specifies the background color of the cell in the Cut MA 1/2 column when moving average 1 crosses over moving average 2. |
|
MA1MA2CrossUnderBackGrdColor |
Specifies the background color of the cell in the Cut MA 1/2 column when moving average 1 crosses under moving average 2. |
|
MA1MA3CrossOverForeGrdColor |
Specifies the color of the text to be displayed in the Cut MA 1/3 column when moving average 1 crosses over moving average 3. |
|
MA1MA3CrossUnderForeGrdColor |
Specifies the color of the text to be displayed in the Cut MA 1/3 column when moving average 1 crosses under moving average 3. |
|
MA1MA3CrossOverBackGrdColor |
Specifies the background color of the cell in the Cut MA 1/3 column when moving average 1 crosses over moving average 3. |
|
MA1MA3CrossUnderBackGrdColor |
Specifies the background color of the cell in the Cut MA 1/3 column when moving average 1 crosses under moving average 3. |
|
MA2MA3CrossOverForeGrdColor |
Specifies the color of the text to be displayed in the Cut MA 2/3 column when moving average 2 crosses over moving average 3. |
|
MA2MA3CrossUnderForeGrdColor |
Specifies the color of the text to be displayed in the Cut MA 2/3 column when moving average 2 crosses under moving average 3. |
|
MA2MA3CrossOverBackGrdColor |
Specifies the background color of the cell in the Cut MA 2/3 column when moving average 2 crosses over moving average 3. |
|
MA2MA3CrossUnderBackGrdColor |
Specifies the background color of the cell in the Cut MA 2/3 column when moving average 2 crosses under moving average 3. |
|
CrossOverAgoForeGrdColor |
Specifies the color of the text to be displayed in the CrossUpAgo column when moving average 1 crosses over both, moving average 2 and moving average3. |
|
CrossUnderAgoForeGrdColor |
Specifies the color of the text to be displayed in the CrossUpAgo column when moving average 1 crosses under both, moving average 2 and moving average3. |
|
CrossOverAgoBackGrdColor |
Specifies the background color of the cell in the CrossUpAgo column when moving average 1 crosses over both, moving average 2 and moving average3. |
|
CrossUnderAgoBackGrdColor |
Specifies the background color of the cell in the CrossUpAgo column when moving average 1 crosses under both, moving average 2 and moving average3. |
|
PositiveSlopeBackgrdCol |
Specifies the background color of the cells in the MA1 through MA3 Slope Percent columns when the moving averages are sloping up. |
|
NegativeSlopeBackgrdCol |
Specifies the background color of the cells in the MA1 through MA3 Slope Percent columns when the moving averages are sloping down. |
|
FlatSlopeBackgrdCol |
Specifies the background color of the cells in the MA1 through MA3 Slope Percent columns when the moving averages are not sloping. |
|
StackedUpBackgrdCol |
Specifies the background color of the cells in the Stacked column when all 3 moving averages are sloping up and MA1 is above MA2 and MA2 is above MA3. |
|
StackedDownBackgrdCol |
Specifies the background color of the cells in the Stacked column when all 3 moving averages are sloping down and MA1 is below MA2 and MA2 is below MA3. |
|
Alerts Parameters:
|
|
|
StatusLongAlert |
Enables/disables the alert notification when moving average 1 is above moving average 2. |
|
StatusShortAlert |
Enables/disables the alert notification when moving average 1 is below moving average 2. |
|
MA1MA2CrossOverAlert |
Enables/disables the alert notification when moving average 1 crosses over moving average 2. |
|
MA1MA2CrossUnderAlert |
Enables/disables the alert notification when moving average 1 crosses under moving average 2. |
|
MA1MA3CrossOverAlert |
Enables/disables the alert notification when moving average 1 crosses over moving average 3. |
|
MA1MA3CrossUnderAlert |
Enables/disables the alert notification when moving average 1 crosses under moving average 3. |
|
MA2MA3CrossOverAlert |
Enables/disables the alert notification when moving average 2 crosses over moving average 3. |
|
MA2MA3CrossUnderAlert |
Enables/disables the alert notification when moving average 2 crosses under moving average 3. |
The Alchemy Moving Averages 3 Line Spread Indicator (Alchemy MovAvg3LSprd)
The Alchemy Moving Averages 3 Line Spread Indicator displays a show me dot when the 2 outer moving averages are within a specified distance.
Indicator Inputs:
|
PlotFastAverage: |
Enables/disables the fast average line plot. |
|
PlotMediumAverage: |
Enables/disables the medium average line plot. |
|
PlotSlowAverage: |
Enables/disables the slow average line plot. |
|
MaximumSpreadDistance: |
Specifies the maximum spread distance in cents, ticks or pips between the 2 outer moving averages for a spread alert to be triggered, whereas a negative setting disables the spread alert show me dot and the spread alert notification. |
|
SpreadPlotPrice: |
Specifies the price for the spread alert show me dot to be placed, whereas a setting of 0 disables the spread alert show me dot. |
|
SpreadPlotOffset: |
Specifies the distance to move the spread alert show me dot above or below the price as specified with the input SpreadPlotPrice . |
|
FastPrice: |
Specifies the price to be used for the fast moving average. |
|
MediumPrice: |
Specifies the price to be used for the medium moving average. |
|
SlowPrice: |
Specifies the price to be used for the slow moving average. |
|
FastLength: |
Specifies the fast moving average length. |
|
MediumLength: |
Specifies the medium moving average length. |
|
SlowLength: |
Specifies the slow moving average length. |
|
FastFactor: |
This input is activated when the fast moving average is specified as an exponential moving average and a setting of 1 returns a Wilders Smoothing Moving Average and a setting of 2 returns a standard exponential moving average. The Factor can be specified as any number and it increases the reaction of the moving average as the Factor is increased, therefore making it a faster moving average with a higher Factor. |
|
MediumFactor: |
This input is activated when the medium moving average is specified as an exponential moving average and a setting of 1 returns a Wilders Smoothing Moving Average and a setting of 2 returns a standard exponential moving average. The Factor can be specified as any number and it increases the reaction of the moving average as the Factor is increased, therefore making it a faster moving average with a higher Factor. |
|
SlowFactor: |
This input is activated when the slow moving average is specified as an exponential moving average and a setting of 1 returns a Wilders Smoothing Moving Average and a setting of 2 returns a standard exponential moving average. The Factor can be specified as any number and it increases the reaction of the moving average as the Factor is increased, therefore making it a faster moving average with a higher Factor. |
|
FastSmoothing: |
This input is activated when the fast moving average is specified as an exponential moving average and a setting of 0 returns a Wilders Smoothing Moving Average and a setting of 1 returns a standard exponential moving average. The Smoothing can be specified as any number and it smooths the moving average as the Smoothing is increased, therefore making it a slower moving average with a higher Smoothing. |
|
MediumSmoothing: |
This input is activated when the medium moving average is specified as an exponential moving average and a setting of 0 returns a Wilders Smoothing Moving Average and a setting of 1 returns a standard exponential moving average. The Smoothing can be specified as any number and it smooths the moving average as the Smoothing is increased, therefore making it a slower moving average with a higher Smoothing. |
|
SlowSmoothing: |
This input is activated when the slow moving average is specified as an exponential moving average and a setting of 0 returns a Wilders Smoothing Moving Average and a setting of 1 returns a standard exponential moving average. The Smoothing can be specified as any number and it smooths the moving average as the Smoothing is increased, therefore making it a slower moving average with a higher Smoothing. |
|
FastDisplace: |
Specifies the number of bars to displace the fast moving average line. Please note that the spread is always based on the current bar's moving average readings and this input does not affect the spread calculations. |
|
MediumDisplace: |
Specifies the number of bars to displace the medium moving average line. Please note that the spread is always based on the current bar's moving average readings and this input does not affect the spread calculations. |
|
SlowDisplace: |
Specifies the number of bars to displace the slow moving average line. Please note that the spread is always based on the current bar's moving average readings and this input does not affect the spread calculations. |
|
FastType: |
Specifies the fast moving average type. A setting of 1 uses a simple moving average, a setting of 2 uses an exponential moving average, a setting of 3 uses a weighted moving average, a setting of 4 uses a triangular moving average. |
|
MediumType: |
Specifies the medium moving average type. A setting of 1 uses a simple moving average, a setting of 2 uses an exponential moving average, a setting of 3 uses a weighted moving average, a setting of 4 uses a triangular moving average. |
|
SlowType: |
Specifies the slow moving average type. A setting of 1 uses a simple moving average, a setting of 2 uses an exponential moving average, a setting of 3 uses a weighted moving average, a setting of 4 uses a triangular moving average. |
The Alchemy 4 Line Moving Averages Indicator (Alchemy MovAvg4Line)
The Alchemy 4 Line Moving Averages indicator contains 4 moving averages as well as a separate optional ShowMe dot and/or paint bar which display when all 4 moving averages are positioned above or below each other in a specified sequence. The moving average lines contain various coloring features based on their slope or their relative positioning. For all of the details, please reference the indicator inputs description below.
Indicator Inputs:
|
Price1 |
Specifies the price for the first moving average. |
|
Price2 |
Specifies the price for the second moving average. |
|
Price3 |
Specifies the price for the third moving average. |
|
Price4 |
Specifies the price for the fourth moving average. |
|
Length1 |
Specifies the number of bars over which the first moving average is calculated, whereas a setting of 0 disables the first moving average. |
|
Length2 |
Specifies the number of bars over which the second moving average is calculated, whereas a setting of 0 disables the second moving average. |
|
Length3 |
Specifies the number of bars over which the third moving average is calculated, whereas a setting of 0 disables the third moving average. |
|
Length4 |
Specifies the number of bars over which the fourth moving average is calculated, whereas a setting of 0 disables the fourth moving average. |
|
Factor1 |
This input is activated when the first moving average is specified as an exponential moving average and a setting of 1 returns a Wilders Smoothing Moving Average and a setting of 2 returns a standard exponential moving average. The Factor can be specified as any number and it increases the reaction of the moving average as the Factor is increased, therefore making it a faster moving average with a higher Factor. |
|
Factor2 |
This input is activated when the second moving average is specified as an exponential moving average and a setting of 1 returns a Wilders Smoothing Moving Average and a setting of 2 returns a standard exponential moving average. The Factor can be specified as any number and it increases the reaction of the moving average as the Factor is increased, therefore making it a faster moving average with a higher Factor. |
|
Factor3 |
This input is activated when the third moving average is specified as an exponential moving average and a setting of 1 returns a Wilders Smoothing Moving Average and a setting of 2 returns a standard exponential moving average. The Factor can be specified as any number and it increases the reaction of the moving average as the Factor is increased, therefore making it a faster moving average with a higher Factor. |
|
Factor4 |
This input is activated when the fourth moving average is specified as an exponential moving average and a setting of 1 returns a Wilders Smoothing Moving Average and a setting of 2 returns a standard exponential moving average. The Factor can be specified as any number and it increases the reaction of the moving average as the Factor is increased, therefore making it a faster moving average with a higher Factor. |
|
Smoothing1 |
This input is activated when the first moving average is specified as an exponential moving average and a setting of 0 returns a Wilders Smoothing Moving Average and a setting of 1 returns a standard exponential moving average. The Smoothing can be specified as any number and it smooths the moving average as the Smoothing is increased, therefore making it a slower moving average with a higher Smoothing. |
|
Smoothing2 |
This input is activated when the second moving average is specified as an exponential moving average and a setting of 0 returns a Wilders Smoothing Moving Average and a setting of 1 returns a standard exponential moving average. The Smoothing can be specified as any number and it smooths the moving average as the Smoothing is increased, therefore making it a slower moving average with a higher Smoothing. |
|
Smoothing3 |
This input is activated when the third moving average is specified as an exponential moving average and a setting of 0 returns a Wilders Smoothing Moving Average and a setting of 1 returns a standard exponential moving average. The Smoothing can be specified as any number and it smooths the moving average as the Smoothing is increased, therefore making it a slower moving average with a higher Smoothing. |
|
Smoothing4 |
This input is activated when the fourth moving average is specified as an exponential moving average and a setting of 0 returns a Wilders Smoothing Moving Average and a setting of 1 returns a standard exponential moving average. The Smoothing can be specified as any number and it smooths the moving average as the Smoothing is increased, therefore making it a slower moving average with a higher Smoothing. |
|
Type1 |
Specifies the moving average type for the first moving average. A setting of 1 uses a simple moving average, a setting of 2 uses an exponential moving average, a setting of 3 uses a weighted moving average, a setting of 4 uses a triangular moving average, a setting of 5 uses a Mid Keltner, a setting of 6 uses a Hull moving average and a setting of 7 uses price as specified with the input Price1. |
|
Type2 |
Specifies the moving average type for the second moving average. A setting of 1 uses a simple moving average, a setting of 2 uses an exponential moving average, a setting of 3 uses a weighted moving average, a setting of 4 uses a triangular moving average, a setting of 5 uses a Mid Keltner, a setting of 6 uses a Hull moving average and a setting of 7 uses price as specified with the input Price2. |
|
Type3 |
Specifies the moving average type for the third moving average. A setting of 1 uses a simple moving average, a setting of 2 uses an exponential moving average, a setting of 3 uses a weighted moving average, a setting of 4 uses a triangular moving average, a setting of 5 uses a Mid Keltner, a setting of 6 uses a Hull moving average and a setting of 7 uses price as specified with the input Price3. |
|
Type4 |
Specifies the moving average type for the fourth moving average. A setting of 1 uses a simple moving average, a setting of 2 uses an exponential moving average, a setting of 3 uses a weighted moving average, a setting of 4 uses a triangular moving average, a setting of 5 uses a Mid Keltner, a setting of 6 uses a Hull moving average and a setting of 7 uses price as specified with the input Price4. |
|
Displace1 |
Specifies the number of bars to displace the first moving average. |
|
Displace2 |
Specifies the number of bars to displace the second moving average. |
|
Displace3 |
Specifies the number of bars to displace the third moving average. |
|
Displace4 |
Specifies the number of bars to displace the fourth moving average. |
|
RelativePositioning1 |
Specifies the relative positioning order of the first moving average. For example, with a setting of 1, the first moving average is considered the fastest moving average to be above the second fastest moving average for a buy alert paint bar, show me and/or alert notification and vice versa, to be below the second fastest moving average for a sell alert paint bar, show me and/or alert notification. With a setting of 0 the first moving average is not considered for a buy or sell alert based on its relative positioning with the other moving averages. |
|
RelativePositioning2 |
Specifies the relative positioning order of the second moving average. For example, with a setting of 2, the second moving average is considered the second fastest moving average to be above the third fastest moving average and to be below the fastest moving average for a buy alert paint bar, show me and/or alert notification and vice versa, to be below the second fastest moving average and to be above the fastest moving average for a sell alert paint bar, show me and/or alert notification. With a setting of 0 the second moving average is not considered for a buy or sell alert based on its relative positioning with the other moving averages. |
|
RelativePositioning3 |
Specifies the relative positioning order of the third moving average. For example, with a setting of 3, the third moving average is considered the third fastest moving average to be above the slowest moving average and to be below the second fastest moving average for a buy alert paint bar, show me and/or alert notification and vice versa, to be below the slowest moving average and to be above the second moving average for a sell alert paint bar, show me and/or alert notification. With a setting of 0 the third moving average is not considered for a buy or sell alert based on its relative positioning with the other moving averages. |
|
RelativePositioning4 |
Specifies the relative positioning order of the fourth moving average. For example, with a setting of 4, the fourth moving average is considered the slowest moving average to be below the third fastest moving average for a buy alert paint bar, show me and/or alert notification and vice versa, to be above the third fastest moving average for a sell alert paint bar, show me and/or alert notification. With a setting of 0 the fourth moving average is not considered for a buy or sell alert based on its relative positioning with the other moving averages. |
|
Coloring1Type |
Specifies the coloring type of the first moving average. A setting of 0 uses the default line color. With a setting of 1, the first moving average is colored with the color as specified by the AlertPB Hi plot color when all moving averages are in a relative up position and it is colored with the color as specified by the AlertPB Lo plot color when all moving averages are in a relative down position. With a setting of -1, the first moving average is colored with the color as specified by the BuyAlert plot color when all moving averages are in a relative up position and it is colored with the color as specified by the SellAlert plot color when all moving averages are in a relative down position. With a setting of 2, the first moving average is colored with a gradient coloring based on its slope, using the AlertPB Hi plot color for the most extreme up slope and the AlertPB Lo plot color for the most extreme down slope. With a setting of -2, the first moving average is colored with a gradient coloring based on its slope, using the BuyAlert plot color for the most extreme up slope and the SellAlert plot color for the most extreme down slope. |
|
Coloring2Type |
Specifies the coloring type of the second moving average. A setting of 0 uses the default line color. With a setting of 1, the second moving average is colored with the color as specified by the AlertPB Hi plot color when all moving averages are in a relative up position and it is colored with the color as specified by the AlertPB Lo plot color when all moving averages are in a relative down position. With a setting of -1, the second moving average is colored with the color as specified by the BuyAlert plot color when all moving averages are in a relative up position and it is colored with the color as specified by the SellAlert plot color when all moving averages are in a relative down position. With a setting of 2, the second moving average is colored with a gradient coloring based on its slope, using the AlertPB Hi plot color for the most extreme up slope and the AlertPB Lo plot color for the most extreme down slope. With a setting of -2, the second moving average is colored with a gradient coloring based on its slope, using the BuyAlert plot color for the most extreme up slope and the SellAlert plot color for the most extreme down slope. |
|
Coloring3Type |
Specifies the coloring type of the third moving average. A setting of 0 uses the default line color. With a setting of 1, the third moving average is colored with the color as specified by the AlertPB Hi plot color when all moving averages are in a relative up position and it is colored with the color as specified by the AlertPB Lo plot color when all moving averages are in a relative down position. With a setting of -1, the third moving average is colored with the color as specified by the BuyAlert plot color when all moving averages are in a relative up position and it is colored with the color as specified by the SellAlert plot color when all moving averages are in a relative down position. With a setting of 2, the third moving average is colored with a gradient coloring based on its slope, using the AlertPB Hi plot color for the most extreme up slope and the AlertPB Lo plot color for the most extreme down slope. With a setting of -2, the third moving average is colored with a gradient coloring based on its slope, using the BuyAlert plot color for the most extreme up slope and the SellAlert plot color for the most extreme down slope. |
|
Coloring4Type |
Specifies the coloring type of the fourth moving average. A setting of 0 uses the default line color. With a setting of 1, the fourth moving average is colored with the color as specified by the AlertPB Hi plot color when all moving averages are in a relative up position and it is colored with the color as specified by the AlertPB Lo plot color when all moving averages are in a relative down position. With a setting of -1, the fourth moving average is colored with the color as specified by the BuyAlert plot color when all moving averages are in a relative up position and it is colored with the color as specified by the SellAlert plot color when all moving averages are in a relative down position. With a setting of 2, the fourth moving average is colored with a gradient coloring based on its slope, using the AlertPB Hi plot color for the most extreme up slope and the AlertPB Lo plot color for the most extreme down slope. With a setting of -2, the fourth moving average is colored with a gradient coloring based on its slope, using the BuyAlert plot color for the most extreme up slope and the SellAlert plot color for the most extreme down slope. |
|
Color1Offset |
Specifies the number of bars to offset the color change of the first moving average. For a histogram, point, cross, left tic or right tic, this input should be set to 0 and for lines, this input should be set to 1 bar. |
|
Color2Offset |
Specifies the number of bars to offset the color change of the second moving average. For a histogram, point, cross, left tic or right tic, this input should be set to 0 and for lines, this input should be set to 1 bar. |
|
Color3Offset |
Specifies the number of bars to offset the color change of the third moving average. For a histogram, point, cross, left tic or right tic, this input should be set to 0 and for lines, this input should be set to 1 bar. |
|
Color4Offset |
Specifies the number of bars to offset the color change of the fourth moving average. For a histogram, point, cross, left tic or right tic, this input should be set to 0 and for lines, this input should be set to 1 bar. |
|
Color1Length: |
Specifies the number of bars back for considering the gradient coloring for the first moving average. With a setting of 0, the length of the first moving average as specified with the input Length1 is automatically used. With a negative setting, the gradient coloring effect is disabled and the specified up and down colors are used. |
|
Color2Length: |
Specifies the number of bars back for considering the gradient coloring for the second moving average. With a setting of 0, the length of the second moving average as specified with the input Length2 is automatically used. With a negative setting, the gradient coloring effect is disabled and the specified up and down colors are used. |
|
Color3Length: |
Specifies the number of bars back for considering the gradient coloring for the third moving average. With a setting of 0, the length of the second moving average as specified with the input Length2 is automatically used. With a negative setting, the gradient coloring effect is disabled and the specified up and down colors are used. |
|
Color4Length: |
Specifies the number of bars back for considering the gradient coloring for the fourth moving average. With a setting of 0, the length of the second moving average as specified with the input Length2 is automatically used. With a negative setting, the gradient coloring effect is disabled and the specified up and down colors are used. |
|
ShowAvg1 |
Enables/disables moving average 1. |
|
ShowAvg2 |
Enables/disables moving average 2. |
|
ShowAvg3 |
Enables/disables moving average 3. |
|
ShowAvg4 |
Enables/disables moving average 4. |
|
ShowMe |
Enables/disables the ShowMe which display a dot below the first price bar when all specified moving averages are in a relative up position and they display a dot above the first price bar when all specified moving averages are in a relative down position. A new alert into the same direction is triggered when anyone of the specified moving averages cross against the current direction and then realign. |
|
ShowPaintBar |
Enables/disables the paint bar which paints the price bar when all specified moving averages are in a relative up position and they display a dot above the first price bar when all specified moving averages are in a relative down position. A new alert into the same direction is triggered when anyone of the specified moving averages cross against the current direction and then realign. The bullish color is controlled with the AlertPB Hi plot color and the bearish color is controlled with the AlertPB Lo plot color. Please note that when making a color change, the indicator needs to be disabled and then re-enabled again before the color changes will take affect. |
|
ShowMeVerticalOffset |
Specifies the number of cents, ticks or pips to move the ShowMe above the high or below the low of the price bar. |
|
BuyAlert |
Enables/disables the alert notification when a bullish ShowMe or paint bar is displayed. |
|
SellAlert |
Enables/disables the alert notification when a bearish ShowMe or paint bar is displayed. |
|
BuyAlertString |
Specifies the text to be displayed in the buy alert notification window when a bullish ShowMe or paint bar is displayed. This is a string input which needs to stay in quotation marks. |
|
SellAlertString |
Specifies the text to be displayed in the sell alert notification window when a bearish ShowMe or paint bar is displayed. This is a string input which needs to stay in quotation marks. |
|
DataNumber |
Specifies the data series number that the indicator is based on. This input is used for the AlertOn Close feature as described below so that the indicator can correctly detect when a bar closes. |
|
AlertOnClose |
Enables/disables the alert notification on the close of the bar only. With this input set to true, the indicator can be set to update value intra-bar while waiting to generate an alert until the close of the bar. |
|
AlertDelay: |
If multiple alerts are triggered simultaneously, only the last alert will be displayed in the alert notification window. This input specifies the number of delay seconds from the time an alert is generated until it is displayed. The number of seconds starts counting from the first tick that triggers the alert, which means that depending on the tick volume, there maybe additional time beyond the specified delay time until the alert is displayed. A value of -1 disables this alert delay feature. This feature is only available for TradeStation 9 or higher. |
The Alchemy Moving Average Global Data Indicator (Alchemy MovAvgGlobalData)
Available for TradeStation 9/10 only!
The moving average of the Alchemy Moving Average Global Data indicator can be based on any bar type and bar interval without having to insert multiple data series into the same chart, which makes it also fully functional in RadarScreen. For all of the details, please reference the indicator inputs description below.
Indicator Inputs:
|
Interval |
Specifies the bar interval. |
|
Type |
Specifies the bar type as follows:-1=volume; 0=ticks; 1=minutes; 2=daily; 3=weekly; 4=monthly; 14=seconds; |
|
Price |
Specifies the price for the moving average as follows: 1=open; 2=high; 3=low; 4=close; |
|
Length |
Specifies the number of bars over which the moving average is calculated. |
|
AvgType |
Specifies the moving average type as follows: 1=simple; 2=exponential; |
|
NumberBarsBack |
Specifies the number of bars to load. |
The Alchemy 4 Line Moving Averages Global Data Indicator (Alchemy MovAvg4LineGlobalData)
Available for TradeStation 9/10 only!
The Alchemy 4 Line Moving Averages Global Data indicator contains 4 moving averages as well as a separate optional ShowMe dot and/or paint bar which display when all 4 moving averages are positioned above or below each other in a specified sequence. The moving averages can be based on any bar type and bar interval without having to insert multiple data series into the same chart, which makes it also fully functional in RadarScreen. The moving average lines contain various coloring features based on their slope or their relative positioning. For all of the details, please reference the indicator inputs description below.
Indicator Inputs:
|
Interval |
Specifies the bar interval. |
|
Type |
Specifies the bar type as follows:-1=volume; 0=ticks; 1=minutes; 2=daily; 3=weekly; 4=monthly; 14=seconds; |
|
Price1 |
Specifies the price for the first moving average as follows: 1=open; 2=high; 3=low; 4=close; |
|
Price2 |
Specifies the price for the second moving average as follows: 1=open; 2=high; 3=low; 4=close; |
|
Price3 |
Specifies the price for the third moving average as follows: 1=open; 2=high; 3=low; 4=close; |
|
Price4 |
Specifies the price for the fourth moving average as follows: 1=open; 2=high; 3=low; 4=close; |
|
Length1 |
Specifies the number of bars over which the first moving average is calculated, whereas a setting of 0 disables the first moving average. |
|
Length2 |
Specifies the number of bars over which the second moving average is calculated, whereas a setting of 0 disables the second moving average. |
|
Length3 |
Specifies the number of bars over which the third moving average is calculated, whereas a setting of 0 disables the third moving average. |
|
Length4 |
Specifies the number of bars over which the fourth moving average is calculated, whereas a setting of 0 disables the fourth moving average. |
|
Avg1Type |
Specifies the first moving average type as follows: 1=simple; 2=exponential; |
|
Avg2Type |
Specifies the second moving average type as follows: 1=simple; 2=exponential; |
|
Avg3Type |
Specifies the third moving average type as follows: 1=simple; 2=exponential; |
|
Avg4Type |
Specifies the fourth moving average type as follows: 1=simple; 2=exponential; |
|
IntraBarValues |
Enables/disables intra-bar calculations. |
|
NumberBarsBack |
Specifies the number of bars to load. |
|
Displace1 |
Specifies the number of bars to displace the first moving average. |
|
Displace2 |
Specifies the number of bars to displace the second moving average. |
|
Displace3 |
Specifies the number of bars to displace the third moving average. |
|
Displace4 |
Specifies the number of bars to displace the fourth moving average. |
|
RelativePositioning1 |
Specifies the relative positioning order of the first moving average. For example, with a setting of 1, the first moving average is considered the fastest moving average to be above the second fastest moving average for a buy alert paint bar, show me and/or alert notification and vice versa, to be below the second fastest moving average for a sell alert paint bar, show me and/or alert notification. With a setting of 0 the first moving average is not considered for a buy or sell alert based on its relative positioning with the other moving averages. |
|
RelativePositioning2 |
Specifies the relative positioning order of the second moving average. For example, with a setting of 2, the second moving average is considered the second fastest moving average to be above the third fastest moving average and to be below the fastest moving average for a buy alert paint bar, show me and/or alert notification and vice versa, to be below the second fastest moving average and to be above the fastest moving average for a sell alert paint bar, show me and/or alert notification. With a setting of 0 the second moving average is not considered for a buy or sell alert based on its relative positioning with the other moving averages. |
|
RelativePositioning3 |
Specifies the relative positioning order of the third moving average. For example, with a setting of 3, the third moving average is considered the third fastest moving average to be above the slowest moving average and to be below the second fastest moving average for a buy alert paint bar, show me and/or alert notification and vice versa, to be below the slowest moving average and to be above the second moving average for a sell alert paint bar, show me and/or alert notification. With a setting of 0 the third moving average is not considered for a buy or sell alert based on its relative positioning with the other moving averages. |
|
RelativePositioning4 |
Specifies the relative positioning order of the fourth moving average. For example, with a setting of 4, the fourth moving average is considered the slowest moving average to be below the third fastest moving average for a buy alert paint bar, show me and/or alert notification and vice versa, to be above the third fastest moving average for a sell alert paint bar, show me and/or alert notification. With a setting of 0 the fourth moving average is not considered for a buy or sell alert based on its relative positioning with the other moving averages. |
|
BuyColor |
Specifies the back ground color for the Stacked Up cells in RadarScreen |
|
SellColor |
Specifies the back ground color for the Stacked Down cells in RadarScreen |
|
Coloring1Type |
Specifies the coloring type of the first moving average. A setting of 0 uses the default line color. With a setting of 1, the first moving average is colored with the color as specified by the AlertPB Hi plot color when all moving averages are in a relative up position and it is colored with the color as specified by the AlertPB Lo plot color when all moving averages are in a relative down position. With a setting of -1, the first moving average is colored with the color as specified by the BuyAlert plot color when all moving averages are in a relative up position and it is colored with the color as specified by the SellAlert plot color when all moving averages are in a relative down position. With a setting of 2, the first moving average is colored with a gradient coloring based on its slope, using the AlertPB Hi plot color for the most extreme up slope and the AlertPB Lo plot color for the most extreme down slope. With a setting of -2, the first moving average is colored with a gradient coloring based on its slope, using the BuyAlert plot color for the most extreme up slope and the SellAlert plot color for the most extreme down slope. |
|
Coloring2Type |
Specifies the coloring type of the second moving average. A setting of 0 uses the default line color. With a setting of 1, the second moving average is colored with the color as specified by the AlertPB Hi plot color when all moving averages are in a relative up position and it is colored with the color as specified by the AlertPB Lo plot color when all moving averages are in a relative down position. With a setting of -1, the second moving average is colored with the color as specified by the BuyAlert plot color when all moving averages are in a relative up position and it is colored with the color as specified by the SellAlert plot color when all moving averages are in a relative down position. With a setting of 2, the second moving average is colored with a gradient coloring based on its slope, using the AlertPB Hi plot color for the most extreme up slope and the AlertPB Lo plot color for the most extreme down slope. With a setting of -2, the second moving average is colored with a gradient coloring based on its slope, using the BuyAlert plot color for the most extreme up slope and the SellAlert plot color for the most extreme down slope. |
|
Coloring3Type |
Specifies the coloring type of the third moving average. A setting of 0 uses the default line color. With a setting of 1, the third moving average is colored with the color as specified by the AlertPB Hi plot color when all moving averages are in a relative up position and it is colored with the color as specified by the AlertPB Lo plot color when all moving averages are in a relative down position. With a setting of -1, the third moving average is colored with the color as specified by the BuyAlert plot color when all moving averages are in a relative up position and it is colored with the color as specified by the SellAlert plot color when all moving averages are in a relative down position. With a setting of 2, the third moving average is colored with a gradient coloring based on its slope, using the AlertPB Hi plot color for the most extreme up slope and the AlertPB Lo plot color for the most extreme down slope. With a setting of -2, the third moving average is colored with a gradient coloring based on its slope, using the BuyAlert plot color for the most extreme up slope and the SellAlert plot color for the most extreme down slope. |
|
Coloring4Type |
Specifies the coloring type of the fourth moving average. A setting of 0 uses the default line color. With a setting of 1, the fourth moving average is colored with the color as specified by the AlertPB Hi plot color when all moving averages are in a relative up position and it is colored with the color as specified by the AlertPB Lo plot color when all moving averages are in a relative down position. With a setting of -1, the fourth moving average is colored with the color as specified by the BuyAlert plot color when all moving averages are in a relative up position and it is colored with the color as specified by the SellAlert plot color when all moving averages are in a relative down position. With a setting of 2, the fourth moving average is colored with a gradient coloring based on its slope, using the AlertPB Hi plot color for the most extreme up slope and the AlertPB Lo plot color for the most extreme down slope. With a setting of -2, the fourth moving average is colored with a gradient coloring based on its slope, using the BuyAlert plot color for the most extreme up slope and the SellAlert plot color for the most extreme down slope. |
|
Color1Offset |
Specifies the number of bars to offset the color change of the first moving average. For a histogram, point, cross, left tic or right tic, this input should be set to 0 and for lines, this input should be set to 1 bar. |
|
Color2Offset |
Specifies the number of bars to offset the color change of the second moving average. For a histogram, point, cross, left tic or right tic, this input should be set to 0 and for lines, this input should be set to 1 bar. |
|
Color3Offset |
Specifies the number of bars to offset the color change of the third moving average. For a histogram, point, cross, left tic or right tic, this input should be set to 0 and for lines, this input should be set to 1 bar. |
|
Color4Offset |
Specifies the number of bars to offset the color change of the fourth moving average. For a histogram, point, cross, left tic or right tic, this input should be set to 0 and for lines, this input should be set to 1 bar. |
|
Color1Length: |
Specifies the number of bars back for considering the gradient coloring for the first moving average. With a setting of 0, the length of the first moving average as specified with the input Length1 is automatically used. With a negative setting, the gradient coloring effect is disabled and the specified up and down colors are used. |
|
Color2Length: |
Specifies the number of bars back for considering the gradient coloring for the second moving average. With a setting of 0, the length of the second moving average as specified with the input Length2 is automatically used. With a negative setting, the gradient coloring effect is disabled and the specified up and down colors are used. |
|
Color3Length: |
Specifies the number of bars back for considering the gradient coloring for the third moving average. With a setting of 0, the length of the second moving average as specified with the input Length2 is automatically used. With a negative setting, the gradient coloring effect is disabled and the specified up and down colors are used. |
|
Color4Length: |
Specifies the number of bars back for considering the gradient coloring for the fourth moving average. With a setting of 0, the length of the second moving average as specified with the input Length2 is automatically used. With a negative setting, the gradient coloring effect is disabled and the specified up and down colors are used. |
|
ShowAvg1 |
Enables/disables moving average 1. |
|
ShowAvg2 |
Enables/disables moving average 2. |
|
ShowAvg3 |
Enables/disables moving average 3. |
|
ShowAvg4 |
Enables/disables moving average 4. |
|
ShowMe |
Enables/disables the ShowMe which display a dot below the first price bar when all specified moving averages are in a relative up position and they display a dot above the first price bar when all specified moving averages are in a relative down position. A new alert into the same direction is triggered when anyone of the specified moving averages cross against the current direction and then realign. |
|
ShowPaintBar |
Enables/disables the paint bar which paints the price bar when all specified moving averages are in a relative up position and they display a dot above the first price bar when all specified moving averages are in a relative down position. A new alert into the same direction is triggered when anyone of the specified moving averages cross against the current direction and then realign. The bullish color is controlled with the AlertPB Hi plot color and the bearish color is controlled with the AlertPB Lo plot color. Please note that when making a color change, the indicator needs to be disabled and then re-enabled again before the color changes will take affect. |
|
ShowStacked |
Enables/disables the Stacked column in RadarScreen. |
|
ShowMeVerticalOffset |
Specifies the number of cents, ticks or pips to move the ShowMe above the high or below the low of the price bar. |
|
BuyAlert |
Enables/disables the alert notification when a bullish ShowMe or paint bar is displayed. |
|
SellAlert |
Enables/disables the alert notification when a bearish ShowMe or paint bar is displayed. |
|
BuyAlertString |
Specifies the text to be displayed in the buy alert notification window when a bullish ShowMe or paint bar is displayed. This is a string input which needs to stay in quotation marks. |
|
SellAlertString |
Specifies the text to be displayed in the sell alert notification window when a bearish ShowMe or paint bar is displayed. This is a string input which needs to stay in quotation marks. |
|
DataNumber |
Specifies the data series number that the indicator is based on. This input is used for the AlertOn Close feature as described below so that the indicator can correctly detect when a bar closes. |
|
AlertOnClose |
Enables/disables the alert notification on the close of the bar only. With this input set to true, the indicator can be set to update value intra-bar while waiting to generate an alert until the close of the bar. |
|
AlertDelay: |
If multiple alerts are triggered simultaneously, only the last alert will be displayed in the alert notification window. This input specifies the number of delay seconds from the time an alert is generated until it is displayed. The number of seconds starts counting from the first tick that triggers the alert, which means that depending on the tick volume, there maybe additional time beyond the specified delay time until the alert is displayed. A value of -1 disables this alert delay feature. This feature is only available for TradeStation 9 or higher. |
The Alchemy 4 Line Moving Averages Global Data Stacked Indicator (Alchemy MovAvg4LineGlobalDataStacked)
Available for TradeStation 9/10 only!
The Alchemy 4 Line Moving Averages Global Data Stacked indicator contains a Stacked column for RadarScreen and it displays "Up" with a green background color when all 4 moving averages are stacked in the order of the fastest moving average being at the top and the slowest moving average being at the bottom and it displays "Down" with a red background color when all 4 moving averages are stacked in the order of the fastest moving average being at the bottom and the slowest moving average being at the top. The moving averages can be based on any bar type and bar interval. For all of the details, please reference the indicator inputs description below.
Indicator Inputs:
|
Interval |
Specifies the bar interval. |
|
Type |
Specifies the bar type as follows:-1=volume; 0=ticks; 1=minutes; 2=daily; 3=weekly; 4=monthly; 14=seconds; |
|
Price1 |
Specifies the price for the first moving average as follows: 1=open; 2=high; 3=low; 4=close; |
|
Price2 |
Specifies the price for the second moving average as follows: 1=open; 2=high; 3=low; 4=close; |
|
Price3 |
Specifies the price for the third moving average as follows: 1=open; 2=high; 3=low; 4=close; |
|
Price4 |
Specifies the price for the fourth moving average as follows: 1=open; 2=high; 3=low; 4=close; |
|
Length1 |
Specifies the number of bars over which the first moving average is calculated, whereas a setting of 0 disables the first moving average. |
|
Length2 |
Specifies the number of bars over which the second moving average is calculated, whereas a setting of 0 disables the second moving average. |
|
Length3 |
Specifies the number of bars over which the third moving average is calculated, whereas a setting of 0 disables the third moving average. |
|
Length4 |
Specifies the number of bars over which the fourth moving average is calculated, whereas a setting of 0 disables the fourth moving average. |
|
Avg1Type |
Specifies the first moving average type as follows: 1=simple; 2=exponential; |
|
Avg2Type |
Specifies the second moving average type as follows: 1=simple; 2=exponential; |
|
Avg3Type |
Specifies the third moving average type as follows: 1=simple; 2=exponential; |
|
Avg4Type |
Specifies the fourth moving average type as follows: 1=simple; 2=exponential; |
|
IntraBarValues |
Enables/disables intra-bar calculations. |
|
NumberBarsBack |
Specifies the number of bars to load. |
|
RelativePositioning1 |
Specifies the relative positioning order of the first moving average. For example, with a setting of 1, the first moving average is considered the fastest moving average to be above the second fastest moving average for a buy alert and vice versa, to be below the second fastest moving average for a sell alert . With a setting of 0 the first moving average is not considered for a buy or sell alert based on its relative positioning with the other moving averages. |
|
RelativePositioning2 |
Specifies the relative positioning order of the second moving average. For example, with a setting of 2, the second moving average is considered the second fastest moving average to be above the third fastest moving average and to be below the fastest moving average for a buy alert and vice versa, to be below the second fastest moving average and to be above the fastest moving average for a sell alert. With a setting of 0 the second moving average is not considered for a buy or sell alert based on its relative positioning with the other moving averages. |
|
RelativePositioning3 |
Specifies the relative positioning order of the third moving average. For example, with a setting of 3, the third moving average is considered the third fastest moving average to be above the slowest moving average and to be below the second fastest moving average for a buy alert and vice versa, to be below the slowest moving average and to be above the second moving average for a sell alert. With a setting of 0 the third moving average is not considered for a buy or sell alert based on its relative positioning with the other moving averages. |
|
RelativePositioning4 |
Specifies the relative positioning order of the fourth moving average. For example, with a setting of 4, the fourth moving average is considered the slowest moving average to be below the third fastest moving average for a buy alert and vice versa, to be above the third fastest moving average for a sell alert. With a setting of 0 the fourth moving average is not considered for a buy or sell alert based on its relative positioning with the other moving averages. |
|
BuyColor |
Specifies the back ground color for the Stacked Up cells in RadarScreen |
|
SellColor |
Specifies the back ground color for the Stacked Down cells in RadarScreen |
|
BuyAlertString |
Specifies the text to be displayed in the buy alert notification window. This is a string input which needs to stay in quotation marks. |
|
SellAlertString |
Specifies the text to be displayed in the sell alert notification window. This is a string input which needs to stay in quotation marks. |
|
AlertOnClose |
Enables/disables the alert notification on the close of the bar only. With this input set to true, the indicator can be set to update value intra-bar while waiting to generate an alert until the close of the bar. |
The Alchemy Moving Average Band Indicator (Alchemy MovAvgBand)
The Alchemy Moving Average Band Indicator displays an upper band above the moving average and a lower band below the moving average. The moving average can be specified as any type of moving average. The upper and lower band width can be specified separately and the band width can be specified in number of cents, ticks or pips. The upper and lower band can be displayed as plot lines and/or as horizontal trend lines.
Indicator Inputs:
|
Moving Average Parameters: |
|
|
MovAvgPrice: |
Specifies the price to be used for the moving average. |
|
MovAvgLength: |
Specifies the moving average length. |
|
MovAvgType: |
Specifies the moving average type. A setting of 1 uses a simple moving average, a setting of 2 uses an exponential moving average, a setting of 3 uses a weighted moving average, a setting o 4 uses a triangular moving average, a setting of 5 uses a Mid Keltner and a setting of 6 uses a Hull moving average, |
|
Displace: |
Specifies the number of bars to offset the moving average and its bands to the left. |
|
Band Parameters: |
|
|
UpperBandDistance: |
Specifies the distance expressed in number of cents, ticks or pips for the upper band width, whereas a setting of 0 disables the upper band. |
|
LowerBandDistance: |
Specifies the distance expressed in number of cents, ticks or pips for the lower band width, whereas a setting of 0 disables the lower band. |
|
Plotting Parameters: |
|
|
ShowAvg: |
Enables/disables the moving average line |
|
PlotUpperBand: |
A setting 0 disables the upper band plot line. With a setting of 1, the upper band plot line is displayed over the entire chart. With a setting of 2, the upper band plot line is displayed for the last bar only. |
|
PlotLowerBand: |
A setting 0 disables the lower band plot line. With a setting of 1, the lower band plot line is displayed over the entire chart. With a setting of 2, the lower band plot line is displayed for the last bar only. |
|
Trendlines Parameters: |
|
|
ShowUpperTrendLine: |
Enables/disables the horizontal trendline for the upper band. The upper band trendline color and weight are controlled with the UpperBand plot. When making a formatting change to this trendline, the indicator needs to be disabled and then enabled again on order for these changes to take affect. |
|
ShowLowerTrendLine: |
Enables/disables the horizontal trendline for the lower channel. The lower channel trendline color and weight are controlled with the LowerBand plot. When making a formatting change to this trendline, the indicator needs to be disabled and then enabled again on order for these changes to take affect. |
|
TL_UpperStyle: |
Specifies the horizontal trendline style for the upper band. |
|
TL_LowerStyle: |
Specifies the horizontal trendline style for the lower band. |
|
TL_UpperExtendLeft: |
Enables/disables the left extension of the horizontal trendline style for the upper band. |
|
TL_LowerExtendLeft: |
Enables/disables the left extension of the horizontal trendline style for the lower band. |
|
TL_UpperExtendRight: |
Enables/disables the right extension of the horizontal trendline style for the upper band. |
|
TL_LowerExtendRight: |
Enables/disables the right extension of the horizontal trendline style for the lower band. |
|
TL_NullPrice: |
Specifies the price to move the horizontal trendlines to, when they are initialized at the first bar on the chart. |
The Alchemy Moving Average Channel Indicator (Alchemy MovAvgChan)
The Alchemy Moving Average Channel Indicator displays an upper channel above the moving average and a lower channel below the moving average. The moving average can be specified as any type of moving average. The upper and lower channel width can be specified separately and the channel width can be specified either as a ATR multiple or as a moving average percentage or in number of cents, ticks or pips. The upper and lower channel can be displayed as plot lines and/or as horizontal trend lines. The moving average line can be colored based on its slope.
Indicator Inputs:
|
Moving Average Parameters: |
|
|
MovAvgPrice: |
Specifies the price to be used for the moving average. |
|
MovAvgLength: |
Specifies the moving average length. |
|
MovAvgType: |
Specifies the moving average type. A setting of 1 uses a simple moving average, a setting of 2 uses an exponential moving average, a setting of 3 uses a weighted moving average, a setting o 4 uses a triangular moving average, a setting of 5 uses a Mid Keltner and a setting of 6 uses a Hull moving average, |
|
MovAvgFactor: |
This input is activated when the moving average is specified as an exponential moving average and a setting of 1 returns a Wilders Smoothing Moving Average and a setting of 2 returns a standard exponential moving average. The Factor can be specified as any number and it increases the reaction of the moving average as the Factor is increased, therefore making it a faster moving average with a higher Factor. |
|
MovAvgSmoothing: |
This input is activated when the moving average is specified as an exponential moving average and a setting of 0 returns a Wilders Smoothing Moving Average and a setting of 1 returns a standard exponential moving average. The Smoothing can be specified as any number and it smooths the moving average as the Smoothing is increased, therefore making it a slower moving average with a higher Smoothing. |
|
Displace: |
Specifies the number of bars to offset the moving average and its bands to the left. |
|
Channel Parameters: |
|
|
Priority 1: |
Moving Average Percent |
|
UpperChannelPercent: |
Specifies the average percent of the upper channel, whereas a setting of 0 disables the upper channel. |
|
LowerChannelPercent: |
Specifies the average percent of the lower channel, whereas a setting of 0 disables the lower channel. |
|
Priority 2: |
ATR |
|
ATR_Length: |
Specifies the ATR length for calculating the upper and lower channel width, whereas a setting of 0 disables the ATR width method for the upper and lower channel. |
|
UpperATR_Factor: |
Specifies the ATR multiplier for calculating the upper channel width, whereas a setting of 0 disables the ATR width method for the upper channel. In order to use this ATR distance method for the upper channel , the input UpperChannelPercent needs to be set to 0. |
|
LowerATR_Factor: |
Specifies the ATR multiplier for calculating the lower channel width, whereas a setting of 0 disables the ATR width method for the lower channel. In order to use this ATR distance method for the lower channel , the input LowerChannelPercent needs to be set to 0. |
|
Priority 3: |
Fixed cent/tick/pip distance |
|
UpperChannelDistance: |
Specifies the distance expressed in number of cents, ticks or pips for the upper channel width, whereas a setting of 0 disables this fixed distance method for the upper channel . In order to use this fixed distance method for the upper band, both inputs UpperChannelPercent and UpperATR_Factor need to be set to 0. |
|
LowerChannelDistance: |
Specifies the distance expressed in number of cents, ticks or pips for the lower channel width, whereas a setting of 0 disables this fixed distance method for the lower channel . In order to use this fixed distance method for the lower band, both inputs LowerChannelPercent and LowerATR_Factor need to be set to 0. |
|
Plotting Parameters: |
|
|
ShowAvg: |
Enables/disables the moving average line |
|
PlotUpperChannel: |
A setting 0 disables the upper channel plot line. With a setting of 1, the upper channel plot line is displayed over the entire chart. With a setting of 2, the upper channel plot line is displayed for the last bar only. |
|
PlotLowerChannel: |
A setting 0 disables the lower channel plot line. With a setting of 1, the lower channel plot line is displayed over the entire chart. With a setting of 2, the lower channel plot line is displayed for the last bar only. |
|
ColorOffset: |
Specifies the number of bars to offset the sloping color change of the average. For a histogram, point, cross, left tic or right tic, this input should be set to 0 and for lines, this input should be set to 1 bar. A negative setting disables the sloping coloring effect. |
|
ColorLength: |
Specifies the number of bars back for considering the gradient coloring for the moving average. With a setting of 0, the length of the moving average as specified with the input Length is automatically used. With a negative setting, the gradient coloring effect is disabled and the specified up and down colors are used. The extreme up slope color is specified with the plot UpSlope and the extreme down slope color is specified with the plot DownSlope. |
|
Trendlines Parameters: |
|
|
ShowUpperTrendLine: |
Enables/disables the horizontal trendline for the upper channel. The upper channel trendline color and weight are controlled with the UpperChan plot. When making a formatting change to this trendline, the indicator needs to be disabled and then enabled again on order for these changes to take affect. |
|
ShowLowerTrendLine: |
Enables/disables the horizontal trendline for the lower channel. The lower channel trendline color and weight are controlled with the LowerChan plot. When making a formatting change to this trendline, the indicator needs to be disabled and then enabled again on order for these changes to take affect. |
|
TL_UpperStyle: |
Specifies the horizontal trendline style for the upper channel. |
|
TL_LowerStyle: |
Specifies the horizontal trendline style for the lower channel. |
|
TL_UpperExtendLeft: |
Enables/disables the left extension of the horizontal trendline style for the upper channel. |
|
TL_LowerExtendLeft: |
Enables/disables the left extension of the horizontal trendline style for the lower channel. |
|
TL_UpperExtendRight: |
Enables/disables the right extension of the horizontal trendline style for the upper channel. |
|
TL_LowerExtendRight: |
Enables/disables the right extension of the horizontal trendline style for the lower channel. |
|
TL_NullPrice: |
Specifies the price to move the horizontal trendlines to, when they are initialized at the first bar on the chart. |
|
Alert Parameters: |
|
|
UpperChannelAlert: |
Specifies the text of the alert notification window when price crosses over the upper channel. This is a string type input and the text needs to stay within quotation marks. To disable this alert, this input needs to be entered with 2 quotation marks such as "". |
|
LowerChannelAlert: |
Specifies the text of the alert notification window when price crosses under the lower channel. This is a string type input and the text needs to stay within quotation marks. To disable this alert, this input needs to be entered with 2 quotation marks such as "". |
|
UpSlopeAlert: |
Specifies the text of the alert notification window when the moving average starts sloping up. This is a string type input and the text needs to stay within quotation marks. To disable this alert, this input needs to be entered with 2 quotation marks such as "". |
|
DownSlopeAlert: |
Specifies the text of the alert notification window when the moving average starts sloping down. This is a string type input and the text needs to stay within quotation marks. To disable this alert, this input needs to be entered with 2 quotation marks such as "". |
The Alchemy Moving Average 1 Line Alert Indicator (Alchemy MovAvg1LAlrt)
The Alchemy Moving Average 1 Line Alert Indicator generates alerts when price is above or below a specified moving average by a minimum percentage.
As a Charting indicator, it can be displayed as follows:
-
Together with the price bars:
-
Displays the moving average (MvgAvg plot)
-
Displays the minimum percentage above and below the moving average (MinPcntAbove/Below plots)
-
Displays the specified price above and below the moving average that changes colors when it exceeds the minimum percentage above and below the moving average (Above/BelowPrice plots)
-
-
On a separate sub-graph that displays the percent above/below the moving average as a histogram that changes colors when it is exceeds the minimum percentage above and below the moving average (MinPcntAbove/Below plots)
As a RadarScreen/Scanner indicator, it can be displayed as follows:
-
Besides the above charting plots, it contains alert cells that generate alerts and that can be used for sorting for all symbols that are above/below a moving average by a specified percentage (Above/BelowAvg plots).
Indicator Inputs:
|
MinimumPercent: |
Specifies the minimum required percent for price as specified by the input AboveAlertPrice to be above the moving average in order for the AboveAvg plot to display the text "Above Avg" and in order for the PcntAbove plot to display the percent value. It specifies the minimum required percent for price as specified by the input BelowAlertPrice to be below the moving average in order for the BelowAvg plot to display the text "Below Avg" and in order for the PcntBelow plot to display the percent value. The minimum percent prices are displayed with the plots MinPcntAbove and MinPcntBelow. |
|
AboveAlertPrice: |
Specifies the price to be used that has to be above the moving average for the AboveAvg and the PcntAbove plots to display. This price is displayed with the plot AbovePrice. |
|
BelowAlertPrice: |
Specifies the price to be used that has to be below the moving average for the BelowAvg and the PcntBelow plots to display. This price is displayed with the plot BelowPrice. |
|
AboveAlertFG: |
Specifies the foreground color for the AboveAvg plot. |
|
AboveAlertBG: |
Specifies the background color for the AboveAvg plot. This color is also used for all other plot alert color changes. |
|
BelowAlertFG: |
Specifies the foreground color for the BelowAvg plot. |
|
BelowAlertBG: |
Specifies the background color for the BelowAvg plot. This color is also used for all other plot alert color changes. |
|
Price: |
Specifies the price to be used for the moving average. |
|
Length: |
Specifies the moving average length. |
|
Factor: |
This input is activated when the moving average is specified as an exponential moving average and a setting of 1 returns a Wilders Smoothing Moving Average and a setting of 2 returns a standard exponential moving average. The Factor can be specified as any number and it increases the reaction of the moving average as the Factor is increased, therefore making it a faster moving average with a higher Factor. |
|
Smoothing: |
This input is activated when the moving average is specified as an exponential moving average and a setting of 0 returns a Wilders Smoothing Moving Average and a setting of 1 returns a standard exponential moving average. The Smoothing can be specified as any number and it smooths the moving average as the Smoothing is increased, therefore making it a slower moving average with a higher Smoothing. |
|
Type: |
Specifies the moving average type. A setting of 1 uses a simple moving average, a setting of 2 uses an exponential moving average, a setting of 3 uses a weighted moving average, a setting of 4 uses a triangular moving average and with a setting of 0, any moving average formula can be typed into the Price input. |
|
ShowMovgAvg: |
Enables/disables the moving average plot. |
|
ShowPcntAboveBelow: |
Enables/disables the percent above/below plots. |
|
ShowPctZeroLine: |
Enables/disables the percent zero line. |
|
ShowAboveBelowAlertPrice: |
Enables/disables the above/below alert price plots. |
|
ShowAboveBelowMvgAvg: |
Enables/disables the above/below minimum moving average plots. |
|
PcntBelowMultiplier: |
Specifies the multiplier for the percent below plot. For example, with a setting of -1, the percent below displays as a negative histogram. |
The Alchemy Smoothed Moving Averages Indicator (Alchemy MovAvgSmooth)
Indicator Inputs:
|
Price: |
Specifies the price to be used for the smoothed moving averages calculation. |
|
Length: |
Specifies the number of bars back to consider for the smoothed moving averages calculation. |
|
Displace: |
Specifies the number of bars to displace the smoothed moving average. |
|
LongAlertPrice: |
Specifies the price that needs to cross over the smoothed moving average to trigger a long crossing alert. |
|
ShortAlertPrice: |
Specifies the price that needs to cross under the smoothed moving average to trigger a short crossing alert. |
The Alchemy Moving Averages Angle Indicator (Alchemy MovAvgAngles)
The Alchemy Moving Averages Angle Indicator displays a text on a price chart that shows the angle of a specified moving average and the number of consecutive bars that the specified moving average has been angling up or down. The moving average angle is displayed as the difference of values between the moving average of the current bar and the moving average of the previous bar.
Indicator Inputs:
|
MvgAvg: |
Specifies the formula for the moving average. For example a 10 bar simple moving average would be typed in as average(close,10), a 10 bar exponential moving average would be typed in as xaverage(close,10) and a 10 bar weighted moving average would be typed in as waverage(close,10). The formula can also be pasted in by clicking on the Dictionary... button. |
|
PositiveColor: |
Specifies the text color for a positive moving averages angle. |
|
NegativeColor: |
Specifies the text color for a negative moving averages angle. |
|
TextPrice: |
Specifies the price of the current bar at which the text object will be anchored at. |
|
AngleText: |
Specifies the descriptive text to be displayed for the Angle. This is a string input and the text always needs to bracketed by quotation marks. |
|
NumberBarsText: |
Specifies the descriptive text to be displayed for the number of consecutive bars. This is a string input and the text always needs to bracketed by quotation marks. |
|
AngleDecimal: |
Specifies the number of decimals for the angle to be displayed at. |
|
TextVertOffSet: |
Specifies the number of ticks to move this text object up or down from to the price as specified with the input "TextPrice", whereas a positive number moves the text object up and a negative value moves the text object down. |
|
TextVertAlign: |
Specifies the vertical alignment of the text object, whereas a value of 0 results in a top vertical placement, a value of 1 results in a bottom vertical placement and a value of 2 results in a centered vertical placement. |
|
TextHorOffSet: |
Specifies the number of bars to move this text object to the left of the current price bar. |
|
TextHorizAlign: |
Specifies the horizontal alignment of the text object, whereas a value of 0 results in a left horizontal placement, a value of 1 results in a right horizontal placement and a value of 2 results in a centered horizontal placement. |
|
SpaceToLeft: |
Specifies the number of spaces to place to the left of the text object. With this feature and TextHorOffSet as well as TextHorizAlign set to 0, the text object can be moved to the right of the current price bar without interfering with any price bars. This is a text string input and the blank spaces need to stay within quotation marks. The more blank spaces are inserted into this input, the further the text object will move to the right, away from the current price bar. Please note that the blank space to the right needs to be created on the chart by setting enough bars to the right under Format > Space to the Right, otherwise, the text object won't be visible. |
The Alchemy Moving Average Exponential Indicator (Alchemy MovAvgExp)
The Alchemy Moving Average Exponential Indicator contains the option of using the standard exponential moving average as well as Wilders Smoothing Moving Average. The moving average line contains a gradient coloring effect based on its slope. The up slope color is controlled with the UpColor plot and the down slope color is controlled with DownColor plot colors under Format Indicator > Color. Please note that when making a color change, the indicator needs to be disabled and then re-enabled again before the color changes will take affect.
Indicator Inputs:
|
Price: |
Specifies the price to be used for the moving average. |
|
MvgAvgLength: |
Specifies the moving average length. |
|
Factor: |
A setting of 1 returns a Wilders Smoothing Moving Average and a setting of 2 returns a standard exponential moving average. The Factor can be specified as any number and it increases the reaction of the moving average as the Factor is increased, therefore making it a faster moving average with a higher Factor. |
|
Smoothing: |
A setting of 0 returns a Wilders Smoothing Moving Average and a setting of 1 returns a standard exponential moving average. The Smoothing can be specified as any number and it smooths the moving average as the Smoothing is increased, therefore making it a slower moving average with a higher Smoothing. |
|
MvgAvgLength: |
Specifies the moving average length. |
|
ColorLength: |
Specifies the number of bars back for considering the extreme slopes of the gradient coloring. With a setting of 0, the length of the moving average as specified with the input MvgAvgLength is automatically used. A setting of -1 uses fixed up and down sloping colors. |
|
ColorOffset: |
Specifies the number of bars to offset the color change. For a histogram, point, cross, left tic or right tic, this input should be set to 0 and for lines, this input should be set to 1 bar. A negative setting disables the coloring effect, using the default MvgAvg plot color. |
The Alchemy Moving Average Exponential Universal Data Indicator (Alchemy MovAvgExpUniversalData)
Available for TradeStation 9/10 only!
The Alchemy Moving Average Exponential Universal Data Indicator displays an exponential moving average on any chart for any specified data series. The moving average line contains a gradient coloring effect based on its slope. The up slope color is controlled with the UpColor plot and the down slope color is controlled with DownColor plot colors under Format Indicator > Color. Please note that when making a color change, the indicator needs to be disabled and then re-enabled again before the color changes will take affect.
Indicator Inputs:
|
OpenHighLowClose: |
Specifies the price to be used for calculating the exponential moving average, whereas a setting of 1 uses the open price, a setting of 2 uses the high price, a setting of 3 uses the low price and a setting of 4 uses the close price. |
|
Length: |
Specifies the moving average length. |
|
ColorOffset: |
Specifies the number of bars to offset the slope color. For a histogram, point, cross, left tic or right tic, this input should be set to 0 and for lines, this input should be set to 1 bar. The up slope color is controlled with the UpColor plot and the down slope color is controlled with the DnColor plot. When making any color changes, the indicator needs to be disabled and then re-enabled before the color changes will take affect. A negative setting disables the coloring effect, using the default AvgExp plot color. |
|
SymbolNme: |
Specifies the symbol to be used for calculating the exponential moving average, whereas the reserved word symbol, automatically uses the symbol as it is applied on the chart. This is a string input and unless the reserved word symbol is used, the specified symbol needs to stay within quotation marks. |
|
NumberBarsBack: |
Specifies the historical number of bars to load from the current date and time for calculating the exponential moving average. If NumberBarsBack is not set to load in enough bars for calculating all the way back to the beginning of the chart, the exponential moving average calculations won't start until later on the chart. Therefore, it is better to load in more bars then not enough. However, as this number increases, it will substantially slow down the load in time of this indicator. If the last bar of the chart is not the current date, to save unnecessary processing power, it is recommended to use the FirstDate and LastDate inputs for specifying the dates to load the historical bars for calculating the exponential moving average. If you receive an error message Not enough Data, you need to either reduce the value of this input and/or increase the date range of your symbol setting. |
|
FirstDate: |
Specifies the earliest date for loading the historical bars to calculate the exponential moving average. In order to use this method of loading the historical bars to calculate the exponential moving average, the input NumberBarsBack has to be set to 0. As explained above, if the last bar of the chart is not the current date, to save unnecessary processing power, it is recommended to use the FirstDate and LastDate inputs for specifying the dates to load the historical bars for calculating the exponential moving average. This is a string input and when used, the precise format has to be "month/day/year". For example a date of February 1st, 2012 would be entered as "2/1/2012". When not used, this input should be left blank with 2 quotation marks as follows "". If the format of this input is not correct, the indicator will generate an invalid date time format error message. |
|
LastDate: |
Specifies the latest date for loading the historical bars to calculate the exponential moving average. In order to use this method of loading the historical bars to calculate the exponential moving average, the input NumberBarsBack has to be set to 0. As explained above, if the last bar of the chart is not the current date, to save unnecessary processing power, it is recommended to use the FirstDate and LastDate inputs for specifying the dates to load the historical bars for calculating the exponential moving average. This is a string input and when used, the precise format has to be "month/day/year". For example a date of February 1st, 2012 would be entered as "2/1/2012". When not used, this input should be left blank with 2 quotation marks as follows "". |
|
Interval: |
Specifies the interval setting for a Tick, Volume or Intra-Day interval of the exponential moving average. |
|
IntervalBarType: |
Specifies the interval bar type of the exponential moving average. A setting of -1 uses a Volume chart. A setting of 0 uses a Tick chart. A setting of 1 uses an Intra-Day Minute chart. A setting of 2 uses a Daily chart. A setting of 3 uses a Weekly chart. A setting of 4 uses a Monthly chart. |
|
ClosedValue: |
Displays the last closed bar moving average value of the specified data series when enabled. |
The Alchemy Moving Average Color Indicator (Alchemy MovAvgColor)
The Alchemy Moving Average Color Indicator displays a moving average of any type as specified and the moving average line contains a gradient coloring effect based on either its slope or on the relationship between price and the moving average. The up color is controlled with the UpColor plot, the down color is controlled with the DownColor plot and the neutral color is controlled with the MovAvg plot colors under Format Indicator > Color. Please note that when making a color change, the indicator needs to be disabled and then re-enabled again before the color changes will take affect.
Indicator Inputs:
|
Price: |
Specifies the price to be used for the moving average. |
|
Length: |
Specifies the moving average length. |
|
MvgAvgType: |
Specifies the moving average type. A setting of 1 uses a simple moving average, a setting of 2 uses an exponential moving average, a setting of 3 uses a weighted moving average, a setting of 4 uses a triangular moving average, a setting of 5 uses a Mid Keltner, a setting of 6 uses a Hull moving average, a setting of 7 uses price as specified with the input Price. |
|
Displace: |
Specifies the number of bars to offset the moving average to the left of its corresponding bar |
|
ColorOffset: |
Specifies the number of bars to offset the color change. For a histogram, point, cross, left tic or right tic, this input should be set to 0 and for lines, this input should be set to 1 bar. A negative setting disables the coloring effect, using the default MvgAvg plot color. |
|
ColorLength: |
Specifies the number of bars back for considering the extreme slopes of the gradient coloring. With a setting of 0, the length of the moving average as specified with the input Length is automatically used. A setting of -1 uses fixed up and down sloping colors. |
|
MinPercent: |
Specifies the minimum percent for either price to cross above or below the moving average line (CrossPrice specified) or for the moving average slope to change directions (CrossPrice set to 0) |
|
UseCrossPrice: |
With a setting of true, the moving average line is colored when price as specified with the input CrossPrice is either above or below the moving average. A setting of false uses the moving average slope for coloring the moving average line. |
|
CrossPrice: |
Specifies the price to be used for coloring the moving average line when this price is either above or below the moving average. A setting of 0 uses the moving average slope for coloring the moving average line. |
|
CrossUpAlert: |
Enables/disables the alert when either price crosses over the moving average line (CrossPrice specified) or the moving average slope changes from down to up (CrossPrice set to 0) |
|
CrossUpAlert: |
Enables/disables the alert when either price crosses under the moving average line (CrossPrice specified) or the moving average slope changes from up to down (CrossPrice set to 0) |
The Alchemy Moving Average Price Percent Indicator (Alchemy MovAvgPricePercent)
The Alchemy Moving Average Price Percent Indicator displays the percent difference between price and a moving average of any type.
Indicator Inputs:
|
Price: |
Specifies the price to be used for comparing to the moving average. |
|
MvgAvgPrice: |
Specifies the price to be used for the moving average. |
|
MvgAvgLength: |
Specifies the moving average length. |
|
MvgAvgType: |
Specifies the moving average type. A setting of 1 uses a simple moving average, a setting of 2 uses an exponential moving average, a setting of 3 uses a weighted moving average, a setting of 4 uses a triangular moving average, a setting of 5 uses a Mid Keltner, a setting of 6 uses a Hull moving average, a setting of 0 uses price as specified with the input MvgAvgPrice. |
|
NegPercentMultiplier: |
Specifies the multiplier for negative percentages. For example, when set to 1, negative percentages will be displayed as a negative histogram. When set to -1, negative percentages will be displayed as positive values for the use with RadarScreen. |
The Alchemy Moving Average-Price Ratio Indicator (Alchemy MovAvgPriceRatio)
The Alchemy Moving Average Price Percent Indicator displays the ratio between price and a moving average of any type.
Indicator Inputs:
|
Price: |
Specifies the price to be used for comparing to the moving average. |
|
MvgAvgPrice: |
Specifies the price to be used for the moving average. |
|
MvgAvgLength: |
Specifies the moving average length. |
|
MvgAvgType: |
Specifies the moving average type. A setting of 1 uses a simple moving average, a setting of 2 uses an exponential moving average, a setting of 3 uses a weighted moving average, a setting of 4 uses a triangular moving average, a setting of 5 uses a Mid Keltner, a setting of 6 uses a Hull moving average, a setting of 0 uses price as specified with the input MvgAvgPrice. |
|
Percent_PointsDollar_MinMove: |
A setting of 1 displays the ratio in percentages, a setting of 2 displays the ratio in points or dollars and a setting of 3 displays the ratio in cents, ticks or pips. |
|
UpColor: |
Specifies the charting plot color or RadarScreen background cell color for positive values. |
|
DownColor: |
Specifies the charting plot color or RadarScreen background cell color for negative values. |
The Alchemy Price To Moving Average Indicator (Alchemy PriceToMovAvg)
The Alchemy Price To Moving Average Indicator displays an up or down text depending on the positioning between price and a moving average.
Indicator Inputs:
|
Price: |
Specifies the price to be used for comparing to the moving average. |
|
MvgAvgPrice: |
Specifies the price to be used for the moving average. |
|
MvgAvgLength: |
Specifies the moving average length. |
|
MvgAvgType: |
Specifies the moving average type. A setting of 1 uses a simple moving average, a setting of 2 uses an exponential moving average, a setting of 3 uses a weighted moving average, a setting of 4 uses a triangular moving average, a setting of 5 uses a Mid Keltner, a setting of 6 uses a Hull moving average, a setting of 0 uses price as specified with the input MvgAvgPrice. |
|
UpText: |
Specifies the text to display when price is above the moving average. |
|
DownText: |
Specifies the text to display when price is below the moving average. |
|
UpColor: |
Specifies the charting plot color or RadarScreen background cell color for positive values. |
|
DownColor: |
Specifies the charting plot color or RadarScreen background cell color for negative values. |
The Alchemy 1 Line Moving Average Indicator (Alchemy MovAvg1Line)
The Alchemy 1 Line Moving Average Indicator displays a moving average of any type as specified and the moving average line contains a gradient coloring effect based on its slope. When used on a positive/negative underlying instrument such as the $TICK, it can be displayed as a histogram with separate positive/negative coloring. This indicator also contains the following additional features:
An optional slope percentage text box for charting.
A slope percentage column for RadarScreen
A price crossing plot.
Paint bars and/or Show Me's that are colored when the price bar touches the moving average and either close in the upper or lower percentage of the bar's range.
Indicator Inputs:
|
|
Moving Average Parameters: |
|
MvgAvgPrice: |
Specifies the price to be used for the moving average. |
|
MvgAvgLength: |
Specifies the moving average length. |
|
MvgAvgFactor: |
This input is activated when the moving average is specified as an exponential moving average and a setting of 1 returns a Wilders Smoothing Moving Average and a setting of 2 returns a standard exponential moving average. The Factor can be specified as any number and it increases the reaction of the moving average as the Factor is increased, therefore making it a faster moving average with a higher Factor. |
|
MvgAvgSmoothing: |
This input is activated when the moving average is specified as an exponential moving average and a setting of 0 returns a Wilders Smoothing Moving Average and a setting of 1 returns a standard exponential moving average. The Smoothing can be specified as any number and it smooths the moving average as the Smoothing is increased, therefore making it a slower moving average with a higher Smoothing. |
|
DataSeriesNum: |
Specifies the data series number that the moving average should be based on. When based on a different data series than 1, this average is limited to a simple moving average. |
|
MvgAvgType: |
Specifies the moving average type. A setting of 1 uses a simple moving average, a setting of 2 uses an exponential moving average, a setting of 3 uses a weighted moving average, a setting of 4 uses a triangular moving average, a setting of 5 uses a Mid Keltner, a setting of 6 uses a Hull moving average, a setting of 7 uses price as specified with the input MvgAvgPrice. |
|
|
Cross: |
|
CrossUpPrice: |
Specifies the price to be used for displaying a moving average up crossing such as high or close. |
|
CrossDownPrice: |
Specifies the price to be used for displaying a moving average down crossing such as low or close. |
|
|
Touch: |
|
TouchClosingPercent: |
Specifies the minimum percentage for the bar to close in the upper or lower bar range for the paint bars to display when the bar touches the moving average. A negative value disables the touch paint bars and alerts. |
|
TouchUpHighPrice: |
Specifies the highest price of the bar that has to touch the moving average and close in the bar's upper range. |
|
TouchUpLowPrice: |
Specifies the lowest price of the bar that has to touch the moving average and close in the bar's upper range. |
|
TouchDownHighPrice: |
Specifies the highest price of the bar that has to touch the moving average and close in the bar's lower range. |
|
TouchDownLowPrice: |
Specifies the lowest price of the bar that has to touch the moving average and close in the bar's lower range. |
|
|
Plotting: |
|
ShowAvg: |
Enables/disables the moving average line. |
|
ShowCross: |
Enables/disables the price crossing plots CrossUp and CrossDn. |
|
ShowTouchPaintBars: |
Enables/disables the moving average touch paint bars. |
|
PB_High: |
Specifies the high price of the paint bar. For example, with PB_High specified as high and PB_Low specified as low, the entire bar range is painted, whereas with PB_High specified as open and PB_Low specified as close, the candle body is painted. |
|
PB_Low: |
Specifies the low price of the paint bar. For example, with PB_High specified as high and PB_Low specified as low, the entire bar range is painted, whereas with PB_High specified as open and PB_Low specified as close, the candle body is painted. |
|
ShowTouchMes: |
Enables/disables the moving average Show Me's. |
|
TouchShowMeOffset: |
Specifies the number of cents, ticks or pips to offset the Show Me's above the Touch Up paint bar high or below the Touch Down paint bar low. |
|
|
Coloring: |
|
ColorLength: |
Specifies the number of bars back for considering the extreme slopes of the gradient coloring. With a setting of 0, the length of the moving average as specified with the input MvgAvgLength is automatically used. A setting of -1 uses fixed up and down sloping colors, a setting of -2 uses fixed positive and negative value colors for use with positive/negative underlying instruments such as the $TICK and a setting of -3 looks at the strategy positions on the same chart in order to determine the line coloring, whereas the UpColor is used for when the strategy is long, the DownColor is used for when the strategy is short and the default MvgAvg plot color is used for when the strategy is flat. |
|
ColorOffset: |
Specifies the number of bars to offset the color change. For a histogram, point, cross, left tic or right tic, this input should be set to 0 and for lines, this input should be set to 1 bar. A negative setting disables the coloring effect, using the default MvgAvg plot color. |
|
UpColor: |
Specifies the line/slope percent color for a positive slope. |
|
DownColor: |
Specifies the line/slope percent color for a negative slope. |
|
|
Slope: |
|
ShowSlopeText: |
Enables/disables the slope percentage text box for charting. |
|
LeftSpace: |
With this input, additional blank space can be added to the left of the text label for the purpose of moving the text labels into the extra space to the right of the last bar as created through Format > Space to the Right. Please note that this is a string input and the quotation marks need to remain. For example, to move the text labels 10 spaces to the right of the most recent bar, the input value would be as follows " " Again, in order for the text object to be visible, the extra space needs to be created between the last bar and the right price axis via Format > Space to the Right |
|
PercentDecimal: |
Specifies the decimal points to display in the slope percentage text box. |
|
PercentMultiplier: |
Specifies the percent slope multiplier for displaying in the slope percentage text box as well as in the RadarScreen column. |
|
|
Positive/Negative Price Parameters: |
|
ShowUpperThreshold: |
Enables/disables the upper threshold line. |
|
ShowLowerThreshold: |
Enables/disables the lower threshold line. |
|
ShowCenterLine: |
Enables/disables the center line. |
|
MaxValue: |
Specifies the maximum value to be used for calculating the upper threshold, lower threshold and center lines. |
|
UpperThresholdPercent: |
Specifies percentage of the MaxValue input for displaying the upper threshold line. For example, with MaxValue set to 1000 and UpperThresholdPercent set to 80, the upper threshold line is drawn at 800. |
|
LowerThresholdPercent: |
Specifies the percentage of the MaxValue input for displaying the lower threshold line. For example, with MaxValue set to 1000 and UpperThresholdPercent set to 20, the upper threshold line is drawn at 200. With a negative setting, the underlying instrument is assumed to be of a positive/negative nature such as the $TICK and the lower price extremes as entered with the input MaxValue is assumed to be a negative value. For example, with MaxValue set to 1000, and LowerThresholdPercent set to -20, the lower threshold line is drawn at -800 (maximum negative value = -1000, therefore 20% above -1000 = -800). |
|
CenterLinePercent: |
Specifies percentage of the MaxValue input for displaying the center line. |
|
|
Alerts: |
|
CrossUpAlertText: |
Secifies the text to be displayed in the alert notification window when price crosses over the moving average. This is a string input and the text needs to stay within quotation marks. A blank input such as "" disables this alert. |
|
CrossDownAlertText: |
Secifies the text to be displayed in the alert notification window when price crosses under the moving average. This is a string input and the text needs to stay within quotation marks. A blank input such as "" disables this alert. |
|
TouchUpAlert: |
Secifies the text to be displayed in the alert notification window when the price bar touches the moving average and closes in the upper percentage of the bar's range. This is a string input and the text needs to stay within quotation marks. A blank input such as "" disables this alert. |
|
TouchDownAlert: |
Secifies the text to be displayed in the alert notification window when the price bar touches the moving average and closes in the lower percentage of the bar's range. This is a string input and the text needs to stay within quotation marks. A blank input such as "" disables this alert. |
The Alchemy 1 Line Moving Average OOEL Indicator (Alchemy MovAvg1Line.OOEL) Available for TradeStation 9/10 only!
The Alchemy 1 Line Moving Average Indicator displays a moving average of any type as specified and the moving average line contains a gradient coloring effect based on its slope. When used on a positive/negative underlying instrument such as the $TICK, it can be displayed as a histogram with separate positive/negative coloring. With this indicator, the moving average parameters can be received directly from a different study such as our AlchemyMASingleLine.OOEL strategy.
This indicator also contains the following additional features:
An optional slope percentage text box for charting.
A slope percentage column for RadarScreen
A price crossing plot.
Paint bars that are colored when the price bar touches the moving average and either close in the upper or lower percentage of the bar's range.
Indicator Inputs:
|
|
Moving Average Parameters: |
|
MvgAvgPrice: |
Specifies the price to be used for the moving average. |
|
MvgAvgLength: |
Specifies the moving average length. |
|
MvgAvgFactor: |
This input is activated when the moving average is specified as an exponential moving average and a setting of 1 returns a Wilders Smoothing Moving Average and a setting of 2 returns a standard exponential moving average. The Factor can be specified as any number and it increases the reaction of the moving average as the Factor is increased, therefore making it a faster moving average with a higher Factor. |
|
MvgAvgSmoothing: |
This input is activated when the moving average is specified as an exponential moving average and a setting of 0 returns a Wilders Smoothing Moving Average and a setting of 1 returns a standard exponential moving average. The Smoothing can be specified as any number and it smooths the moving average as the Smoothing is increased, therefore making it a slower moving average with a higher Smoothing. |
|
DataSeriesNum: |
Specifies the data series number that the moving average should be based on. When based on a different data series than 1, this average is limited to a simple moving average. |
|
MvgAvgType: |
Specifies the moving average type. A setting of 1 uses a simple moving average, a setting of 2 uses an exponential moving average, a setting of 3 uses a weighted moving average, a setting of 4 uses a triangular moving average, a setting of 5 uses a Mid Keltner, a setting of 6 uses a Hull moving average, a setting of 7 uses price as specified with the input MvgAvgPrice. |
|
gdName: |
Specifies the Global Dictionary name for receiving the MvgAvgLength and the MvgAvgType input values. This is a string input which needs to stay within quotation marks. When used, the values of the inputs MvgAvgLength and the MvgAvgType are ignored. To disable this feature, this input needs to be blank with just 2 quotation marks. |
|
|
Cross: |
|
CrossUpPrice: |
Specifies the price to be used for displaying a moving average up crossing such as high or close. |
|
CrossDownPrice: |
Specifies the price to be used for displaying a moving average down crossing such as low or close. |
|
|
Touch: |
|
TouchClosingPercent: |
Specifies the minimum percentage for the bar to close in the upper or lower bar range for the paint bars to display when the bar touches the moving average. A negative value disables the touch paint bars and alerts. |
|
TouchUpHighPrice: |
Specifies the highest price of the bar that has to touch the moving average and close in the bar's upper range. |
|
TouchUpLowPrice: |
Specifies the lowest price of the bar that has to touch the moving average and close in the bar's upper range. |
|
TouchDownHighPrice: |
Specifies the highest price of the bar that has to touch the moving average and close in the bar's lower range. |
|
TouchDownLowPrice: |
Specifies the lowest price of the bar that has to touch the moving average and close in the bar's lower range. |
|
|
Plotting: |
|
ShowAvg: |
Enables/disables the moving average line. |
|
ShowCross: |
Enables/disables the price crossing plots CrossUp and CrossDn. |
|
ShowTouchPaintBars: |
Enables/disables the paint bars. |
|
PB_High: |
Specifies the high price of the paint bar. For example, with PB_High specified as high and PB_Low specified as low, the entire bar range is painted, whereas with PB_High specified as open and PB_Low specified as close, the candle body is painted. |
|
PB_Low: |
Specifies the low price of the paint bar. For example, with PB_High specified as high and PB_Low specified as low, the entire bar range is painted, whereas with PB_High specified as open and PB_Low specified as close, the candle body is painted. |
|
|
Coloring: |
|
ColorLength: |
Specifies the number of bars back for considering the extreme slopes of the gradient coloring. With a setting of 0, the length of the moving average as specified with the input MvgAvgLength is automatically used. A setting of -1 uses fixed up and down sloping colors, a setting of -2 uses fixed positive and negative value colors for use with positive/negative underlying instruments such as the $TICK and a setting of -3 looks at the strategy positions on the same chart in order to determine the line coloring, whereas the UpColor is used for when the strategy is long, the DownColor is used for when the strategy is short and the default MvgAvg plot color is used for when the strategy is flat. |
|
ColorOffset: |
Specifies the number of bars to offset the color change. For a histogram, point, cross, left tic or right tic, this input should be set to 0 and for lines, this input should be set to 1 bar. A negative setting disables the coloring effect, using the default MvgAvg plot color. |
|
UpColor: |
Specifies the line/slope percent color for a positive slope. |
|
DownColor: |
Specifies the line/slope percent color for a negative slope. |
|
|
Slope: |
|
ShowSlopeText: |
Enables/disables the slope percentage text box for charting. |
|
LeftSpace: |
With this input, additional blank space can be added to the left of the text label for the purpose of moving the text labels into the extra space to the right of the last bar as created through Format > Space to the Right. Please note that this is a string input and the quotation marks need to remain. For example, to move the text labels 10 spaces to the right of the most recent bar, the input value would be as follows " " Again, in order for the text object to be visible, the extra space needs to be created between the last bar and the right price axis via Format > Space to the Right |
|
PercentDecimal: |
Specifies the decimal points to display in the slope percentage text box. |
|
PercentMultiplier: |
Specifies the percent slope multiplier for displaying in the slope percentage text box as well as in the RadarScreen column. |
|
|
Positive/Negative Price Parameters: |
|
ShowUpperThreshold: |
Enables/disables the upper threshold line. |
|
ShowLowerThreshold: |
Enables/disables the lower threshold line. |
|
ShowCenterLine: |
Enables/disables the center line. |
|
MaxValue: |
Specifies the maximum value to be used for calculating the upper threshold, lower threshold and center lines. |
|
UpperThresholdPercent: |
Specifies percentage of the MaxValue input for displaying the upper threshold line. For example, with MaxValue set to 1000 and UpperThresholdPercent set to 80, the upper threshold line is drawn at 800. |
|
LowerThresholdPercent: |
Specifies the percentage of the MaxValue input for displaying the lower threshold line. For example, with MaxValue set to 1000 and UpperThresholdPercent set to 20, the upper threshold line is drawn at 200. With a negative setting, the underlying instrument is assumed to be of a positive/negative nature such as the $TICK and the lower price extremes as entered with the input MaxValue is assumed to be a negative value. For example, with MaxValue set to 1000, and LowerThresholdPercent set to -20, the lower threshold line is drawn at -800 (maximum negative value = -1000, therefore 20% above -1000 = -800). |
|
CenterLinePercent: |
Specifies percentage of the MaxValue input for displaying the center line. |
|
|
Alerts: |
|
CrossUpAlertText: |
Secifies the text to be displayed in the alert notification window when price crosses over the moving average. This is a string input and the text needs to stay within quotation marks. A blank input such as "" disables this alert. |
|
CrossDownAlertText: |
Secifies the text to be displayed in the alert notification window when price crosses under the moving average. This is a string input and the text needs to stay within quotation marks. A blank input such as "" disables this alert. |
|
TouchUpAlert: |
Secifies the text to be displayed in the alert notification window when the price bar touches the moving average and closes in the upper percentage of the bar's range. This is a string input and the text needs to stay within quotation marks. A blank input such as "" disables this alert. |
|
TouchDownAlert: |
Secifies the text to be displayed in the alert notification window when the price bar touches the moving average and closes in the lower percentage of the bar's range. This is a string input and the text needs to stay within quotation marks. A blank input such as "" disables this alert. |
The Alchemy 1 Line Moving Average RadarScreen Indicator (Alchemy MovAvg1LineRS)
The Alchemy 1 Line Moving Average RadarScreen indicator contains a column for the moving average value and a column that displays the moving average slope percentage. The cell background for each column is colored based on a positive or negative slope. The moving average type for each moving average can be individually specified such as simple average, exponential average, weighted average, triangular average, mid Keltner average or Hull average.
Indicator Inputs:
|
Moving Average Parameters:
|
|
|
Price |
Specifies the price for the moving average. |
|
Length |
Specifies the number of bars over which the moving average is calculated. |
|
Type |
Specifies the type of moving average for the first moving average. A setting of 1 uses a simple moving average, a setting of 2 uses an exponential moving average, a setting of 3 uses a weighted moving average, a setting of 4 uses a triangular moving average, a setting of 5 uses a Mid Keltner, a setting of 6 uses a Hull moving average and a setting of 7 uses a custom formula as specified with the input Price. |
|
MinSlopePercent |
Specifies the minimum slope percentage in order for the cell background to be colored for a positive or negative slope. |
|
PercentDecimal |
Specifies the decimal points of the Slope percentage. |
|
Colors Parameters:
|
|
|
BackGrdCol_NegativeSlope |
Specifies the cell background color of both columns when the moving average is sloping down. |
|
BackGrdCol_FlatSlope |
Specifies the cell background color of both columns when the moving average is flat. |
|
BackGrdCol_PositiveSlope |
Specifies the cell background color of both columns when the moving average is sloping up. |
The Alchemy 2 Line Moving Averages Trend Indicator (Alchemy MovAvg2LnTrd)
The Alchemy 2 Line Moving Averages Trend Indicator displays 2 moving averages and a crossing dot when both moving averages cross. Additionally, the slow average can be colored based on its position in relation to the fast average. This color is controlled with the UpColor and DownColor plot colors under Format Indicator > Color. When the slow moving average is above the fast moving average, the slow moving average is colored with the UpColor plot color and when the slow moving average is below the fast moving average, the slow moving average is colored with the DownColor plot color. The color of the Cross dot is controlled with the CrossUpColor and CrossDnColor plot colors under Format Indicator > Color. When the slow moving average crosses over the fast moving average, the Cross dot is colored with the CrossUpColor plot color and when the slow moving average crosses below the fast moving average, the Cross dot is colored with the CrossDnColor plot color. Please note that when making a color change, the indicator needs to be disabled and then re-enabled again before the color changes will take affect.
Indicator Inputs:
|
FastPrice: |
Specifies the price to be used for the fast moving average. |
|
SlowPrice: |
Specifies the price to be used for the slow moving average. |
|
FastLength: |
Specifies the fast moving average length. |
|
SlowLength: |
Specifies the slow moving average length. |
|
FastFactor: |
This input is activated when the fast moving average is specified as an exponential moving average and a setting of 1 returns a Wilders Smoothing Moving Average and a setting of 2 returns a standard exponential moving average. The Factor can be specified as any number and it increases the reaction of the moving average as the Factor is increased, therefore making it a faster moving average with a higher Factor. |
|
SlowFactor: |
This input is activated when the slow moving average is specified as an exponential moving average and a setting of 1 returns a Wilders Smoothing Moving Average and a setting of 2 returns a standard exponential moving average. The Factor can be specified as any number and it increases the reaction of the moving average as the Factor is increased, therefore making it a faster moving average with a higher Factor. |
|
FastSmoothing: |
This input is activated when the fast moving average is specified as an exponential moving average and a setting of 0 returns a Wilders Smoothing Moving Average and a setting of 1 returns a standard exponential moving average. The Smoothing can be specified as any number and it smooths the moving average as the Smoothing is increased, therefore making it a slower moving average with a higher Smoothing. |
|
SlowSmoothing: |
This input is activated when the slow moving average is specified as an exponential moving average and a setting of 0 returns a Wilders Smoothing Moving Average and a setting of 1 returns a standard exponential moving average. The Smoothing can be specified as any number and it smooths the moving average as the Smoothing is increased, therefore making it a slower moving average with a higher Smoothing. |
|
FastType: |
Specifies the fast moving average type. A setting of 1 uses a simple moving average, a setting of 2 uses an exponential moving average, a setting of 3 uses a weighted moving average, a setting of 4 uses a triangular moving average, a setting of 5 uses a Mid Keltner, a setting of 6 uses a Hull moving average, a setting of 7 uses price as specified with the input FastPrice. |
|
SlowType: |
Specifies the slow moving average type. A setting of 1 uses a simple moving average, a setting of 2 uses an exponential moving average, a setting of 3 uses a weighted moving average, a setting of 4 uses a triangular moving average, a setting of 5 uses a Mid Keltner, a setting of 6 uses a Hull moving average, a setting of 7 uses price as specified with the input SlowPrice. |
|
ShowFastAvg: |
Enables/disables the fast average line. |
|
ShowSlowAvg: |
Enables/disables the slow average line. |
|
CrossPlot: |
A setting of 1 displays a crossing dot at the fast average line, a setting of 2 displays a crossing dot at the slow average line and a setting of 0 disables the crossing dot. |
|
ShowNegativePriceValues: |
Enables/disables the plotting of negative price values. |
|
TrendColorOffset: |
Specifies the number of bars to offset the trend color change. For points, crosses, Left Tics and Right Tcs, this input should be set to 0 and for lines, this input should be set to 1 bar. With a negative setting, the slow average uses its default color without any trend coloring. |
|
AlertDelay: |
If multiple alerts are triggered simultaneously, only the last alert will be displayed in the alert notification window. This input specifies the number of delay seconds from the time an alert is generated until it is displayed. The number of seconds starts counting from the first tick that triggers the alert, which means that depending on the tick volume, there maybe additional time beyond the specified delay time until the alert is displayed. A value of -1 disables this alert delay feature. This feature is only available for TradeStation 9 or higher. |
Intraday Time Zones
Ever noticed that certain times of the day are more active than others? This indicator alerts you to the various widely recognized daytrading time zones. Certain times in the market day have been recognized as exhibiting repeatable, consistent trading patterns.
The Alchemy Intraday Time Zones indicator alerts you to the various widely recognized trading time zones during the market day. This indicator is an excellent tool for the daytrader.
In many markets such as the S&P futures, Nasdaq futures and other daytraded markets, it has been discovered that there are distinct, repeatable patterns in the market relating to certain times of the day. For instance, many daytraders will not enter trades in the first 20-30 minutes of the market due to increased volatility and lack of a clear trend development.
It is important to note that these times are “expected” time patterns and are not to be construed as a stand-alone trading system or as being 100% accurate. However, the time zones are accurate and consistent enough to assist the daytrader in determining “expected” reactions in the market in the time zones.
Opening Session
You will notice that the first 20 minutes of the market day are not included in the Opening Session. This is because most daytraders do not trade this period due to the extreme volatility and lack of trend development during this time. Many of the NYSE stocks are delayed in opening in the morning due to order imbalances and this takes a few minutes to resolve itself.
The Opening Session will many times set the tone for the rest of the trading day. If there is a large move in the Opening Session without any significant retracement in and around the end of the Opening Session, expect the likelihood of a strong trending day in that established direction. Normally, the market will put in a counter-trend move of the established trend in and around the end of the Opening Session. The use of other technical indicators such as the Trading Alchemy Divergence Indicator or possibly other indicators such as stochastics, MACD or moving average crossover indicators are used to help identify possible counter-trend moves.
Mid-Day Period
The Mid-Day Period is usually the least volatile time of the trading day. It is during this time of the day that many of the floor traders in the trading pits take a lunch break and actually leave the trading pits. This usually creates light volume, which in turn can cause exaggerated, choppy movements in price. When volume dries up, it allows the smaller floor traders a chance to run and gun for stops without having to commit large amounts of capital. Many times, well-placed stops can be hit during this period due to the lighter volume conditions. Many traders will not enter short-term or daytrades during this period. Even if the market is in a strong trend coming out of the Opening Session, the Mid-Day Period will usually be less volatile than other times of the day. Many traders prefer to monitor their positions or try to range trade during this time. The use of other indicators to help identify short-term highs and lows could be used to attempt range trading during the Mid-Day Period.
Resumption Period
The market at this time is expected to resume its trend for the day, or if there is a particular bullish or bearish bias for the day, move in the direction of the high or low set earlier in the day. The market is expected to test it’s high or low made earlier before the quieter lunch period. Many traders enter their afternoon trades during the Resumption Period.
Afternoon Activity
Many times, the Afternoon Activity occurs when the market attempts to relieve the buying or selling pressure built up throughout the day by moving counter to the established trend of the day. The market will many times test the high or low established earlier in the trading day at this time. Traders can watch for signs of a possible reversal or continuation of trend and enter their trades accordingly.
Late Afternoon Activity
If the market does not move counter to the established trend during the Afternoon Activity, then watch for the move to occur during the Late Afternoon Activity. If the counter trend move occurs during the Late Afternoon Activity, the move should be much stronger.
Remember, the Alchemy Intraday Time Zones are not intended to be a trading system. These time zones have been recognized to be fairly consistent in the more liquid daytraded markets. This indicator’s purpose is to assist you in identifying the times when certain market events regularly occur. Use the Alchemy Intraday Time Zones indicator with other indicators to suit your own style of trading.
The Alchemy TimeZones Indicator
To view chart, go to: http://www.tradingalchemy.com/ViewChartsIntradayTimeZones.htm
User Defined Inputs:
SessStET: This input synchronizes the exchange time with the local
time. Since most markets open at
The Alchemy Bar Time Indicator (Alchemy BarTime) Available for TradeStation 9/10 only!
The Alchemy Bar Time Indicator displays the total bar time of a non time based bar such as a Tick or a Volume bar as a histogram. The time can be displayed in either seconds or minutes. The indicator also contains an average line of the bar time histogram and it contains alerts when the bar time and/or the average exceeds a specified threshold.
Indicator Inputs:
|
ShowTime: |
Enables/disables the bar time histogram. |
|
ShowTimeThreshold: |
Enables/disables the bar time threshold line. |
|
ShowAvgThreshold: |
Enables/disables the bar time average threshold line. |
|
FastColor: |
Specifies the color for when the histogram is below the time threshold line. Otherwise, the default plot color is used. |
|
ColorOffset: |
Specifies the number of bars to offset the time histogram color change. For a histogram, point, cross, left tic or right tic, this input should be set to 0 and for. |
|
TimeThreshold: |
Specifies the time histogram threshold line value. |
|
AverageLength: |
Specifies the look back length for the average line of the time histogram, whereas a setting of 0 disables the average line of the time histogram. |
|
AvgThreshold: |
Specifies the time average threshold line value. |
|
CrossOverAlertText: |
Specifies the text that is displayed in the alert text notification window when the time average crosses over the average threshold line. This is a string input field that always needs to stay within quotation marks. A blank value such as "" disables this alert. |
|
CrossUnderAlertText: |
Specifies the text that is displayed in the alert text notification window when the time average crosses under the average threshold line. This is a string input field that always needs to stay within quotation marks. A blank value such as "" disables this alert. |
|
Seconds1OrMinutes2: |
With a setting of 1, the bar time is expressed in seconds and with a setting of 2, the bar time is expressed in minutes. |
The Alchemy Price Bar Clock Indicator (Alchemy PrceBarClock)
The Alchemy Price Bar Clock Indicator displays a text on a price chart that shows the remaining time left on the current price bar. Since tick and volume bars do not close at a specific time, this indicator is not designed to work on these types of interval settings. Due to its nature, this indicator only works on real time charts and it will update only whenever a new price tick is received. This indicator also contains a bar close alert which can be utilized on any bar type, including tick, volume, daily, weekly and monthly charts. The regular text clock color can be specified with the RegColor plot and alert text clock color can be specified with the AlertColor plot, both under Format > Indicator > Color. Please note that when making a color change, the indicator needs to be disabled and then re-enabled again before the color changes will take affect.
Indicator Inputs:
|
ClockPrice: |
Specifies the price of the current bar at which the text object will be anchored at. (TradeStation version only) |
|
ClockVertOffSet: |
Specifies the number of ticks to move this text object up or down from to the current price value, whereas a positive number moves the text object up and a negative value moves the text object down. |
|
ClockVertAlign: |
Specifies the vertical alignment of the text object, whereas a value of 0 results in a top vertical placement, a value of 1 results in a bottom vertical placement and a value of 2 results in a centered vertical placement. |
|
ClockHorOffSet: |
Specifies the number of bars to move this text object to the left of the current price bar. |
|
ClockHorizAlign: |
Specifies the horizontal alignment of the text object, whereas a value of 0 results in a left horizontal placement, a value of 1 results in a right horizontal placement and a value of 2 results in a centered horizontal placement. |
|
SpaceToLeft: |
Specifies the number of spaces to place to the left of the text object. With this feature and ClockHorOffSet as well as ClockHorizAlign set to 0, the text object can be moved to the right of the current price bar without interfering with any price bars. This is a text string input and the blank spaces need to stay within quotation marks. The more blank spaces are inserted into this input, the further the text object will move to the right, away from the current price bar. Please note that the blank space to the right needs to be created on the chart by setting enough bars to the right under Format > Space to the Right, otherwise, the text object won't be visible. |
|
AlertMinutes: |
Specifies the number of minutes left as to when an alert will be triggered. This input works in conjunction with the input "AlertSeconds". For example, to be alerted 1 minute and 30 seconds before the close of a bar, AlertMinutes would need to be set to 1 and AlertSeconds would need to be set to 30. A negative setting disables this alert. |
|
AlertSeconds: |
Specifies the number of seconds left as to when an alert will be triggered. This input works in conjunction with the input "AlertMinutes". For example, to be alerted 1 minute and 30 seconds before the close of a bar, AlertMinutes would need to be set to 1 and AlertSeconds would need to be set to 30. A negative setting disables this alert. |
|
BarCloseAlertText: |
Enables the bar close alert and specifies the text to be displayed at the bar close. This alert automatically displays the bar type and bar interval in front of the specified alert. Please note that this is a string input and the specified text needs to be within quotation marks. For example, with a specified text of "Bar Close" the bar close alert on a 3 minute chart will display as 3 Minute Bar Close. When left blank such as "", this alert is disabled. Please note that when using both, remaining time and bar close alerts, the alert needs to be set to "Alert continuously". |
The Alchemy Price Difference Indicator (Alchemy PriceDifference)
The Alchemy Price Difference indicator displays the difference between 2 specified price points on the chart as a text label.
Indicator Inputs:
|
Price1: |
The price difference is the difference between Price 1 minus Price 2. |
|
Price2: |
The price difference is the difference between Price 1 minus Price 2. |
|
PositiveDifferenceColor: |
Specifies the color for a positive price difference. |
|
NegativeDifferenceColor: |
Specifies the color for a negative price difference. |
|
ZeroDifferenceColor: |
Specifies the color for a zero price difference. |
|
TxtFont: |
Specifies the font of the text label. This is a string input and the value of this input needs to stay within quotation marks. |
|
TxtSize: |
Specifies the size of the text label. |
|
PriceDecimal: |
Specifies the number of decimal points that the price difference is displayed as. |
|
TxtPrice: |
Specifies the price for the text label to be anchored to. |
|
TxtVerticalOffset: |
Specifies the number of cents, ticks or pips to shift the text label up or down from the price as specified witht he input TxtPrice. |
|
TxtHorizontalOffset: |
Specifies the number of bars to shift the text label to the left of the current bar. |
|
TxtHorizontalStyle: |
Specifies the horizontal placement style of the text label, whereas a value of 0 places the text label to the right, a value of 1 places the text label to the left and a value of 2 places the text label centered. |
|
TxtVerticalStyle: |
Specifies the vertical placement style of the text label, whereas a value of 0 places the text label to the bottom, a value of 1 places the text label to the top and a value of 2 places the text label centered. |
The Alchemy Price-MACD Indicator (Alchemy pMACD)
The Alchemy Price-MACD indicator displays the difference between price and a specified moving average as a histogram and it changes histogram colors as well as triggers an alert when this distance exceeds a specified threshold.
Indicator Inputs:
|
UpPrice: |
Specifies the price to be used to measure the distance above the moving average. |
|
DownPrice: |
Specifies the price to be used to measure the distance below the moving average. |
|
MvgAvgPrice: |
Specifies the price to be used for the moving average. |
|
MvgAvgLength: |
Specifies the moving average length. |
|
MvgAvgType: |
Specifies the moving average type. A setting of 1 uses a simple moving average, a setting of 2 uses an exponential moving average, a setting of 3 uses a weighted moving average, a setting of 4 uses a triangular moving average, a setting of 5 uses a Mid Keltner, a setting of 6 uses a Hull moving average and with a setting of 0, any moving average formula can be typed into the Price input. |
|
UsePercent: |
With a setting of true, the distance is expressed in percent of the price and with a setting of false, the distance is expressed in points/dollars. |
|
AlertDistance: |
Specifies the minimum distance for triggering a color change and alert. |
|
PlotThresholdOnly: |
With a setting of true, the histogram is plotted only for bars that meet the alert criteria. This is useful for RadarScreen sorting. |
|
CrossAlert: |
With a setting of true, the alert is triggered only at the cross of the threshold, whereas with a setting of false, the alert is triggered for all bars that exceed the threshold. |
|
UpAlert: |
Enables/disables the up alert. |
|
DownAlert: |
Enables/disables the down alert. |
|
ColorOffset: |
Specifies the number of bars to offset the alert color change. For histograms, this input should be set to 0 and for lines, this input should be set to 1 bar. |
|
UpColor: |
Specifies the color for an up alert. |
|
DownColor: |
Specifies the color for a down alert. |
|
AlertWidth: |
Specifies the plot thickness to be used for alert bars. |
|
PlotZeroLine: |
Enables/disables the zero line. |
|
PlotThreshold: |
Enables/disables the positive and negative threshold lines. |
The Alchemy Rectangle Indicator (Alchemy Rectangle) Available for TradeStation 9/10 and higher!
The Alchemy Rectangle indicator draws a rectangle around the last specified number of bars.
Indicator Inputs:
|
HighPrice: |
Specifies the high price. |
|
LowPrice: |
Specifies the low price. |
|
Length: |
Specifies the number of bars over which to calculate and to draw the rectangle. |
|
Displace: |
Specifies the number of bars back for the rectangle to end. |
|
VerticalAdd: |
Specifies the number of cents, ticks or pips for the rectangle to extend to the top and bottom of the high and low price. |
|
RectangleColor: |
Specifies the color of the rectangle |
The Alchemy Renko Indicator (Alchemy Renko) Available for TradeStation 9/10 and higher!
The Alchemy Renko indicator uses Renko bars to determine market turns and trends, but different from the native Renko bar charts, the Alchemy Renko indicator includes extreme price data used as wicks and tails on standard Renko bars and it provides the option of specifying the conditions under which a reversal or trend continuation is plotted.
Indicator Inputs:
|
BrickSize: |
Specifies the brick size or number of cents/ticks/pips in the bar body. |
|
NewTrendingBar: |
Specifies the number of cents/ticks/pips for price to break the previous bar in order for a new trending bar to be established. |
|
ShowWickTail: |
Enables/disables the wicks and the tails. |
|
ShowCurrentCandle: |
Enables/disables the current candle. |
|
ShowPriceTick: |
Enables/disables the current closing price. |
|
ShowCurrentHighLow: |
Enables/disables the current high and low prices. |
|
BullReversalColor: |
Specifies the bullish reversal bar color. |
|
BearReversalColor: |
Specifies the bearish reversal bar color. |
|
BullContinuationColor: |
Specifies the bullish trend continuation bar color. |
|
BearContinuationColor: |
Specifies the bearish trend continuation bar color. |
|
|
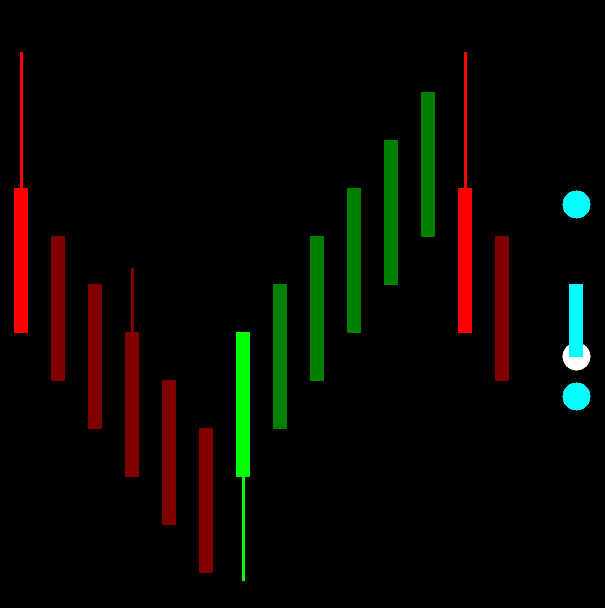
The Alchemy Accounts Provider Close Positions Indicator (Alchemy AccountsProviderClosePositions) Available for TradeStation 9/10 only!
The Alchemy Accounts Provider Close Positions indicator closes all open positions when a specified maximum gain or loss of all open account positions is reached. This indicator needs to be inserted into anyone chart, independent from the instruments that are being traded and the account open position dollar value is displayed in the status bar.
In order for the indicator to generate orders, the option "Enable RunCommand EasyLanguage Keyword" box in the "General" window under "Format Indicator" needs to be checked with confirmation set to off.
Instructions on enabling the entry order macros:
TradeStation 9.5
The "MACROS" mode needs to be enabled (MACROS button in Status Bar needs to be green).
TradeStation 10
Access from the Main toolbar and click the Lock/Unlock Order Placement
![]() icon. If the Main toolbar is not visible, you may display it using the
View>Platform Toolbars>Main ToolBar menu sequence.
icon. If the Main toolbar is not visible, you may display it using the
View>Platform Toolbars>Main ToolBar menu sequence.
Selecting the Lock Order Entry Macros item from the drop-down menu locks or
unlocks (turns on or off) the ability to place orders with order entry macros.
When locked, a blue box appears around the icon associated with this item and
the ability to run order entry macros will be disabled.
This indicator is available for TradeStation 9/10
only. Very important: Please make sure to disable all Validations &
Confirms for each market category under File > Preferences > TradeStation Order
Entry...
Indicator Inputs:
|
MaximumGain: |
Specifies the maximum dollar gain of all open positions at which time all open positions are closed, whereas a value of 0 disables the maximum gain exit. |
|
MaximumLoss: |
Specifies the maximum dollar loss of all open positions at which time all open positions are closed, whereas a value of 0 disables the maximum loss exit. |
|
GainColor: |
Specifies the color of the displayed account open position dollar value when it is positive. |
|
LossColor: |
Specifies the color of the displayed account open position dollar value when it is negative. |
|
CustomText: |
Specifies the text to be displayed before the account open position dollar value. This is a string input which needs to be within quotation marks. |
The Alchemy Strategy Position Equalizer Indicator (Alchemy StratPosEqua) Available for TradeStation 9/10 only!
The Alchemy Strategy Position Equalizer Indicator keeps all real time open positions in sync with the strategy positions on a chart by automatically placing orders whenever it detects a position mismatch between real time open positions and strategy positions. All orders generated by this indicator are market orders. This indicator needs to be inserted into the same chart as the strategy that is being automated. Please note that if the strategy automation is disabled, the indicator still generates real time orders based on the strategy charting positions. In order for the indicator to generate orders, the option "Enable RunCommand EasyLanguage Keyword" box in the "General" window under "Format Indicator" needs to be checked with confirmation set to off.
Instructions on enabling the entry order macros:
TradeStation 9.5
The "MACROS" mode needs to be enabled (MACROS button in Status Bar needs to be green).
TradeStation 10
Access from the Main toolbar and click the Lock/Unlock Order Placement
![]() icon. If the Main toolbar is not visible, you may display it using the
View>Platform Toolbars>Main ToolBar menu sequence.
icon. If the Main toolbar is not visible, you may display it using the
View>Platform Toolbars>Main ToolBar menu sequence.
Selecting the Lock Order Entry Macros item from the drop-down menu locks or
unlocks (turns on or off) the ability to place orders with order entry macros.
When locked, a blue box appears around the icon associated with this item and
the ability to run order entry macros will be disabled.
This indicator is available for TradeStation 9/10
only. Very important: Please make sure to disable all Validations &
Confirms for each market category under File > Preferences > TradeStation Order
Entry...
Indicator Inputs:
|
AccountNumber: |
Specifies the trading account number that the indicator looks for position mismatches. This is a string input which always requires the quotation marks and it is caps sensitive. When left blank, the indicator always defaults to the trading account number that is being used for this particular chart under Format Strategies.. |
|
SymbName: |
Specifies the trading symbol that the indicator looks for position mismatches. This is a string input which always requires the quotation marks and it is caps sensitive. When left blank, the indicator always defaults to the trading symbol that is being used on this chart. |
|
SymbolCategory: |
Specifies the trading symbol category that the indicator looks for position mismatches. This is a string input which always requires the quotation marks and it is caps sensitive. The categories have to be entered as follows: "Equity", "EquityOption", "Future", "FutureOption", or "Forex". When left blank (""), the indicator automatically detects the category of the symbol that it is applied on. |
|
ActicateMacros: |
Enables the order macros. |
|
ReverseChartPosition: |
With a setting of true, the indicator generates reverse orders. For example, with this feature enabled and when applied to a strategy chart of one instrument with the SymbName specified for another instrument, the indicator will generate a sell order for the specified instrument when the strategy on the chart is long and vice versa, the indicator will generate a buy order for the specified instrument when the strategy on the chart is short. Please note that when specifying a different instrument from the instrument that the indicator is applied on, as in this example, the AccountNumber, SymbolCategory, BuyLongCommand, ExitLongCommand, SellShortCommand and/or ExitShortCommand may have to be specified through their corresponding inputs as the instrument that the orders are generated for, may fall into a different symbol category, using different order commands and/or may use a different trading account number from the instrument applied on the chart, which is what the indicator would detect automatically if not specified. |
|
BuyLongCommand: |
Specifies the buy long order command macro and the command "Buy" enters a long position. This is a string input which always requires the quotation marks. When left blank (""), the indicator automatically detects the category of the symbol that it is applied on and uses the corresponding buy long order command. |
|
ExitLongCommand: |
Specifies the exit long order command macro and the command command "Sell" exits a long position. This is a string input which always requires the quotation marks. When left blank (""), the indicator automatically detects the category of the symbol that it is applied on and uses the corresponding exit long order command. |
|
SellShortCommand: |
Specifies the sell short order command macro. For Futures and Forex, the command "Sell" enters a short position, whereas for equities, the command "SellShort" enters a short position. This is a string input which always requires the quotation marks. When left blank (""), the indicator automatically detects the category of the symbol that it is applied on and uses the corresponding sell short order command. |
|
ExitShortCommand: |
Specifies the exit short order command macro. For Futures and Forex, the command "Buy" exits a short position, whereas for equities, the command "BuyToCover" exits a short position. This is a string input which always requires the quotation marks and it is caps sensitive. When left blank (""), the indicator automatically detects the category of the symbol that it is applied on and uses the corresponding exit short order command. |
|
Frequency: |
Sets the order frequency such as "Once", "OncePerBar", "EndOfBar" or "Always". |
|
MaximumNumberOrders: |
Specifies the maximum number of continuous orders to be placed until a position match is reached. A setting of 0 allows an unlimited number of continuous orders to be placed and with a setting of 0, it is strongly advised to use the "SecondsDelay" feature from above in order to prevent duplicate orders from being generated due to the time lag that occurs between the submitted order commands and the orders being filled. Please note that with a setting of 1, the first order macro may not be recognized, therefore, not generating any order macros at all. |
|
SecondsDelay: |
Specifies the time interval in number of seconds in between which the indicator keeps checking the TradeManager for position mismatches. This time interval prevents continuous duplicate orders from being generated due to the time lag that occurs between the submitted order commands and the orders being filled. A setting of 0 disables this delay method. |
|
ShowTestPlots: |
Enables/disables the test plots, plots 3 through 9, whereas CA MktPos stands for charting market position, CA CurCntr stands for charting current contracts, CA PosQty stands for charting position quantity, RT PosQty stands for real time position quantity, Order Qty stands for order quantity and Counter stands for number of ticks counter. |
|
ShowPrintLog: |
Enables/disables the print file which is printed to c:\stratposequalog.txt. |
The Alchemy Strategy Position Equalizer Pro Indicator (Alchemy StratPosEquaPro) Available for TradeStation 9/10 only!
The Alchemy Strategy Position Equalizer Pro Indicator keeps all real time open positions in sync with the strategy positions on a chart by automatically placing orders whenever it detects a position mismatch between real time open positions and strategy positions. This Pro version uses the event timer to monitor the real time positions and place order macros within a specified milliseconds interval. Additionally to the regular version, this Pro version also can be activated on certain specified days of the week as well as within certain times of the day and it can use a specified position size percentage for matching real time positions
All orders generated by this indicator are market orders. This indicator needs to be inserted into the same chart as the strategy that is being automated. Please note that if the strategy automation is disabled, the indicator still generates real time orders based on the strategy charting positions. In order for the indicator to generate orders, the option "Enable RunCommand EasyLanguage Keyword" box in the "General" window under "Format Indicator" needs to be checked with confirmation set to off.
Instructions on enabling the entry order macros:
TradeStation 9.5
The "MACROS" mode needs to be enabled (MACROS button in Status Bar needs to be green).
TradeStation 10
Access from the Main toolbar and click the Lock/Unlock Order Placement
![]() icon. If the Main toolbar is not visible, you may display it using the
View>Platform Toolbars>Main ToolBar menu sequence.
icon. If the Main toolbar is not visible, you may display it using the
View>Platform Toolbars>Main ToolBar menu sequence.
Selecting the Lock Order Entry Macros item from the drop-down menu locks or
unlocks (turns on or off) the ability to place orders with order entry macros.
When locked, a blue box appears around the icon associated with this item and
the ability to run order entry macros will be disabled.
This indicator is available for TradeStation 9/10
only. Very important: Please make sure to disable all Validations &
Confirms for each market category under File > Preferences > TradeStation Order
Entry...
Indicator Inputs:
|
AccountNumber: |
Specifies the trading account number that the indicator looks for position mismatches. This is a string input which always requires the quotation marks and it is caps sensitive. When left blank, the indicator always defaults to the trading account number that is being used for this particular chart under Format Strategies.. |
|
SymbName: |
Specifies the trading symbol that the indicator looks for position mismatches. This is a string input which always requires the quotation marks and it is caps sensitive. When left blank, the indicator always defaults to the trading symbol that is being used on this chart. |
|
SymbolCategory: |
Specifies the trading symbol category that the indicator looks for position mismatches. This is a string input which always requires the quotation marks and it is caps sensitive. The categories have to be entered as follows: "Equity", "EquityOption", "Future", "FutureOption", or "Forex". When left blank (""), the indicator automatically detects the category of the symbol that it is applied on. |
|
PositionSizePercentage: |
Specifies the position size percentage to be used for matching real time positions. For example, with a setting of 50, the indicator will match only 50 percent of the strategy positions. A setting of 0 disables this feature, whereas the indicator always matches the real time position with the strategy positions as shown on the chart. |
|
ReverseChartPosition: |
With a setting of true, the indicator generates reverse orders. For example, with this feature enabled and when applied to a strategy chart of one instrument with the SymbName specified for another instrument, the indicator will generate a sell order for the specified instrument when the strategy on the chart is long and vice versa, the indicator will generate a buy order for the specified instrument when the strategy on the chart is short. Please note that when specifying a different instrument from the instrument that the indicator is applied on, as in this example, the AccountNumber, SymbolCategory, BuyLongCommand, ExitLongCommand, SellShortCommand and/or ExitShortCommand may have to be specified through their corresponding inputs as the instrument that the orders are generated for, may fall into a different symbol category, using different order commands and/or may use a different trading account number from the instrument applied on the chart, which is what the indicator would detect automatically if not specified. |
|
StartTme: |
Specifies the earliest time in the day as to when to generate order macros. This input is specified in military time without the colon. For example, 5:00pm would be entered as 1700. A negative value disables this feature. |
|
EndTme: |
Specifies the latest time in the day as to when to generate order macros. This input is specified in military time without the colon. For example, 5:00pm would be entered as 1700. A negative value disables this feature. |
|
Mon: |
Enables the order macros on Mondays. |
|
Tue: |
Enables the order macros on Tuesdays. |
|
Wed: |
Enables the order macros on Wednesdays. |
|
Thu: |
Enables the order macros on Thursdays. |
|
Fri: |
Enables the order macros on Fridays. |
|
Sat: |
Enables the order macros on Saturdays. |
|
Sun: |
Enables the order macros on Sundays. |
|
BuyLongCommand: |
Specifies the buy long order command macro and the command "Buy" enters a long position. This is a string input which always requires the quotation marks. When left blank (""), the indicator automatically detects the category of the symbol that it is applied on and uses the corresponding buy long order command. |
|
ExitLongCommand: |
Specifies the exit long order command macro and the command command "Sell" exits a long position. This is a string input which always requires the quotation marks. When left blank (""), the indicator automatically detects the category of the symbol that it is applied on and uses the corresponding exit long order command. |
|
SellShortCommand: |
Specifies the sell short order command macro. For Futures and Forex, the command "Sell" enters a short position, whereas for equities, the command "SellShort" enters a short position. This is a string input which always requires the quotation marks. When left blank (""), the indicator automatically detects the category of the symbol that it is applied on and uses the corresponding sell short order command. |
|
ExitShortCommand: |
Specifies the exit short order command macro. For Futures and Forex, the command "Buy" exits a short position, whereas for equities, the command "BuyToCover" exits a short position. This is a string input which always requires the quotation marks and it is caps sensitive. When left blank (""), the indicator automatically detects the category of the symbol that it is applied on and uses the corresponding exit short order command. |
|
Frequency: |
Sets the order frequency such as "Once", "OncePerBar", "EndOfBar" or "Always". |
|
MaximumNumberOrders: |
Specifies the maximum number of continuous orders to be placed until a position match is reached. A setting of 0 allows an unlimited number of continuous orders to be placed and with a setting of 0, it is strongly advised to use the "SecondsDelay" feature from above in order to prevent duplicate orders from being generated due to the time lag that occurs between the submitted order commands and the orders being filled. Please note that with a setting of 1, the first order macro may not be recognized, therefore, not generating any order macros at all. |
|
SecondsDelay: |
Specifies the time interval in number of seconds in between which the indicator keeps checking the TradeManager for position mismatches. This time interval prevents continuous duplicate orders from being generated due to the time lag that occurs between the submitted order commands and the orders being filled. A setting of 0 disables this delay method. |
|
MilliSecondsTimerInterval: |
Specifies the indicator activity timer interval in milliseconds, whereas a negative value uses the legacy method of tick by tick updating. |
|
ShowOrderMacroStatus: |
Enables/disables the text in the status line that displays the order macro status such as either OrderMacroOn or OrderMacroOff. |
|
OnColor: |
Specifies the color for the text in the status line that displays the order macro on status such as OrderMacroOn. |
|
OffColor: |
Specifies the color for the text in the status line that displays the order macro off status such as OrderMacroOff. |
|
ShowTestPlots: |
Enables/disables the test plots, plots 3 through 9, whereas CA MktPos stands for charting market position, CA CurCntr stands for charting current contracts, CA PosQty stands for charting position quantity, RT PosQty stands for real time position quantity, Order Qty stands for order quantity and Counter stands for number of ticks counter. |
|
ShowPrintLog: |
Enables/disables the print file which is printed to c:\stratposequalog.txt. |
|
PrintActiveLog: |
Enables/disables the print file to the EasyLanguage Print Log which displays the date and time of the last indicator activity. |
The Alchemy Order Macro Pivot Stop Indicator (Alchemy OM PivotStop) Available for TradeStation 9/10 only!
The Alchemy Order Macro Pivot Stop Indicator detects open positions and places stop order macros to exit at the closest pivot. This indicator offers more flexible and sophisticated ways of placing exit orders than are available in the TradeStation Matrix window. All stop orders that are placed by this indicator are shown in the Matrix window and they can be easily moved in the Matrix window by dragging them up or down. In order for the indicator to generate orders, the option "Enable RunCommand EasyLanguage Keyword" box in the "General" window under "Format Indicator" needs to be checked with either confirmation set to on or off.
Instructions on enabling the entry order macros:
TradeStation 9.5
The "MACROS" mode needs to be enabled (MACROS button in Status Bar needs to be green).
TradeStation 10
Access from the Main toolbar and click the Lock/Unlock Order Placement
![]() icon. If the Main toolbar is not visible, you may display it using the
View>Platform Toolbars>Main ToolBar menu sequence.
icon. If the Main toolbar is not visible, you may display it using the
View>Platform Toolbars>Main ToolBar menu sequence.
Selecting the Lock Order Entry Macros item from the drop-down menu locks or
unlocks (turns on or off) the ability to place orders with order entry macros.
When locked, a blue box appears around the icon associated with this item and
the ability to run order entry macros will be disabled.
This indicator is available for TradeStation 9/10
only. Very important: Please make sure to disable all Validations &
Confirms for each market category under File > Preferences > TradeStation Order
Entry...
To use this indicator, please follow these steps:
Create a
chart for the symbol that you are trading by going to File > New > Window >
Chart Analysis > OK
Format the symbol by clicking on Format > Symbol > Settings and select the
symbol that you are trading.
Insert the indicator into the chart by clicking on Insert > Indicator...
and select our Alchemy OM PivotStop indicator
Format the indicator by clicking on Format Analysis Techniques..., select our
Alchemy OM PivotStop indicator and click on Format
Click on the General tab and check Enable RunCommand EasyLanguage Keyword with
confirmation Off
Click on the Inputs tab and adjust all of the exit settings as desired.
For an explanation for each input, please refer to our indicator input
description below.
Indicator Inputs:
|
PivotLowPrice |
Specifies the price to be used for pivot lows. |
|
PivotHighPrice |
Specifies the price to be used for pivot highs. |
|
LeftStrength |
Specifies the minimum number of bars to the left of a pivot. |
|
RightStrength |
Specifies the minimum number of bars to the right of a pivot. |
|
PivotAdd |
Specifies the number of cents, ticks or pips to add to the pivot for placing the stop order. |
|
ShowEntryPrice |
Enables/disables the plot for the entry price. |
|
ShowPivots |
Enables/disables the ShowMe dots for the pivots. |
|
Target1 |
Specifies the distance in number of ticks/pips/cents from the entry price for placing the first profit target and initiating the second trailing stop. A setting of 0 disables the second trailing stop as well as the first profit target. |
|
AccountNumber |
Specifies the trading account number. This is a string input which always requires the quotation marks and it is caps sensitive. When left blank, the indicator always defaults to the trading account number that is being used for this particular chart under Format Strategies. |
|
SymbName |
Specifies the trading symbol that the indicator places orders for. This is a string input which always requires the quotation marks and it is caps sensitive. When left blank, the indicator always defaults to the trading symbol that is being used on this chart. |
|
SymbCategory |
Specifies the trading symbol category that the indicator looks for placing orders for. This is a string input which always requires the quotation marks and it is caps sensitive. The categories have to be entered as follows: "Equity", "EquityOption", "Future", "FutureOption", or "Forex". When left blank (""), the indicator automatically detects the category of the symbol that it is applied on. |
|
SellCommand |
Specifies the sell order command macro. For Futures and Forex, the command "sell" enters a short position and exits a long position, whereas for equities, the command "sellshort" enters a short position and the command "sell" exits a long position. This is a string input which always requires the quotation marks and it is caps sensitive. |
|
BuyCommand |
Specifies the buy order command macro. For Futures and Forex, the command "buy" enters a long position and exits a short position, whereas for equities, the command "buy" enters a long position and the command "buytocover" exits a short position. This is a string input which always requires the quotation marks and it is caps sensitive. |
|
Frequency |
Sets the order frequency such as "Once", "OncePerBar", "EndOfBar" or "Always". |
|
RoundingPrecision |
Specifies the rounding decimal precision for specifying the entry price, whereas a negative setting reads the entry price as reflected in the TradeManager |
|
NumberTicksDelay |
Specifies the delay time in number of price ticks from the time previous orders are cancelled until new orders are placed. This delay prevents duplicate orders from being generated due to the time lag that occurs between the submitted cancel orders command and the cancelled orders confirmation. A negative setting disables this delay method. |
|
SecondsDelay |
Specifies the delay time in number of seconds from the time previous orders are cancelled until new orders are placed. This delay prevents duplicate orders from being generated due to the time lag that occurs between the submitted cancel orders command and the cancelled orders confirmation. A negative setting disables this delay method. |
The Alchemy Order Macro Stop-Target-Trailing Indicator (Alchemy OM StpTarTrl) Available for TradeStation 9/10 only!
The Alchemy Order Macro Stop-Target-Trailing Indicator detects open positions and has the option of placing order macros for a protective stop, 2 targets and 2 trailing stops on a real time basis. This indicator offers more flexible and sophisticated ways of placing exit orders than are available in the TradeStation Matrix window. All stop and limit orders that are placed by this indicator are shown in the Matrix window and they can be easily moved in the Matrix window by dragging them up or down. In order for the indicator to generate orders, the option "Enable RunCommand EasyLanguage Keyword" box in the "General" window under "Format Indicator" needs to be checked with either confirmation set to on or off.
Instructions on enabling the entry order macros:
TradeStation 9.5
The "MACROS" mode needs to be enabled (MACROS button in Status Bar needs to be green).
TradeStation 10
Access from the Main toolbar and click the Lock/Unlock Order Placement
![]() icon. If the Main toolbar is not visible, you may display it using the
View>Platform Toolbars>Main ToolBar menu sequence.
icon. If the Main toolbar is not visible, you may display it using the
View>Platform Toolbars>Main ToolBar menu sequence.
Selecting the Lock Order Entry Macros item from the drop-down menu locks or
unlocks (turns on or off) the ability to place orders with order entry macros.
When locked, a blue box appears around the icon associated with this item and
the ability to run order entry macros will be disabled.
This indicator is available for TradeStation 9/10
only. Very important: Please make sure to disable all Validations &
Confirms for each market category under File > Preferences > TradeStation Order
Entry...
To use this indicator, please follow these steps:
Create a
chart for the symbol that you are trading by going to File > New > Window >
Chart Analysis > OK
Format the symbol by clicking on Format > Symbol > Settings and select the
symbol that you are trading.
Insert the indicator into the chart by clicking on Insert > Indicator...
and select our Alchemy OM StpTarTrl indicator
Format the indicator by clicking on Format Analysis Techniques..., select our
Alchemy OM StpTarTrl indicator and click on Format
Click on the General tab and check Enable RunCommand EasyLanguage Keyword with
confirmation Off
Click on the Inputs tab and adjust all of the exit settings as desired.
For an explanation for each input, please refer to our indicator input
description below.
Indicator Inputs:
|
ProtectiveStop |
Specifies the distance in number of ticks/pips/cents from the entry price for placing the protective stop, whereas a setting of 0 disables the protective stop. |
|
InitialTrailingStop |
Specifies the initial trailing stop distance in number of ticks/pips/cents. Please note that if the initial trailing stop distance is greater than the protective stop distance, the protective stop will stay in place until the maximum position profit minus the initial trailing stop distance exceeds the protective stop at which time the initial trailing stop is engaged. A setting of 0 disables the initial trailing stop. |
|
TrailingStop2 |
Specifies the trailing stop distance in number of ticks/pips/cents for the second trailing stop, which is initiated once Target 1 is reached. The second trailing stop is disabled with Trailing Stop2 or Target1 set to 0. |
|
Target1 |
Specifies the distance in number of ticks/pips/cents from the entry price for placing the first profit target and initiating the second trailing stop. A setting of 0 disables the second trailing stop as well as the first profit target. |
|
Target1PercentExit |
Specifies the percent contracts/shares to exit at the first profit target, whereas a setting of 0 disables the first profit target. |
|
Target2 |
Specifies the distance in number of ticks/pips/cents from the entry price for placing the second profit target. A setting of 0 disables the second profit target. |
|
AccountNumber |
Specifies the trading account number. This is a string input which always requires the quotation marks and it is caps sensitive. When left blank, the indicator always defaults to the trading account number that is being used for this particular chart under Format Strategies. |
|
SymbName |
Specifies the trading symbol that the indicator places orders for. This is a string input which always requires the quotation marks and it is caps sensitive. When left blank, the indicator always defaults to the trading symbol that is being used on this chart. |
|
SymbCategory |
Specifies the trading symbol category that the indicator looks for placing orders for. This is a string input which always requires the quotation marks and it is caps sensitive. The categories have to be entered as follows: "Equity", "EquityOption", "Future", "FutureOption", or "Forex". When left blank (""), the indicator automatically detects the category of the symbol that it is applied on. |
|
SellOrder |
Specifies the sell order command macro. For Futures and Forex, the command "sell" enters a short position and exits a long position, whereas for equities, the command "sellshort" enters a short position and the command "sell" exits a long position. This is a string input which always requires the quotation marks and it is caps sensitive. |
|
BuyOrder |
Specifies the buy order command macro. For Futures and Forex, the command "buy" enters a long position and exits a short position, whereas for equities, the command "buy" enters a long position and the command "buytocover" exits a short position. This is a string input which always requires the quotation marks and it is caps sensitive. |
|
Frequency |
Sets the order frequency such as "Once", "OncePerBar", "EndOfBar" or "Always". |
|
RoundingPrecision |
Specifies the rounding decimal precision for specifying the entry price, whereas a negative setting reads the entry price as reflected in the TradeManager |
|
ShowEntryPrice |
Enables/disables the plot for the entry price. |
|
PrintFile |
Enables/disables the print file which is printed to c:\stoptargetlog.txt |
|
Decimal |
Specifies the decimal points at which to display the Analysis Commentary and the print file. |
The Alchemy Order Macro Stop-3 Target-Trailing Indicator (Alchemy OM StpT3Trl) Available for TradeStation 9/10 only!
The Alchemy Order Macro Stop-Target-Trailing Indicator detects open positions and has the option of placing order macros for a protective stop, a breakeven stop, 3 targets and 2 trailing stops on a real time basis. This indicator offers more flexible and sophisticated ways of placing exit orders than are available in the TradeStation Matrix window. All stop and limit orders that are placed by this indicator are shown in the Matrix window and they can be easily moved in the Matrix window by dragging them up or down. In order for the indicator to generate orders, the option "Enable RunCommand EasyLanguage Keyword" box in the "General" window under "Format Indicator" needs to be checked with either confirmation set to on or off.
Instructions on enabling the entry order macros:
TradeStation 9.5
The "MACROS" mode needs to be enabled (MACROS button in Status Bar needs to be green).
TradeStation 10
Access from the Main toolbar and click the Lock/Unlock Order Placement
![]() icon. If the Main toolbar is not visible, you may display it using the
View>Platform Toolbars>Main ToolBar menu sequence.
icon. If the Main toolbar is not visible, you may display it using the
View>Platform Toolbars>Main ToolBar menu sequence.
Selecting the Lock Order Entry Macros item from the drop-down menu locks or
unlocks (turns on or off) the ability to place orders with order entry macros.
When locked, a blue box appears around the icon associated with this item and
the ability to run order entry macros will be disabled.
This indicator is available for TradeStation 9/10
only. Very important: Please make sure to disable all Validations &
Confirms for each market category under File > Preferences > TradeStation Order
Entry...
To use this indicator, please follow these steps:
Create a
chart for the symbol that you are trading by going to File > New > Window >
Chart Analysis > OK
Format the symbol by clicking on Format > Symbol > Settings and select the
symbol that you are trading.
Insert the indicator into the chart by clicking on Insert > Indicator...
and select our Alchemy OM StpT3Trl indicator
Format the indicator by clicking on Format Analysis Techniques..., select our
Alchemy OM StpTarTrl indicator and click on Format
Click on the General tab and check Enable RunCommand EasyLanguage Keyword with
confirmation Off
Click on the Inputs tab and adjust all of the exit settings as desired.
For an explanation for each input, please refer to our indicator input
description below.
Indicator Inputs:
|
ProtectiveStop |
Specifies the distance in number of ticks/pips/cents from the entry price for placing the protective stop, whereas a setting of 0 disables the protective stop. |
|
BreakEvenMinimumProfit |
Specifies the minimum profit in ticks/pips/cents to be reached at which time the breakeven stop is initiated, whereas a setting of 0 disables the breakeven stop. |
|
BreakEvenAddDistance |
Specifies the distance in ticks/pips/cents to add to the entry price in favor of the currently held position for placing the break even stop. |
|
InitialTrailingStop |
Specifies the initial trailing stop distance in number of ticks/pips/cents. Please note that if the initial trailing stop distance is greater than the protective stop distance, the protective stop will stay in place until the maximum position profit minus the initial trailing stop distance exceeds the protective stop at which time the initial trailing stop is engaged. A setting of 0 disables the initial trailing stop. |
|
TrailingStop2 |
Specifies the trailing stop distance in number of ticks/pips/cents for the second trailing stop, which is initiated once Target 1 is reached. The second trailing stop is disabled with Trailing Stop2 or Target1 set to 0. |
|
LimitOrMIT |
A setting of "Limit", "L", "limit" or "l" uses limit orders for the targets, otherwise Market If Touched orders are used. |
|
Target1 |
Specifies the distance in number of ticks/pips/cents from the entry price for placing the first profit target and initiating the second trailing stop. A setting of 0 disables the second trailing stop as well as the first profit target. |
|
Target1PercentExit |
Specifies the percent contracts/shares to exit at the first profit target, whereas a setting of 0 disables the first profit target. |
|
Target2 |
Specifies the distance in number of ticks/pips/cents from the entry price for placing the second profit target. A setting of 0 disables the second profit target. |
|
Target2PercentExit |
Specifies the percent contracts/shares to exit at the second profit target, whereas a setting of 0 disables the second profit target. |
|
Target3 |
Specifies the distance in number of ticks/pips/cents from the entry price for placing the third target at which to exit all open positions, whereas a setting of 0 disables the third profit target. |
|
AccountNumber |
Specifies the trading account number. This is a string input which always requires the quotation marks and it is caps sensitive. When left blank, the indicator always defaults to the trading account number that is being used for this particular chart under Format Strategies. |
|
SymbName |
Specifies the trading symbol that the indicator places orders for. This is a string input which always requires the quotation marks and it is caps sensitive. When left blank, the indicator always defaults to the trading symbol that is being used on this chart. |
|
SymbCategory |
Specifies the trading symbol category that the indicator looks for placing orders for. This is a string input which always requires the quotation marks and it is caps sensitive. The categories have to be entered as follows: "Equity", "EquityOption", "Future", "FutureOption", or "Forex". When left blank (""), the indicator automatically detects the category of the symbol that it is applied on. |
|
SellCommand |
Specifies the sell order command macro. For Futures and Forex, the command "sell" enters a short position and exits a long position, whereas for equities, the command "sellshort" enters a short position and the command "sell" exits a long position. This is a string input which always requires the quotation marks and it is caps sensitive. When left blank (""), the indicator automatically specifies the sell order command based on the detected category of the symbol that it is applied on |
|
BuyCommand |
Specifies the buy order command macro. For Futures and Forex, the command "buy" enters a long position and exits a short position, whereas for equities, the command "buy" enters a long position and the command "buytocover" exits a short position. This is a string input which always requires the quotation marks and it is caps sensitive. When left blank (""), the indicator automatically specifies the buy order command based on the detected category of the symbol that it is applied on |
|
Frequency |
Sets the order frequency such as "Once", "OncePerBar", "EndOfBar" or "Always". |
|
RoundingPrecision |
Specifies the rounding decimal precision for specifying the entry price, whereas a negative setting reads the entry price as reflected in the TradeManager |
|
ShowEntryPrice |
Enables/disables the plot for the entry price. |
|
NumberTicksDelay |
Specifies the delay time in number of price ticks from the time previous orders are cancelled until new orders are placed. This delay prevents duplicate orders from being generated due to the time lag that occurs between the submitted cancel orders command and the cancelled orders confirmation. A negative setting disables this delay method. |
|
SecondsDelay |
Specifies the delay time in number of seconds from the time previous orders are cancelled until new orders are placed. This delay prevents duplicate orders from being generated due to the time lag that occurs between the submitted cancel orders command and the cancelled orders confirmation. A negative setting disables this delay method. |
|
PrintStopTargetLog |
Enables/disables the print file which is printed to c:\stoptargetlog.txt |
|
Decimal |
Specifies the decimal points at which to display the Analysis Commentary and the print file. |
|
PrintStopTargetLog |
Enables/disables the print file which is printed to c:\stoptargetlog.txt |
|
Decimal |
Specifies the decimal points at which to display the Analysis Commentary and the print file. |
The Alchemy Order Macro Trailing-Add On-Reverse Indicator (Alchemy OM TrailAddOnReverse) Available for TradeStation 9/10 only!
The Alchemy Order Macro Trailing-Add On-Reverse Indicator detects open positions and has the option of placing order macros for a trailing stop, add on positions and reverse position on a real time basis. This indicator offers more flexible and sophisticated ways of placing exit orders than are available in the TradeStation Matrix window. All stop orders that are placed by this indicator are shown in the Matrix window and they can be easily moved in the Matrix window by dragging them up or down. In order for the indicator to generate orders, the option "Enable RunCommand EasyLanguage Keyword" box in the "General" window under "Format Indicator" needs to be checked with either confirmation set to on or off.
Instructions on enabling the entry order macros:
TradeStation 9.5
The "MACROS" mode needs to be enabled (MACROS button in Status Bar needs to be green).
TradeStation 10
Access from the Main toolbar and click the Lock/Unlock Order Placement
![]() icon. If the Main toolbar is not visible, you may display it using the
View>Platform Toolbars>Main ToolBar menu sequence.
icon. If the Main toolbar is not visible, you may display it using the
View>Platform Toolbars>Main ToolBar menu sequence.
Selecting the Lock Order Entry Macros item from the drop-down menu locks or
unlocks (turns on or off) the ability to place orders with order entry macros.
When locked, a blue box appears around the icon associated with this item and
the ability to run order entry macros will be disabled.
This indicator is available for TradeStation 9/10
only. Very important: Please make sure to disable all Validations &
Confirms for each market category under File > Preferences > TradeStation Order
Entry...
To use this indicator, please follow these steps:
Create a
chart for the symbol that you are trading by going to File > New > Window >
Chart Analysis > OK
Format the symbol by clicking on Format > Symbol > Settings and select the
symbol that you are trading.
Insert the indicator into the chart by clicking on Insert > Indicator...
and select our Alchemy OM TrailAddOnReverse indicator
Format the indicator by clicking on Format Analysis Techniques..., select our
Alchemy OM TrailAddOnReverse indicator and click on Format
Click on the General tab and check Enable RunCommand EasyLanguage Keyword with
confirmation Off
Click on the Inputs tab and adjust all of the exit settings as desired.
For an explanation for each input, please refer to our indicator input
description below.
Disclosure and warning:
This indicator places orders in the live market and before using it in live trading, it is your responsibility to practice with it in simulated mode. By purchasing this indicator, you agree NOT to hold Joe Jogerst, Trading Alchemy and/or Alchemy Trading Technologies, Inc. liable for any monetary loss, and/or emotional damage. By using this indicator, you agree that use of this software is entirely at your own risk.
Indicator Inputs:
|
TrailingStopDistance |
Specifies the trailing stop distance. The input PriceFormat specifies the format of the specified stop distance. A setting of 0 disables the trailing stop. |
|
AddOnPositionProfitDollars |
Specifies the initial open position profit dollar amount at which the indicator will add on to the current position size. After the initial add on position, the open position profit dollar amount requirement for each consecutive next add on position is being doubled. A setting of 0 disables the position add on. |
|
AddOnPositionSize |
Specifies the number of shares/contracts to add on to the current position. |
|
ReversalPositionSize |
Specifies the position size in number of shares/contracts for reversing when a position is exited. A setting of 0 disables the reversal function. Caution: With this feature enabled, the indicator will automatically reverse positions whenever a position is closed out manually and in order to disables this temporarily, the order entry placement feature can be locked by double clicking on the green OE MACROS button in the Status Bar. Once ready to resume for the indicator to continue placing orders, the order entry placement feature needs to be unlocked again by double clicking on the red OE MACROS button in the Status Bar |
|
PriceFormat |
Specifies the format of the trailing stop distance as specified with the input TrailingStopDistance as follows: With a value of 1 the distance is expressed in a dollar amount on a position basis, with a value of 2 the distance is expressed in a dollar amount per contract/share, with a value of 3 the distance is expressed in cents/ticks/pips per contract/share and with a value of 1 the distance is expressed in dollars/points per contract/share. |
|
AccountNumber |
Specifies the trading account number. This is a string input which always requires the quotation marks and it is caps sensitive. When left blank, the indicator always defaults to the trading account number that is being used for this particular chart under Format Strategies. |
|
SymbName |
Specifies the trading symbol that the indicator places orders for. This is a string input which always requires the quotation marks and it is caps sensitive. When left blank, the indicator always defaults to the trading symbol that is being used on this chart. |
|
SymbCategory |
Specifies the trading symbol category that the indicator looks for placing orders for. This is a string input which always requires the quotation marks and it is caps sensitive. The categories have to be entered as follows: "Equity", "EquityOption", "Future", "FutureOption", or "Forex". When left blank (""), the indicator automatically detects the category of the symbol that it is applied on. |
|
BuyLongCommand |
Specifies the buy long order command macro. The command "buy" enters a long position. This is a string input which always requires the quotation marks and it is caps sensitive. When left blank (""), the indicator automatically specifies the buy order command based on the detected category of the symbol that it is applied on |
|
SellShortCommand |
Specifies the sell short order command macro. For Futures and Forex, the command "sell" enters a short position, whereas for equities, the command "sellshort" enters a short position. This is a string input which always requires the quotation marks and it is caps sensitive. |
|
SellCommand |
Specifies the sell order command macro. The command "sell" exits a long position. This is a string input which always requires the quotation marks and it is caps sensitive. When left blank (""), the indicator automatically specifies the sell order command based on the detected category of the symbol that it is applied on |
|
BuyCommand |
Specifies the buy order command macro. For Futures and Forex, the command "buy" exits a short position, whereas for equities, the command "buytocover" exits a short position. This is a string input which always requires the quotation marks and it is caps sensitive. When left blank (""), the indicator automatically specifies the buy order command based on the detected category of the symbol that it is applied on |
|
Frequency |
Sets the order frequency such as "Once", "OncePerBar", "EndOfBar" or "Always". |
|
Duration |
Specifies the order duration such as "Day" for day only. |
|
EndTme |
Specifies the latest time of the day for the indicator to be active. Once this time is reached the indicator will close all open positions and disable itself. In order for the indicator to place orders on the next day again, the indicator will need to be re-enabled again at that time. The format is military time without the colon. A negative setting such as -1 disables this feature. |
|
RoundingPrecision |
Specifies the rounding decimal precision for specifying the entry price, whereas a negative setting reads the entry price as reflected in the TradeManager |
|
ShowEntryPrice |
Enables/disables the plot for the entry price. |
|
NumberTicksDelay |
Specifies the delay time in number of price ticks from the time previous orders are cancelled until new orders are placed. This delay prevents duplicate orders from being generated due to the time lag that occurs between the submitted cancel orders command and the cancelled orders confirmation. A negative setting disables this delay method. Caution: To prevent duplicate orders, it is recommended to set this input to a value no lower than 2 ticks. |
The Alchemy Order Macro Stop-Trailing-Add On-Reverse Indicator (Alchemy OM Stop-Trail-AddOn-Reverse) Available for TradeStation 9/10 only!
The Alchemy Order Macro Stop-Trailing-Add On-Reverse Indicator detects open positions and has the option of placing order macros for a protective stop, trailing stop, add on positions and reverse position on a real time basis. This indicator offers more flexible and sophisticated ways of placing exit orders than are available in the TradeStation Matrix window. All stop orders that are placed by this indicator are shown in the Matrix window and they can be easily moved in the Matrix window by dragging them up or down. In order for the indicator to generate orders, the option "Enable RunCommand EasyLanguage Keyword" box in the "General" window under "Format Indicator" needs to be checked with either confirmation set to on or off.
Instructions on enabling the entry order macros:
TradeStation 9.5
The "MACROS" mode needs to be enabled (MACROS button in Status Bar needs to be green).
TradeStation 10
Access from the Main toolbar and click the Lock/Unlock Order Placement
![]() icon. If the Main toolbar is not visible, you may display it using the
View>Platform Toolbars>Main ToolBar menu sequence.
icon. If the Main toolbar is not visible, you may display it using the
View>Platform Toolbars>Main ToolBar menu sequence.
Selecting the Lock Order Entry Macros item from the drop-down menu locks or
unlocks (turns on or off) the ability to place orders with order entry macros.
When locked, a blue box appears around the icon associated with this item and
the ability to run order entry macros will be disabled.
This indicator is available for TradeStation 9/10
only. Very important: Please make sure to disable all Validations &
Confirms for each market category under File > Preferences > TradeStation Order
Entry...
To use this indicator, please follow these steps:
Create a
chart for the symbol that you are trading by going to File > New > Window >
Chart Analysis > OK
Format the symbol by clicking on Format > Symbol > Settings and select the
symbol that you are trading.
Insert the indicator into the chart by clicking on Insert > Indicator...
and select our Alchemy OM TrailAddOnReverse indicator
Format the indicator by clicking on Format Analysis Techniques..., select our
Alchemy OM TrailAddOnReverse indicator and click on Format
Click on the General tab and check Enable RunCommand EasyLanguage Keyword with
confirmation Off
Click on the Inputs tab and adjust all of the exit settings as desired.
For an explanation for each input, please refer to our indicator input
description below.
Disclosure and warning:
This indicator places orders in the live market and before using it in live trading, it is your responsibility to practice with it in simulated mode. By purchasing this indicator, you agree NOT to hold Joe Jogerst, Trading Alchemy and/or Alchemy Trading Technologies, Inc. liable for any monetary loss, and/or emotional damage. By using this indicator, you agree that use of this software is entirely at your own risk.
Indicator Inputs:
|
ProtectiveStopDistance |
Specifies the protective stop distance. The input PriceFormat specifies the format of the specified stop distance. A setting of 0 disables the protective stop. |
|
TrailingStopDistance |
Specifies the trailing stop distance. The input PriceFormat specifies the format of the specified stop distance. A setting of 0 disables the trailing stop. |
|
AddOnIncrement |
Specifies the increment in number of cents, ticks or pips from the average entry price at which the indicator will add on to the current position size. A positive value adds on as price moves into profits and a negative value adds on when price retraces. A setting of 0 disables the position add on. |
|
AddOnPositionSize |
Specifies the number of shares/contracts to add on to the current position. |
|
ReversalPositionSize |
Specifies the position size in number of shares/contracts for reversing when a position is exited. A setting of 0 disables the reversal function. Caution: With this feature enabled, the indicator will automatically reverse positions whenever a position is closed out manually and in order to disables this temporarily, the order entry placement feature can be locked by double clicking on the green OE MACROS button in the Status Bar. Once ready to resume for the indicator to continue placing orders, the order entry placement feature needs to be unlocked again by double clicking on the red OE MACROS button in the Status Bar |
|
PriceFormat |
Specifies the format of the trailing stop distance as specified with the input TrailingStopDistance as follows: With a value of 1 the distance is expressed in a dollar amount on a position basis, with a value of 2 the distance is expressed in a dollar amount per contract/share, with a value of 3 the distance is expressed in cents/ticks/pips per contract/share and with a value of 1 the distance is expressed in dollars/points per contract/share. |
|
AccountNumber |
Specifies the trading account number. This is a string input which always requires the quotation marks and it is caps sensitive. When left blank, the indicator always defaults to the trading account number that is being used for this particular chart under Format Strategies. |
|
SymbName |
Specifies the trading symbol that the indicator places orders for. This is a string input which always requires the quotation marks and it is caps sensitive. When left blank, the indicator always defaults to the trading symbol that is being used on this chart. |
|
SymbCategory |
Specifies the trading symbol category that the indicator looks for placing orders for. This is a string input which always requires the quotation marks and it is caps sensitive. The categories have to be entered as follows: "Equity", "EquityOption", "Future", "FutureOption", or "Forex". When left blank (""), the indicator automatically detects the category of the symbol that it is applied on. |
|
BuyLongCommand |
Specifies the buy long order command macro. The command "buy" enters a long position. This is a string input which always requires the quotation marks and it is caps sensitive. When left blank (""), the indicator automatically specifies the buy order command based on the detected category of the symbol that it is applied on |
|
SellShortCommand |
Specifies the sell short order command macro. For Futures and Forex, the command "sell" enters a short position, whereas for equities, the command "sellshort" enters a short position. This is a string input which always requires the quotation marks and it is caps sensitive. |
|
SellCommand |
Specifies the sell order command macro. The command "sell" exits a long position. This is a string input which always requires the quotation marks and it is caps sensitive. When left blank (""), the indicator automatically specifies the sell order command based on the detected category of the symbol that it is applied on |
|
BuyCommand |
Specifies the buy order command macro. For Futures and Forex, the command "buy" exits a short position, whereas for equities, the command "buytocover" exits a short position. This is a string input which always requires the quotation marks and it is caps sensitive. When left blank (""), the indicator automatically specifies the buy order command based on the detected category of the symbol that it is applied on |
|
Frequency |
Sets the order frequency such as "Once", "OncePerBar", "EndOfBar" or "Always". |
|
Duration |
Specifies the order duration such as "Day" for day only. |
|
EndTme |
Specifies the latest time of the day for the indicator to be active. Once this time is reached the indicator will close all open positions and disable itself. In order for the indicator to place orders on the next day again, the indicator will need to be re-enabled again at that time. The format is military time without the colon. A negative setting such as -1 disables this feature. |
|
RoundingPrecision |
Specifies the rounding decimal precision for specifying the entry price, whereas a negative setting reads the entry price as reflected in the TradeManager |
|
ShowEntryPrice |
Enables/disables the plot for the entry price. |
|
NumberTicksDelay |
Specifies the delay time in number of price ticks from the time previous orders are cancelled until new orders are placed. This delay prevents duplicate orders from being generated due to the time lag that occurs between the submitted cancel orders command and the cancelled orders confirmation. A negative setting disables this delay method. Caution: To prevent duplicate orders, it is recommended to set this input to a value no lower than 2 ticks. |
The Alchemy Equity Curve Indicator (Alchemy EquityCurve) Available for TradeStation 9/10 only!
The Alchemy Equity Curve indicator plots the equity curve of the strategies that are inserted into the same chart as equity lines in the lower sub-graph of the chart. This indicator contains the following optional lines and dots: Strategy net profit line, closed equity line and separate dot as well as an open position profit line. It also contains an average line of the closed equity as well as an alert feature for when the closed equity drops a specified amount below its average. The line colors are controlled with the color plots under Format Indicator > Color. Please note that when making a color change, the indicator needs to be disabled and then re-enabled again before the color changes will take affect.
Indicator Inputs:
|
|
Plotting: |
|
PlotNetProfit |
Enables/disables the net profit/loss line. |
|
PlotClosedEquityLine |
Enables/disables the closed equity line. |
|
PlotClosedEquityDot |
Enables/disables the closed equity dot. |
|
PlotOpenPositionProfit |
Enables/disables the open position profit line. |
|
PlotZeroLine |
Enables/disables the zero line. |
|
PlotAvg |
Enables/disables the average line of the closed equity. |
|
PlotMinimumEquityDot |
Enables/disables minimum equity dot plot which is displayed MinimumEquity dollar amount below the average line. A setting of 1 displays a dot for only the last closed trade, a setting of 2 displays a dot for all last closed trades and a setting of 0 disables this dot. |
|
MinimumEquityColoring |
Enables/disables the closed equity line coloring and line width change when the closed equity reaches the minimum equity distance below the average line. A setting of 1 changes the line color and width only the last closed trade, a setting of 2 changes the line color and width for all last closed trades and a setting of 0 disables this alert feature. The line color and width is controlled with the color plot MinEquity under Format Indicator > Color and Style. Please note that when making a color or width change, the indicator needs to be disabled and then re-enabled again before the changes will take affect. |
|
ColorBarOffset |
Specifies the number of bars to offset the color and width change. For a histogram, point, cross, left tic or right tic, this input should be set to 0 and for lines, this input should be set to 1 bar |
|
|
Average: |
|
AvgLength |
Specifies the length of the closed equity line. |
|
MinimumEquity |
Specifies the minimum equity dollar distance below the average. |
|
|
Alerts: |
|
AvgCrossOverAlert |
Enables/disables the alert for when the equity line crosses over its average line. |
|
AvgCrossUnderAlert |
Enables/disables the alert for when the equity line crosses under its average line. |
|
MinimumEquityAlert |
Enables/disables the alert for when the equity line reaches MinimumEquity dollar amount below the average line |
|
AlertDecimal |
Specifies the number of decimals for the dollar amount as specified with the input MinimumEquity to display in the alert notification window. |
The Alchemy Force Index Indicator (Alchemy ForceIndex)
The Alchemy Force Index is an indicator that uses price and volume to assess the power behind a move or identify possible turning points. It combines direction, extent and volume, three essential elements to price movement, as an oscillator that fluctuates in positive and negative territory as the balance of power shifts. The Force Index can be used to reinforce the overall trend, identify playable corrections or foreshadow reversals with divergences. The Alchemy Force Index indicator contains a Force Index histogram and an average line.
Indicator Inputs:
|
Price |
Specifies the price to be used such as open, high, low or close. |
|
Vol |
Specifies the volume to be used such as volume or ticks. |
|
Length |
Specifies the look back length for the Force Index average line, whereas a setting of 0 disables the average line. |
|
Type |
Specifies the moving average type of the Force Index average line. A setting of 1 uses a simple moving average, a setting of 2 uses an exponential moving average, a setting of 3 uses a weighted moving average, a setting o 4 uses a triangular moving average, a setting of 5 uses a Mid Keltner and a setting of 6 uses a Hull moving average. A setting of 0 disables the average line. |
| ShowForceIndex | Enables/disables the Force Index histogram. |
| ShowZeroLine | Enables/disables the zero line |
The Alchemy Fractal-Squat Indicator (Alchemy Fractal-Squat)
All markets
are characterized by the fact that on the most part the prices do not change too
much, and only short periods of time (15–30 percent) account for trend changes.
Most lucrative periods are usually the case when market prices change according
to a certain trend. The Alchemy Fractal-Squat indicator detects a series
of at least five successive bars, with the highest HIGH in the middle, and two
lower HIGHs on both sides, referred to as a up fractal. The reversing set
is a series of at least five successive bars, with the lowest LOW in the middle,
and two higher LOWs on both sides, which correlates to a down fractal. The
fractals are indicated with the show me dots. When a fractal bar is
associated with an increasing volume yet temporarily stalling price movement, it
is marked as a fractal-squat bar. Fractal bars can be used for breakout
signals such as buying above an up fractal high and selling below a down fractal
low.
Indicator Inputs:
|
VolumePrice |
Specifies the volume to be used for detecting a fractal-squat bar such as ticks or volume |
|
VerticalOffset |
Specifies the number of cents, ticks or pips to offset the show me dots from the high or low of the bar. |
Heikin-Ashi Indicators
Heikin-Ashi chart looks like the candlestick chart but the method of calculation and plotting of the candles on the Heikin-Ashi chart is different from the candlestick chart. In candlestick charts, each candlestick shows four different numbers: Open, Close, High and Low price and each candlestick is independent and has no relation with the previous candlestick. But Heikin-Ashi candles are different and each candle is calculated and plotted using some information from the previous candle:
1- Close price: the close price in a Heikin-Ashi candle is the average of open,
close, high and low price.
2- Open price: the open price in a Heikin-Ashi candle is the average of the open
and close of the previous candle.
3- High price: the high price in a Heikin-Ashi candle is chosen from one of the
high, open and close price of which has the highest value.
4- Low price: the high price in a Heikin-Ashi candle is chosen from one of the
high, open and close price of which has the lowest value.
So candles of a Heikin-Ashi chart are related to each other because the close
and open price of each candle should be calculated using the previous candle
close and open price and also the high and low price of each candle is affected
by the previous candle. So a Heikin-Ashi chart is slower than a candlestick
chart and its signals are delayed (like when we use moving averages on our chart
and trade according to them).
What are the advantages and disadvantages of this delay?
This delay has made the Heikin-Ashi candle as a good indicator for volatile
instruments because it prevents us from rushing and making mistakes and trading
against the market.
The Alchemy Heikin-Ashi Indicator (Alchemy HeikinAshi)
The Alchemy Heikin-Ashi indicator replaces the standard OHLC or Candlestick bars and when using this indicator, the price bars should be made invisible as follows:
TradeStation 8 and higher: Format > Symbol > Style > Make price data invisible.
TradeStation 4 and TradeStation 2000i: Format > Symbol > Style > Select Dot on Close and under Component Color, select the background color.
Candle Coloring Controls:
TradeStation 8 and higher: The up candle color is controlled with the UpTrend plot color and the down candle color is controlled with the DnTrend plot color. Please note that when making a color change, the indicator needs to be disabled and then re-enabled again before the color changes will take affect.
TradeStation 4 and TradeStation 2000i: The up candle color is controlled with the input UpColor and the down candle color is controlled with the input DownColor.
Body, wick and tail plotting in TradeStation 4 and TradeStation 2000i:
Since TradeStation 4 and TradeStation 2000i does not allow for multiple paint bar plotting within one indicator, it is necessary to insert 2 separate indicators in order to plot both, body and wick/tail as follows:
In order to plot the body, insert the first Indicator with the following settings:
Inputs:
PlotBody: true
WickPercent: 0
TailPercent: 0
Style:
ha Open Type: Bar High
ha Close Type: Bar Low
ha High Type: Point
ha Low Type: Point
In order to plot the tail and the wick, insert a second Indicator with the following settings:
Inputs:
PlotBody: false
WickPercent: 100
TailPercent: 100
Style:
ha Open Type: Point
ha Close Type: Point
ha High Type: Bar High
ha Low Type: Bar Low
Indicator Inputs:
|
Length |
Specifies the look back length for using an average of the past number of bars, whereas a setting of -1 uses the standard and conventional method of calculating the Heikin-Ashi candle. |
| PlotHA_Body | Enables/disables the plotting of the Heikin-Ashi candle body. |
| HA_WickPercent | Specifies the Heikin-Ashi wick percent length, whereas a setting of 100 displays the full wick and a setting of 0 does not display a wick. |
| HA_TailPercent | Specifies the Heikin-Ashi tail percent length, whereas a setting of 100 displays the full tail and a setting of 0 does not display a tail. |
| Heikin-Ashi Candle Parameters: | |
| PlotHeikinAshi | Enables/disables the plotting of the Heikin-Ashi candle. |
| PlotHAopen | Enables/disables the plotting of the Heikin-Ashi open. In order to plot the open, the input PlotHA_Body needs to be enabled as well. |
| PlotHAhigh | Enables/disables the plotting of the Heikin-Ashi high. In order to plot the high, the input HA_WickPercent needs to be greater than 0. |
| PlotHAlow | Enables/disables the plotting of the Heikin-Ashi low. In order to plot the low, the input HA_TailPercent needs to be greater than 0. |
| PlotHAclose | Enables/disables the plotting of the Heikin-Ashi close. In order to plot the close, the input PlotHA_Body needs to be enabled as well. |
| HAopenColorOffset | Specifies the number of bars to offset the color change of the Heikin-Ashi open plot. For a paint bar, histogram, point, cross, left tic or right tic, this input should be set to 0 and for lines, this input should be set to 1 bar. |
| HAhighColorOffset | Specifies the number of bars to offset the color change of the Heikin-Ashi high plot. For a paint bar, histogram, point, cross, left tic or right tic, this input should be set to 0 and for lines, this input should be set to 1 bar. |
| HAlowColorOffset | Specifies the number of bars to offset the color change of the Heikin-Ashi low plot. For a paint bar, histogram, point, cross, left tic or right tic, this input should be set to 0 and for lines, this input should be set to 1 bar. |
| HAcloseColorOffset | Specifies the number of bars to offset the color change of the Heikin-Ashi close plot. For a paint bar, histogram, point, cross, left tic or right tic, this input should be set to 0 and for lines, this input should be set to 1 bar. |
| HAopenTrendColor | Enables/disables the trend coloring of the Heikin-Ashi open plot. When enabled, the up trend color is specified with the UpTrend plot color and the down trend color is specified with the DnTrend plot color. Whenever making a color change, the indicator needs to be disabled and then re-enabled again before the color changes will take affect. |
| HAhighTrendColor | Enables/disables the trend coloring of the Heikin-Ashi high plot. When enabled, the up trend color is specified with the UpTrend plot color and the down trend color is specified with the DnTrend plot color. Whenever making a color change, the indicator needs to be disabled and then re-enabled again before the color changes will take affect. |
| HAlowTrendColor | Enables/disables the trend coloring of the Heikin-Ashi low plot. When enabled, the up trend color is specified with the UpTrend plot color and the down trend color is specified with the DnTrend plot color. Whenever making a color change, the indicator needs to be disabled and then re-enabled again before the color changes will take affect. |
| HAcloseTrendColor | Enables/disables the trend coloring of the Heikin-Ashi close plot. When enabled, the up trend color is specified with the UpTrend plot color and the down trend color is specified with the DnTrend plot color. Whenever making a color change, the indicator needs to be disabled and then re-enabled again before the color changes will take affect. |
| Price Candle Parameters: | |
| PlotPriceCandle | A setting of 0 disables the plotting of the price candle. A setting of 1 enables the plotting of the OHLC price candles, which are the 4 plots open, close, high and low. A setting of 2 enables the plotting of the candle stick price candles, which are the 6 plots open, close, Wick High, Wick Low, Tail High and Tail Low. |
| PlotPriceOpen | Enables/disables the plotting of the price candle open. |
| PlotPriceHigh | Enables/disables the plotting of the price candle high. |
| PlotPriceLow | Enables/disables the plotting of the price candle low. |
| PlotPriceClose | Enables/disables the plotting of the price candle close. |
| PriceOpenColorOffset | Specifies the number of bars to offset the color change of the price candle open plot. For a paint bar, histogram, point, cross, left tic or right tic, this input should be set to 0 and for lines, this input should be set to 1 bar. |
| PriceHighColorOffset | Specifies the number of bars to offset the color change of the price candle high plot. For a paint bar, histogram, point, cross, left tic or right tic, this input should be set to 0 and for lines, this input should be set to 1 bar. |
| PriceLowColorOffset | Specifies the number of bars to offset the color change of the price candle low plot. For a paint bar, histogram, point, cross, left tic or right tic, this input should be set to 0 and for lines, this input should be set to 1 bar. |
| PriceCloseColorOffset | Specifies the number of bars to offset the color change of the price candle close plot. For a paint bar, histogram, point, cross, left tic or right tic, this input should be set to 0 and for lines, this input should be set to 1 bar. |
| PriceOpenTrendColor | Enables/disables the trend coloring of the price candle open plot. When enabled, the up trend color is specified with the UpTrend plot color and the down trend color is specified with the DnTrend plot color. Whenever making a color change, the indicator needs to be disabled and then re-enabled again before the color changes will take affect. |
| PriceHighTrendColor | Enables/disables the trend coloring of the price candle high plot. When enabled, the up trend color is specified with the UpTrend plot color and the down trend color is specified with the DnTrend plot color. Whenever making a color change, the indicator needs to be disabled and then re-enabled again before the color changes will take affect. |
| PriceLowTrendColor | Enables/disables the trend coloring of the price candle low plot. When enabled, the up trend color is specified with the UpTrend plot color and the down trend color is specified with the DnTrend plot color. Whenever making a color change, the indicator needs to be disabled and then re-enabled again before the color changes will take affect. |
| PriceCloseTrendColor | Enables/disables the trend coloring of the price candle close plot. When enabled, the up trend color is specified with the UpTrend plot color and the down trend color is specified with the DnTrend plot color. Whenever making a color change, the indicator needs to be disabled and then re-enabled again before the color changes will take affect. |
| Alerts: | |
| BullishAlert | Specifies the alert notification text when there is a bullish trend change. This is a string input and all text needs to stay within quotation marks. To disable the bullish trend change alert, this input needs to stay blank with just 2 quotation marks. |
| BearishAlert | Specifies the alert notification text when there is a bearish trend change. This is a string input and all text needs to stay within quotation marks. To disable the bearish trend change alert, this input needs to stay blank with just 2 quotation marks. |
| TradeStation 4 and TradeStation 2000i only: | |
| UpColor | Specifies the color for an up candle |
| DownColor | Specifies the color for a down candle |
The Alchemy Heikin-Ashi RadarScreen Indicator (Alchemy HeikinAshiRS)
The Alchemy Heikin-Ashi RadarScreen indicator contains a column that colors the cell according to the Heikin-Ashi candle trend.
Indicator Inputs:
|
Length |
Specifies the look back length for using an average of the past number of bars, whereas a setting of -1 uses the standard and conventional method of calculating the Heikin-Ashi candle. |
| WickPercent | Specifies the wick percent length, whereas a setting of 100 displays the full wick and a setting of 0 does not display a wick. |
| TailPercent | Specifies the tail percent length, whereas a setting of 100 displays the full tail and a setting of 0 does not display a tail. |
| UpCandleText | Specifies the cell text for an up candle. This is a string input which needs to stay within quotation marks. |
| DownCandleText | Specifies the cell text for a down candle. This is a string input which needs to stay within quotation marks. |
| UpCandleColor | Specifies the background color for an up candle. |
| DownCandleColor | Specifies the background color for a down candle. |
| BullishAlert | Specifies the alert notification text for a bullish trend change alert. This is a string input which needs to stay within quotation marks. A blank field (""), disables this alert. |
| BearishAlert | Specifies the alert notification text for a bearish trend change alert. This is a string input which needs to stay within quotation marks. A blank field (""), disables this alert. |
Example of sorting a TradeStation Scanner window for a trendchange with our Alchemy Heikin-Ashi RadarScreen indicator:
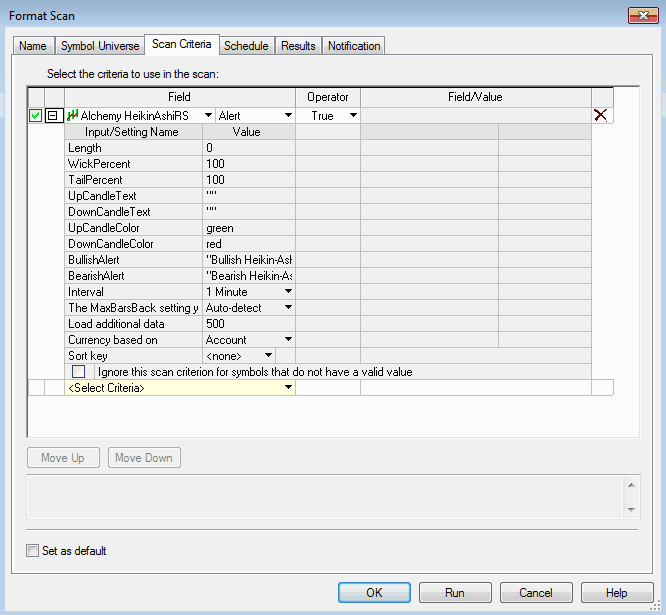
The Alchemy Heikin-Ashi Alert Indicator (Alchemy Heikin-AshiAlert) Available for TradeStation 9/10 only!
The Alchemy Heikin-Ashi Alert indicator tracks the Heikin-Ashi trend on up to 3 time frames and it plots a line in a lower sub-graph that is colored based on all or a majority of Heikin-Ashi indicators being up or down. The colors are specified with the color plots AllUp, MajorityUp, AllDown and MajorityDown. Please note that when making a color change, the indicator needs to be disabled and then re-enabled again before the color changes will take affect. This indicator contains an additional plot that displays a dot above the line on the first bar when all Heikin-Ashi indicators are up after they all have been down before and vice versa, on the first bar when all Heikin-Ashi indicators are down after they all have been up before.
Indicator Inputs:
|
ShowTrend |
Enables/disables the line that is colored based on all or a majority of Heikin-Ashi indicators being up or down. |
| TrendValue | Specifies the value of the trend line |
|
ShowTrendChange |
Enables/disables the plot that displays a dot above the line on the first bar when all Heikin-Ashi indicators are up after they all have been down before and vice versa, on the first bar when all Heikin-Ashi indicators are down after they all have been up before. |
| TrendChangeValue | Specifies the value of the trend change dot |
| Symbol1 | Specifies the symbol of the first time frame. This is a string input which needs to stay within quotation marks. If the same symbol as applied on a chart is used, the reserved word getsymbolname can be used. When left blank such as "", the first time frame will not be used. |
| Symbol2 | Specifies the symbol of the second time frame. This is a string input which needs to stay within quotation marks. If the same symbol as applied on a chart is used, the reserved word getsymbolname can be used. When left blank such as "", the second time frame will not be used. |
| Symbol3 | Specifies the symbol of the third time frame. This is a string input which needs to stay within quotation marks. If the same symbol as applied on a chart is used, the reserved word getsymbolname can be used. When left blank such as "", the third time frame will not be used. |
| Interval1 | Specifies the interval setting for a Tick, Volume or Intra-Day interval of the first time frame. As a universal example, we set this input to barinterval which automatically uses the same time frame as the chart that the indicator is applied on. However, with IntervalBarType1 set to either a daily, weekly or monthly interval, Interval1 does not have an affect. With a setting of 0, the first time frame will not be used. |
| Interval2 | Specifies the interval setting for a Tick, Volume or Intra-Day interval of the second time frame. As a universal example, we set this input to barinterval*3 which automatically uses a time frame that is 3 times higher from the chart that the indicator is applied on. However, with IntervalBarType2 set to either a daily, weekly or monthly interval, Interval2 does not have an affect. With a setting of 0, the second time frame will not be used. |
| Interval3 | Specifies the interval setting for a Tick, Volume or Intra-Day interval of the third time frame. As a universal example, we set this input to barinterval*6 which automatically uses a time frame that is 6 times higher from the chart that the indicator is applied on. However, with IntervalBarType3 set to either a daily, weekly or monthly interval, Interval3 does not have an affect. With a setting of 0, the third time frame will not be used. |
| BarType1 | Specifies the interval of the first time frame. A setting of -1 uses a Volume chart. A setting of 0 uses a Tick chart. A setting of 1 uses an Intra-Day Minute chart. A setting of 2 uses a Daily chart. A setting of 3 uses a Weekly chart. A setting of 4 uses a Monthly chart. |
| BarType2 | Specifies the interval of the second time frame. A setting of -1 uses a Volume chart. A setting of 0 uses a Tick chart. A setting of 1 uses an Intra-Day Minute chart. A setting of 2 uses a Daily chart. A setting of 3 uses a Weekly chart. A setting of 4 uses a Monthly chart. |
| BarType3 | Specifies the interval of the third time frame. A setting of -1 uses a Volume chart. A setting of 0 uses a Tick chart. A setting of 1 uses an Intra-Day Minute chart. A setting of 2 uses a Daily chart. A setting of 3 uses a Weekly chart. A setting of 4 uses a Monthly chart. |
| NumberBarsBack1 | Specifies the historical number of bars to load from the current date and time for calculating the first time frame. When this number of bars exceeds the historical data loaded in, the indicator will not plot and the solution for this is to either decrease this number or increase the the historical data range of the symbol. This number of bars is based on the interval setting of the first time frame. With a setting of 0, the first time frame will not be used. |
| NumberBarsBack2 | Specifies the historical number of bars to load from the current date and time for calculating the second time frame. When this number of bars exceeds the historical data loaded in, the indicator will not plot and the solution for this is to either decrease this number or increase the the historical data range of the symbol. This number of bars is based on the interval setting of the second time frame. With a setting of 0, the second time frame will not be used. |
| NumberBarsBack3 | Specifies the historical number of bars to load from the current date and time for calculating the third time frame. When this number of bars exceeds the historical data loaded in, the indicator will not plot and the solution for this is to either decrease this number or increase the the historical data range of the symbol. This number of bars is based on the interval setting of the third time frame. With a setting of 0, the third time frame will not be used. |
The Alchemy Horizontal Line Indicator (Alchemy HorizontLine)
The Alchemy Horizontal Line Indicator plots a horizontal line as specified with an indicator input and it has the option of entering and displaying a custom text label for its corresponding line.
Indicator Inputs:
|
Price: |
Specifies the price of the horizontal line. |
|
CustomText: |
Specifies the custom text to be placed next to the price. This is a string input and the text needs to be within the quotation marks. |
|
Text_Decimal: |
Specifies the number of decimals to display. |
|
FixedPrice: |
A setting of true uses a fixed price as entered with the input Price. With a setting of false the Price input can be used with a dynamic price series such as open, high, low or close as entered in the input Price. |
|
|
Dynamic Coloring Feature: When the prices as specified with the input UpColorPrice is above the horizontal line, the text, horizontal trend line and plot line color change to the color as specified with the UpColor plot. When the price as specified with the input DownColorPrice is below the horizontal line, the text, horizontal trend line and plot line color change to the color as specified with the DnColor plot. Otherwise, the text, horizontal trend line and plot line color change to the color as specified with the Horizontal plot. This input specifies the number of bars to offset the color change of the plot line. For a histogram, point, cross, left tic or right tic, this input should be set to 0 and for lines, this input should be set to 1 bar. A negative setting disables this coloring feature |
|
ColorOffset: |
This input enables the dynamic text, horizontal trend line and plot line coloring feature and it specifies the number of bars to offset the color change of the plot line. For a histogram, point, cross, left tic or right tic, this input should be set to 0 and for lines, this input should be set to 1 bar. A negative setting disables this coloring feature |
|
UseUpColorPrice: |
Enables/disables the up color price coloring feature. |
|
UpColorPrice: |
When the price as specified with this input is above the horizontal line, the text, horizontal trend line and plot line color change to the color as specified with the UpColor plot. |
|
UseDownColorPrice: |
Enables/disables the down color price coloring feature. |
|
DownColorPrice: |
When the price as specified with this input is below the horizontal line, the text, horizontal trend line and plot line color change to the color as specified with the DnColor plot. |
|
ShowPrice: |
With ShowPrice at 0, the text displays the Custom text only, with ShowPrice at 1, the text displays the Price and then the CustomText and with ShowPrice at 2, the text displays the CustomText and then the Price. |
|
Text_MoveToRightSpace: |
When set to true, the text is being moved into the right space between the vertical price axis and the current bar. Please note that the Space To The Right number of bars (Format > Space to the right....) needs to be set large enough to fit the corresponding text in to the blank space. |
|
Text_LeftSpace: |
Specifies the space to add to the left of the text in order to create extra space between the current price bar and the text. |
|
Text_Separation: |
Specifies the space between the Price and the Custom text. |
|
Text_VerticalOffset: |
Specifies the number of cents, ticks or pips to move the text above or below the horizontal line. |
|
Text_HorizontalOffset: |
Specifies the number of bars to move the text to the left form the current bar. This input is ignored when Text_MoveToRightSpace is enabled. |
|
Text_HorizontalAlign: |
Specifies the horizontal alignment of the text whereas 0=right aligned, 1=left aligned and 2=center aligned. This input is ignored when Text_MoveToRightSpace is enabled. |
|
Text_VerticalAlign: |
Specifies the vertical alignment of the text whereas 0=bottom aligned, 1= top aligned and 2= center aligned. |
|
ShowTrendLine: |
Enables/disables the horizontal trend line. The color and size of the trendline can be controlled by formatting the Horizontal plot 1 line under Format > Style and Format > Color. Please note that after making any kind of formatting changes, the indicator needs to be disabled and enabled before the formatting changes will take effect. |
|
TL_Style: |
Specifies the style of the horizontal trend line. |
|
TL_ExtendRight: |
Enables/disables the right extension of the trend line. |
|
ShowPlot: |
Enables/disables the plot line. |
|
CrossOverPrice: |
Specifies the crossover alert price. |
|
CrossUnderPrice: |
Specifies the crossunder alert price. |
|
AlertText: |
Specifies the cross alert text. This is a string input and the text needs to be within the quotation marks. |
The Alchemy Vertical Line Indicator (Alchemy VerticalLine)
The Alchemy Vertical Line Indicator plots a vertical line and generates an alert at the same specified time each day. This indicator is designed to only work on time charts such as tick, volume or intra-day charts. The vertical line color is controlled with the LineColor plot under Format Indicator > Color. The vertical line weight is controlled with the LineColor plot weight under Format Indicator > Style. Please note that the vertical line size can be increased only for solid lines. When making a color or line weight change, the indicator needs to be disabled and then re-enabled again before the color changes will take affect.
Indicator Inputs:
|
Tme: |
Specifies the time of the day as to when the vertical line is drawn and an alert is generated. The format is in military charting time without the colon, e.g. 1:00pm would be entered as 1300. |
|
VerticalLineStyle: |
Specifies the style of the vertical line. The options are as follows: tool_solid or 1, tool_dashed or 2, tool_dotted or 3, tool_dashed2 or 4, tool_dashed3 or 5. |
The Alchemy Automatic Trend Line Indicator (Alchemy TL Automatic)
The Alchemy
Automatic Trend Line indicator inserts down and up trendlines, connecting each
new swing high/swing low with the next most recent higher/lower swing high/swing
low within the last x number of swing highs/swing lows. It extends each new
trendline to the right and sets it's color and alert type. It truncates a down
trendline/up trendline on the right when the next new down trendline/up
trendline is drawn and it deletes a down trendline/up trendline when the next
new down trendline/up trendline is drawn.
1.) It can be applied on any oscillator as specified by its indicator input. The
indicator plots the oscillator together with its automatic trendlines.
2.) This indicator can also be used on price in any subgraph of a multiple data
series chart.
Chart setup instructions for plotting the trend lines on an oscillator or on a price chart in a lower subgraph:
For
trendlines to be plotted in a subgraph you need to have a price series in the
same subgraph. So add your symbol to the chart as data 2 and display it in
subgraph 2.
Next ‘hide’ the symbol in subgraph 2 by changing the style of the symbol to ‘bar
on close’ and change the color to your background color’.
Next set the scaling of the symbol in subgraph 2 to ‘User Defined’ and set the
Minimum and Maximum values to the range of your plots (e.g., 0 to 3).
Set the ‘Base study on’ setting for your line drawing indicator to data 2 and
set it to display in subgraph 2.
Finally, set the scaling of the indicator to ‘Same as symbol’.
Indicator Inputs:
|
PlotOscillator |
Enables/disables the Osc plot 1. |
|
Oscillator |
Defines the oscillator to be used. The oscillator function can be pasted into this input by clicking on the Dictionary button. |
|
PlotOverBought |
Enables/disables the OverBought plot 2. |
|
OverBought |
Specifies the overbought value. |
|
PlotOverSold |
Enables/disables the OverSold plot 3. |
|
OverSold |
Specifies the oversold value. |
|
PlotZeroLine |
Enables/disables the ZeroLine plot 4. |
| ZeroLine | Specifies the zero line value. |
| PriceHigh | Specifies the price to be used for pivot highs. When drawing trendlines on an oscillator, the oscillator function has to be used for this input and it can be pasted into this input by clicking on the Dictionary button. |
| PriceLow | Specifies the price to be used for pivot lows. When drawing trendlines on an oscillator, the oscillator function has to be used for this input and it can be pasted into this input by clicking on the Dictionary button. |
| UpTL_BreakPrice | Specifies the price to be used for breaking the up trend line. When drawing trendlines on an oscillator, the oscillator function has to be used for this input and it can be pasted into this input by clicking on the Dictionary button. |
| DnTL_BreakPrice | Specifies the price to be used for breaking the down trend line. When drawing trendlines on an oscillator, the oscillator function has to be used for this input and it can be pasted into this input by clicking on the Dictionary button. |
| SwHiStrength | Specifies the pivot strength for swing highs. |
| SwLoStrength | Specifies the pivot strength for swing lows. |
| MaxPivotsBack | Specifies the maximum number of pivots to consider. |
| BarsPast | Specifies the number of bars from when a trend line is penetrated after which it will be truncated. |
| History | A setting of "Yes" displays the trendlines historically on the chart and a setting of "No" displays the trendlines for the most recent swing only. |
| DnTLColor | Specifies the color for the down trend lines |
| UpTLColor | Specifies the color for the up trend lines |
| TL_Style | Specifies the trend line style. |
| TL_Size | Specifies the trend line size. |
| AlertType | Specifies the alert type such as "Intrabar" or "OnClose". |
The Alchemy Consecutive Highs-Lows Indicator (Alchemy HiLoConsec)
The Alchemy Consecutive Highs-Lows indicator paints the price bars when a consecutive number of higher highs or lower lows have been made. This indicator includes the option to require higher highs together with higher lows for up trend bars and lower lows together with lower highs for down trend bars.
User Defined Inputs:
|
MinimumConsecutiveBars: |
Specifies the minimum number of consecutive higher high or lower low bars. Please note that the paint bar displays the bar after the minimum number of consecutive higher high or lower low bars. |
|
MinimumPercentDistance: |
Specifies the minimum percent distance between the current price and the previous price in order to qualify for a higher high or lower low. |
|
ShowHigh: |
Enables/disables the higher high paint bars. |
|
ShowLow: |
Enables/disables the lower low paint bars. |
|
UpTrendHighPrice: |
Specifies the price to be used for higher highs such as high or close. |
|
UpTrendLowPrice: |
Specifies the price to be used for higher lows such as high or close. A setting of 0 disables this criteria. |
|
DownTrendLowPrice: |
Specifies the price to be used for lower lows such as low or close. |
|
DownTrendHighPrice: |
Specifies the price to be used for lower highs such as low or close. A setting of 0 disables this criteria. |
|
High_PB_HighPrice: |
Specifies the price to be used for higher highs paint bar high. To paint the bar range, this input should be specified as high and to paint the candle body, this input should be specified as open. |
|
High_PB_LowPrice: |
Specifies the price to be used for higher highs paint bar low. To paint the bar range, this input should be specified as low and to paint the candle body, this input should be specified as close. |
|
Low_PB_HighPrice: |
Specifies the price to be used for lower lows paint bar high. To paint the bar range, this input should be specified as high and to paint the candle body, this input should be specified as open. |
|
Low_PB_LowPrice: |
Specifies the price to be used for lower lows paint bar low. To paint the bar range, this input should be specified as low and to paint the candle body, this input should be specified as close. |
|
HighAlert: |
Enables/disables the alert for higher highs. |
|
LowAlert: |
Enables/disables the alert for lower lows. |
The Alchemy High Low Alert Indicator (Alchemy HighLowAlert)
The Alchemy High Low Alert indicator displays the percentage distance between the current price and the x-bar high and the x-bar low, such as a 52 week high or a 52 week low. This indicator can be applied on a chart as a histogram or in a RadarScreen window to scan for symbols that are trading within a specified percent distance of an x-bar high or x-bar low. For easy scanning, the percent is displayed only if the distance is within the specified maximum distance.
Indicator Inputs:
|
Length: |
Specifies the number of bars to look for an x-bar high or an x-bar low. For example, when applied on a weekly chart with a Length setting of 52, the indicator looks for the distance between the current price and the 52 week high/low. |
|
PercentDistance: |
Specifies the maximum percent distance between the current price and the x-bar high/low in order to display the percent distance plots/cells, whereas the x-bar high/x-bar low is considered 100 percent. For example, with an x-bar high of 100 and the current price trading at 90, the percent distance would be displayed as 10% (100-90=10, which is 10% of 100). |
|
ShowHigh: |
Enables/disables all indicator functions related to the distance to the x-bar high. |
|
ShowLow: |
Enables/disables all indicator functions related to the distance to the x-bar low. |
|
HighPrice: |
Specifies the price to be used for measuring the distance to the x-bar high such as high or close. |
|
LowPrice: |
Specifies the price to be used for measuring the distance to the x-bar low such as low or close. |
|
PlotHigh: |
A setting of disables the High%Dist plot/cell. Otherwise this input is used as a multiplier of the plot/cell value. For example, a setting of 1 displays the plot/cell value as a positive value and a setting of -1 displays the plot/cell value as a negative value. |
|
PlotLow: |
A setting of disables the Low%Dist plot/cell. Otherwise this input is used as a multiplier of the plot/cell value. For example, a setting of 1 displays the plot/cell value as a positive value and a setting of -1 displays the plot/cell value as a negative value. |
|
HighAlert: |
Enables/disables the alert when the current price is within the specified percent distance of the x-bar high. |
|
LowAlert: |
Enables/disables the alert when the current price is within the specified percent distance of the x-bar low. |
|
ShowHighAlertPrintLog: |
Enables/disables the log file c:\AlchemyHighAlertLog.txt, which logs all symbols that are within the specified percent distance of the x-bar high. This is an append file, which keeps adding new records whenever the indicator is updated. Therefore, in order to refresh this file, it can be deleted from this directory and the indicator will create a new file as soon as it is updated again. |
|
ShowLowAlertPrintLog: |
Enables/disables the log file c:\AlchemyLowAlertLog.txt, which logs all symbols that are within the specified percent distance of the x-bar low. This is an append file, which keeps adding new records whenever the indicator is updated. Therefore, in order to refresh this file, it can be deleted from this directory and the indicator will create a new file as soon as it is updated again. |
|
AlertDecimal: |
Specifies the decimal points for the percent to be displayed in the alert notification window and the print log. |
The Alchemy High Low X-Bar Indicator (Alchemy HighLowXBar)
The Alchemy High Low X-Bar indicator displays a show me dot when the current bar makes the highest high or the lowest low over a specified number of bars back.
Indicator Inputs:
|
HighPrice: |
Specifies the price to be used for calculating the highest high such as high or close. |
|
LowPrice: |
Specifies the price to be used for calculating the lowest low such as low or close. |
|
Length: |
Specifies the number of bars to look back for the highest high or the lowest low. |
|
ShowHigh: |
Enables/disables the highest high plot. |
|
ShowLow: |
Enables/disables the lowest low plot. |
|
HighPlotPrice: |
Specifies the price for the highest high show me such as high. |
|
LowPlotPrice: |
Specifies the price for the lowest low show me such as low. |
|
HighAlertText: |
Specifies the text to be displayed in the alert notification window when the current bar makes the highest high. This is a string input which needs to stay within quotation marks. To disable this alert, this field needs to be blank such as "". |
|
LowAlertText: |
Specifies the text to be displayed in the alert notification window when the current bar makes the lowest low. This is a string input which needs to stay within quotation marks. To disable this alert, this field needs to be blank such as "". |
The Alchemy High Low RadarScreen Indicator (Alchemy HighLowRS)
The Alchemy High Low RadarScreen indicator displays the highest high and the lowest low starting with a specified time for a 1 minute, 2 minute, 5 minute, 10 minute, 15 minute, 20 minute, 30 minute, 45 minute and 60 minute time period. Each time period is displayed by a separate column and the highs and lows are displayed as separate rows.
User Defined Inputs:
|
Tme: |
Specifies the time after which to calculate the high and low prices. The format is in military charting time without the colon, e.g. 1:00pm would be entered as 1300. |
|
Price: |
Specifies the price to be used such as high for calculating the bar highs or low for calculating the bar lows. |
|
HighLow: |
A setting of 1 calculates the highest prices for each interval and a setting of -1 calculates the lowest prices for each interval. |
|
ExcludeDayOfWeek: |
Specifies the day of the week to exclude from these calculations which should be set to 0 for all electronic all session or overnight session symbols such as @ES or @YM in order to exclude the Sunday session. The values return the following days: 0=Sunday, 1=Monday, 2=Tuesday, 3=Wednesday, 4=Thursday, 5=Friday, 6=Saturday and a negative setting disables this feature. |
|
ShowZero: |
When true, the indicator displays zero values for the columns that have not reached a certain time interval yet. When set to false, zero values are not displayed. |
|
ShowHighLow: |
Enables/disables the descriptive H/L column. |
In the workspace
TA High-LowRS.tsw, we created a
sample RadarScreen window with the @ES, the @YM and the @NQ symbol and here is
an explanation on how this template is set up:
Row 3 calculates the highs after
8:30, therefore the indicator input settings
for this particular row are as follows: Tme=830,
Price=high, HighLow=1
Row 4 calculates the lows after
8:30, therefore the indicator input settings
for this particular row are as follows: Tme=830,
Price=low, HighLow=-1
Row 6 calculates the highs after
9:30, therefore the indicator input settings
for this particular row are as follows: Tme=930,
Price=high, HighLow=1
Row 7 calculates the lows after
9:30, therefore the indicator input settings
for this particular row are as follows: Tme=930,
Price=low, HighLow=-1
Rows 11, 12, 14 and 15 follow the exact same format, only for the @YM
symbol and Rows 19, 20, 22 and 23 follow the exact same format, only for the @NQ
symbol
Please note, that in order for the indicator to correctly calculate the interval
columns, the symbol interval has to always be 1 Min.
The Alchemy Pivot Bar Formation Indicator (Alchemy PivotBarForm)
The Alchemy Pivot Bar Formation indicator displays a show me dot when a pivot high or a pivot low is formed. The pivot high can be specified with a certain number of lower high bars to the left and a certain number of lower high bars to the right. Vive versa, the pivot low can be specified with a certain number of higher low bars to the left and a certain number of higher low bars to the right. The pivot high can also be specified as a single high bar, double high bar and so fourth. Vice versa, the pivot low can also be specified as a single low bar, double low bar and so fourth. For a detailed explanation of this indicator, please refer to the indicator inputs below.
Indicator Inputs:
|
HighPrice: |
Specifies the price to be used for highs such as high or close. |
|
LowPrice: |
Specifies the price to be used for lows such as low or close. |
|
LeftStrength: |
Specifies the number of required bars with lower highs to the left of a pivot high and the number of required bars with higher lows to the left of a pivot low. |
|
RightStrength: |
Specifies the number of required bars with lower highs to the right of a pivot high and the number of required bars with higher lows to the right of a pivot low. |
|
MaxEqualBars: |
Specifies the maximum number of bars with equal highs to qualify as a pivot high and the maximum number of bars with equal lows to qualify as a pivot low. |
|
PlotOffset: |
Specifies the point or dollar distance to offset the show me dot from the pivot high or low. |
|
ShowHigh: |
Enables/disables the pivot high show me dot. |
|
ShowLow: |
Enables/disables the pivot low show me dot. |
|
HighAlert: |
Enables/disables the pivot high alert. |
|
LowAlert: |
Enables/disables the pivot low alert. |
High Low Mid Points Indicators
Is the market near a new high or low? Is the general trend up or down? Know for sure and keep track of these important points with Trading Alchemy’s High, Low, Mid Points Indicator. The Alchemy High, Low Mid Points indicators consist of four indicators which plot the high, low and mid points of the market on either an intraday, weekly, monthly or yearly basis. In addition, the Alchemy High, Low, Mid Points indicator indicates trend direction based on the selected time frame.
The Alchemy High, Low, Mid Points indicators consist of four indicators, which plot the high, low and mid point price on either an intraday, weekly, monthly or yearly basis. These levels are considered key levels of support and resistance by many traders and they are also used as key breakout points. It is always a good trading practice to keep track of the high, low and mid point price of the market you are trading. A unique feature included in the High, Low, Mid Points indicators is trend identification on either a daily, weekly, monthly or yearly basis. The indicator determines the trend and labels the chart with either an uptrend or downtrend. Additionally, the indicator will give an alert anytime the trend changes. This indicator will help you stay aware of the larger trends and will alert you to any breakouts on the selected time frame.
The Alchemy DailyHiLoMid Indicator
To view chart, go to: http://www.tradingalchemy.com/ViewChartsHighLowMidPoints.htm
User Defined Inputs:
|
ShowHigh: |
Allows you to display the daily high either as a trendline, plotline or disable it. Plotlines may adjust the screen scaling of the chart to the extreme high and low prices of the plot values, whereas trendlines move into view as the current market price approaches them. If the range between the highest and the lowest plot value is very large, it may compress the entire chart to a point where it becomes very hard to read the bars. Plotlines display the highs all the way back on the chart for historic viewing whereas trendlines display the current high only, making the chart less cluttered. For display in a RadarScreen window, the high needs to be set to plot. This is a string input which requires the quotation marks. This input looks at the first letter only and it is case sensitive. To display a trendline for the high, type in "Trendline" or simply "T", to display a plotline for the high, type in "Plot" or simply "P" and to disable the high, type in "". |
|
ShowLow: |
Allows you to display the daily low either as a trendline, plotline or disable it. Plotlines may adjust the screen scaling of the chart to the extreme high and low prices of the plot values, whereas trendlines move into view as the current market price approaches them. If the range between the highest and the lowest plot value is very large, it may compress the entire chart to a point where it becomes very hard to read the bars. Plotlines display the lows all the way back on the chart for historic viewing whereas trendlines display the current low only, making the chart less cluttered. For display in a RadarScreen window, the low needs to be set to plot. This is a string input which requires the quotation marks. This input looks at the first letter only and it is case sensitive. To display a trendline for the low, type in "Trendline" or simply "T", to display a plotline for the low, type in "Plot" or simply "P" and to disable the low, type in "". |
|
ShowMid: |
Allows you to display the daily mid point either as a trendline, plotline or disable it. Plotlines may adjust the screen scaling of the chart to the extreme high and low prices of the plot values, whereas trendlines move into view as the current market price approaches them. If the range between the highest and the lowest plot value is very large, it may compress the entire chart to a point where it becomes very hard to read the bars. Plotlines display the mid point all the way back on the chart for historic viewing whereas trendlines display the current mid point only, making the chart less cluttered. For display in a RadarScreen window, the mid point needs to be set to plot. This is a string input which requires the quotation marks. This input looks at the first letter only and it is case sensitive. To display a trendline for the mid point, type in "Trendline" or simply "T", to display a plotline for the mid point, type in "Plot" or simply "P" and to disable the mid point, type in "". |
|
NumAgo: |
Specifies the number of days ago for which to display the daily high, low and midpoint, whereas a setting of 0 displays the current daily high, low and close, a setting of 1 displays the previous days high, low, close and so fourth. |
|
MidPcnt: |
Specifies the mid point percentage between the daily high and the daily low, whereas a setting of 50 calculates the exact mid point between the daily high and the daily low. |
|
SessionStartTme: |
Specifies the session start time. A negative setting uses TradeStation's day high and day low functions that are based on a calendar day. This format is in military charting time without the colon. For example, 1:30pm would be entered as 1330. Please note that when using a custom session, the reserved word Sess1StartTime can not be used. |
|
SessionEndTme: |
Specifies the session end time. A negative setting uses TradeStation's dday high and day low functions that are based on a calendar day. This format is in military charting time without the colon. For example, 1:30pm would be entered as 1330. Please note that when using a custom session, the reserved word Sess1EndTime can not be used. |
|
ExcludeDayOfWeek: |
Specifies a certain day of the week to be excluded from a session to be used for the high and the low, whereas 0=Sunday, 1=Monday, 2=Tuesday, 3=Wednesday, 4=Thursday, 5=Friday, 6=Saturday and a negative value disables this feature. |
|
HiAlrt: |
Allows you to disable the alert when the market makes a new high. A setting of "True" enables the alert and a setting of "False" disables the alert. It is defaulted to True. |
|
LoAlrt: |
Allows you to disable the alert when the market makes a new low. A setting of "True" enables the alert and a setting of "False" disables the alert. It is defaulted to True. |
|
TrndAlrt: |
Allows you to disable the alert when the market changes its trend. A setting of "True" enables the alert and a setting of "False" disables the alert. It is defaulted to True. |
|
MidAlert: |
Allows you to disable the alert when the market approaches or breaks the mid point. A setting of "True" enables the alert and a setting of "False" disables the alert. It is defaulted to True. |
|
AlertStart: |
Specifies the earliest time an alert will be generated. A setting of 0 disables this feature. |
|
AlertEnd: |
Specifies the latest time an alert will be generated. A setting of 0 disables this feature. |
|
AlrtDist: |
Allows you to adjust the distance in ticks by how far the market can approach the mid point before an alert is generated. It is defaulted to 10 ticks. |
|
MinBreak: |
Allows you to adjust the minimum distance in ticks by how far the market needs to break the mid point before an alert is generated. It is defaulted to 0 ticks. |
|
MidVert: |
Allows you to vertically adjust the displayed text for the mid point value. If the text sits below the plot line or trendline, a positive value will raise the text and a negative value will lower the text. If the text sits above the plot line or trendline, a positive value will lower the text and a negative value raise the text. It is defaulted to 0 ticks. |
|
HiLoVert: |
Allows you to vertically adjust the displayed text for the daily high and daily low values. If the text sits below the plot line or trendline, a positive value will raise the text and a negative value will lower the text. If the text sits above the plot line or trendline, a positive value will lower the text and a negative value raise the text. It is defaulted to 0 ticks. |
|
MidHor: |
Allows you to horizontally adjust the displayed text for the mid point value. Each increment will move the text one bar further to the left. It is defaulted to 5 bars. |
|
HiLoHor: |
Allows you to horizontally adjust the displayed text for the daily high and daily low values. Each increment will move the text one bar further to the left. It is defaulted to 5 bars. |
|
ShowText: |
Enables/disables the text objects displaying the high, low and mid point prices. |
|
Decimal: |
Allows you to adjust the number of decimals in which the text for the daily high, low and mid point values display. It is defaulted to 2 decimals. |
|
Fraction: |
If you are applying the Alchemy DailyHiLoMid indicator to any symbol that reads in fractions, such as bonds, you can set this input to True and the displayed text for daily high, low and mid point values will read in fractions (e.g. 106^30). For symbols that trade in ½ ticks such as the 10 year US Treasury Notes, the “Decimal” input needs to be set to a negative number. |
|
UpCol: |
Specifies the color of the highs in an uptrend. |
|
DownCol: |
Specifies the color of the lows in a downtrend. |
|
NeutrCol: |
Specifies the color of the highs in a downtrend and the lows in an uptrend. |
|
HorAlign: |
Specifies the horizontal alignment of the text objects displaying the high, low and mid point prices, whereas 0 uses left placement, 1 uses right placement and 2 uses centered placement. |
|
TLStyle: |
Specifies the trendline style with the following options: tool_solid, tool_dashed, tool_dotted, tool_dashed2 and tool_dashed3. |
|
TLSize: |
Specifies the thickness of the trendline with a range from 0 to 6 |
The Alchemy WeeklyHiLoMd Indicator
To view chart, go to: http://www.tradingalchemy.com/ViewChartsHighLowMidPoints.htm
User Defined Inputs:
|
ShowHigh: |
Allows you to display the weekly high either as a trendline, plotline or disable it. Plotlines may adjust the screen scaling of the chart to the extreme high and low prices of the plot values, whereas trendlines move into view as the current market price approaches them. If the range between the highest and the lowest plot value is very large, it may compress the entire chart to a point where it becomes very hard to read the bars. Plotlines display the highs all the way back on the chart for historic viewing whereas trendlines display the current high only, making the chart less cluttered. For display in a RadarScreen window, the high needs to be set to plot. This is a string input which requires the quotation marks. This input looks at the first letter only and it is case sensitive. To display a trendline for the high, type in "Trendline" or simply "T", to display a plotline for the high, type in "Plot" or simply "P" and to disable the high, type in "". |
|
ShowLow: |
Allows you to display the weekly low either as a trendline, plotline or disable it. Plotlines may adjust the screen scaling of the chart to the extreme high and low prices of the plot values, whereas trendlines move into view as the current market price approaches them. If the range between the highest and the lowest plot value is very large, it may compress the entire chart to a point where it becomes very hard to read the bars. Plotlines display the lows all the way back on the chart for historic viewing whereas trendlines display the current low only, making the chart less cluttered. For display in a RadarScreen window, the low needs to be set to plot. This is a string input which requires the quotation marks. This input looks at the first letter only and it is case sensitive. To display a trendline for the low, type in "Trendline" or simply "T", to display a plotline for the low, type in "Plot" or simply "P" and to disable the low, type in "". |
|
ShowMid: |
Allows you to display the weekly mid point either as a trendline, plotline or disable it. Plotlines may adjust the screen scaling of the chart to the extreme high and low prices of the plot values, whereas trendlines move into view as the current market price approaches them. If the range between the highest and the lowest plot value is very large, it may compress the entire chart to a point where it becomes very hard to read the bars. Plotlines display the mid point all the way back on the chart for historic viewing whereas trendlines display the current mid point only, making the chart less cluttered. For display in a RadarScreen window, the mid point needs to be set to plot. This is a string input which requires the quotation marks. This input looks at the first letter only and it is case sensitive. To display a trendline for the mid point, type in "Trendline" or simply "T", to display a plotline for the mid point, type in "Plot" or simply "P" and to disable the mid point, type in "". |
|
NumAgo: |
Specifies the number of days ago for which to display the weekly high, low and midpoint, whereas a setting of 0 displays the current weekly high, low and close, a setting of 1 displays the previous weekly high, low, close and so fourth. |
|
MidPcnt: |
Specifies the mid point percentage between the weekly high and the weekly low, whereas a setting of 50 calculates the exact mid point between the weekly high and the weekly low. |
|
HiAlrt: |
Allows you to disable the alert when the market makes a new high. A setting of "True" enables the alert and a setting of "False" disables the alert. It is defaulted to True. |
|
LoAlrt: |
Allows you to disable the alert when the market makes a new low. A setting of "True" enables the alert and a setting of "False" disables the alert. It is defaulted to True. |
|
TrndAlrt: |
Allows you to disable the alert when the market changes its trend. A setting of "True" enables the alert and a setting of "False" disables the alert. It is defaulted to True. |
|
MidAlert: |
Allows you to disable the alert when the market approaches or breaks the mid point. A setting of "True" enables the alert and a setting of "False" disables the alert. It is defaulted to True. |
|
AlertStart: |
Specifies the earliest time an alert will be generated. A setting of 0 disables this feature. |
|
AlertEnd: |
Specifies the latest time an alert will be generated. A setting of 0 disables this feature. |
|
AlrtDist: |
Allows you to adjust the distance in ticks by how far the market can approach the mid point before an alert is generated. It is defaulted to 10 ticks. |
|
MinBreak: |
Allows you to adjust the minimum distance in ticks by how far the market needs to break the mid point before an alert is generated. It is defaulted to 0 ticks. |
|
MidVert: |
Allows you to vertically adjust the displayed text for the mid point value. If the text sits below the plot line or trendline, a positive value will raise the text and a negative value will lower the text. If the text sits above the plot line or trendline, a positive value will lower the text and a negative value raise the text. It is defaulted to 0 ticks. |
|
HiLoVert: |
Allows you to vertically adjust the displayed text for the weekly high and weekly low values. If the text sits below the plot line or trendline, a positive value will raise the text and a negative value will lower the text. If the text sits above the plot line or trendline, a positive value will lower the text and a negative value raise the text. It is defaulted to 0 ticks. |
|
MidHor: |
Allows you to horizontally adjust the displayed text for the mid point value. Each increment will move the text one bar further to the left. It is defaulted to 5 bars. |
|
HiLoHor: |
Allows you to horizontally adjust the displayed text for the weekly high and weekly low values. Each increment will move the text one bar further to the left. It is defaulted to 5 bars. |
|
ShowText: |
Enables/disables the text objects displaying the high, low and mid point prices. |
|
Decimal: |
Allows you to adjust the number of decimals in which the text for the weekly high, low and mid point values display. It is defaulted to 2 decimals. |
|
Fraction: |
If you are applying the Alchemy WeeklyHiLoMid indicator to any symbol that reads in fractions, such as bonds, you can set this input to True and the displayed text for weekly high, low and mid point values will read in fractions (e.g. 106^30). For symbols that trade in ½ ticks such as the 10 year US Treasury Notes, the “Decimal” input needs to be set to a negative number. |
|
UpCol: |
Specifies the color of the highs in an uptrend. |
|
DownCol: |
Specifies the color of the lows in a downtrend. |
|
NeutrCol: |
Specifies the color of the highs in a downtrend and the lows in an uptrend. |
|
HorAlign: |
Specifies the horizontal alignment of the text objects displaying the high, low and mid point prices, whereas 0 uses left placement, 1 uses right placement and 2 uses centered placement. |
|
TLStyle: |
Specifies the trendline style with the following options: tool_solid, tool_dashed, tool_dotted, tool_dashed2 and tool_dashed3. |
|
TLSize: |
Specifies the thickness of the trendline with a range from 0 to 6 |
The Alchemy MonthlyHLM Indicator
To view chart, go to: http://www.tradingalchemy.com/ViewChartsHighLowMidPoints.htm
User Defined Inputs:
|
ShowHigh: |
Allows you to display the monthly high either as a trendline, plotline or disable it. Plotlines may adjust the screen scaling of the chart to the extreme high and low prices of the plot values, whereas trendlines move into view as the current market price approaches them. If the range between the highest and the lowest plot value is very large, it may compress the entire chart to a point where it becomes very hard to read the bars. Plotlines display the highs all the way back on the chart for historic viewing whereas trendlines display the current high only, making the chart less cluttered. For display in a RadarScreen window, the high needs to be set to plot. This is a string input which requires the quotation marks. This input looks at the first letter only and it is case sensitive. To display a trendline for the high, type in "Trendline" or simply "T", to display a plotline for the high, type in "Plot" or simply "P" and to disable the high, type in "". |
|
ShowLow: |
Allows you to display the monthly low either as a trendline, plotline or disable it. Plotlines may adjust the screen scaling of the chart to the extreme high and low prices of the plot values, whereas trendlines move into view as the current market price approaches them. If the range between the highest and the lowest plot value is very large, it may compress the entire chart to a point where it becomes very hard to read the bars. Plotlines display the lows all the way back on the chart for historic viewing whereas trendlines display the current low only, making the chart less cluttered. For display in a RadarScreen window, the low needs to be set to plot. This is a string input which requires the quotation marks. This input looks at the first letter only and it is case sensitive. To display a trendline for the low, type in "Trendline" or simply "T", to display a plotline for the low, type in "Plot" or simply "P" and to disable the low, type in "". |
|
ShowMid: |
Allows you to display the monthly mid point either as a trendline, plotline or disable it. Plotlines may adjust the screen scaling of the chart to the extreme high and low prices of the plot values, whereas trendlines move into view as the current market price approaches them. If the range between the highest and the lowest plot value is very large, it may compress the entire chart to a point where it becomes very hard to read the bars. Plotlines display the mid point all the way back on the chart for historic viewing whereas trendlines display the current mid point only, making the chart less cluttered. For display in a RadarScreen window, the mid point needs to be set to plot. This is a string input which requires the quotation marks. This input looks at the first letter only and it is case sensitive. To display a trendline for the mid point, type in "Trendline" or simply "T", to display a plotline for the mid point, type in "Plot" or simply "P" and to disable the mid point, type in "". |
|
NumAgo: |
Specifies the number of days ago for which to display the monthly high, low and midpoint, whereas a setting of 0 displays the current monthly high, low and close, a setting of 1 displays the previous monthly high, low, close and so fourth. |
|
MidPcnt: |
Specifies the mid point percentage between the monthly high and the monthly low, whereas a setting of 50 calculates the exact mid point between the monthly high and the monthly low. |
|
HiAlrt: |
Allows you to disable the alert when the market makes a new high. A setting of "True" enables the alert and a setting of "False" disables the alert. It is defaulted to True. |
|
LoAlrt: |
Allows you to disable the alert when the market makes a new low. A setting of "True" enables the alert and a setting of "False" disables the alert. It is defaulted to True. |
|
TrndAlrt: |
Allows you to disable the alert when the market changes its trend. A setting of "True" enables the alert and a setting of "False" disables the alert. It is defaulted to True. |
|
MidAlert: |
Allows you to disable the alert when the market approaches or breaks the mid point. A setting of "True" enables the alert and a setting of "False" disables the alert. It is defaulted to True. |
|
AlertStart: |
Specifies the earliest time an alert will be generated. A setting of 0 disables this feature. |
|
AlertEnd: |
Specifies the latest time an alert will be generated. A setting of 0 disables this feature. |
|
AlrtDist: |
Allows you to adjust the distance in ticks by how far the market can approach the mid point before an alert is generated. It is defaulted to 10 ticks. |
|
MinBreak: |
Allows you to adjust the minimum distance in ticks by how far the market needs to break the mid point before an alert is generated. It is defaulted to 0 ticks. |
|
MidVert: |
Allows you to vertically adjust the displayed text for the mid point value. If the text sits below the plot line or trendline, a positive value will raise the text and a negative value will lower the text. If the text sits above the plot line or trendline, a positive value will lower the text and a negative value raise the text. It is defaulted to 0 ticks. |
|
HiLoVert: |
Allows you to vertically adjust the displayed text for the monthly high and monthly low values. If the text sits below the plot line or trendline, a positive value will raise the text and a negative value will lower the text. If the text sits above the plot line or trendline, a positive value will lower the text and a negative value raise the text. It is defaulted to 0 ticks. |
|
MidHor: |
Allows you to horizontally adjust the displayed text for the mid point value. Each increment will move the text one bar further to the left. It is defaulted to 5 bars. |
|
HiLoHor: |
Allows you to horizontally adjust the displayed text for the monthly high and monthly low values. Each increment will move the text one bar further to the left. It is defaulted to 5 bars. |
|
ShowText: |
Enables/disables the text objects displaying the high, low and mid point prices. |
|
Decimal: |
Allows you to adjust the number of decimals in which the text for the monthly high, low and mid point values display. It is defaulted to 2 decimals. |
|
Fraction: |
If you are applying the Alchemy MonthlyHiLoMid indicator to any symbol that reads in fractions, such as bonds, you can set this input to True and the displayed text for monthly high, low and mid point values will read in fractions (e.g. 106^30). For symbols that trade in ½ ticks such as the 10 year US Treasury Notes, the “Decimal” input needs to be set to a negative number. |
|
UpCol: |
Specifies the color of the highs in an uptrend. |
|
DownCol: |
Specifies the color of the lows in a downtrend. |
|
NeutrCol: |
Specifies the color of the highs in a downtrend and the lows in an uptrend. |
|
HorAlign: |
Specifies the horizontal alignment of the text objects displaying the high, low and mid point prices, whereas 0 uses left placement, 1 uses right placement and 2 uses centered placement. |
|
TLStyle: |
Specifies the trendline style with the following options: tool_solid, tool_dashed, tool_dotted, tool_dashed2 and tool_dashed3. |
|
TLSize: |
Specifies the thickness of the trendline with a range from 0 to 6 |
The Alchemy YearlyHiLoMd Indicator
To view chart, go to: http://www.tradingalchemy.com/ViewChartsHighLowMidPoints.htm
User Defined Inputs:
|
ShowHigh: |
Allows you to display the yearly high either as a trendline, plotline or disable it. Plotlines may adjust the screen scaling of the chart to the extreme high and low prices of the plot values, whereas trendlines move into view as the current market price approaches them. If the range between the highest and the lowest plot value is very large, it may compress the entire chart to a point where it becomes very hard to read the bars. Plotlines display the highs all the way back on the chart for historic viewing whereas trendlines display the current high only, making the chart less cluttered. For display in a RadarScreen window, the high needs to be set to plot. This is a string input which requires the quotation marks. This input looks at the first letter only and it is case sensitive. To display a trendline for the high, type in "Trendline" or simply "T", to display a plotline for the high, type in "Plot" or simply "P" and to disable the high, type in "". |
|
ShowLow: |
Allows you to display the yearly low either as a trendline, plotline or disable it. Plotlines may adjust the screen scaling of the chart to the extreme high and low prices of the plot values, whereas trendlines move into view as the current market price approaches them. If the range between the highest and the lowest plot value is very large, it may compress the entire chart to a point where it becomes very hard to read the bars. Plotlines display the lows all the way back on the chart for historic viewing whereas trendlines display the current low only, making the chart less cluttered. For display in a RadarScreen window, the low needs to be set to plot. This is a string input which requires the quotation marks. This input looks at the first letter only and it is case sensitive. To display a trendline for the low, type in "Trendline" or simply "T", to display a plotline for the low, type in "Plot" or simply "P" and to disable the low, type in "". |
|
ShowMid: |
Allows you to display the yearly mid point either as a trendline, plotline or disable it. Plotlines may adjust the screen scaling of the chart to the extreme high and low prices of the plot values, whereas trendlines move into view as the current market price approaches them. If the range between the highest and the lowest plot value is very large, it may compress the entire chart to a point where it becomes very hard to read the bars. Plotlines display the mid point all the way back on the chart for historic viewing whereas trendlines display the current mid point only, making the chart less cluttered. For display in a RadarScreen window, the mid point needs to be set to plot. This is a string input which requires the quotation marks. This input looks at the first letter only and it is case sensitive. To display a trendline for the mid point, type in "Trendline" or simply "T", to display a plotline for the mid point, type in "Plot" or simply "P" and to disable the mid point, type in "". |
|
NumAgo: |
Specifies the number of days ago for which to display the yearly high, low and midpoint, whereas a setting of 0 displays the current yearly high, low and close, a setting of 1 displays the previous yearly high, low, close and so fourth. |
|
MidPcnt: |
Specifies the mid point percentage between the yearly high and the yearly low, whereas a setting of 50 calculates the exact mid point between the yearly high and the yearly low. |
|
HiAlrt: |
Allows you to disable the alert when the market makes a new high. A setting of "True" enables the alert and a setting of "False" disables the alert. It is defaulted to True. |
|
LoAlrt: |
Allows you to disable the alert when the market makes a new low. A setting of "True" enables the alert and a setting of "False" disables the alert. It is defaulted to True. |
|
TrndAlrt: |
Allows you to disable the alert when the market changes its trend. A setting of "True" enables the alert and a setting of "False" disables the alert. It is defaulted to True. |
|
MidAlert: |
Allows you to disable the alert when the market approaches or breaks the mid point. A setting of "True" enables the alert and a setting of "False" disables the alert. It is defaulted to True. |
|
AlertStart: |
Specifies the earliest time an alert will be generated. A setting of 0 disables this feature. |
|
AlertEnd: |
Specifies the latest time an alert will be generated. A setting of 0 disables this feature. |
|
AlrtDist: |
Allows you to adjust the distance in ticks by how far the market can approach the mid point before an alert is generated. It is defaulted to 10 ticks. |
|
MinBreak: |
Allows you to adjust the minimum distance in ticks by how far the market needs to break the mid point before an alert is generated. It is defaulted to 0 ticks. |
|
MidVert: |
Allows you to vertically adjust the displayed text for the mid point value. If the text sits below the plot line or trendline, a positive value will raise the text and a negative value will lower the text. If the text sits above the plot line or trendline, a positive value will lower the text and a negative value raise the text. It is defaulted to 0 ticks. |
|
HiLoVert: |
Allows you to vertically adjust the displayed text for the yearly high and yearly low values. If the text sits below the plot line or trendline, a positive value will raise the text and a negative value will lower the text. If the text sits above the plot line or trendline, a positive value will lower the text and a negative value raise the text. It is defaulted to 0 ticks. |
|
MidHor: |
Allows you to horizontally adjust the displayed text for the mid point value. Each increment will move the text one bar further to the left. It is defaulted to 5 bars. |
|
HiLoHor: |
Allows you to horizontally adjust the displayed text for the yearly high and yearly low values. Each increment will move the text one bar further to the left. It is defaulted to 5 bars. |
|
ShowText: |
Enables/disables the text objects displaying the high, low and mid point prices. |
|
Decimal: |
Allows you to adjust the number of decimals in which the text for the yearly high, low and mid point values display. It is defaulted to 2 decimals. |
|
Fraction: |
If you are applying the Alchemy YearlyHiLoMid indicator to any symbol that reads in fractions, such as bonds, you can set this input to True and the displayed text for yearly high, low and mid point values will read in fractions (e.g. 106^30). For symbols that trade in ½ ticks such as the 10 year US Treasury Notes, the “Decimal” input needs to be set to a negative number. |
|
UpCol: |
Specifies the color of the highs in an uptrend. |
|
DownCol: |
Specifies the color of the lows in a downtrend. |
|
NeutrCol: |
Specifies the color of the highs in a downtrend and the lows in an uptrend. |
|
HorAlign: |
Specifies the horizontal alignment of the text objects displaying the high, low and mid point prices, whereas 0 uses left placement, 1 uses right placement and 2 uses centered placement. |
|
TLStyle: |
Specifies the trendline style with the following options: tool_solid, tool_dashed, tool_dotted, tool_dashed2 and tool_dashed3. |
|
TLSize: |
Specifies the thickness of the trendline with a range from 0 to 6 |
Channel Indicators
The Alchemy Channel Indicator is a volatility based 'envelope' indicator that measures market movement in relation to an upper and lower band. It is used to predict the trend of the market. An overbuy occurs when prices move above the upper band, and an oversell occurs when prices move below the lower band. The Alchemy Channel Indicator is designed to assist traders with the identification of strong trending markets and then identify possible entry points in the direction of the trend. We developed a smoothing formula that filters out some of the market noise and displays more reliable market containment zones.
The Alchemy Channel Indicator (Alchemy Channel)
The Alchemy Channel indicator displays the mid Channel line, the upper Channel Band, the lower Channel band, the mid line between the upper band to mid Channel line and the mid line between the mid Channel line to lower band. It also contains an optional paint bar that paints the price bar when the market retraces back to the opposite mid line after penetrating the outer Band. For a detailed explanation of all the features of this indicator, please refer to the input description below.
Indicator Inputs:
| Price | Specifies which bar value (price, function, or formula) to average. |
| Len | Sets the period of time (in bars) over which an average will be taken. |
| Width | Sets a multiplier to be used in the calculation of the upper and lower band. |
| MidlinePercent | Specifies the mid lines percent. For example, with a setting of 50, the mid lines are calculated at the half way point between the upper band to mid Keltner line and the mid Keltner line to lower band. |
| MaximumRetracementBars | This input enables the paint bar that paints the price bar when the market retraces back to the opposite mid line after penetrating the outer Band and it specifies the maximum number of allowed bars from the last bar that penetrated the outer Band to the bar that retraces to the opposite mid line. A setting of 0 disables this paint bar. |
| UpsidePenetrationPrice | Specifies the price that needs to penetrate the upper Band such as close, low or high. |
| DownsidePenetrationPrice | Specifies the price that needs to penetrate the lower Band such as close, low or high. |
| PB_High | Specifies the price to be used for the paint bar high such as high or close. With PB_High set to high and PB_Low set to low, the entire price bar is being painted and with PB_High set to close and PB_Low set to open, the candle body is being painted. |
| PB_Low | Specifies the price to be used for the paint bar low such as low or open. With PB_High set to high and PB_Low set to low, the entire price bar is being painted and with PB_High set to close and PB_Low set to open, the candle body is being painted. |
| PlotTop | Enables/disables the upper Band line. |
| PlotMid | Enables/disables the Mid line. |
| PlotBot | Enables/disables the lower Band line. |
| PlotMidlines | Enables/disables the mid lines. |
| BullAlert | Enables/disables the alert notification when a bullish retracement paint bar is being painted. |
| BearAlert | Enables/disables the alert notification when a bearish retracement paint bar is being painted. |
The Alchemy Channel Oscillator (Alchemy ChannelOscillator)
The Alchemy Channel oscillator displays a histogram, representing the Channel band width. For a detailed explanation of all the features of this indicator, please refer to the input description below.
Indicator Inputs:
| Price | Specifies which bar value (price, function, or formula) to average. |
| Len | Sets the period of time (in bars) over which an average will be taken. |
| Width | Sets a multiplier to be used in the calculation of the upper and lower band. |
Trailing Stop Indicators
Incorporate the “Golden Rule” of trading: Cut your losses short and let your profits run. Let Trading Alchemy’s Trailing Stop Indicators assist you with logical stop placement. The Alchemy Trailing Stop Indicators are based on three different methodologies: Percent Retracement, Volatility and Pivot stop. These logical stops placements are designed to capture the majority of any substantial move in the market while providing adequate protection of your market position.
All of the Alchemy Trailing Stop Indicators are self-adaptive and are designed to capture the majority of any substantial move in the market, while providing adequate protection in the case of a major trend change. The Alchemy Trailing Stop Indicators use logical areas in the market to set stops. The use of logical stops is considered one of the most critical aspects of successful trading.
The Alchemy PercentStop Indicator (Alchemy PercentStop)
Many traders set stops by risking a certain predetermined percentage of either the position high or the position profit. Our AlchemyPercent Stop Indicator accommodates both methods.
Method 1:
Trailing stop distance based off a specified percentage of the entry price or the position high in a long trade and the position low in a short trade.
Method 2:
Trailing Stop distance based off a specified percentage of the position profit. This method contains 4 different floor amounts and percentages. This gives the user the ability to tighten up stops as the position profit increases by using decreasing percentages for each higher floor amount.
To view chart, go to: http://www.tradingalchemy.com/ViewChartsTrailingStop.htm
Indicator Inputs:
| Global Parameters | |
|
AutoDetect: |
With this input set to true, this indicator detects any position initiated on the chart by a strategy and it will automatically plot the volatility stop based on these entries. When set to true all of the manual entry inputs below are automatically by-passed. This feature is not available for TradeStation 2000i, TradeStation 4 or SuperCharts. |
|
UsePositionBasis: |
This input is utilized only when anyone of the Floor Amounts are used for calculating the position profit either on a position basis when set to 1 or on a per contract/share basis when set to 0. |
| Long: | |
|
LongStop: |
Allows you to disable the percent trailing stop for a long entry. A setting of "True" enables the percent trailing stop for a long entry and a setting of "False" disables the percent trailing stop for a long entry. It is defaulted to True. |
| The inputs below only function with AutoDetect set to false: | |
|
LoEnTime: |
Allows
you to set the time of the first bar from when the Alchemy PercentStop
Indicator will start calculating the percent trailing stop for a long
entry. The time format is in military
time (e.g. |
|
LoEnDate: |
Allows
you to set the date of the first bar from when the Alchemy PercentStop
Indicator will start calculating the percent trailing stop for a long
entry. The date format is as follows: Year-Month-Day (e.g. 20010510 = |
|
LongEntryPrice: |
Specifies the long entry price to calculate the profit for the long trailing stop. When set to 0, the opening price of the entry bar is used to calculate the profit. |
|
LongEntryQty: |
Specifies the number of shares/contracts for calculating the floor amount thresholds of the long stops. This input is utilized only when anyone of the Floor Amounts are used for calculating the position profit on a position basis. |
|
LoStAlrt: |
Allows you to disable the alert when the percent trailing stop for a long entry changes. A setting of "True" enables the alert and a setting of "False" disables the alert. |
| Short: | |
|
ShortStop: |
Allows you to disable the percent trailing stop for a short entry. A setting of "True" enables the percent trailing stop for a short entry and a setting of "False" disables the percent trailing stop for a short entry. |
| The inputs below only function with AutoDetect set to false: | |
|
ShEnTime: |
Allows
you to set the time of the first bar from when the Alchemy PercentStop
Indicator will start calculating the percent trailing stop for a short
entry. The time format is in military
time (e.g. |
|
ShEnDate: |
Allows
you to set the date of the first bar from when the Alchemy PercentStop Indicator
will start calculating the percent trailing stop for a short entry. The date format is as follows: Year-Month-Day (e.g.
20010510 = |
|
ShortEntryPrice: |
Specifies the short entry price to calculate the profit for the short trailing stop. When set to 0, the opening price of the entry bar is used to calculate the profit. |
|
LongEntryQty: |
Specifies the number of shares/contracts for calculating the floor amount thresholds of the short stops. This input is utilized only when anyone of the Floor Amounts are used for calculating the position profit on a position basis. |
|
ShStAlrt: |
Allows you to disable the alert when the percent trailing stop for a short entry changes. A setting of "True" enables the alert and a setting of "False" disables the alert. |
| Percent Stop Parameters (Method 1): | |
|
StopPcnt: |
This input sets the percent stop distance. Please note that in order to use the percent profit stop (method 2), this input needs to be set to 0 |
|
FixedStopPcnt: |
When set to 1, the percent stop distance is based on the entry price and when set to 0, the percent stop distance is based on the position high in a long trade and the position low in a short trade. |
|
Percent Profit Stop
Parameters (Method 2) Please note that in order to use this method, the input StopPcnt needs to be set to 0 |
|
| Floor Level 1: | |
|
FloorAmt1: |
FloorAmnt1 is a numeric expression representing the amount of profit to be reached before the first stop takes effect. |
|
FloorPcnt1: |
FloorPcnt1 is a numeric expression representing the amount of percent profit to be reached before the first stop takes effect. |
|
TrailingPct1: |
Trailing Pct1 is the percent of the profit for the first trailing stop that you are willing to lose. |
| Floor Level 2: | |
|
FloorAmt2: |
FloorAmnt2 is a numeric expression representing the amount of profit to be reached before the second stop takes effect. |
|
FloorPcnt2: |
FloorPcnt2 is a numeric expression representing the amount of percent profit to be reached before the second stop takes effect. |
|
TrailingPct2: |
Trailing Pct2 is the percent of the profit for the second trailing stop that you are willing to lose. |
| Floor Level 3: | |
|
FloorAmt3: |
FloorAmnt3 is a numeric expression representing the amount of profit to be reached before the third stop takes effect. |
|
FloorPcnt3: |
FloorPcnt3 is a numeric expression representing the amount of percent profit to be reached before the third stop takes effect. |
|
TrailingPct3: |
Trailing Pct3 is the percent of the profit for the third trailing stop that you are willing to lose. |
| Floor Level 4: | |
|
FloorAmt4: |
FloorAmnt4 is a numeric expression representing the amount of profit to be reached before the fourth stop takes effect. |
|
FloorPcnt4: |
FloorPcnt4 is a numeric expression representing the amount of percent profit to be reached before the fourth stop takes effect. |
|
TrailingPct4: |
Trailing Pct4 is the percent of the profit for the fourth trailing stop that you are willing to lose. |
|
TrailingPct4: |
Trailing Pct4 is the percent of the profit for the fourth trailing stop that you are willing to lose. |
| Plots: | |
|
PlotHigh: |
Enables/disables the highest high plot. |
|
PlotLongStop: |
Enables/disables the long stop plot. |
|
PlotLow: |
Enables/disables the lowest low plot. |
|
PlotShortStop: |
Enables/disables the short stop plot. |
| Trend Lines: | |
|
HighLine: |
Enables/disables the highest high trend line. |
|
LongStopLine: |
Enables/disables the long stop trend line. |
|
LowLine: |
Enables/disables the lowest low trend line. |
|
ShortStopLine: |
Enables/disables the short stop trend line. |
|
TLStyle: |
Specifies the trend line style. |
|
TLSize: |
Specifies the trend line size. |
| Text: | |
|
ShowText: |
Enables/disables the text labels. |
|
TextVert: |
Allows you to vertically adjust the displayed text for the high, low and stop values. If the text sits below the plot line or trendline, a positive value will lower the text and a negative value will raise the text. If the text sits above the plot line or trendline, a positive value will raise the text and a negative value will lower the text. |
|
TextHor: |
Allows you to horizontally adjust the displayed text for the high, low and stop values. Each increment will move the text one bar further to the left. |
|
TextHorizAlign: |
Specifies the horizontal alignment of the text whereas 2 = center aligned, 1 = left aligned, 0 = right aligned. |
|
LeftSpace: |
With this input, additional blank space can be added to the left of the text label for the purpose of moving the text labels into the extra space to the right of the last bar as created through Format > Space to the Right. For this purpose, the input TextHorizAlign needs to be set to "Right" and the input TextHoriz needs to be set to 0. Please note that this is a string input and the quotation marks need to remain. For example, to move the text labels 10 spaces to the right of the most recent bar, the input value would be as follows " " Again, in order for the text object to be visible, the extra space needs to be created between the last bar and the right price axis via Format > Space to the Right |
|
PercentDecimal: |
Specifies the number of decimals in which the text displays the stop percentage. |
|
PriceDecimal: |
Specifies the number of decimals in which the text for the high, low and stop values are displayed. |
|
Fraction: |
If you are applying the Alchemy PercentStop Indicator to any symbol that reads in fractions, such as bonds, you can set this input to True and the displayed text for the high, low and stop values will read in fractions (e.g. 106^30). For symbols that trade in ½ ticks such as the 10 year US Treasury Notes, the “Decimal” input needs to be set to a negative number. |
The AlchemyVolatile Stop Indicator
A Volatility Stop is predicated on the principle that volatility in the market, to some extent, represents noise in the market. The primary idea is to determine the noise in the market and then place the stop level just outside the immediate noise in the market. The Volatility Stop uses a multiple of the volatility of the market expressed as a multiple of the average true range of the market. The Volatility Stop allows the trader to adjust the sensitivity of the market noise filter.
To view chart, go to: http://www.tradingalchemy.com/ViewChartsTrailingStop.htm
User Defined Inputs:
|
AutoDetect: |
With this input set to true, this indicator detects any position initiated on the chart by a strategy and it will automatically plot the volatility stop based on these entries. When set to true all of the manual entry inputs below are automatically by-passed. This feature is not available for TradeStation 2000i, TradeStation 4 or SuperCharts. |
|
LoEnTime: |
Allows
you to set the time of the first bar from when the Alchemy VolatileStop
Indicator will start calculating the volatility trailing stop for a long
entry. The time format is in military
time (e.g. |
|
LoEnDate: |
Allows
you to set the date of the first bar from when the Alchemy VolatileStop
Indicator will start calculating the volatility trailing stop for a long
entry. The date format is as
follows: Year-Month-Day (e.g. 010510 =
|
|
ShEnTime: |
Allows
you to set the time of the first bar from when the Alchemy VolatileStop
Indicator will start calculating the volatility trailing stop for a short
entry. The time format is in military
time (e.g. |
|
ShEnDate: |
Allows
you to set the date of the first bar from when the Alchemy VolatileStop
Indicator will start calculating the volatility trailing stop for a short
entry. The date format is as follows: Year-Month-Day (e.g.
010510 =
|
|
LongStop: |
Allows you to disable the volatility trailing stop for a long entry. A setting of "True" enables the volatility trailing stop for a long entry and a setting of "False" disables the volatility trailing stop for a long entry. It is defaulted to True. |
|
ShortStop: |
Allows you to disable the volatility trailing stop for a short entry. A setting of "True" enables the volatility trailing stop for a short entry and a setting of "False" disables the volatility trailing stop for a short entry. It is defaulted to True. |
|
LoStAlrt: |
Allows you to disable the alert when the volatility trailing stop for a long entry changes. A setting of "True" enables the alert and a setting of "False" disables the alert. It is defaulted to True. |
|
ShStAlrt: |
Allows you to disable the alert when the volatility trailing stop for a short entry changes. A setting of "True" enables the alert and a setting of "False" disables the alert. It is defaulted to True. |
|
ShowLoSt: |
Allows you to display the volatility long stop as a trendline or as a plotline. Plotlines adjust the screen scaling of the chart to the extreme high and low prices of the plot values, whereas trendlines move into view as the current market price approaches them. If the range between the highest and the lowest plot value is very large, it may compress the entire chart to a point where it becomes very hard to read the bars. In order to keep the volatility long stop in constant view, we defaulted this input to "Plot", however, if the volatility long stop is too far out of range, therefore causing your chart to get too compressed, you may change this input to "Trendline". |
|
ShowShSt: |
Allows you to display the volatility short stop as a trendline or as a plotline. Plotlines adjust the screen scaling of the chart to the extreme high and low prices of the plot values, whereas trendlines move into view as the current market price approaches them. If the range between the highest and the lowest plot value is very large, it may compress the entire chart to a point where it becomes very hard to read the bars. In order to keep the volatility short stop in constant view, we defaulted this input to "Plot", however, if the volatility short stop is too far out of range, therefore causing your chart to get too compressed, you may change this input to "Trendline". |
|
ShowText: |
Enables/disables the text displayed for the short/long stop. |
|
VolLen: |
This user-defined input determines the number of bars used to calculate the volatility. |
|
VolFact: |
This user-defined adjusts the volatility factor. |
|
TextVert: |
Allows you to vertically adjust the displayed text for the stop values. If the text sits below the plot line or trendline, a positive value will lower the text and a negative value will raise the text. If the text sits above the plot line or trendline, a positive value will raise the text and a negative value will lower the text. It is defaulted to 0 ticks. |
|
TextHor: |
Allows you to horizontally adjust the displayed text for the stop values. Each increment will move the text one bar further to the left. It is defaulted to 2 bars. |
|
Decimal: |
Allows you to adjust the number of decimals in which the text for the stop values display. It is defaulted to 2 decimals. |
|
Fraction: |
If you are applying the Alchemy VolatileStop Indicator to any symbol that reads in fractions, such as bonds, you can set this input to True and the displayed text for the stop values will read in fractions (e.g. 106^30). For symbols that trade in ½ ticks such as the 10 year US Treasury Notes, the “Decimal” input needs to be set to a negative number. |
Alchemy Function for the Alchemy Volatility Stop Indicator (for a function definition, click on the function name):
|
The AlchemyVolatileTrlIn function returns the volatility trailing stop value starting from an entry point on the chart as determined by its entry inputs. |
The Alchemy Automatic Volatile Stop Indicator (Alchemy VolatStpAuto)
The Alchemy VolatStpAuto indicator uses the same volatility trailing parameters as the Alchemy Volatile Stop indicator but it automatically determines the trend of the market and automatically changes directions, either trailing below the market in an up trend or trailing above the market in a down trend. Therefore, with this indicator, a specific entry point can not be determined but it can rather be used as a trend indicator very similar to a Parabolic SAR indicator.
User Defined Inputs:
|
VolatilePrice: |
Specifies the price to be used for the volatility calculation such as truerange or range. |
|
VolatileLength: |
Specifies the trailing bars to consider in the volatility calculation. |
|
VolatileFact: |
Specifies the volatility multiplication factor. |
|
UseCloseTrail: |
Specifies whether the trailing stop distance is based on the highest high/lowest low or highest close/lowest close, whereas a setting of true uses the close and a setting of false uses the high/low. |
|
UseCloseStop: |
Specifies whether the trailing stop needs to be taken out by the close of a bar or by the high of a bar in a down trend and by the low of a bar in an up trend in order to change trend. A setting of true uses the close of a bar and a setting of false uses the high/low of a bar. |
|
BullColor: |
Specifies the plot color for a bullish trailing stop. |
|
BearColor: |
Specifies the plot color for a bearish trailing stop. |
Alchemy Function for the Alchemy Automatic Volatility Stop Indicator (for a function definition, click on the function name):
|
The AlchemyVolatility is a multiple-output function that provides the trailing stop value, trend direction and the highest high or lowest low of the Alchemy Automatic Volatility Stop indicator (Alchemy VolatStpAuto). |
The Alchemy PivotStop Indicator
The Pivot Stop is based on identified support and resistance levels created by actual market action. A long Pivot Stop would be trailed up as new support pivots are created by market action. A short Pivot Stop is trailed down as new resistance pivots are created by the market. Support and resistance levels are used in many ways by successful traders. Using support and resistance levels as stop loss points is a logical use of the support and resistance levels concept.
To view chart, go to: http://www.tradingalchemy.com/ViewChartsTrailingStop.htm
User Defined Inputs:
|
UseStrategyEntries: |
When set to true, the indicator automatically detects a strategy position and starts a new swing calculation starting with the entry bar. Please note that in order to utilize a continuous calculation or when this indicator is not being used in conjunction with an entry strategy, this input needs to be set to false. |
|
EntrTime: |
Specifies the time of the first
bar from when the Alchemy PivotStop Indicator will start calculating and displaying the pivot
trailing stops. The time format is in
military time (e.g. |
|
EntrDate_YYYYMMDD: |
Specifies the date of the first
bar from when the Alchemy PivotStop Indicator will start calculating and displaying the pivot
trailing stops. The date format is as
follows: Year-Month-Day (e.g. 20010510 = |
|
LongStop: |
Allows you to disable the pivot trailing stop for a long entry. A setting of "True" enables the pivot trailing stop for a long entry and a setting of "False" disables the pivot trailing stop for a long entry. It is defaulted to True. |
|
ShrtStop: |
Allows you to disable the pivot trailing stop for a short entry. A setting of "True" enables the pivot trailing stop for a short entry and a setting of "False" disables the pivot trailing stop for a short entry. It is defaulted to True. |
|
LoStAlrt: |
Allows you to disable the alert when the pivot trailing stop for a long entry changes. A setting of "True" enables the alert and a setting of "False" disables the alert. It is defaulted to True. |
|
ShStAlrt: |
Allows you to disable the alert when the pivot trailing stop for a short entry changes. A setting of "True" enables the alert and a setting of "False" disables the alert. It is defaulted to True. |
|
ShowHigh: |
Allows you to display the highest high as a trendline or as a plotline. Plotlines adjust the screen scaling of the chart to the extreme high and low prices of the plot values, whereas trendlines move into view as the current market price approaches them. If the range between the highest and the lowest plot value is very large, it may compress the entire chart to a point where it becomes very hard to read the bars. In order to help with viewing the highest highs from which the percent long stop is calculated, we defaulted this input to "Plot", however, if the highest high is too far out of range, therefore causing your chart to get too compressed, you may change this input to "Trendline". When set to "", it disables the high lines and text. |
|
ShowLoSt: |
Allows you to display the pivot long stop as a trendline or as a plotline. Plotlines adjust the screen scaling of the chart to the extreme high and low prices of the plot values, whereas trendlines move into view as the current market price approaches them. If the range between the highest and the lowest plot value is very large, it may compress the entire chart to a point where it becomes very hard to read the bars. In order to keep the pivot long stop in constant view, we defaulted this input to "Plot", however, if the pivot long stop is too far out of range, therefore causing your chart to get too compressed, you may change this input to "Trendline". When set to "", it disables the long stop lines and text. |
|
ShowLow: |
Allows you to display the lowest low as a trendline or as a plotline. Plotlines adjust the screen scaling of the chart to the extreme high and low prices of the plot values, whereas trendlines move into view as the current market price approaches them. If the range between the highest and the lowest plot value is very large, it may compress the entire chart to a point where it becomes very hard to read the bars. In order to help with viewing the lowest low from which the percent short stop is calculated, we defaulted this input to "Plot", however, if the lowest low is too far out of range, therefore causing your chart to get too compressed, you may change this input to "Trendline". When set to "", it disables the low lines and text. |
|
ShowShSt: |
Allows you to display the pivot short stop as a trendline or as a plotline. Plotlines adjust the screen scaling of the chart to the extreme high and low prices of the plot values, whereas trendlines move into view as the current market price approaches them. If the range between the highest and the lowest plot value is very large, it may compress the entire chart to a point where it becomes very hard to read the bars. In order to keep the pivot short stop in constant view, we defaulted this input to "Plot", however, if the pivot short stop is too far out of range, therefore causing your chart to get too compressed, you may change this input to "Trendline". When set to "", it disables the short stop lines and text. |
|
RetrPivLength: |
This user-defined input determines the minimum requirement for number of bars making lower highs following a swing high in an uptrend or making higher lows following a swing low in a downtrend, in order to qualifiy for a retracement pivot. We defaulted this input to 4 bars, however, if you wish to display shorter term swings or longer term swings, you may decrease or increase this input respectively. |
|
MinRetrPercent: |
Specifies the minimum required retracement percent for a qualifying retracement pivot, whereas a setting of 0 disables this requirement. |
|
MinimumPenetration: |
Specifies the minimum cent, tick or pip distance for the price to penetrate through a previous retracement pivot in order for the trend to change. |
|
ShowText: |
Enables/disables the text labels. |
|
TextVert: |
Allows you to vertically adjust the displayed text for the high, low and stop values. If the text sits below the plot line or trendline, a positive value will lower the text and a negative value will raise the text. If the text sits above the plot line or trendline, a positive value will raise the text and a negative value will lower the text. It is defaulted to 0 ticks. |
|
TextHor: |
Allows you to horizontally adjust the displayed text for the high, low and stop values. Each increment will move the text one bar further to the left. It is defaulted to 2 bars. |
|
Decimal: |
Allows you to adjust the number of decimals in which the text for the high, low and stop values display. It is defaulted to 2 decimals. |
|
Fraction: |
If you are applying the Alchemy PivotStop Indicator to any symbol that reads in fractions, such as bonds, you can set this input to True and the displayed text for the high, low and stop values will read in fractions (e.g. 106^30). For symbols that trade in ½ ticks such as the 10 year US Treasury Notes, the “Decimal” input needs to be set to a negative number. |
The Alchemy TRIX Indicator (Alchemy TRIX)
The Alchemy
TRIX indicator is an oscillator used to identify oversold and overbought
markets, and it can also be used as a momentum indicator. Like many oscillators,
TRIX oscillates around a zero line. When it is used as an oscillator, a positive
value indicates an overbought market while a negative value indicates an
oversold market. When TRIX is used as a momentum indicator, a positive value
suggests momentum is increasing while a negative value suggests momentum is
decreasing. Many analysts believe that when the TRIX crosses above the zero line
it gives a buy signal, and when it closes below the zero line, it gives a sell
signal. Also, divergences between price and TRIX can indicate significant
turning points in the market. Additionally to a standard TRIX indicator the Alchemy
TRIX indicator contains an average line, also referred to as a signal line with
a cross plot and a cross alert when the TRIX crosses its signal line, which can
also be used as potential buy or sell signals.
For a detailed explanation of all the features of this indicator, please refer to the input description below.
Indicator Inputs:
| TrixPrice | Specifies which bar value (price, function, or formula) to be considered for the TRIX calculation. |
| TrixLength | Sets the number of bars to be considered for the TRIX calculation. |
| AverageLength | Sets the number of bars to be considered for the TRIX average line, whereas a setting of 0 disables the TRIX average line. |
| AverageType | Specifies moving average type for the TRIX average line. A setting of 1 uses a simple moving average, a setting of 2 uses an exponential moving average, a setting of 3 uses a weighted moving average, a setting of 4 uses a triangular moving average, a setting of 5 uses a Mid Keltner and a setting of 6 uses a Hull moving average,, whereas a setting of 0 disables the TRIX average line. |
| ShowTrix | Enables/disables the TRIX line. |
| ShowZeroLine | Enables/disables the zero line. |
| ShowAvgCross | Enables/disables the cross plot. |
| TrixColorNormLength | Number of bars over which to normalize the TRIX line for gradient coloring. |
| TrixUpColor | Specifies the color to use for TRIX indicator values that are relatively high over TrixColorNormLength bars, whereas a negative setting disables the gradient coloring of the TRIX line and uses the fixed default color for the TRIX line |
| TrixDnColor | Specifies the color to use for TRIX indicator values that are relatively low over TrixColorNormLength bars, whereas a negative setting disables the gradient coloring of the TRIX line and uses the fixed default color for the TRIX line |
| TrixGridForegroundColor | Specifies the color to use for TRIX numbers in RadarScreen cells when gradient coloring is enabled, that is, when both TrixUpColor and TrixDnColor are set to non-negative values. |
| AvgColorNormLength | Number of bars over which to normalize the average line for gradient coloring. |
| AvgUpColor | Specifies the color to use for average values that are relatively high over AvgColorNormLength bars, whereas a negative setting disables the gradient coloring of the average line and uses the fixed default color for the average line |
| AvgDnColor | Specifies the color to use for average values that are relatively low over AvgColorNormLength bars, whereas a negative setting disables the gradient coloring of the average line and uses the fixed default color for the average line |
| AvgGridForegroundColor | Specifies the color to use for average numbers in RadarScreen cells when gradient coloring is enabled, that is, when both AvgUpColor and AvgDnColor are set to non-negative values. |
| AvgCrossUpColor | Specifies the color to use for the cross plot when the TRIX crosses over the average line, whereas a setting of 0 disables the cross over plot and alert. |
| AvgCrossDnColor | Specifies the color to use for the cross plot when the TRIX crosses under the average line, whereas a setting of 0 disables the cross under plot and alert. |
| ZeroCrossAlert | Enables/disables the TRIX zero crossing alert notification. |
The Alchemy True Strength Index Indicator (Alchemy TSI)
The
Alchemy True Strength Index (TSI) is a momentum oscillator based on a double
smoothing of price changes. By smoothing price changes, the TSI captures the
ebbs and flows of price action with a steadier line that filters out the noise.
As with most momentum oscillators, chartists can derive signals from
overbought/oversold readings, centerline crossovers, bullish/bearish divergences
and signal line crossovers.
The True Strength Index (TSI) is an oscillator that fluctuates between positive
and negative territory. As with many momentum oscillators, the centerline
defines the overall bias. The bulls have the momentum edge when TSI is positive
and the bears have the edge when it's negative. Chartists can also look for
bullish and bearish divergences to anticipate trend reversals.
The TSI is somewhat unique because it tracks the underlying price quite well. In
other words, the oscillator can capture a sustained move in one direction or the
other. The peaks and troughs in the oscillator often match the peaks and troughs
in price. In this regard, chartists can draw trend lines and mark
support/resistance levels using TSI. Line breaks can then be used to generate
signals.
Indicator Inputs:
| Price | Specifies which the price to be used for calculating the TSI. |
| Length | Specifies the number of look back bars to be considered for the TSI calculation. |
| Smoothing1 | Specifies the first smoothing factor. |
| Smoothing2 | Specifies the second smoothing factor. |
The Alchemy On Balance Volume Indicator (Alchemy OnBalanceVol)
The Alchemy On Balance Volume indicator contains an average line as well as multiple coloring and alert features such as a bullish/bearish divergence alert feature as well as a above /below average coloring and alert feature. The alert colors for the OBV line are controlled with the color plots under Format Indicator > Color. Please note that when making a color change, the indicator needs to be disabled and then re-enabled again before the color changes will take affect. For a detailed explanation of this indicator please refer to the indicator inputs description below.
Indicator Inputs:
|
AverageLength |
Specifies the OBV average length, whereas a setting of 0 disables the average. |
|
AverageType |
Specifies the OBV average type. A setting of 1 uses a simple moving average, a setting of 2 uses an exponential moving average, a setting of 3 uses a weighted moving average, a setting of 4 uses a triangular moving average, a setting of 5 uses a Mid Keltner and a setting of 6 uses a Hull moving average. A setting of 0 disables the OBV average |
|
AvgColorOffset |
Specifies the number of bars to offset the color change of the OBV when it is above or below its average. For a histogram, point, cross, left tic or right tic, this input should be set to 0 and for lines, this input should be set to 1 bar. A negative setting disables this coloring feature. |
|
ShowOBV |
Enables/disables the OBV line. |
|
ShowAverage |
Enables/disables the OBV average line. |
|
AboveAverageAlert |
Enables/disables the alert when the OBV crosses over the OBV average line. |
|
BelowAverageAlert |
Enables/disables the alert when the OBV crosses under the OBV average line. |
|
AlertLength |
Specifies the number of look back bars for the divergence alerts. A setting of 0 disables both, the bullish and the bearish divergence alert. |
|
BullDivergenceAlert |
Enables/disables the bullish divergence alert. |
|
BearDivergenceAlert |
Enables/disables the bearish divergence alert. |
|
AlertDelay: |
If multiple alerts are triggered simultaneously, only the last alert will be displayed in the alert notification window. This input specifies the number of delay seconds from the time an alert is generated until it is displayed. The number of seconds starts counting from the first tick that triggers the alert, which means that depending on the tick volume, there maybe additional time beyond the specified delay time until the alert is displayed. A value of -1 disables this alert delay feature. This feature is only available for TradeStation 9 or higher. |
The Alchemy Trend Volume with Zig Zag Points indicators (Alchemy TrendVolumeZigZagPnts and Alchemy TrendVolumeZigZagPntsOOEL)
The Alchemy Trend Volume with Zig Zag Points indicators display the cumulative volume for each swing together with the Zig Zag Points swing lines. As an alternative trend calculation method, the trend can be determined by highest or lowest closes over a specified period. These indicators are designed to confirm a trending market. They also can be used to indicate when the trend is weakening and for the market to get ready for a reversal. For chart examples, please go to Alchemy Trend Volume with Zig Zag Points Indicator
The Alchemy TrendVolumeZigZagPntsOOEL is our newest version for TradeStation 9 and higher, which offers the option of anchoring the trend line points by bar number reference, essential for non-time based bar types such as tick, volume and advanced bar types as well as for second charts. The Alchemy TrendVolumeZigZagPnts is our legacy version, which exclusively uses the date and time reference method for anchoring the trend line points.
Indicator Inputs:
|
VolumePrice |
Specifies the price to be used for volume such as volume or ticks. |
|
SwingPrice |
Specifies the price to be used for determining the zig zag points swing lines |
|
RetracePnts |
Specifies the maximum retracement points in order for the swing to change directions. A negative value uses the alternative trend calculation method that determines the trend by highest or lowest closes over a specified period, which also disables the Zig Zag Points swing lines. |
|
MatchZigZagPoints |
Since the trend change of the Zig Zag Points swing lines doesn't occur until several bars after the price pivot, the trend volume histogram bars have to recalculate and redraw backwards when a trend change occurs, causing for all up trend volume histogram bars to be replaced with down trend volume histogram bars after a swing high has been determined and vice versa, for all down trend volume histogram bars to be replaced with up trend volume histogram bars after a swing low has been determined. With this input disabled, the former bars won't be replaced, but instead, up trend volume and down trend volume histogram bars will display simultaneously. When disabling this input, it is recommended to display the down trend volume histogram bars as negative values by enabling the input ShowDownTrendVolumeBelowZero. |
|
TrendDetectionLength |
With RetracePnts set to a negative value, the indicator uses the alternative trend calculation method that determines the trend by highest or lowest closes over a number of bars as specified with this input. |
|
ShowUpTrend |
Enables/disables the up trend volume histogram. |
|
ShowDownTrend |
Enables/disables the down trend volume histogram. |
|
ShowZeroLine |
Enables/disables the zero line. |
|
ShowDownTrendVolumeBelowZero |
When enabled, the down trend volume hsitgram bars display as negative values. |
|
TimeBarsBNorDT |
This input is available for our Alchemy TrendVolumeZigZagPntsOOEL indicator only. With a setting of 1, the indicator uses the bar number reference method for anchoring the trend line points on time based chart types and with a setting of 2, the indicator uses the date and time reference method for anchoring the trend line points on time based chart types. |
|
LineColor |
Specifies the color of the Zig Zag Points swing lines. A negative value disables the Zig Zag Points swing lines |
|
LineWidth |
Specifies the width of the Zig Zag Points swing lines. A negative value disables the Zig Zag Points swing lines |
|
LineStyle |
Specifies the style of the Zig Zag Points swing lines. A negative value disables the Zig Zag Points swing lines |
|
DelayedUpTrendColor |
Since the trend change of the Zig Zag Points swing lines doesn't occur until several bars after the price pivot, the trend volume histogram bars have to recalculate and redraw backwards when a trend change occurs. This input specifies the color of the up trend volume histogram bars starting with the first bar after the swing low up to the bar before the trend change had been detected. |
|
DelayedDownTrendColor |
Since the trend change of the Zig Zag Points swing lines doesn't occur until several bars after the price pivot, the trend volume histogram bars have to recalculate and redraw backwards when a trend change occurs. This input specifies the color of the down trend volume histogram bars starting with the first bar after the swing high up to the bar before the trend change had been detected. |
|
NewUpTrendAlert |
Specifies the alert text that is displayed in the alert notification window when the trend changes to the up side. This is a string input which needs to stay within quotation marks. When left blank such as "" this alert is disabled. |
|
NewDownTrendAlert |
Specifies the alert text that is displayed in the alert notification window when the trend changes to the down side. This is a string input which needs to stay within quotation marks. When left blank such as "" this alert is disabled. |
The Alchemy Volume Average Indicator (Alchemy Volume Avg)
The Alchemy Volume Indicator plots a volume histogram and a volume average line. The volume histogram changes colors and weight when volume spikes by a specified percentage. It also contains an alert that is triggered when volume crosses the volume average by a specified percentage.
Indicator Inputs:
|
AvgLength: |
Specifies the volume average length. |
|
Volume1_Tick2: |
A setting of 1 uses volume and a setting of 2 uses ticks. |
|
VolumePercent: |
Specifies the minimum volume spike percent for the volume histogram color and width to be changed. When a volume spike occurs the volume histogram color changes color as specified with the input VolumeSpikeUpColor when price closes higher and VolumeSpikeDownColor when price closes lower. |
|
VolumeAverageCrossPercent: |
Specifies the minimum percent for volume to cross the volume average for an alert to be triggered. |
|
UpColor: |
Specifies the volume histogram color when price closes higher. |
|
DownColor: |
Specifies the volume histogram color when price closes lower. |
|
VolumeSpikeUpColor: |
Specifies the volume histogram color when volume spikes and price closes higher. |
|
VolumeSpikeDownColor: |
Specifies the volume histogram color when volume spikes and price closes lower. |
|
VolumeSpikeNeutralColor: |
Specifies the volume histogram color when volume spikes and price closes equal. |
|
VolumeSpikeWidth: |
Specifies the volume histogram width when volume spikes. |
The Alchemy Volume Net Up/Down Indicator (Alchemy VolumNetUpDn)
The Alchemy Volume Net Up/Down indicator displays the sum or the average net up minus down volume over a specified number of bars as a histogram and it changes the histogram color and thickness based on specified threshold zones. The various threshold colors are specified with the threshold color plots under Format Indicator > Color and the various threshold thicknesses are specified with the threshold color plots under Format Indicator > Style. Please note that when making a color or thickness change, the indicator needs to be disabled and then re-enabled again before the color changes will take affect.
Indicator Inputs:
|
Threshold1: |
Specifies the highest positive and the lowest negative threshold. |
|
Threshold2: |
Specifies the second highest positive and the second lowest negative threshold. |
|
Threshold3: |
Specifies the third highest positive and the third lowest negative threshold. |
|
Length: |
Specifies the look back length for calculating the sum or the average net up minus down volume, whereas a setting of 0 uses the net up minus down volume. |
|
Type: |
Specifies the average type for calculating the sum or the average net up minus down volume. A setting of 0 uses the sum, a setting of 1 uses a simple moving average, a setting of 2 uses an exponential moving average, a setting of 3 uses a weighted moving average, a setting of 4 uses a triangular moving average, a setting of 5 uses a Mid Keltner, a setting of 6 uses a Hull moving average, a setting of 7 uses the net up minus down volume. |
|
ShowNetVolume: |
With a setting of true, the histogram displays the sum or the average net up minus down volume and with a setting of false, the histogram displays a fixed histogram bar as specified with the input PlotValue. |
|
ShowThresholdLines: |
Enables/disables the threshold lines. Please note that the threshold lines can only be displayed with ShowNetVolume enabled. |
|
ColorOffset: |
Specifies the number of bars to offset the color change. For a histogram, point, cross, left tic or right tic, this input should be set to 0 and for lines, this input should be set to 1 bar. |
The Alchemy Volume Ratio Indicator (Alchemy Volume Ratio)
The Alchemy Volume Ratio plots the Volume Ratio, which is an average of the ratio between the up/down tick difference and the total number of ticks. To provide several smoothing levels, our indicator also plots an average line of this volume ratio as well as an average of this average. Essentially, the volume ratio compares the representation of buyers vs. sellers over a period of time. The assumption is that if a bar closes up, the attributable volume was induced by buying pressure and thus the price bar is under accumulation. Conversely, if a bar closes down, the trading activity is deemed to be selling induced, a sign of distribution. For positive ratios, there have been more buyers than sellers over that time period and the ratio is bullish. Negative ratios exhibit more sellers than buyers over the study period and the ratio is bearish.
User Defined Inputs:
|
PlotVolRatio: |
Enables/disables the VolRatio plot. |
|
PlotSmoothing1Avg: |
Enables/disables the Smooth1Avg plot. |
|
PlotZeroLine: |
Enables/disables the ZeroLine plot. |
|
VolRatioLength: |
Specifies the volume ratio average length. |
|
Smoothing1Length: |
Specifies the average length for the average of the volume ratio average. |
|
Smoothing2Length: |
Specifies the average length for the average of the average of the volume ratio average. A setting of 0 disables the Smooth2Avg plot. |
|
VolRatioType: |
Specifies the volume ratio average type. A setting of 1 uses a simple moving average, a setting of 2 uses an exponential moving average, a setting of 3 uses a weighted moving average, a setting o 4 uses a triangular moving average, a setting of 5 uses a Mid Keltner and a setting of 6 uses a Hull moving average. |
|
Smoothing1Type: |
Specifies the smoothing 1 average type. A setting of 1 uses a simple moving average, a setting of 2 uses an exponential moving average, a setting of 3 uses a weighted moving average, a setting o 4 uses a triangular moving average, a setting of 5 uses a Mid Keltner and a setting of 6 uses a Hull moving average. |
|
Smoothing2Type: |
Specifies the smoothing 2 average type. A setting of 1 uses a simple moving average, a setting of 2 uses an exponential moving average, a setting of 3 uses a weighted moving average, a setting o 4 uses a triangular moving average, a setting of 5 uses a Mid Keltner and a setting of 6 uses a Hull moving average. |
|
UpVolAlertPct: |
Up volume alert if the volume ratio average is greater than this input. |
|
DnVolAlertPct: |
Down volume alert if the volume ratio average is smaller than this input. |
|
ColorNormLength: |
Specifies the number of bars over which to normalize the indicator for gradient coloring. |
|
VR_UpColor: |
Specifies the color to use for volume ratio average values that are relatively high over ColorNormLength bars. Set to -1 to disable gradient plot coloring. When disabled, the VolRatio color is determined by settings in indicator properties dialog box. |
|
VR_DnColor: |
Specifies the color to use for volume ratio average values that are relatively low over ColorNormLength bars. Set to -1 to disable gradient plot coloring. When disabled, the VolRatio color is determined by settings in indicator properties dialog box. |
|
Smoothing1_UpColor: |
Specifies the color to use for Smooth1Avg values that are relatively high over ColorNormLength bars. Set to -1 to disable gradient plot coloring. When disabled, the Smooth1Avg color is determined by settings in indicator properties dialog box. |
|
Smoothing1_DnColor: |
Specifies the color to use for Smooth1Avg values that are relatively low over ColorNormLength bars. Set to -1 to disable gradient plot coloring. When disabled, the Smooth1Avg color is determined by settings in indicator properties dialog box. |
|
Smoothing2_UpColor: |
Specifies the color to use for Smooth2Avg values that are relatively high over ColorNormLength bars. Set to -1 to disable gradient plot coloring. When disabled, the Smooth2Avg color is determined by settings in indicator properties dialog box. |
|
Smoothing2_DnColor: |
Specifies the color to use for Smooth2Avg values that are relatively low over ColorNormLength bars. Set to -1 to disable gradient plot coloring. When disabled, the Smooth2Avg color is determined by settings in indicator properties dialog box. |
The Alchemy Volume Reversal Indicator (Alchemy VolumeRevers)
The Alchemy Volume Reversal indicator displays show me dots and an alert when there is a volume increase in conjunction with a close in the upper or lower range of the bar as well as a double bottom or double top bar, which indicates a possible reversal.
User Defined Inputs:
|
RangePercent: |
Specifies the range percentage for the bar to close. For example, with a setting of 25, a green dot is plotted at the bar price as specified with the input BearPlotPrice when the close is within 25% of the high of the bar and vice versa, a red bearish dot is plotted at the bar price as specified with the input BearPlotPrice when the close is within 25% of the low of the bar. |
|
ShowReversal: |
Enables/disables the bullish and bearish reversal plots. These plots do not require a double bottom or double top. With UseDoubleBottomTop disabled, these plots display bars that close within the specified bar range, independent of a double bottom or double top. With UseDoubleBottomTop enabled, these plots display bars that close within the specified bar range but are not double bottoms or double tops. |
|
UseDoubleBottomTop: |
Enables/disables the double bottom and double top plots. Additionally to the double bottom/double top requirement, the bars also have to close within the specified bar range. |
|
UseVolumeOrTicks: |
A setting of 1 uses volume and a setting of 2 uses ticks. |
|
MinVolumeIncrease: |
Specifies the minimum volume percent increase in order to generate a show me dot and/or alert, whereas 100% is based on the previous bar volume. For example, with a setting of 10, and a volume reading at the previous bar of 1,000, the current bar has to reach a minimum of 1,100 in order for a show me dot and/or alert to be displayed. A setting of 0 disables this requirement. |
|
BullPlotOffset: |
Specifies the number of cents/ticks/pips to move the bullish reversal dot below the low of the bar. |
|
BearPlotOffset: |
Specifies the number of cents/ticks/pips to move the bearish reversal dot above the high of the bar. |
|
DbleBotPlotOffset: |
Specifies the number of cents/ticks/pips to move the double bottom cross below the low of the bar. |
|
DbleTopPlotOffset: |
Specifies the number of cents/ticks/pips to move the double top cross above the high of the bar. |
|
BullAlert: |
Enables/disables the bullish alert. |
|
BearAlert: |
Enables/disables the bearish alert. |
The Alchemy Volume Divergence Indicator (Alchemy VolumeDiverg)
The Alchemy Volume Divergence indicator displays a bullish show me dot at a doji or up candle with higher down volume than up volume and the indicator displays a bearish show me dot at a doji or down candle with higher up volume than down volume
User Defined Inputs:
|
VerticalOffset: |
Specifies the distance to move the show me dot above the high or below the low of the bar. |
|
MinCandlePercent: |
Specifies the minimum percent difference to qualify for an up or down candle, whereas with a setting of 0, a doji can be used for both, up and down candle and with a setting of 100, the candle has to close 100 percent of its range above its open in order to qualify for an up candle and the candle has to close 100 percent of its range below its open in order to qualify for a down candle. |
|
MinVolumePercent: |
Specifies the minimum required percent difference between up and down volume, whereas with a setting of 0, the difference between up and down volume can be the slightest amount and with a setting of 100, the difference between up and down volume has to be 100 percent of the total volume. |
|
BullishAlert: |
Enables/disables the bullish alert. |
|
BearishAlert: |
Enables/disables the bearish alert. |
The Alchemy Volume Ratio Alert Indicator (Alchemy VoluRatiAler)
The Alchemy Volume Ratio Alert indicator displays show me dots when the up/down volume ratio or the down/up volume ratio exceeds a specified percentage.
User Defined Inputs:
|
Ratio: |
Specifies the minimum ratio for a show me dot to be displayed. For example with a setting of 2, an up ratio alert would be displayed if the up volume is 1,000 and the down volume is 500. Vice versa, a down ratio alert would be displayed if the down volume is 1,000 and the up volume is 500. |
|
PlotOffset: |
Specifies the distance to move the show me dot above the high or below the low of the bar. |
|
UpAlert: |
Enables/disables the up ratio alert. |
|
DownAlert: |
Enables/disables the down ratio alert. |
|
Decimal: |
Specifies the decimal points for the ratio to be displayed in the alert notification window. |
The Alchemy Volume Up/Down Percent Indicator (Alchemy VolumeUp/Dn%)
The Alchemy Volume Up/Down Percent indicator displays the up volume percent in relation to the total volume as a positive histogram and the down volume percent in relation to the total volume as a negative histogram. It has the option of changing histogram colors and thickness, accompanied with an optional alert when this percent exceeds a specified threshold. The histogram alert colors re controlled with the alert plots under Format Indicator > Color and he histogram alert thicknesses are controlled with the alert plots under Format Indicator > Style. Please note that when making a color or thickness change, the indicator needs to be disabled and then re-enabled again before the color changes will take affect.
User Defined Inputs:
|
MinimumPercent: |
Specifies the alert percent threshold when exceeded, the histogram colors and thicknesses change as specified with the alert plots UpVolAlrtCol and DnVolAlrtCol. Please note that when making a color or thickness change, the indicator needs to be disabled and then re-enabled again before the color changes will take affect. |
|
ShowUpVolume: |
Enables/disables the up volume percent histogram. |
|
ShowDnVolume: |
Enables/disables the down volume percent histogram. |
|
DnVolumeMultiplier: |
Specifies the multiplier for the down volume percent histogram. For example, with a setting of -1, the down volume percent will be displayed as a negative histogram and with a setting of 1, the down volume percent will be displayed as a positive histogram. |
|
ShowZeroLine: |
Enables/disables the zero line. |
|
ShowThreshold: |
Enables/disables the threshold lines as specified with the input MinimumPercent. |
|
UpVolumeAlert: |
Enables/disables the up volume alert. |
|
DnVolumeAlert: |
Enables/disables the down volume alert. |
|
AlertDecimal: |
Specifies the decimal points for the percent to be displayed in the alert notification window. |
|
UpVolumeOffset: |
Specifies the number of bars to offset the alert color change for the up volume percent. For histograms, this input should be set to 0 and for lines, this input should be set to 1 bar. |
|
DnVolumeOffset: |
Specifies the number of bars to offset the alert color change for the down volume percent. For histograms, this input should be set to 0 and for lines, this input should be set to 1 bar. |
The Alchemy Volume Ratio Histogram Indicator (Alchemy VoluRatiHist)
The Alchemy Volume Ratio Alert indicator displays a positive histogram of the up/down volume ratio when the up volume is greater than the down volume and it displays a negative histogram of the down/up volume ratio when the down volume is greater than the up volume. It also changes histogram color and thickness, accompanied with an optional alert when this ratio exceeds a specified percentage. The histogram colors are controlled with the color plots under Format Indicator > Color. Please note that when making a color change, the indicator needs to be disabled and then re-enabled again before the color changes will take affect.
User Defined Inputs:
|
Ratio: |
Specifies the minimum required ratio for the histogram to change colors and thickness, accompanied with an optional alert. For example with a setting of 2, an up ratio alert would be displayed if the up volume is 1,000 and the down volume is 500. Vice versa, a down ratio alert would be displayed if the down volume is 1,000 and the up volume is 500. |
|
ColorOffset: |
Specifies the number of bars to offset the alert color change. For histograms, this input should be set to 0 and for lines, this input should be set to 1 bar. |
|
AlertWidthIncrease: |
Specifies the histogram width increase for an alert bar. |
|
ShowZeroLine: |
Enables/disables the zero line. |
|
ShowThreshold: |
Enables/disables the positive and negative threshold lines as specified with the input Ratio. |
|
UpAlert: |
Enables/disables the up ratio alert. |
|
DownAlert: |
Enables/disables the down ratio alert. |
|
Decimal: |
Specifies the decimal points for the ratio to be displayed in the alert notification window. |
The Alchemy Volume Ratio PaintBar Indicator (Alchemy VoluRatioPB)
The Alchemy Volume Ratio PaintBar indicator paints the price bars with a gradient color based on the up/down volume ratio. It has the option of displaying the up volume reading as a text object above the price bar and the down volume reading as a text object below the price bar. Additionally, it has an optional show me study that can be enabled when a specified up volume or down volume ratio threshold is exceeded.
Indicator Inputs:
|
ShowPaintBar: |
Enables/disables the paint bar feature. |
|
ColorLength: |
Specifies the number of bars over which to consider the extreme up and down volume ratio values for calculating the extreme up and down volume ratio colors. The extreme up volume ratio color is specified with the VolRatioHi plot color and the extreme down volume ratio color is specified with the VolRatioLo plot color. Please note that when making a color change, the indicator needs to be disabled and then re-enabled again before the color changes will take affect. |
|
Txt_VolumeDivisor: |
Specifies the number to divide the up and down volume for displaying the up and down volume text. For example, with a value of 1000, the text rounds to the nearest 1,000 value and displays it as 1,000's such as 2 for a volume reading of 2,400 or 35 for a volume reading of 35,499. |
|
UpText: |
Specifies the text to display in front of the up volume text. This is a string type input which always needs to be within quotation marks. To leave this text blank, this input would be specified as "" |
|
DnText: |
Specifies the text to display in front of the down volume text. This is a string type input which always needs to be within quotation marks. To leave this text blank, this input would be specified as "" |
|
Txt_VertOffset: |
Specifies the number of cents, ticks or pips to move the up text higher from the high of the bar and to move the down text lower from the low of the bar. |
|
Txt_HorizOffset: |
Specifies the number of bars to move the text to the left from the bar. |
|
UpTxt_VertAlign: |
Specifies the vertical alignment of the up text, whereas 2 = center aligned, 1 = top aligned and 0 = bottom aligned. |
|
DnTxt_VertAlign: |
Specifies the vertical alignment of the down text, whereas 2 = center aligned, 1 = top aligned and 0 = bottom aligned. |
|
Txt_HorizAlign: |
Specifies the horizontal alignment of the text, whereas 2 = center aligned, 1 = left aligned and 0 = right aligned. |
|
ShowText: |
A setting of 0 disables the text objects, with a setting of 1, the text objects are displayed for the current bar only and with a setting of 2, the text objects are displayed for all bars on the chart. The up volume text is specified with the VolRatioHi plot color and the down volume text is specified with the VolRatioLo plot color. Please note that when making a color change, the indicator needs to be disabled and then re-enabled again before the color changes will take affect. |
|
RatioThreshold: |
Specifies the up volume ratio threshold which when exceeded, displays a show me dot above the high of the bar and the down volume ratio threshold which when exceeded, displays a show me dot below the low of the bar. A setting of 0 disables the show me dots. |
|
ShowMeVerticalOffset: |
Specifies the number of cents, ticks or pips to move the up volume show me dots above the up text and to move the down volume show me dots below the down text. |
|
UpVolumeAlert: |
Enables/disables the up volume alert which triggers when the up volume ratio threshold is exceeded. |
|
DnVolumeAlert: |
Enables/disables the down volume alert which triggers when the down volume ratio threshold is exceeded. |
|
AlertDecimal: |
Specifies the decimal points at which to display the ratio threshold in the alert notification window. |
The Alchemy Volume Ratio Oscillator (Alchemy VoluRatioOsc)
The Alchemy Volume Ratio Oscillator displays the difference between the up and down volume as a histogram that is colored with a gradient color based on the up/down volume ratio. Additionally, it contains a moving average line of this histogram.
Indicator Inputs:
|
ShowNetVolume: |
Enables/disables the net volume histogram. |
|
AvgLength: |
Specifies the histogram average length, whereas a setting of 0 disables the average line. |
|
AvgType: |
Specifies the histogram average type. A setting of 0 disables the average line, a setting of 1 uses a simple moving average, a setting of 2 uses an exponential moving average, a setting of 3 uses a weighted moving average, a setting o 4 uses a triangular moving average, a setting of 5 uses a Mid Keltner and a setting of 6 uses a Hull moving average, a setting of 7 uses price as specified with the input Price. |
|
ShowZeroLine: |
Enables/disables the zero line. |
|
ColorLength: |
Specifies the number of bars over which to consider the extreme up and down volume ratio values for calculating the extreme up and down volume ratio colors. The extreme up volume ratio color is specified with the NetUpVol plot color and the extreme down volume ratio color is specified with the NetDnVol plot color. Please note that when making a color change, the indicator needs to be disabled and then re-enabled again before the color changes will take affect. |
|
NetVolumeColorOffset: |
Specifies the number of bars to offset the color change of the net volume histogram. For a histogram, point, cross, left tic or right tic, this input should be set to 0 and for lines, this input should be set to 1 bar. |
|
VolumeDivisor: |
Specifies the number to divide the up and down volume for displaying the net up/down volume. For example, with a value of 1000, the net up/down volume rounds to the nearest 1,000 value and displays it as 1,000's such as 2 for a net up/down volume reading of 2,400 or 35 for a net up/down volume reading of 35,499. |
|
RatioThreshold: |
Specifies the up volume ratio threshold which when exceeded, changes the histogram width as specified with the plot NetUpVol and triggers an alert notification. When the down volume ratio threshold is exceeded, it changes the histogram width as specified with the plot NetDnVol and it triggers an alert notification. A setting of 0 disables this feature. |
|
UpVolumeAlert: |
Enables/disables the up volume alert which triggers when the up volume ratio threshold is exceeded. |
|
DnVolumeAlert: |
Enables/disables the down volume alert which triggers when the down volume ratio threshold is exceeded. |
|
AlertDecimal: |
Specifies the decimal points at which to display the ratio threshold in the alert notification window. |
The Alchemy Volume Spread Analysis Indicator (Alchemy VolumeSpreadAnalysis)
Volume Spread Analysis looks into price action in relation to volume. Volume Spread Analysis is the study of the market forces of supply and demand and the manipulation of those forces through the psychology of crowd behavior, through examining the relationship between the quantity of volume on a price bar, the spread of the price or range of the bar, and the closing price on the height of that bar. Studying these variables establishes the equilibrium of demand and supply as well as the likely near term direction of the market.
Volume Spread Analysis uses three
components on the chart to determine the balance of supply and demand as well as
the probable near term direction of the market. These components are the amount
of volume affecting the price, the price spread or range of the price and where
price closes. Volume Spread Analysis analyses volume and what the price did as a
result and relative to the preceding bars on a chart.
The Alchemy Volume Spread Analysis indicator displays the volume as a histogram and colors it based on the equilibrium of demand and supply in conjunction with the likely near term direction of the market. Additionally, it contains a moving average line of this histogram as well as 2 standard deviation lines of this average.
Our Alchemy Volume Spread Analysis indicator provides the unique feature of being able to use real time data that is only available in quote fields such as ask size, bid size, trade volume or daily volume for real time bars.
Indicator Inputs:
|
RealTimeVolumePrice: |
Specifies the volume price to be used for real time bars. |
|
HistoricalValueVolumePrice: |
Specifies the volume price to be used for historical bars. |
|
IntrabarAccumulative: |
With a value of 2, the real time volume price is accumulated intra bar, in order to get an accumulative reading such as the accumulative combined ask and bid size for each bar. A negative value such as -1, disables this feature. |
|
DataSeriesNumber: |
Specifies the data series number that the indicator is based on. |
|
ShowVolume: |
Enables/disables the volume histogram. |
|
ShowAvg: |
Enables/disables the average of the volume histogram. |
|
ShowStdDev: |
Enables/disables the 2 standard deviation lines of the average of the volume histogram. |
|
Vol: |
Specifies the volume to be used such as volume or ticks. |
|
AvgLength: |
Specifies the average length. |
|
StdDev1: |
Specifies the length for the first standard deviation line. |
|
StdDev2: |
Specifies the length for the second standard deviation line. |
|
Volume Histogram Coloring: |
The histogram coloring can be specified with the following inputs: UpCloseColor, DownCloseColor, EqualCloseColor, NoDemandColor, NoSupplyColor, NeutralColor and ChurningColor. |
|
VolumeColorOffset: |
Specifies the number of bars to offset the color change of the volume histogram. For a histogram, point, cross, left tic or right tic, this input should be set to 0 and for lines, this input should be set to 1 bar. |
The Alchemy Volume Weighted Average Price (VWAP) Indicators
The Volume Weighted Average Price (VWAP) is a measure of the price at which the majority of a given period's trading in a given security took place.
The Alchemy Volume Weighted Average Price (VWAP) Charting Indicator (Alchemy VWAP)
The Alchemy Volume Weighted Average Price (VWAP) Charting Indicator provides the flexibility of being able to calculate and display the VWAP for any specified period such as an intraday, daily, monthly, weekly and yearly period or even for a specified time and/or date range. Additionally, this indicator offers an optional average line as well as 3 separate standard deviation bands of the VWAP.
Indicator Inputs:
|
ShowVWAP: |
Enables/disables the VWAP line. |
|
ColorOffset: |
Specifies the number of bars to offset the color change of the VWAP line. For a histogram, point, cross, left tic or right tic, this input should be set to 0 and for lines, this input should be set to 1 bar. |
|
AboveAvgColor: |
Specifies the color for when price is above the VWAP. |
|
BelowAvgColor: |
Specifies the color for when price is below the VWAP. |
|
VolumePrice: |
Specifies the volume to be used such as volume or ticks. |
|
SD_AvgPriceType: |
Specifies the average price to be used for the standard deviation calculation. A value of 1 uses the bar close, a value of 2 uses the bar high/low average, a value of 3 uses the bar high/low/close average, a value of 4 uses the bar high/low/close/open average and a value of 0 disables all standard deviation bands. |
|
SD1NumDevs: |
Specifies the number of deviations up and down for the first standard deviation band, whereas a value of 0 disables the first standard deviation band. |
|
SD2NumDevs: |
Specifies the number of deviations up and down for the second standard deviation band, whereas a value of 0 disables the second first standard deviation band. |
|
SD3NumDevs: |
Specifies the number of deviations up and down for the third standard deviation band, whereas a value of 0 disables the third standard deviation band. |
|
AvgLength: |
Specifies the average length, whereas a value of 0 disables the average line of the VWAP. |
|
AvgType: |
Specifies the moving average type. A setting of 1 uses a simple moving average, a setting of 2 uses an exponential moving average, a setting of 3 uses a weighted moving average, a setting of 4 uses a triangular moving average, a setting of 5 uses a Mid Keltner, a setting of 6 uses a Hull moving average, a setting of 7 uses price as specified with the input MvgAvgPrice. A value of 0 disables the average line of the VWAP. |
|
StartTime: |
Specifies the time of day as to when the VWAP calculation starts over again. The format of this input is in military time without the colon. For example, a time of 1:00 PM is expressed as 1300. This setting works on intra-day charts only. |
|
Date_YYYYMMDD: |
Specifies the date as to when the VWAP calculation starts. The format of this input is 4 digit year - 2 digit month - 2 digit date. For example, a date of 7/3/2017 is expressed as 20170703. This setting works on intra-day or daily charts only. |
|
LastWeekDay: |
Specifies the last week day for using a new week to start the VWAP calculation over again, whereas 0=Sunday, 1=Monday, 2=Tuesday, 3=Wednesday, 4=Thursday, 5=Friday and 6= Sunday. This setting works on intra-day or daily charts only and in order to use the weekly recalculation method, all 3 inputs StartTime, SessEndTime and Date_YYYYMMDD have to be set to a negative value such as -1. |
|
MonthlyOrYearly: |
With a setting of 1, the VWAP calculation starts over at each new month and with a setting of 2, the VWAP calculation starts over at each new year. In order to use the monthly or yearly recalculation method, all 4 inputs StartTime, SessEndTime, Date_YYYYMMDD and LastWeekDay have to be set to a negative value such as -1. |
|
With all 5 inputs StartTime, SessEndTime, Date_YYYYMMDD, LastWeekDay and MonthlyOrYearly set to negative values such as -1, the VWAP calculation starts from the very beginning of the chart without any recalculations. |
The Alchemy Volume Weighted Average Price (VWAP) RadarScreen Indicator (Alchemy VWAP RS)
The Alchemy Volume Weighted Average Price (VWAP) RadarScreen Indicator displays the number of bars ago when price touched the VWAP and it's standard deviation bands
Indicator Inputs:
|
MaxBarsAgo: |
Specifies the maximum number of bars to look back, whereas a negative value disables this requirement. |
|
VWAPColor: |
Specifies the cell background color for the VWAPAgo column when price touches the VWAP. |
|
UpperSDColor: |
Specifies the cell background color for the SDAgo column when price touches the upper standard deviation bands. |
|
LowerSDColor: |
Specifies the cell background color for the SDAgo column when price touches the lower standard deviation bands. |
|
TextColor: |
Specifies the text color. |
|
VolumePrice: |
Specifies the volume to be used such as volume or ticks. |
|
SD_AvgPriceType: |
Specifies the average price to be used for the standard deviation calculation. A value of 1 uses the bar close, a value of 2 uses the bar high/low average, a value of 3 uses the bar high/low/close average, a value of 4 uses the bar high/low/close/open average and a value of 0 disables all standard deviation bands. |
|
SD1NumDevs: |
Specifies the number of deviations up and down for the first standard deviation band, whereas a value of 0 disables the first standard deviation band. |
|
SD2NumDevs: |
Specifies the number of deviations up and down for the second standard deviation band, whereas a value of 0 disables the second first standard deviation band. |
|
SD3NumDevs: |
Specifies the number of deviations up and down for the third standard deviation band, whereas a value of 0 disables the third standard deviation band. |
|
AvgLength: |
Specifies the average length, whereas a value of 0 disables the average line of the VWAP. |
|
AvgType: |
Specifies the moving average type. A setting of 1 uses a simple moving average, a setting of 2 uses an exponential moving average, a setting of 3 uses a weighted moving average, a setting of 4 uses a triangular moving average, a setting of 5 uses a Mid Keltner, a setting of 6 uses a Hull moving average, a setting of 7 uses price as specified with the input MvgAvgPrice. A value of 0 disables the average line of the VWAP. |
|
StartTime: |
Specifies the time of day as to when the VWAP calculation starts over again. The format of this input is in military time without the colon. For example, a time of 1:00 PM is expressed as 1300. This setting works on intra-day charts only. |
|
Date_YYYYMMDD: |
Specifies the date as to when the VWAP calculation starts. The format of this input is 4 digit year - 2 digit month - 2 digit date. For example, a date of 7/3/2017 is expressed as 20170703. This setting works on intra-day or daily charts only. |
|
LastWeekDay: |
Specifies the last week day for using a new week to start the VWAP calculation over again, whereas 0=Sunday, 1=Monday, 2=Tuesday, 3=Wednesday, 4=Thursday, 5=Friday and 6= Sunday. This setting works on intra-day or daily charts only and in order to use the weekly recalculation method, all 3 inputs StartTime, SessEndTime and Date_YYYYMMDD have to be set to a negative value such as -1. |
|
MonthlyOrYearly: |
With a setting of 1, the VWAP calculation starts over at each new month and with a setting of 2, the VWAP calculation starts over at each new year. In order to use the monthly or yearly recalculation method, all 4 inputs StartTime, SessEndTime, Date_YYYYMMDD and LastWeekDay have to be set to a negative value such as -1. |
|
With all 5 inputs StartTime, SessEndTime, Date_YYYYMMDD, LastWeekDay and MonthlyOrYearly set to negative values such as -1, the VWAP calculation starts from the very beginning of the chart without any recalculations. |
The Alchemy Volume Weighted Average Price (VWAP) RadarScreen Plus Indicator (Alchemy VWAP RS+)
Additionally to the BarsAgo columns of the Alchemy Volume Weighted Average Price (VWAP) RadarScreen Indicator, the Alchemy Volume Weighted Average Price (VWAP) RadarScreen Plus Indicator also displays the VWAP and all of it's standard deviation bands.
Indicator Inputs:
|
MaxBarsAgo: |
Specifies the maximum number of bars to look back, whereas a negative value disables this requirement. |
|
VWAPColor: |
Specifies the cell background color for the VWAPAgo column when price touches the VWAP. |
|
UpperSDColor: |
Specifies the cell background color for the SDAgo column when price touches the upper standard deviation bands. |
|
LowerSDColor: |
Specifies the cell background color for the SDAgo column when price touches the lower standard deviation bands. |
|
TextColor: |
Specifies the text color. |
|
VolumePrice: |
Specifies the volume to be used such as volume or ticks. |
|
SD_AvgPriceType: |
Specifies the average price to be used for the standard deviation calculation. A value of 1 uses the bar close, a value of 2 uses the bar high/low average, a value of 3 uses the bar high/low/close average, a value of 4 uses the bar high/low/close/open average and a value of 0 disables all standard deviation bands. |
|
SD1NumDevs: |
Specifies the number of deviations up and down for the first standard deviation band, whereas a value of 0 disables the first standard deviation band. |
|
SD2NumDevs: |
Specifies the number of deviations up and down for the second standard deviation band, whereas a value of 0 disables the second first standard deviation band. |
|
SD3NumDevs: |
Specifies the number of deviations up and down for the third standard deviation band, whereas a value of 0 disables the third standard deviation band. |
|
AvgLength: |
Specifies the average length, whereas a value of 0 disables the average line of the VWAP. |
|
AvgType: |
Specifies the moving average type. A setting of 1 uses a simple moving average, a setting of 2 uses an exponential moving average, a setting of 3 uses a weighted moving average, a setting of 4 uses a triangular moving average, a setting of 5 uses a Mid Keltner, a setting of 6 uses a Hull moving average, a setting of 7 uses price as specified with the input MvgAvgPrice. A value of 0 disables the average line of the VWAP. |
|
StartTime: |
Specifies the time of day as to when the VWAP calculation starts over again. The format of this input is in military time without the colon. For example, a time of 1:00 PM is expressed as 1300. This setting works on intra-day charts only. |
|
Date_YYYYMMDD: |
Specifies the date as to when the VWAP calculation starts. The format of this input is 4 digit year - 2 digit month - 2 digit date. For example, a date of 7/3/2017 is expressed as 20170703. This setting works on intra-day or daily charts only. |
|
LastWeekDay: |
Specifies the last week day for using a new week to start the VWAP calculation over again, whereas 0=Sunday, 1=Monday, 2=Tuesday, 3=Wednesday, 4=Thursday, 5=Friday and 6= Sunday. This setting works on intra-day or daily charts only and in order to use the weekly recalculation method, all 3 inputs StartTime, SessEndTime and Date_YYYYMMDD have to be set to a negative value such as -1. |
|
MonthlyOrYearly: |
With a setting of 1, the VWAP calculation starts over at each new month and with a setting of 2, the VWAP calculation starts over at each new year. In order to use the monthly or yearly recalculation method, all 4 inputs StartTime, SessEndTime, Date_YYYYMMDD and LastWeekDay have to be set to a negative value such as -1. |
|
With all 5 inputs StartTime, SessEndTime, Date_YYYYMMDD, LastWeekDay and MonthlyOrYearly set to negative values such as -1, the VWAP calculation starts from the very beginning of the chart without any recalculations. |
The Alchemy Momentum Trigger Indicator (Alchemy MomentumTrig)
The Alchemy Momentum Trigger indicator displays the market trend in form of a positive or negative histogram and when a momentum change is detected, it triggers potential entries into the direction of the trend by displaying trigger dots on the zero line. The histogram colors are controlled with the color plots PosUpColor, PosDownColor, NegUpColor and NegDownColor. When a bullish momentum change is detected, the zero line trigger dot displays with an alert color as specified with the color plot BullTrigCol. When a bearish momentum change is detected, the zero line trigger dot displays with an alert color as specified with the color plot BearTrigCol. When an increasing momentum into the direction of the bullish trend is detected, the zero line trigger dot displays with a regular color as specified with the color plot BullColor. When an increasing momentum into the direction of the bearish trend is detected, the zero line trigger dot displays with a regular color as specified with the color plot BearColor. Please note that when making a color change, the indicator needs to be disabled and then re-enabled again before the color changes will take affect.
Indicator Inputs:
|
PlotHistogram |
Enables/disables the histogram plot. |
|
PlotTrigger |
Enables/disables the trigger plot. |
|
TriggerAlertPlotIncrease |
Specifies the size increase of the Trigger alert dot. |
|
Trigger |
When disabled, the trigger plot bypasses the momentum filter and displays continuous dots between the trigger alert dots. |
|
TriggerNumber |
Specifies the trigger calculation mode and the options are 1 for a faster momentum calculation or 2, for a slower momentum calculation |
|
TriggerPercent |
Specifies the trigger threshold percent. |
|
Price |
Specifies the price to be used for the trend calculation such as open, high, low or close. |
|
Factor1 |
Specifies the primary sensitivity factor for the trend calculation, whereas a decreasing value increases the sensitivity for a more shorter term trend, vice versa, an increasing value decreases the sensitivity for a more longer term trend. |
|
Factor2 |
Specifies the secondary sensitivity factor for the trend calculation, whereas a decreasing value increases the sensitivity for a more shorter term trend, vice versa, an increasing value decreases the sensitivity for a more longer term trend. |
|
Deviation1 |
Specifies the primary trend calculation method and the options are 1, 2, 3, 4, 5 or 6. |
|
Deviation2 |
Specifies the secondary trend calculation method and the options are 1, 2, 3, 4, 5 or 6. |
Alchemy Function for the Alchemy Momentum Trigger Indicator (for a function definition, click on the function name):
|
The AlchemyMomentumTrigger function is a multiple-output function that provides the plot values for the indicator Alchemy MomentumTrig. |
The Alchemy MACD% Indicator(Alchemy MACD%)
The Alchemy MACD% Indicator displays the percent difference between 2 moving averages of any type.
Indicator Inputs:
|
|
Moving Average Parameters: |
|
Price: |
Specifies the price to be used for the moving averages. |
|
FastLength: |
Specifies the fast moving average length. |
|
SlowLength: |
Specifies the slow moving average length. |
|
FastType: |
Specifies the fast moving average type. A setting of 1 uses a simple moving average, a setting of 2 uses an exponential moving average, a setting of 3 uses a weighted moving average, a setting of 4 uses a triangular moving average, a setting of 5 uses a Mid Keltner, a setting of 6 uses a Hull moving average, a setting of 7 uses price as specified with the input MvgAvgPrice. |
|
SlowType: |
Specifies the slow moving average type. A setting of 1 uses a simple moving average, a setting of 2 uses an exponential moving average, a setting of 3 uses a weighted moving average, a setting of 4 uses a triangular moving average, a setting of 5 uses a Mid Keltner, a setting of 6 uses a Hull moving average, a setting of 7 uses price as specified with the input MvgAvgPrice. |
|
|
Coloring: |
|
ColorOffset: |
Specifies the number of bars to offset the color change. For a histogram, point, cross, left tic or right tic, this input should be set to 0 and for lines, this input should be set to 1 bar. A negative setting disables the coloring effect, using the default MACD% plot color. |
|
UpColor: |
Specifies the color for a positive MACD% |
|
DownColor: |
Specifies the line/slope percent color for a negative MACD% |
|
|
Alerts: |
|
PositiveAlertText: |
Specifies the alert text to be displayed in the alert notification window when the MACD% crosses into positive. This is a string input which needs to be within quotation marks. To disable this alert, this input needs to be blank with just the 2 quotation marks (""). |
|
NegativeAlertText: |
Specifies the alert text to be displayed in the alert notification window when the MACD% crosses into negative. This is a string input which needs to be within quotation marks. To disable this alert, this input needs to be blank with just the 2 quotation marks (""). |
The Alchemy Wick-Tail Ratio RadarScreen Indicator (Alchemy WickTailRatio)
A long tail tells us that the
market made a significant fall and then quickly retreated from this price level,
which is often seen as a bullish signal. Vice versa, a long wick tells us
that the market made a significant rise and then quickly fell from this price
level, which is often seen as a bearish signal. The Alchemy Wick-Tail
Ratio RadarScreen indicator plots a ratio column, which represents the ratio
percentage between the wick and the tail. For example, a reading of 200% means
that the tail is twice the size of the wick, whereas a reading of 50% means that
the tail is half the size of the wick. When the ratio is at or above the
minimum bullish ratio as specified with the indicator input, the cells light up
with a bullish background color and when the ratio is at or below the minimum
bearish ratio as specified with the indicator input, the cells light up with a
bearish background. Otherwise, the cells are blank.
Indicator Inputs:
|
PeriodsAgo |
Specifies the number of periods ago, whereas a value of 0 uses the current bar, a value of 1 uses the previous bar and so fourth. |
|
BullRatio |
Specifies the minimum ratio for a bullish alert. For example a value of 2 requires for the tail to be at least twice the size of the wick. |
|
BearRatio |
Specifies the minimum ratio for a bearish alert. For example a value of 0.5 requires for the tail to be half the size of the wick or less. |
|
BullColor |
When the ratio is at or above the BullRatio, the cells light up with a background color as specified with this input. |
|
BearColor |
When the ratio is at or below the BearRatio, the cells light up with a background color as specified with this input |
|
BullAlert |
Specifies the alert text to be displayed for a bullish alert. This is a string input which requires for the text to be within quotation marks. When left blank with just 2 quotation marks, it will disable the bullish alert. |
|
BearAlert |
Specifies the alert text to be displayed for a bearish alert. This is a string input which requires for the text to be within quotation marks. When left blank with just 2 quotation marks, it will disable the bearish alert. |
|
ZeroPercent |
When a candle closes at its high or at its low, such a candle will have a zero size wick or tail and in order to calculate a ratio, a zero size wick or tail needs to be expressed as a very small value other than zero. This input specifies the percent of the bar's range as this zero value. For example, with a bar's range of 1 dollar, a ZeroPercent value of 1, determines a zero wick as 1 percent of 1 dollar, which would be 1 cent. |
The Alchemy W-M Indicator (Alchemy W-M) Available for TradeStation 9/10 only!
The Alchemy W-M indicator displays W bottom and M top formations on either price or on a specified oscillator. For an explanation on the various pattern points, here is a picture of a W pattern example:
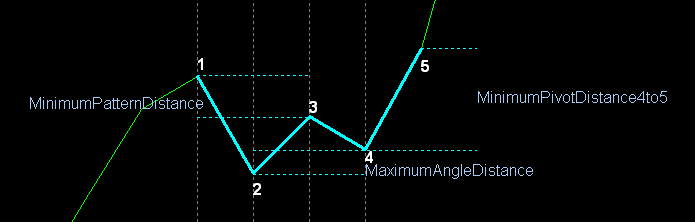
Indicator Inputs:
|
M_Price |
Specifies the price to be used for plotting and displaying the M patterns. |
|
W_Price |
Specifies the price to be used for plotting and displaying the W patterns. |
|
MinimumPatternDistance |
Specifies the minimum point distance for point 1 to be above point 3 for a W pattern and the minimum point distance for point 1 to be below point 3 for a M pattern. |
|
MaximumAngleDistance |
Specifies the maximum point distance between point 2 and point 4, whereas a negative setting disables this requirement. |
|
MinimumPivotDistance1to2/2to3/3to4/4to5 |
Specifies the minimum point distance between each corresponding point. |
|
MinimumPivotBars1to2/2to3/3to4 |
Specifies the minimum number of required bars in between each corresponding point. |
|
MaximumPivotBars1to2/2to3/3to4 |
Specifies the maximum number of allowed bars in between each corresponding point, whereas a setting of 0 disables this requirement |
|
PlotOffset |
Specifies the number of bars to offset the color change. For a histogram, point, cross, left tic or right tic, this input should be set to 0 and for lines, this input should be set to 1 bar. |
|
W_Plot |
Enables/disables the W patterns. |
|
M_Plot |
M_Plot |
|
W_Alert |
Enables/disables the W pattern alert notification. |
|
M_Alert |
Enables/disables the M pattern alert
notification.
|
The Alchemy Keltner Paint Bar (Alchemy KeltnerPB)
The Alchemy Keltner Paint Bar indicator is a proprietary Keltner Channel indicator that paints the price bars when a bar closes above the upper Keltner Channel and above a specified percentage of the bar's range and the indicator paints the price bars a different color when a bar closes below the lower Keltner Channel and below a specified percentage of the bar's range.
Indicator Inputs:
| Price | Specifies which bar value (price, function, or formula) to average. |
| Len | Sets the period of time (in bars) over which an average will be taken. |
| Width | Sets a multiplier to be used in the calculation of the upper and lower band. |
| ClosingRangePercent | Specifies the bar range percent. For example, with a setting of 25, the bar has to close in it's upper 25% bar range and above the upper Keltner or in it's lower 25% bar range and below the lower Keltner. |
| PB_High | Specifies the price to be used for the paint bar high such as high or close. With PB_High set to high and PB_Low set to low, the entire price bar is being painted and with PB_High set to close and PB_Low set to open, the candle body is being painted. |
| PB_Low | Specifies the price to be used for the paint bar low such as low or open. With PB_High set to high and PB_Low set to low, the entire price bar is being painted and with PB_High set to close and PB_Low set to open, the candle body is being painted. |
| UpperAlert | Specifies the text to be displayed in the alert notification window for an upper alert. This is a string input which needs to stay within quotation marks. To disable this alert, this field needs to be blank with just 2 quotation marks. |
| LowerAlert | Specifies the text to be displayed in the alert notification window for a lower alert. This is a string input which needs to stay within quotation marks. To disable this alert, this field needs to be blank with just 2 quotation marks. |
The Alchemy Keltner-Moving Average Indicator (Alchemy Keltner-MovAvg)
The Alchemy Keltner-Moving Average indicator is a proprietary Keltner Channel indicator that displays the Mid Keltner line, the upper Keltner Channel, the lower Keltner Channel, the mid line between the upper Keltner Channel to Mid Keltner line and the mid line between the Mid Keltner line to lower Keltner Channel. Additionally, it contains an optional paint bar that paints the price bar when the market retraces back to the opposite mid line after penetrating the outer Keltner Band and an optional moving average that colors the moving average line based on its location to the Keltner Channel.
Indicator Inputs:
| Price | Specifies which bar value (price, function, or formula) to average. |
| Len | Sets the period of time (in bars) over which an average will be taken. |
| Width | Sets a multiplier to be used in the calculation of the upper and lower band. |
| MidlinePercent | Specifies the mid lines percent. For example, with a setting of 50, the mid lines are calculated at the half way point between the upper band to mid Keltner line and the mid Keltner line to lower band. |
| MaximumRetracementBars | This input enables the paint bar that paints the price bar when the market retraces back to the opposite mid line after penetrating the outer Band and it specifies the maximum number of allowed bars from the last bar that penetrated the outer Band to the bar that retraces to the opposite mid line. A setting of 0 disables this paint bar. |
| UpsidePenetrationPrice | Specifies the price that needs to penetrate the upper Band such as close, low or high. |
| DownsidePenetrationPrice | Specifies the price that needs to penetrate the lower Band such as close, low or high. |
| MovAvgPrice | Specifies the moving average price. |
| MovAvgLength | Specifies the moving average length. A setting of 0 disables the moving average. |
| MovAvgType | Specifies the moving average type. A setting of 1 uses a simple moving average, a setting of 2 uses an exponential moving average, a setting of 3 uses a weighted moving average, a setting o 4 uses a triangular moving average, a setting of 5 uses a Mid Keltner, a setting of 6 uses a Hull moving average, a setting of 7 uses price as specified with the input MovAvgPrice. |
| MovAvgColorOffset | Specifies the number of bars to offset the color change. For a histogram, point, cross, left tic or right tic, this input should be set to 0 and for lines, this input should be set to 1 bar. A negative setting disables the coloring feature. |
| MovAvgUpColor | Specifies the moving average color for when it is above the Upper Keltner. |
| MovAvgDownColor | Specifies the moving average color for when it is below the Lower Keltner. |
| PB_High | Specifies the price to be used for the paint bar high such as high or close. With PB_High set to high and PB_Low set to low, the entire price bar is being painted and with PB_High set to close and PB_Low set to open, the candle body is being painted. |
| PB_Low | Specifies the price to be used for the paint bar low such as low or open. With PB_High set to high and PB_Low set to low, the entire price bar is being painted and with PB_High set to close and PB_Low set to open, the candle body is being painted. |
| PlotTop | Enables/disables the upper Band line. |
| PlotMid | Enables/disables the Mid line. |
| PlotBot | Enables/disables the lower Band line. |
| PlotMidlines | Enables/disables the mid lines. |
| BullAlert | Enables/disables the alert notification when a bullish retracement paint bar is being painted. |
| BearAlert | Enables/disables the alert notification when a bearish retracement paint bar is being painted. |
The Alchemy Parabolic SAR Indicator (Alchemy ParabolicSAR)
Additionally to the standard Parabolic SAR indicator, the Alchemy Parabolic SAR indicator contains the option of displaying the parabolic SAR based off a separate data series as well as the option of displaying paint bars based on the parabolic SAR trend, whereas a bullish trend is defined as the parabolic SAR being below the price bars and a bearish trend is defined as the parabolic SAR being above the price bars.
Indicator Inputs:
| AfStep | Sets the acceleration increment factor. |
| AfLimit | Sets the acceleration limitation factor. |
| DataNum | Specifies the data series number on which the parabolic SAR is being calculated. |
| ShowParabolicSAR | Enables/disables the parabolic SAR plot. |
| ShowTrend | Enables/disables the trend paint bars. |
| PB_High | Specifies the price to be used for the paint bar high such as high or close. With PB_High set to high and PB_Low set to low, the entire price bar is being painted and with PB_High set to close and PB_Low set to open, the candle body is being painted. |
| PB_Low | Specifies the price to be used for the paint bar low such as low or open. With PB_High set to high and PB_Low set to low, the entire price bar is being painted and with PB_High set to close and PB_Low set to open, the candle body is being painted. |
| BullishAlert | Specifies the text to be displayed in the alert notification window for a bullish alert. This is a string input which needs to stay within quotation marks. To disable this alert, this field needs to be blank with just 2 quotation marks. |
| BearishAlert | Specifies the text to be displayed in the alert notification window for a bearish alert. This is a string input which needs to stay within quotation marks. To disable this alert, this field needs to be blank with just 2 quotation marks. |
The Alchemy Market Trend Indicator (Alchemy MarketTrend)
When observing any randomly selected bar chart, it becomes clearly obvious to the trained eye, in a very graphic way; that there is a presence of trending and non-trending markets. By recognizing certain patterns and formations, the market trend can be identified on any bar chart of any financial instrument, regardless of the time frame chosen. These patterns and formations can be identified based upon the upside penetration of market highs and the downside penetration of market lows. In simply recognizing the critical highs in a down-trend and the critical lows in an up-trend, a trader will be able to stay in a trend longer; by acknowledging the levels at which the market may reverse and by affirming when these levels are penetrated. Market highs and market lows are continuously being formed. When a trader becomes proficient at identifying these critical levels; it can help tremendously to predict which direction the market may move next; and whether a market is trending up, trending down, or is trapped in a non-trending phase. With this insight, the trader will be able to determine optimal entry levels to enter the market in the direction of the trend.
This trend analysis can be applied by starting with any significant swing on a chart in order to define critical highs and critical lows in the market. This initial move can then be called the initial swing. Once the market retraces away from either the high or the low of the initial swing and then proceeds to penetrate the high or low of the initial swing, the trend analysis begins in the direction of the penetration. The penetration up through the high or down through the low of the initial swing marks the beginning of a new trend in that direction.
The Alchemy MarketTrend indicator displays the highs
as green dots in an uptrend and the lows as red dots in a down trend.
Before an upside penetration of the initial swing-high or a downside penetration
of the initial swing-low can occur, the market has to move away from these highs
or lows. As a first requirement, the market has to move a minimum distance
away from the initial swing-high or the initial swing-low and this minimum
distance is displayed by the Alchemy MarketTrend indicator with purple dots.
In the case of an upside penetration; this indicates that an up-trend has begun
and we look at the lowest retracement-low that occurred once the market moved
off the initial swing-high. This is now the most recent retracement-low in this
up-trend. The Alchemy MarketTrend indicator displays these retracement lows with
cyan dots. Once the previous swing-high is penetrated to the upside, the most
recent retracement-low is displayed with thicker cyan dots. In an up-trend, the
market will be making higher highs and higher retracement-lows. The up-trend
remains intact as long as the most recent retracement-low is not penetrated to
the downside. Once the most recent retracement-low is penetrated, however, this
is an indication for a potential market reversal from an up-trend to a
down-trend.
Once the high of the initial swing is penetrated to the upside, we can assume
that this same up-trend pattern of higher highs and higher retracement lows will
continue to the upside. At this point, we will look to enter the market long on
the first pullback down from the most recent high, by using Fibonacci
retracements, which are displayed by this indicator.
Additionally to these Fibonacci retracements, the indicator contains a support-resistance band. Similar to Fibonacci retracements, this band acts as a support zone when the market approaches it from above and it acts as a resistance zone when the market approaches it from below. When the support-resistance band is within the two Fibonacci retracements, there is confluence between the Fibonacci retracements and the support-resistance band. This significantly strengthens this support-resistance zone and it increases the likeliness of the market halting at this level.
Indicator Inputs:
|
|
Global Parameters: |
|
StartTime: |
Specifies the time of the first bar from when the
Alchemy MarketTrend Indicator will start calculating the swings. The time format is in military time (e.g. |
|
SessionEndTme: |
Specifies the session end time. The time format is in military time (e.g. |
|
ExcludeDayOfWeek: |
Specifies the day of the week to exclude, whereas 0=Sunday, 1=Monday and so fourth. A negative value disables this input and this input works in conjunction with the input StartTime. |
|
StartDate_YYYYMMDD: |
Specifies the date of the first bar from when the
Alchemy MarketTrend Indicator will start calculating the swings. The date format is as follows: Year-Month-Day (e.g.
20190510 = |
|
MinimumRetracementBars: |
Specifies the minimum number of required retracement bars that qualify a retracement, whereas a value of 0 lifts this requirement. |
|
MinimumRetracementPercent: |
Specifies the minimum required retracement percentage that qualify a retracement, whereas a value of 0 lifts this requirement. |
|
MinimumPenetration: |
Specifies the minimum cent, tick or pip distance required for price to penetrate the most recent retracement low or high. |
|
SwingRetracementLength: |
Specifies the look back length for calculating the minimum retracement line. |
|
SwingRetracementWidth: |
Specifies the band width for calculating the minimum retracement line. |
|
SwingRetracementPercent: |
Specifies the retracement percent of the minimum retracement line. |
|
NewRetracementFactor: |
Specifies the minimum factor for a new qualifying retracement. |
|
|
Retracement Parameters: |
|
R1: |
Specifies the percent for the first Fibonacci retracement line, whereas a value of 0 disables this retracement line. |
|
R2: |
Specifies the percent for the second Fibonacci retracement line, whereas a value of 0 disables this retracement line. |
|
R3: |
Specifies the percent for the third Fibonacci retracement line, whereas a value of 0 disables this retracement line. |
|
R4: |
Specifies the percent for the fourth Fibonacci retracement line, whereas a value of 0 disables this retracement line. |
|
ShowRetracements: |
A value of 0 disables all Fibonacci retracement lines, a value of 1 enables all Fibonacci retracement lines and a value of 2 displays the Fibonacci retracement lines only after a qualifying retracement. |
|
BandFactor1: |
Specifies the factor or the closest support-resistance band, whereas a value of 0 disables the support-resistance band. |
|
BandFactor2: |
Specifies the factor or the furthest support-resistance band, whereas a value of 0 disables the support-resistance band. |
|
|
Trendlines Parameters: |
|
ShowSwingHigh_TL: |
Enables/disables the swing high trend line. |
|
ShowSwingLow_TL: |
Enables/disables the swing low trend line. |
|
TLStyle: |
Specifies the trendline style. The options are as follows: tool_solid or 1, tool_dashed or 2, tool_dotted or 3, tool_dashed2 or 4, tool_dashed3 or 5 |
|
TLSize: |
Specifies the trendline size. |
|
|
Text Parameters: |
|
ShowSwingHigh_Txt: |
Enables/disables the swing high text. |
|
ShowSwingLow_Txt: |
Enables/disables the swing low text. |
|
Fraction: |
If you are applying this indicator to any symbol that reads in fractions, such as bonds, you can set this input to True and the displayed text for the first, second, third and fourth values will read in fractions (e.g. 106^30). For symbols that trade in ½ ticks such as the 10 year US Treasury Notes, the “Decimal” input needs to be set to a negative number. |
|
Decimal: |
Specifies the number of decimals in which the text for the first, second, third and fourth retracement values display. |
|
|
Text Positioning Parameters: |
|
HiLoVert: |
Specifies the vertical adjustment of the displayed text for the swing high and swing low values. |
|
HiLoHor: |
Specifies the horizontal adjustment of the displayed text for the swing high and swing low values. Each increment will move the text one bar further to the left. |
|
HorAlign: |
Specifies the horizontal text alignment of all text objects. This is a string field which needs to stay within quotation marks. For left alignment, type in "Left" or "L", for center alignment, type in "Center" or "C" and for right alignment, type in "Right" or "R". |
|
LeftSpace: |
With this input, additional blank space can be added to the left of the text label for the purpose of moving the text labels into the extra space to the right of the last bar as created through Format > Space to the Right. For this purpose, the input HorAlign needs to be set to "Left" and all ...Hor inputs below need to be set to 0. Please note that this is a string input and the quotation marks need to remain. For example, to move the text labels 10 spaces to the right of the most recent bar, the input value would be as follows " " Again, in order for the text object to be visible, the extra space needs to be created between the last bar and the right price axis via Format > Space to the Right |
|
|
Plotlines Parameters: |
|
PlotSwingHigh: |
Enables/disables the swing high plot line. |
|
PlotSwingLow: |
Enables/disables the swing low plot line. |
|
PlotRetraceLine: |
Enables/disables the minimum retracement line. |
|
PlotRetracement: |
Enables/disables the retracement line. |
|
PlotTrendRetracement: |
Enables/disables the trend retracement line of a qualifying retracement. |
|
|
Alerts Parameters: |
|
HiLoAlrt: |
Enables/disables the alert when the market makes a new high or low. |
|
TrndAlrt: |
Enables/disables the alert when the market changes its trend. |
|
AlrtDist: |
Specifies the distance in cents, ticks or pips by how far the market can approach the first, second, third or fourth retracement before an alert is generated. |
|
MinBreak: |
Specifies the minimum distance in cents, ticks or pips by how far the market needs to break the first, second, third or fourth retracement, before an alert is generated. |
The Alchemy Pivot High-Low Consecutive Indicator (Alchemy PivotHighLowConsecutive)
The Alchemy Pivot High-Low Consecutive indicator identifies pivot highs that have a specified number of consecutive higher prices to the left and a specified number of consecutive number of lower prices to the right. Vice versa, the indicator identifies pivot lows that have a specified number of consecutive lower prices to the left and a specified number of consecutive number of higher prices to the right.
Indicator Inputs:
| PivotHighPrice | Specifies the price to be used for pivot highs such as open, high, low or close. |
| PivotLowPrice | Specifies the price to be used for pivot lows such as open, high, low or close. |
| LeftStrength | Specifies the minimum number of consecutive higher/lower prices to the left of a pivot. |
| RightStrength | Specifies the minimum number of consecutive higher/lower prices to the right of a pivot. |
| Offset | Specifies the number of cents, ticks or pips to offset the ShowMe Dot above the high or below the low of the bar. |
| PivotHighAlert | Specifies the text to be displayed in the alert notification window for a pivot high alert. This is a string input which needs to stay within quotation marks. To disable this alert, this field needs to be blank with just 2 quotation marks. |
| PivotLowAlert | Specifies the text to be displayed in the alert notification window for a pivot low alert. This is a string input which needs to stay within quotation marks. To disable this alert, this field needs to be blank with just 2 quotation marks. |
Chart Setup Examples
|
Counter Trend Chart: |
|
Time Frame: |
5 minute chart |
|
Indicators: |
|
Alchemy DailyHiLoMid Alchemy Engulfment Alchemy Pivots Alchemy Reversal Alchemy RSIDivergence Alchemy TimeZones |
|
To view Counter Trend Chart, go to: http://www.tradingalchemy.com/Download/ChartSetup/ChartSetup.htm |
|
Pivot Retracements Chart: |
|
Time Frame: |
1 minute chart |
|
Indicators: |
|
Alchemy PivotRetrace Alchemy PivotStop |
|
To view Pivot Retracements Chart, go to: http://www.tradingalchemy.com/Download/ChartSetup/ChartSetup.htm |
|
Trend Retracements Chart: |
|
Time Frame: |
5 minute chart |
|
Indicators: |
|
Alchemy MvgAvg3Line Alchemy TrendRetrace |
|
To view Trend Retracement Chart, go to: http://www.tradingalchemy.com/Download/ChartSetup/ChartSetup.htm |
Rolling Pivots Chart: |
|
Time Frame:
|
Data1: 1 minute Data2: 60 minute |
|
Indicators: |
|
Alchemy DoubleBotTop Alchemy Engulfment Alchemy Reversal Alchemy RollingPivot Alchemy TimeZones |
|
To view Rolling Pivots Chart, go to: http://www.tradingalchemy.com/Download/ChartSetup/ChartSetup.htm |
Breakout Chart: |
|
Time Frame: |
30 minute chart |
|
Indicators: |
|
Alchemy Breakout Alchemy PercentStop Alchemy WeeklyHiLoMd |
|
To view Breakout Chart, go to: http://www.tradingalchemy.com/Download/ChartSetup/ChartSetup.htm |
Expert or Analysis Commentary
The Trading Alchemy Indicators make extensive use of the Expert Commentary/Analysis Commentary feature provided by TradeStation. If you are using TradeStation 8/9, the feature has been re-named Analysis Commentary from Expert Commentary used by earlier versions of TradeStation. The feature is exactly the same, only the name has changed.
To use this helpful feature, simply click on the Expert Commentary/Analysis Commentary button located on the top toolbar and then click on any bar on your chart. If a Trading Alchemy Indicator gives an alert or if a condition exists which the indicator was designed to detect, a pop-up window will display a detailed explanation of the condition or alert and will also give a reference to the Trading Alchemy web site for more information regarding the indicator and the market condition it is reporting. This feature acts as a real-time learning tutorial and will assist you in learning more detail about the market conditions reported by the Trading Alchemy software.
We believe that the extra effort we made in developing the Expert Commentary/Analysis Commentary feature was well worth it. It is our hope that you will find this feature helpful in accelerating your learning and understanding of the Trading Alchemy software. Please take the time to familiarize yourself with this unique tool.
Alerts
The alerts for all of the Trading Alchemy indicators are turned off by default. In order to activate any alert, click on "Format" - "Analysis Techniques…". Then select the indicator for which you wish to activate the alert and click on "Format". In the "Properties" screen of the "Format Indicator: …" window, check the "Enable Alert" option. Please keep in mind that if an indicator is set to "Update Every Tick" and an alert is triggered, continuous alerts will be generated until the bar closes or the alert is manually disabled. If the "Update Every Tick" options is unchecked, the alert will not be triggered until the close of the bar. If you wish to be alerted to certain market conditions as soon as they happen, you can check the "Update Every Tick" options and then manually uncheck it again once the first alert is triggered. This is why we built many alert options into our user-defined inputs in order to give you the most flexibility in choosing the type of event you might wish to be alerted to. If you would like to track your alerts, you may set up a tracking center for each workspace.
Alchemy Functions Index
|
For our Alchemy functions index and definitions, please go to: http://www.tradingalchemy.com/Download/Functions/AlchemyFunctionsIndex.htm
|
|
|